0.016-inch Distal Extension: Biomechanics of Deepbite Correction

Deep bites are tricky—not just vertically, but also in the sagittal and transverse planes. But what if you could correct both anterior and posterior segments simultaneously with calibrated force? Enter the 0.016-inch distal extension, an appliance designed to erupt and rotate both halves of the arch in harmony.


🔩 Indications: When Should You Use This Appliance?

  1. ✅ Growth potential remains — you need an eruptive force.
  2. ✅ Second-order discrepancy: Incisors are higher than canines.
  3. ✅ Mild arch length deficiency: 2–3 mm per side.
  4. ✅ Deep curve of Spee requiring leveling.
  5. ✅ Extractions performed (usually 1st premolars).

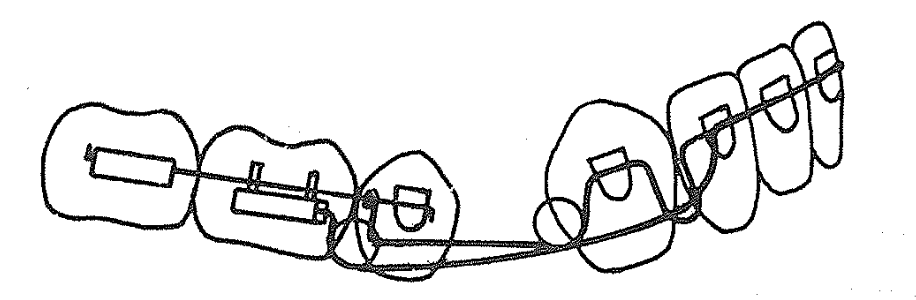
🧰 Appliance Design: What’s It Made Of?

ComponentDescription
Base arch0.018 × 0.025 SS with helices (or 0.017 × 0.025 TMA for flexibility)
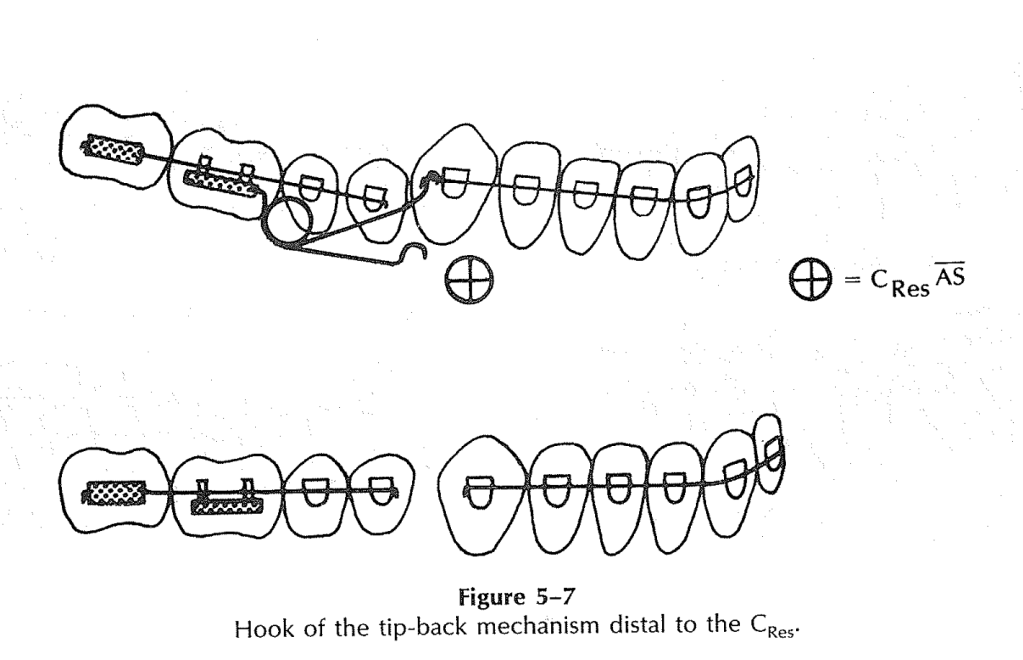
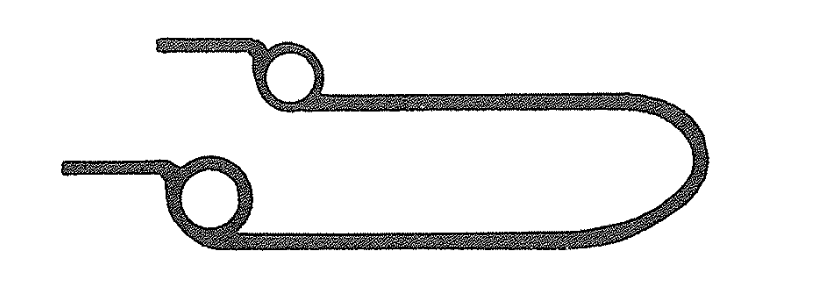
Distal extension0.016-inch wire with: 1) Vertical loop mesial to canine, 2) Helix distal to canine
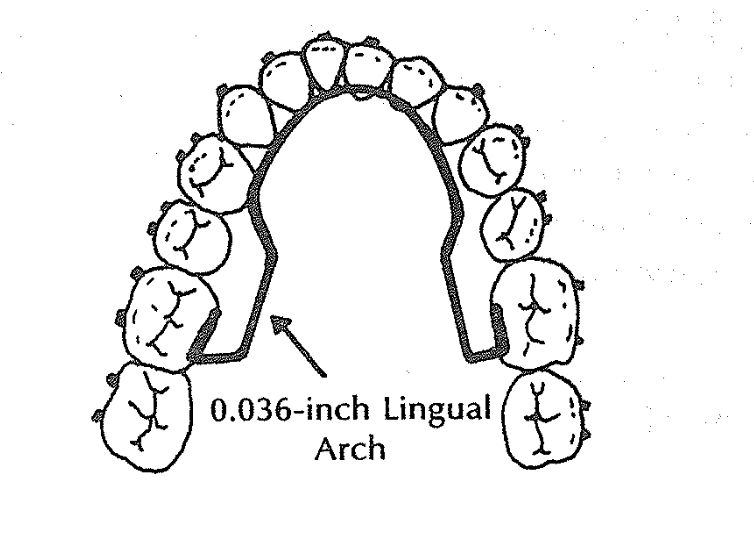
Lingual arch0.036-inch wire to stabilize molars and maintain transverse control

Where does the distal extension go?

  • It may lie over the tie-wings of the second premolar bracket
  • OR hook over the buccal segment wire for stability

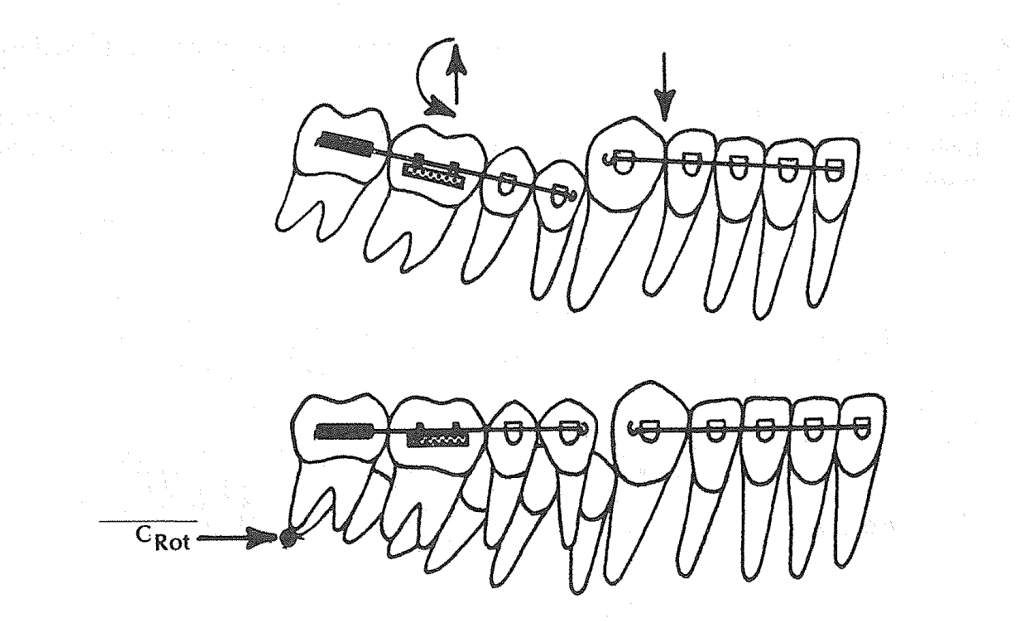
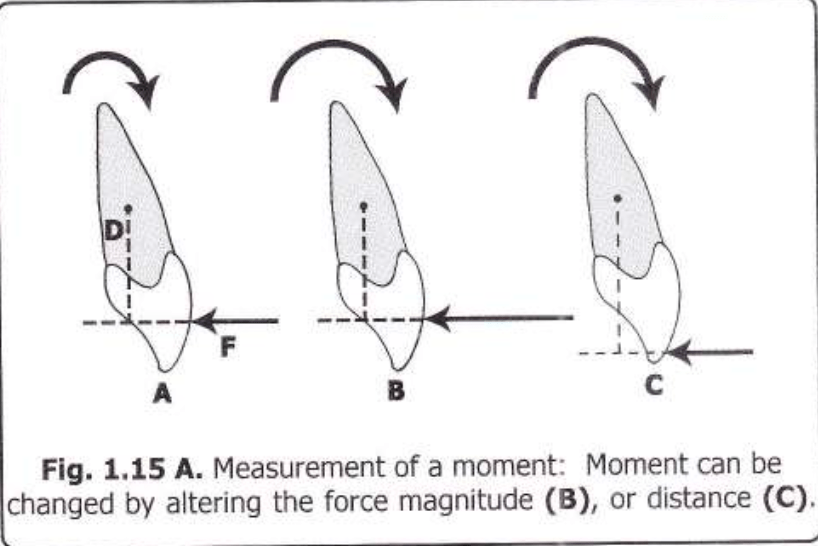
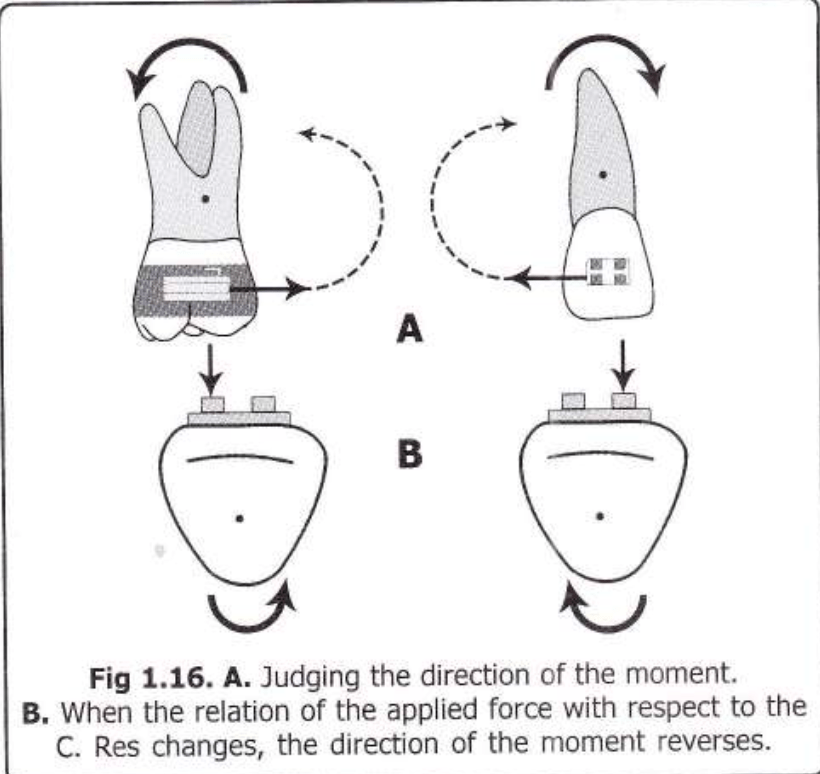
🔬 Biomechanics: Alpha + Beta Moment Logic

The beauty of this system lies in its dual-moment design:

  • Alpha moment = From the distal extension → anterior eruption and rotation (roots distal)
  • Beta moment = From the base arch → posterior eruption and rotation (roots mesial)

💡 Equal alpha and beta moments (A = B) → Balanced leveling of anterior and posterior segments.
💡 More alpha > beta → More anterior eruption.
💡 More beta > alpha → More posterior eruption.


💡 Clinical Scenario: Classic Use Case

👩‍⚕️ Patient:

  • 13-year-old female
  • Deep curve of Spee
  • Class I extraction case (1st premolars removed)
  • Incisors slightly higher than canines

Treatment Strategy:

  • Use 0.016-inch distal extension with base arch + lingual arch
  • Activate helix distal to canine (preactivation bends)
  • Open the vertical loop mesial to canine by 2 mm for controlled canine eruption
  • Tie back the base arch anteriorly and posteriorly through helices

Expected Response:

  • Canines and lateral incisors erupt and rotate (roots distal)
  • Central incisors may not erupt, due to depressive force at midline (from base arch)
  • Buccal segments rotate with mesial root movement (flattening curve of Spee)
  • Canines nudge distally, helping resolve minor crowding from extraction space

📈 Smart Force Calibration:

  • Use a Dontrix gauge
  • Activate base arch to deliver 100g per side (midline 200g)
  • Adjust vertical loop and helices for fine control of eruption depth and direction

📍 Clinical Scenario 1: Balanced Leveling (Alpha = Beta)

Goal: Simultaneous leveling of deep anterior and posterior segments in an extraction case.

👩‍⚕️ Case:

  • 14-year-old male
  • Class I malocclusion with deep curve of Spee
  • 1st premolars extracted
  • Canines slightly high; incisors and second molars need to level simultaneously
  • Good growth potential

🎯 Action:

  • Distal extension helix pre-activated (alpha moment)
  • Base arch helices activated equally (beta moment)
  • Tie-back done at midline and molar regions
  • Lingual arch in place

🧠 Biomechanical Result:

  • Anterior and posterior segments erupt together
  • Curve of Spee flattens from both directions
  • Incisor roots move slightly distally, and molar roots move slightly mesially
  • No change in arch length

💡 Takeaway: Use equal moments when both curves—anterior and posterior—need correction simultaneously.


📍 Clinical Scenario 2: Dominant Anterior Eruption (Alpha > Beta)

Goal: Level anterior segment more than posterior — ideal for flared incisors or high canines.

👩‍⚕️ Case:

  • 12-year-old female
  • Deep bite with flared incisors and canines higher than centrals
  • Premolars extracted
  • Posterior segment relatively flat

🎯 Action:

  • Stronger activation in distal extension helix (increase alpha moment)
  • Base arch lightly activated (smaller beta moment)
  • Anterior tie-back still present for vertical control
  • Lingual arch helps stabilize molars

🧠 Biomechanical Result:

  • Lateral incisors and canines erupt more
  • Central incisors stay relatively stable (due to midline tie-back)
  • Posterior segment moves minimally

💡 Takeaway: Increase alpha moment to focus eruption where it’s needed—ideal when you want to level high caninesor intrude flared incisors.


📍 Clinical Scenario 3: Dominant Posterior Eruption (Beta > Alpha)

Goal: Flatten steep posterior occlusal plane while maintaining incisor position.

👨‍⚕️ Case:

  • 15-year-old male
  • Deep overbite due to extruded second molars and upright first molars
  • Incisors already well-aligned, no need for anterior extrusion

🎯 Action:

  • Strong preactivation of base arch helices (high beta moment)
  • Minimal or no activation in distal extension (low alpha moment)
  • Anterior tie-back ensures incisor control
  • Lingual arch reinforces anchorage

🧠 Biomechanical Result:

  • Posterior teeth (especially molars) erupt and rotate
  • Incisors stay stable or even intrude slightly
  • Curve of Spee flattens mostly from the posterior end

💡 Takeaway: Boost beta moment when you want to rotate posterior segments without disturbing the incisors.


🔁 Quick Recap:

SituationDominant MomentEffect
Want both anterior + posterior levelingAlpha = BetaBalanced eruption
Canines/laterals are highAlpha > BetaMore anterior eruption
Molars need eruptionBeta > AlphaMore posterior eruption

🧠 Final Student Takeaway: Logic-Based Questions Before Using the Distal Extension

  1. Is there a vertical difference between incisors and canines?
  2. Do you want both anterior and posterior segments to level together?
  3. Are extractions done and minimal arch space required?
  4. Is the lingual arch in place to counter uncontrolled molar movement?
  5. Have you pre-activated helices/loops to deliver precise alpha and beta moments?

🧪 Bonus Concept: Incisor Behavior

🔍 Incisors won’t erupt unless alpha moment overcomes the midline depressive force from the base arch. That’s why laterals and canines erupt more than centrals!

Base Arch Mechanism: Biomechanics of Deepbite Correction

When managing a deep overbite, we often think about intrusion archescurve of Spee leveling, or anterior bite turbos. But have you met the “base arch”?

This humble-looking yet biomechanically brilliant appliance does more than you expect — especially when molar control and occlusal plane leveling are your goals.

🔍 What Is the Base Arch?

Also called the intrusive arch, the base arch shares design features with the tip-back mechanism:

  • Buccal segments: 0.018 × 0.025 inch stainless steel
  • Anterior segment (from canine to canine): 0.016 inch or larger
  • Lingual arch: mandatory to stabilize molars
  • The base arch wire (0.017 × 0.025 inch TMA or 0.018 × 0.025 inch SS) includes helices or stops/washers.

But here’s the twist:

  • The base arch is tied back.
  • This fixes the hook in place — no sliding anteroposteriorly as in tip-back.
  • The center of rotation (Crot) shifts mesially, closer to the mesial root of the first molar.

💡 Clinical Scenario 1: Deep Bite Without Flaring Incisors

👩‍⚕️ Patient:

  • 14-year-old female
  • Deep curve of Spee, increased overbite
  • Incisors well-aligned, not flared
  • Goal: Level curve of Spee without proclination

Treatment Plan:

base arch is used with a lingual arch in place. The base arch is:

  • Preactivated and tied back
  • Not sliding (fixed helices or stops used)
  • Calibrated with a Dontrix gauge to deliver ~200g (100g per side)

What Happens Biomechanically?

  • The tied-back base arch applies an eruptive force to posterior teeth.
  • The Crot shifts mesially → molars rotate and erupt, reducing the curve of Spee.
  • Incisors remain stable, no flaring, thanks to tie-back ligature through helices.
  • You get vertical leveling without anterior dentoalveolar protrusion.

💡 Clinical Scenario 2: Deep Bite with Slight Incisor Flaring👨‍⚕️ Patient:

👨‍⚕️ Patient:

  • 15-year-old male
  • Class I molar, but deep overbite
  • Mild lower incisor flaring, crowding resolved
  • Posterior bite is underdeveloped

Treatment Plan:

Use a base arch without tying it back, and no lingual arch is placed (intentional).

What Happens?

Incisors become more upright, which is desired in this case. Without a tie-back, the anterior segment is free → some lingual crown torque may develop. The lack of a lingual arch allows posterior eruption and rotation to happen more freely. Curve of Spee flattens.

How to Decide When to Use Base Arch and How to Modify It

Clinical GoalUse Base Arch?Tie Back?Lingual Arch?Expected Result
Deep bite, no flaring✅ Yes✅ Yes✅ YesEruption of molars, anterior stability
Deep bite with incisor flaring✅ Yes❌ No❌ NoPosterior eruption + anterior uprighting
Need arch length gain❌ No (use tip-back instead)Base arch doesn’t increase arch length
Avoid incisor flaring✅ Yes✅ Yes✅ YesNo anterior proclination

🧠 Ask Yourself Before Using a Base Arch:

  1. Is anterior flaring acceptable or not?
  2. Do I need posterior eruption and rotation to flatten the curve?
  3. Will the lingual arch block or assist the desired moment?
  4. Is there any need to increase arch length (then consider tip-back instead)?

Tip-Back Mechanism: Biomechanics of Deep Bite

🚀 Imagine this:

You’re treating a teenage patient with:

  • deep curve of Spee,
  • Mild arch length deficiency (~1–2 mm),
  • And an anterior crowding with slightly flared lower incisors.

You’re not quite ready for extractions, and distalization isn’t needed in full force. You just need a smart trick to upright the molars and gain that precious 1–2 mm of space per side. What do you do?

Enter the Tip-Back Mechanism.

🎯 What Is the Tip-Back Mechanism?

Think of the tip-back spring like a little lever system. It uses a negative moment to rotate the buccal segments (molars and premolars) upright, making them more vertical instead of tipped mesially.

When you do that, the buccal segments “tip back”, and voilà – a small but meaningful amount of arch length is gained anteriorly.

Key term: Crot (center of rotation) – in this case, found distal to the second molar, allowing effective rotation and eruption of the buccal segment.

🛠️ Components of a Tip-Back Setup

Here’s what goes into this appliance:

  1. 0.036” Lingual Arch – for anchorage.
  2. 0.018 × 0.025” Anterior Segment – typically from lateral to lateral or lateral to premolar.
  3. Buccal Stabilizing Segments (BSS) – rectangular wires (0.018 × 0.025”) from molars to premolars.
  4. The Tip-Back Hook/Spring – placed strategically to apply the eruptive & rotational force.

✅ Scenario 1: Hook Placed Between Canine and Lateral Incisor (Near CRes of Anterior Segment)

Patient: 13-year-old with mild lower incisor crowding, deep bite, and normal axial inclination of anteriors.

Clinical Findings:

  • Deep curve of Spee
  • Lower incisors are upright
  • Mandibular canines and lateral incisors are aligned but crowded
  • Slight arch length deficiency (~2 mm)

Hook Placement:

👉 Between lateral incisor and canine, i.e., near the center of resistance (CRes) of the anterior segment.

Biomechanical Reasoning:

  • When the hook is placed close to the CRes, the force system causes minimal rotational tendency on the anterior segment.
  • This results in controlled tip-back and uprighting of the molars without flaring or retraction of incisors.
  • Eruptive force is delivered to molars → distal crown tipping → space is gained mesial to first premolars.

✅ Scenario 2: Hook Placed Distal to the Canine (Distal to the CRes of Anterior Segment)

Patient: 14-year-old with pseudo-Class III tendency and flared lower incisors

Clinical Findings:

  • Lower incisors show labial flaring
  • Canines are slightly higher (gingivally placed) than central incisors
  • There is mild lower anterior crowding
  • Patient shows forward functional shift of the mandible

Hook Placement:

👉 Distal to the CRes—typically between canine and first premolar

Biomechanical Reasoning:

  • Force acts below and behind the CRes of the anterior segment.
  • This creates a clockwise moment, causing the roots of the incisors to come forward, helping to upright flared anteriors.
  • It counteracts the labial inclination, resulting in a flatter occlusal plane.


📚 Summary: When to Use Tip-Back?

Use this when your case has:

  • 🧑‍⚕️ A growing patient,
  • 😬 Deep curve of Spee,
  • 📏 Mild arch length deficiency (1–2 mm),
  • 🦷 Steep occlusal plane,
  • 🚫 Need to avoid anterior flaring.
ScenarioHook PlacementEffect on Anterior SegmentClinical Use
1Between lateral incisor & canineNeutral / minimal tippingDeep bite, normal incisor inclination
2Distal to canineUprighting of flared anteriorsPseudo-Class III, flared lower incisors

Determinants of Successful Treatment of Bimaxillary Protrusion: Orthodontic Treatment versus Anterior Segmental Osteotomy

📍Scene: Department of Orthodontics, South India
You’re sipping your 4th cup of filter kaapi ☕, scrolling through cephs, and bam! You spot that patient who walks in looking like they’re always mid-pout. Not because they’re annoyed – but because their upper and lower jaws are both chillin’ way ahead of where they’re supposed to be!

Say hello to the one and only:
💥 Bimaxillary Prognathism (BP)! 💥

🧠 First, What’s the Problem in BP?

  • Teeth: Proclined upper/lower incisors
  • Bone: Bony base might be normal or slightly prognathic
  • Soft Tissue: Thick lips, everted vermilion, lip incompetence
  • Profile: Convex, often with a shallow mentolabial sulcus
  • Patient Goal: Most patients want facial esthetics, not just dental alignment.

✅ Orthodontic Treatment (OT): When is it Enough?

🦷 Recommend OT when:

FeatureWhat to Look ForWhy It Works
SkeletalSkeletal Class I or mild Class IIEasy to camouflage with incisor retraction
Vertical PatternNormodivergent or mild open biteNot too much vertical correction needed
DentalProclined and protrusive incisors (U1-NA > 7 mm, IIA < 115°)Can retract and upright teeth
ChinModerate Pog-NB or prominent chinProfile will improve with incisor retraction
Soft TissueMild lip strain, acute NLA, small interlabial gapIncisor retraction improves esthetics
AgeAdolescents or young adultsBone remodeling is more effective

🔬 Clinical Clue: If the patient shows good incisor protrusion, decent chin, and minimal vertical discrepancy, OT alone (with 4 premolar extraction and maximum anchorage like TADs) is effective.

BUT WAIT! 😬 It’s not all rose petals and retraction:

  • 😨 Root resorption
  • 🌀 Over-tipping the incisors (like they’re diving into the lingual pool)
  • 🧱 Dehiscence & fenestrations (Bye-bye, cortical bone)
  • 🫣 Incomplete retraction (when anchorage says, “Nope!”)
  • 😳 Too much upper incisor show = accidental rabbit cosplay 🐰

🚀 New tech to the rescue:

  • Miniscrews = anchorage champs 💪🏽
  • Torque control = no flaring disasters
  • Rapid ortho techniques = get that smile faster! 🏎️💨

But still… sometimes, it’s just not enough.


🛠️ Anterior Segmental Osteotomy (ASO): When is It Needed?

🧱 Recommend ASO when:

FeatureWhat to Look ForWhy OT Fails
SkeletalSkeletal Class II with mandibular deficiencyCan’t fix jaw position with braces
Vertical PatternHyperdivergent, steep SN-GoMe, open bite tendencyDifficult to close lip or rotate chin
DentalIncisors upright or not protrusive (U1-NA < 5 mm, IIA > 120°)Not enough room to retract teeth
ChinRetrusive chin (low Pog-NB)Profile won’t improve without surgery
Soft TissueLarge interlabial gap, obtuse nasolabial angleLip strain and eversion won’t resolve
AgeAdults > 25 yrs, with high esthetic demandFaster and more definitive solution

🔬 Clinical Clue: If the incisors are already upright but the face still looks full/lips strained, you can’t “retract” anymore — go for ASO.

👎🏽 But, ASO comes with a long list of side dishes (a.k.a. complications):

  • 🦷 Root cutting (Poor canine gets the axe 😢)
  • 🧊 Temporary lower lip numbness
  • 🦴 Wound healing issues
  • 🦷 Necrosis or ankylosis if you’re not careful
  • 🧩 Occlusion mess – especially around canines and premolars

⚠️ Often, post-ASO ortho is still needed to fine-tun


🔍 The Big Question: OT or ASO? 🤔

You can’t just toss a coin! The decision depends on:

  • Skeletal pattern
  • Soft tissue thickness
  • Degree of dentoalveolar protrusion
  • Chin position
  • Patient expectations (a.k.a. “I want to look like my fav actor” syndrome 🎥)

📈 Discriminant Analysis = Your Clinical GPS 📍

To make life easier, the researchers did stepwise discriminant analysis to find THE SEVEN COMMANDMENTS (ahem… key variables) that can predict who should get OT vs. ASO:

No.VariableMeaning
1️⃣IIA (°)Interincisal Angle
2️⃣U1-NA (mm)Upper incisor to NA distance
3️⃣CF (°)Craniofacial angle (skeletal volume idea)
4️⃣Interlabial gap (mm)Resting mouth opening
5️⃣Lower NLA (°)Lower nasolabial angle
6️⃣Ptm-N (mm)Posterior maxillary length
7️⃣PNS-ANS (mm)Anterior maxillary length

👩‍⚕️ Let’s Apply: Clinical Scenarios

🩺 Scenario 1: OT is Ideal

  • 25-year-old female
  • U1-NA = 9 mm, IIA = 110°
  • CF = 155°, Pog-NB = +1.5 mm
  • Lower NLA = 61°
  • Interlabial gap = 1.5 mm

✅ Go with OT

  • Great incisor proclination
  • Good chin projection
  • Lips will improve with retraction
  • No skeletal Class II red flags

🩺 Scenario 2: ASO Recommended

  • 28-year-old female
  • U1-NA = 4.5 mm, IIA = 120°
  • CF = 150°, Pog-NB = -1 mm
  • Lower NLA = 70°
  • Interlabial gap = 3.2 mm

✅ Go with ASO

  • Incisors already upright — nothing more to retract
  • Receded chin, large gap → lip incompetence won’t fix with OT
  • More obtuse NLA = lip eversion

🩺 Scenario 3: Neither OT Nor ASO Alone Is Sufficient

  • 30-year-old male
  • Severe skeletal Class II
  • SNB = 74°, CF = 145°
  • Pog-NB = –4 mm, IIA = 123°
  • Large interlabial gap

❌ OT will fail
❌ ASO alone won’t help

🟢 Best: Two-jaw surgery (maxillary ASO + mandibular advancement)
— To correct both jaw position and dental alignment.


🛠️ Simplified Decision Rule (Mnemonic Style)

“OT IF the teeth are the issue, ASO IF the face is the issue.”

  • 🦷 Teeth protrusive, chin okay → OT
  • 👄 Face convex, lip strain, chin poor → ASO
  • 🦴 Jaw discrepancy → Consider Two-jaw Surgery

CLINICAL BASED MCQS

1. A 23-year-old female presents with lip incompetence, protrusive incisors, and Class I molar relationship. Cephalometric values show IIA = 118°, U1-NA = 7 mm, Ptm-N = 45 mm, and CF = 5°. What is the most appropriate initial treatment approach?

A. Begin OT with maximum anchorage
B. Consider ASO followed by OT
C. Non-extraction OT with miniscrew support
D. Two-jaw surgery with setback of mandible

✅ Answer: B
Explanation: IIA < 120°, U1-NA is high, and Ptm-N is short with low CF, favoring poor response to OT alone—ASO is indicated.

2. In a borderline BP case with normal upper incisor inclination, low interlabial gap, and skeletal Class I tendency, which factor would most strongly tip the decision toward OT rather than ASO?

A. Presence of shallow mentolabial sulcus
B. Reduced NLA
C. Short posterior facial height
D. Smaller Ptm-N and normal U1-NA

✅ Answer: D
Explanation: If upper incisors are not overly protrusive and soft tissue strain is minimal, OT alone may be sufficient.

3. A patient treated with OT showed flat profile, reduced upper lip protrusion, but residual lip incompetence and an obtuse lower nasolabial angle. What was likely missed in the pre-treatment assessment?

A. Overjet measurement
B. Posterior maxillary depth
C. Interlabial gap evaluation
D. Chin projection assessment (Pog-NB)

✅ Answer: D
Explanation: A recessed chin (low Pog-NB) can lead to persistent lip strain even after dental retraction. Skeletal correction might have been more suitable.

4. Which combination of cephalometric changes at T0 is most predictive of failure with OT but success with ASO ?

A. IIA = 130°, U1 exposure = 3 mm, CF = 6°
B. U1-NA = 10 mm, Ptm-N = 43 mm, posterior facial height = low
C. L1-APog = 2 mm, SN-GoMe = 27°, upper NLA = 110°
D. Ramus height = 53 mm, facial depth = 130 mm, Björk sum = 390°

✅ Answer: B
Explanation: Excessive upper incisor protrusion and reduced posterior maxillary length are signs of poor OT prognosis, favoring ASO.

5. A patient shows borderline criteria for both OT and ASO. What non-cephalometric clinical factor might guide the decision most effectively?

A. Dental arch shape
B. Smile arc
C. Lip strain on closure
D. Curve of Spee

✅ Answer: C
Explanation: Persistent lip strain despite normal incisor inclination is a strong indication for skeletal intervention.

6. If a patient has mild crowding, increased U1-NA, normal IIA, and a steep occlusal plane, what would likely happen if treated with OT alone?

A. Successful dental compensation and facial balance
B. Improved profile with reduced lip eversion
C. Residual lip incompetence and soft tissue dissatisfaction
D. Increased interincisal angle and chin projection

✅ Answer: C
Explanation: Without correcting steep occlusal plane and protrusive upper incisors, soft tissue results may remain suboptimal.

7. What is the clinical relevance of Ptm-N distance in treatment planning?

A. Represents vertical maxillary height
B. Reflects maxillary length, affecting incisor support
C. Indicates anterior-posterior mandibular position
D. Directly correlates to upper lip thickness

✅ Answer: B
Explanation: Ptm-N represents posterior maxillary length, crucial for determining maxillary support for anterior teeth.

9. In a clinical setting, what would justify two-jaw surgery over ASO alone for a BP patient?

A. Prominent upper incisors and increased U1-NA
B. Skeletal Class II due to mandibular retrusion and steep occlusal plane
C. Excessive overbite with upright lower incisors
D. Soft tissue eversion without incisor proclination

✅ Answer: B
Explanation: Skeletal Class II due to mandibular deficiency cannot be corrected with ASO alone—mandibular advancement is indicated.

📌 Summary Table: OT vs. ASO Logic

CriteriaSuggests OTSuggests ASO
U1-NA>6–7 mm<5 mm
IIA<115°>120°
Pog-NBPositive or near zeroNegative (recessive chin)
CFHigh (skeletal harmony)Low (imbalance)
Interlabial gap<2 mm>2.5 mm
NLAAcute (tight lips)Obtuse (everted lips)
Chin projectionGoodPoor
AgeTeens/early 20sAdults (esp. >25 yrs)
Patient esthetic demandMild to moderateHigh demand

Effects of miniplate anchored and conventional Forsus Fatigue Resistant Devices in the treatment of Class II malocclusion

Hey there, future smile designers! 👩‍⚕️👨‍⚕️
Let’s take a dive into something that keeps many orthodontists up at night (besides coffee and ceph tracings): Class II malocclusion—aka the “Oops, my mandible missed the memo to grow” situation. 😅

😬 What’s Class II Anyway?

Imagine your upper jaw (Maxilla the Diva 💁‍♀️) is strutting too far forward, while the lower jaw (Manny the Mandible 😶) is chilling way too far back. Not cute. That’s Class II malocclusion, and it happens in about 24% of orthodontic patients. That’s right—almost a quarter of your future clientele is walking around with a misaligned overbite!

🎯 The Game Plan: Grow that Jaw, Baby!

When the patient is still in their growth spurt era (cue dramatic puberty montage), we can:

  1. Stimulate the mandible to catch up ⏩
  2. Inhibit maxillary growth to slow the diva down 🛑
  3. Or heck—do both like an orthodontic multitasker! 🙌

🤖 Enter: Fixed Functional Appliances (FFAs)

Now these appliances are like your strict tuition master. They don’t rely on patient mood, sugar levels, or whether the moon is in retrograde. They push the jaw forward 24/7. No break. No excuses. Not even during your cousin’s wedding in Madurai.

✅ The Good:

  • Works full time, even when the patient is playing PUBG.
  • No compliance issue, because we all know teenage boys only remember cricket scores, not elastics. 🙄

❌ The Problem:

These devices sometimes push the lower front teeth forward like an autorickshaw in peak traffic 🚖💨—anchorage loss, da! Which means:

  • Less skeletal correction
  • More chance of relapse (like that one ex who keeps coming back…even after you blocked them) 😑

🔩 TADs to the Rescue!

Temporary Anchorage Devices (TADs) are like your elder sister who holds the line when relatives start asking about your marks. Strong. Silent. Supportive. 💪

But for serious cases, we need the big guns—miniplates. Surgical anchors that go into the bone. Yes pa, real screws in real bones. 🪛🦴

🦷 Enter: Forsus Fatigue Resistant Device (FRD)

This one is like the Rajinikanth of functional appliances. No-nonsense. Always working. Introduced in 2001, this hybrid hero pushes the mandible forward while gently whispering to the maxilla, “Slow down, akka!”

The latest version? Forsus FRD EZ2 – sounds like something from an engineering boy’s final-year project, no? 😄

It attaches from maxillary molar to mandibular archwire and applies forces that say:

  • “Mandible, get up and move!”
  • “Maxilla, sit down and behave.”

All day, all night. No complaints. Just action. 💥

🔬 So What Did This Turkish Study Do?

Our fellow dental researchers in Turkey (no, not the country you eat during Christmas, pa—the actual country 🇹🇷) asked:

“Which is better—conventional Forsus FRD or Forsus FRD with miniplate anchorage?”

They wanted to see how each affects:

  • 🦴 Skeletal changes
  • 🦷 Tooth movement
  • 👃 Soft tissue profile

So here’s how the groups panned out:

  • MA-Forsus Group (Miniplate Anchored):
    15 bravehearts (2 girls + 13 boys) said, “Surgery? Bring it on!”
    They were fitted with Forsus FRD EZ2 + Miniplates for approx 9.4 months.
  • C-Forsus Group (Conventional):
    15 polite refusals (8 girls + 7 boys) said “No knife, please!”
    Treated with standard Forsus FRD EZ2 for approx 9.46 months.

All patients got 0.018″ Roth brackets. But like filter coffee, how you serve it makes all the difference ☕👇

  • MA-Forsus: Only upper arch teeth got bonded (minimalist vibes)
  • C-Forsus: All maxillary and mandibular teeth bonded, second molars too (go big or go home)

For C-Forsus kids:

  • Maxillary molars got the headgear tubes
  • Mandibular archwire joined the fun between canine & premolar

(Simple setup, but no drama-free guarantee)

For MA-Forsus champs:

These kids got a full VIP treatment, surgical-style 🏥💪

🪛 Miniplate Insertion:

  • Under local anesthesia (brave heroes, truly)
  • 10mm horizontal incision ~5mm above the gum line
  • Mucoperiosteal flaps lifted (like dosa batter, gently and with care)
  • Two miniplates placed with:
    • 7mm screws at the top
    • 9mm screws at the bottom
    • 1.5–2mm space between plate and mucosa (no one wants sore spots, okay?)

Sutures out on day 7, and boom—ready for action! 💥

Then, Forsus FRDs were attached like this:

  • Upper part: maxillary molar tubes
  • Lower part: miniplate long arms (anchorage of the gods, I tell you!) 🙏

📸 Records, Because Pics or It Didn’t Happen

A total of 90 lateral cephs were taken at 3 stages:

  • 🕰️ T0 – Before treatment
  • 📈 T1 – After leveling
  • 🎯 T2 – After Forsus phase

Each ceph was analysed for 17 landmarks and 16 measurements (7 angular + 9 linear) using Dolphin Imaging 🐬💻
(Because nothing says science like measuring bones with a software named after a sea mammal!)

RESULTS

AspectConventional Forsus (C-Forsus)Miniplate-Anchored Forsus (MA-Forsus)Comments
Maxillary Growth (SNA angle)Significant decrease (maxilla growth restricted)Significant decrease (same as conventional)Both act like headgear — saying “Hey maxilla, don’t go forward!”
Effective Maxillary Length (Co-A)Significant increaseSignificant increaseMaxilla tries to grow a bit anyway — biology is tricky!
Mandibular Growth (SNB & Co-Gn)Increase (~2.5 mm growth)Greater increase (~3.69 mm growth)Miniplate gives better anchorage — mandible grows more confidently, like a proud hero flexing muscles!
Mandibular Rotation (SN/GoGn angle)No significant changeSignificant posterior rotationMA-Forsus pushes mandible down and back!
Face Height (Anterior & Posterior)Significant increaseSignificant increaseFace grows taller as mandible adjusts
Maxillary Incisor PositionRetrusion (moved backward)RetrusionBoth cause upper front teeth to move backward — no more “bird beak” smile!
Mandibular Incisor PositionProclination (tipped forward)Retrusion (moved backward)MA-Forsus stops unwanted forward flaring — very good news for patients!
Upper Lip PositionRetrusion (moves backward)RetrusionUpper lip follows upper incisors.
Lower Lip PositionProtrusion (moves forward)No significant changeLower lip behaves depending on incisor movement — with miniplate, it stays chill like a calm pond.
Side Effects / ComplicationsLower incisor flaring, limited skeletal correctionReduced incisor flaring, better skeletal effectMiniplate anchorage reduces unwanted tooth movement but needs surgery and careful hygiene.
LimitationsNo surgery needed, less costRequires 2 surgeries, risk of inflammation, higher costMore effort and money needed with miniplates — patient must be ready for that investment.

What are the factors that affect the long-term success of comprehensive Class II correction?

Today, we’re diving into the long-term success of comprehensive Class II correction. That’s right—grab your elastics and settle in, because this one’s going to be more enlightening than a mid-treatment ceph.

Now, when it comes to treating Class II malocclusion, there’s a question that keeps popping up like a stubborn second molar: What makes the results last? I mean, sure, we can correct the bite, make it look Instagram-worthy at debond, but what stops it from bouncing right back like your patient’s missed appointment excuses?

Let’s start with timing. You might think that earlier is better—like catching a flight or beating the lunch line at a conference—but evidence says otherwise. A randomized controlled study—yes, the gold standard of scientific drama—looked at early headgear treatment and found that timing? Not critical. That’s right, early intervention is not the orthodontic version of calling shotgun. Turns out, what really matters is growth—good, old-fashioned, pubertal, awkward selfie-stage growth.

Specifically, we’re talking about favorable downward and forward mandibular growth. It’s like Mother Nature throwing you a bone—literally. If that mandible keeps chugging forward during and after treatment, your Class II correction has a fighting chance of holding up. It’s like the orthodontic version of having backup power on your spaceship. Without it, you’re just drifting in relapse space.

Speaking of relapse—and we must, because it’s as inevitable as a bracket popping off before prom—studies show that one of the main culprits in post-treatment change is the mesial movement of the upper molars. Yep, those sneaky maxillary molars are edging forward like they’re trying to photobomb your perfect occlusion.

But fear not! In adolescents, forward mandibular displacement comes to the rescue. It compensates for the relapse, counteracting that molar mischief by pushing things back into alignment. It’s like a Jedi mind trick, but with jawbones.

Now, let’s talk adults. You know, the ones who call to ask if they can get Invisalign but also admit they “might not wear it much.” In adult patients, we don’t have the same growth advantages. The dental and skeletal structures are basically on a “no more updates” setting. So post-treatment changes? Limited. But here’s the kicker—they still show a similar degree of relapse in sagittal molar correction as adolescents. Which feels unfair, but biology never signed a contract.

So, to sum it up, if you want long-term success in Class II correction, don’t obsess over starting early—focus on managing and maximizing growth. Monitor molar movement like it’s your ex’s new Instagram activity, and brace yourself for the fact that some relapse is part of the game, no matter the age.

And remember—Class II correction is a marathon, not a sprint. Or more accurately, a guided, biomechanically orchestrated, compliance-dependent crawl toward ideal occlusion. But hey—resistance is futile… especially if you ignore anchorage.

Until next time, keep those wires tight, those retainers in, and never underestimate the power of mandibular growth.

Do extraction patterns actually affect relapse in Class II cases?

Let’s dive into one of orthodontics’ eternal debates — how extraction patterns affect relapse in Class II malocclusion cases. Or, as some call it, “Should we yank two teeth, four teeth, or none at all — and will the molars stay where we put them?”

So here’s the punchline first — long-term stability doesn’t seem to care that much about the number of premolars you extract. Shocking, I know. Whether you go with two maxillary premolars or a full four-premolar extraction, the occlusal stability is pretty much the same.

Now, that’s not a green light to start extracting premolars like you’re harvesting crops — but it is a nice reminder that there’s no rigid extraction formula tied to relapse.

Here’s something else to chew on:
There’s no solid evidence that finishing Class II cases with Class I molar relationships gives you better long-term outcomes. Yeah — you heard that right. You’re not legally or biologically bound to force every molar into Class I just to impress your ortho mentors or keep your cephs symmetrical.

In fact, a case-control study showed that treating a Class II case by extracting two maxillary premolars and finishing with a Class II molar relationship was actually more efficient than trying to wrestle the entire molar segment into Class I. So not only is it okay — it might actually save you time and effort.

And later studies backed it up:
Whether you end with Class I molars or Class II molars, the long-term occlusal results are basically the same. That’s right. The molars don’t seem to care as long as the rest of the arch is harmonious, the bite is functional, and the patient stops chewing ice with their canines.

So to sum it all up:
Extraction pattern? Choose based on case needs, not relapse paranoia.
Class I molar finish? Nice, but not mandatory.
Long-term stability? Not dependent on textbook-perfect molar positioning.

Bottom line?
Orthodontics isn’t always about achieving the prettiest occlusal photo — it’s about functional, stable results that stick around longer than your patient’s post-treatment whitening.

You’ve got options, Class II warriors. Choose wisely — but don’t stress if the molars decide to stay Class II. Stability won’t judge you.

Orthodontic Space Opening in Patients with Congenitally Missing Lateral Incisors

What do you do when a lateral incisor is missing from birth (congenitally)?

You’ve got three main options:

OptionDescriptionProsCons
🦷 Space ClosureCanine takes the lateral’s placeNo prosthetic neededCanine isn’t a perfect aesthetic match
🧱 Resin-Bonded BridgeA minimally invasive bridgeSaves adjacent teeth53% survival in 10.5 yrs, may fall off
🛠️ ImplantPlace a single-tooth implantLong-term, tooth-friendlyTiming is tricky, needs bone support

📚 STUDY GOAL:

To find out: When is the best time to start orthodontic space opening if the goal is to place a single-tooth implant later?


👥 THE PATIENT CREW:

  • 14 Caucasian teenagers (9 girls 👧, 5 boys 👦)
  • 26 missing lateral incisors
  • All treated at University Hospital Carl Gustav Carus, Dresden (That’s in Germany 🇩🇪, folks!)

🦴 THE BONE CHRONICLES: T1 ➡️ T2 ➡️ T3

Timeline Translation:

Time PointAge (Mean ± SD)What’s Happening
T113.02 ± 1.49 yrsStart of ortho treatment 👩‍⚕️
T215.55 ± 1.38 yrsEnd of ortho treatment 🎉
T318.67 ± 2.83 yrsImplant placement time 🔩🦷

📉 Bone Loss Over Time (Yikes!):

TimeBone Deficiency (mm²)Significance vs T1
T10.26 ± 0.69
T21.92 ± 1.54✅ P = .044
T33.77 ± 3.07✅ P = .028

👀 Observation: The longer you wait, the more bone disappears. So don’t dilly-dally with space opening if you’re planning an implant!


🕰️ EARLY vs. LATE TREATMENT – Who Wins?

GroupT1 DeficiencyT2 DeficiencyT3 Deficiency
Early Starters ⏰0.44 mm²2.05 mm²2.61 mm² ✅
Late Starters 😴0.00 mm²1.78 mm²4.93 mm² ❌

🏆 WinnerEarly treatment group – less bone loss at implant time!


📐 Incisor Inclination Drama

Ortho mechanics led to incisor proclination during space opening. Let’s break it down:

TimeInclination Angle (°)Change
Start (T1)22.1° ± 6.9
End (T2)31.5° ± 7.2+9.4°

⚠️ Why it matters: The implant angle needs to match the natural inclination of the incisors. Planning is 🔑!


🧪 IMPLANT PLACEMENT: A MINI MANUAL

  • Ideal implant size: 3.75 mm shaft, 4 mm collar (But minis like 3.0 mm are also used!)
  • Safe distance: At least 1 mm between implant and neighboring roots.
  • Required bone support: 6 mm × 12 mm = 72 mm² implant surface.
  • Gingival trick: Lateral incisor gingival margin is 1 mm higher than central incisor—so the implant must be placed 1 mm below the central’s margin.

🧠 Pro Tip: Use cephs and stone casts to assess inclination and bone volume before diving in!

📉 Alveolar Ridge Loss: When Bone Gets Ghosted

Here’s the tea ☕:

Once a tooth is missing (especially in the front upper jaw), the bone and soft tissue in that area start shrinking—kind of like a deflated balloon 🎈.

Researchers noticed something wild 😳:

🕒 Time Point% Ridge Deficiency
T1 (Start of ortho treatment)0.4%
T2 (End of ortho)2.7%
T3 (Time of implant)5.2%

👉 14x increase from T1 to T3! Yikes!

But wait…

The late treatment group had less bone loss at T2.
But then they lost more bone by T3 compared to the early group. 🤔

Translation: It’s not just about when you start ortho—it’s about how the bone behaves later, and spoiler alert: it’s moody.


🧬 Blame It on Your Genes

There’s a strong genetic component to how much ridge loss happens—some people lose more, some less.

🔬 Why the variability?

  • Growth factors (hello, biology!) 📈
  • Differences in how people’s bones respond after treatment
  • Timing of canine eruption and extraction of baby teeth

🐶 Canines to the Rescue

If you remove the primary lateral, the canine erupts into that space.
But if you remove the primary canine too early → 🥴 buccolingual resorption (bye bye, bone).

👉 Pro Tip:
Only extract the baby canine just before you move the permanent one distally.
This way, the root stretches the PDL and…
💥 Builds Bone Like a Boss 💪


📏 Kokich vs. This Study: A Bone-Off!

StudyWhat they found
Kokich (20 pts)Less than 1% bone loss up to 4 years later 😇
This studyUp to 5.2% loss at implant time 😱

Why the difference?
This study measured surface area (6–12 mm region), not just distances. Also, they only looked at maxillary cases, not mandibular or premolars. Apples vs. oranges… or molars vs. incisors 🧐🍊


📣 Final Orthodontic Pro Tips 🎓

🎯 1. Late is great (sometimes)

  • Starting treatment later (around age 16.5) = less time for ridge to disappear before implant.
  • But don’t be too late or you’ll miss the growth train 🛤️

📐 2. Watch those incisor angles!

  • Mean incisor proclination at T2 = 31.5° 😮
  • Standard = 22.1° → so 9.4° extra
  • Over-proclination = thin bone = implant trouble (think 👻 bone and 😬 visible crown margins)

📏 3. Don’t ignore root spacing!

  • Just because crowns look good doesn’t mean roots are happy 😬
  • Use wire bending or bracket repositioning to create that root party room 🎉🦷🦷🦷

🧠 Growth Matters: Don’t Jump the Implant Gun!

Since implants don’t move (hello, ankylosis 😑), don’t place them before facial growth is done.

📸 Take a ceph → wait 6 months → take another
If Nasion to Menton doesn’t change = 💡 Growth done!


🧠 TL;DR for Ortho Ninjas 🥷

TakeawayWhy It Matters
Ridge loss is real!And it gets worse with time ⏳
Canine movement = bone creationBut only if timed right 🕒
Late treatment can be helpfulLess waiting time till implant 🚀
Incisor proclination can hurt youImplant survival needs a strong cervical bone base 🧱
Roots matter too!Not just crown position 😅

So remember ortho fam:
You’re not just aligning teeth—you’re sculpting bone for the future 💀➡️🦷✨

Now go forth and move those canines smartly! 💃🕺

SPOTIFY EPISODE LINK: https://spotifycreators-web.app.link/e/PzKwJAxmfTb

Comparison of AdvanSync2® and Twin Block Appliances in Treatment of Class II Malocclusion With Retrognathic Mandible—An Observational Retrospective Study

Hey tooth warriors! 🦷💥 Today, we’re diving into the world of Class II malocclusion—aka when the upper jaw says, “I’m moving ahead,” and the lower jaw whispers, “Wait for me!” 😅

This condition happens when there’s a mismatch in jaw positioning—either the lower jaw is shy (mandibular retrusion)or the upper jaw is a bit too bold (maxillary prognathism). But spoiler alert: most of the time, it’s the mandible lagging behind. 🐢

🎯 GROWING PATIENTS = GROWING OPPORTUNITIES

If your patient’s still growing (yay puberty! 🎉), you’ve got options to guide those jaws like a dental GPS:

  • Functional appliances = Tell the mandible, “Come on buddy, time to move forward.” 🦷➡️
  • Headgear = Tap the brakes on that upper jaw growth. 🛑👃

👉 These options work best before the growth spurt ends, so early detection is key!

👄 REMOVABLE VS. FIXED APPLIANCES – THE BATTLE BEGINS ⚔️

We’ve got two major contenders:

1. Twin Block (Removable Champ)

  • Invented by Clark (nope, not Superman 🦸).
  • Worn like retainers—you can pop them in and out. 😬
  • Works like a charm when patients actually wear them (compliance alert 🚨).
  • Great for boosting mandibular growth and improving jaw harmony. 🎵

2. AdvanSync2® (Fixed Fighter)

  • glow-up of the classic Herbst appliance.
  • Created by the Dischinger duo in 2008 (dental bros! 👨‍🔬👨‍🔬).
  • Cemented on molars (yep, no backing out now 😅).
  • Works full-time (24/7 hustle 😤) with telescopic rods to push that mandible forward.
  • Bonus: You can slap on braces while using it! 💪

Wait… what happened to the original Herbst?

Well, it kinda had a bad rep:

  • Bulky 🙄
  • Cheek-poking parts 😵
  • Maintenance nightmare 🪛

So, enter AdvanSync2®—smaller, sleeker, and less ouch-y! 🙌

🤓 WHY THIS STUDY MATTERS:

Most past studies compared AdvanSync2® with other fixed appliances. But let’s face it—compliance with removable appliances is like relying on a teenager to do chores 🧹 (sometimes it happens, sometimes… not so much).

👉 That’s why this study asks: “What really happens when we compare Twin Block (removable) to AdvanSync2® (fixed)?”

They measured:

  • Skeletal changes (how the jaws move 🦴)
  • Dentoalveolar changes (what the teeth and surrounding structures do 🦷)
  • Soft tissue effects (how the face changes 😮)

And just to keep things scientific (and dramatic), they had a null hypothesis“No difference between the two.”

But are they really that similar? 🤔

🧪 Study Design Recap:

This was a retrospective study (no time machines, just old records), comparing 10–15 year olds at CVMI stages 2–4 (hello puberty 👋). No control group here because, ethically, you can’t just not treat a kid who needs help 😬.

👉 Group I: Twin Blockers (Avg age 12.1)
👉 Group II: AdvanSync2® gang (Avg age 12.8)

Perfect timing—just around the growth spurt, which, as Baccetti says, is the sweet spot for jaw growth magic! ✨

🧠 Cranial Base Variables

Both groups showed a little reshaping action up at the top:

  • Twin Block: +1.55° saddle angle ⛰️, -3.41° articular angle.
  • AdvanSync2®: -2.40° articular angle.

Translation? 👇
Both appliances helped bring the mandible forward relative to the cranial base—a win for both sides! 🙌

🦴 Maxillary Skeletal Variables

The whole idea here is to chill out maxillary growth (aka the “headgear effect” 😤🛑).

  • Twin Block: Co-Pt A increased a bit (+2.15 mm) due to normal growth or orthopedic stimulation, but SNA dropped slightly (−0.52°).
  • AdvanSync2®: Also showed some changes, but surprisingly, not a major maxillary growth restriction this time!

📚 PS: Other studies hyped up AdvanSync2® as a maxilla tamer… not quite here. 🤷‍♀️

😮‍💨 Mandibular Skeletal Variables – The Main Event!

Here’s where things get really spicy 🌶️

✅ Twin Block Results:

  • Co-Gn (mandibular length): +2.87 mm
  • SNB (mandible angle): +1.59°
  • Pog-N perpendicular: +0.84 mm

💬 Verdict: A decent push forward, but not groundbreaking.

✅ AdvanSync2® Results:

  • Co-Gn: A whopping +5.34 mm 📏
  • SNB: +3.11° 🎯
  • Pog-N perpendicular: +3.69 mm
  • Ar-Go (ramus length): +1.89 mm

😱 That’s some serious forward growth, folks!

📣 AdvanSync2® went full beast mode, proving why fixed appliances are often preferred when compliance is shaky. No “oops, I forgot to wear it today” moments here! 😅

🤝 Upper Jaw vs. Lower Jaw – Let’s Talk Relationships! 💬

(aka Intermaxillary Variables)

You know it’s serious when we start talking ANB angle and Wits appraisal—that’s dental code for “How far is that lower jaw lagging behind?” 🏃‍♂️💨

📉 ANB Angle + Wits = Both Took a Dive

  • Twin Block:
    🟢 ANB dropped by −2.11°
    🟢 Wits dropped by −3.09 mm
  • AdvanSync2®:
    🔵 ANB dropped even more – −2.88°
    🔵 Wits dropped more too – −4.04 mm

🎯 Translation: Both appliances moved the lower jaw forward, reducing the gap between upper and lower jaws. But hey, AdvanSync2® had a slight edge—probably thanks to that all-day, everyday action. 💪


🔍 Maxillary–Mandibular Differential (aka Who Grew More?)

  • Twin Block: +0.94 mm
  • AdvanSync2®: +2.39 mm

Why the difference? The mandible had a growth spurt, thanks to being pushed forward like a coach yelling, “Get in the game!” 🗣️🏈

💬 It’s not just growth, it’s functional ortho magic! ✨
The telescopic mechanism of AdvanSync2® = more forward jaw movement + better skeletal change. Boom. ✅


📏 Vertical Skeletal Variables – Are We Growing Up… or Just Forward?

Heads up! 📐 Let’s look at how the face stretched vertically during treatment. (Because yes, your face can grow “taller,” too!)

VariableTwin BlockAdvanSync2®What It Means 😅
Na-Me (ant. facial height)+0.63 mm+2.82 mmYou got taller. Sort of. 🧍‍♂️
S-Go (post. facial height)+1.02 mm+1.73 mmBack of the face grew, too! 🧠➡️🦷
ANS-Me (lower face)+0.96 mm+2.13 mmHello, chin drop! 🪞
Mandibular plane angle+0.89°+1.12°Slight clockwise jaw rotation 🔁

👉 So both appliances caused the lower face to elongate and the jaw to rotate a bit downward and forward.
Why? That sneaky posterior bite block in the Twin Block lifts the bite, guiding the growth downward. AdvanSync2® does similar things, just without being removable. 🛠️

Interdental and Soft Tissue Shenanigans

(Or in ortho-speak: “Did we fix the bite, and does the face care?”)

We’re wrapping up our headgear-free saga with the final act: interdental movementssoft tissue glow-ups, and what this all means for your future ortho plans. Let’s bite in! 🍴


🦷 Interdental Variables – Where the Teeth Party Happens 🎉

✅ Twin Block Group:

  • U1-L1 angle (interincisal): Dropped by −2.51° = incisors tipped toward each other 📉
  • Overjet: Reduced by −5.29 mm 😲
  • Overbite: Down by −1.48 mm
  • Molar correction: A solid +4.21 mm

💬 Why? Because Twin Block tends to retrocline upper incisors and procline lowers. The bite evens out as the jaws come together and molars do a sweet lil’ shift—maxillary molars move back, mandibular molars step forward like a bold dance move. 💃🕺


✅ AdvanSync2® Group:

  • U1-L1 angle: Went up by +2.97°, though not significantly = incisors slightly angled apart 📐
  • Overjet: Reduced by −4.60 mm
  • Overbite: Also decreased −2.27 mm
  • Molar correction: A powerful −5.18 mm

💬 So AdvanSync2® corrected molar position and bite depth quite well—just like Twin Block—but didn’t tweak those incisors as much. It’s a fixed appliance, so it works around the clock 🕒, giving it an edge with molar shifts and bite correction even when patients forget they’re wearing it. 😉


⚖️ Which Appliance Wins the Tooth Battle?

  • Overjet/Overbite/Molar Fix? ✅ Both did great!
  • Interincisal angle (U1-L1)? 🏆 Twin Block wins—more controlled incisor movement.

🦷 Moral of the story: If your patient has big overjet and deep overbite—either appliance is your pal. But if you need more precise incisor control, Twin Block might give you the edge (assuming they wear it 🤞).


👄 Soft Tissue Changes – The Face-Off (Literally) 🤳

Time to find out: Did these appliances do the orthodontic equivalent of contouring?

✅ Twin Block:

  • Upper lip to E-plane: Moved back −1.04 mm (that’s subtle retraction)
  • Lower lip: Nudged forward +0.59 mm (barely noticeable)
  • Nasolabial angle: Slightly up +2.09°

➡️ Basically: Minor lip shifts, mostly due to how the upper incisors moved back. Nothing major—think more like a light Instagram filter than a full makeover. 😅


✅ AdvanSync2®:

  • Upper lip to E-plane: Also retracted −1.68 mm
  • Lower lip: Slightly forward +1.32 mm
  • Nasolabial angle: +3.12° (again, mild)

💬 Bottom line? Not a dramatic change here either. Some studies say AdvanSync2® can puff out the lower lip, but in this study: changes weren’t significant.

📸 Takeaway: Don’t promise your patients a new selfie look—these appliances fix bites, not faces. 😄


🧪 Final Diagnosis: Who Wins the Ortho Crown? 👑

✅ Both Twin Block and AdvanSync2®:

  • Correct overjet and molar relationship beautifully
  • Promote mandibular growth
  • Deliver mild soft-tissue and vertical skeletal changes

🏆 AdvanSync2® stands out for:

  • More effective mandibular length gain
  • Greater SNB increase (hello forward jaw!)
  • No worries about compliance because… they can’t take it out 😏

🤝 Twin Block shines for:

  • More controlled incisor movement
  • Still effective—but requires that magical thing called “patient cooperation” 🙃

SUMMARY

🦴 Skeletal Changes

VariableTwin Block (Mean Change)AdvanSync2® (Mean Change)Significance
Co-Gn (mm)+2.87+5.34P < 0.01
SNB (°)+1.59+3.11P < 0.01
SNA (°)−0.52−0.04NS
Co-Pt A (mm)+2.15+3.31NS
Articular Angle (°)−3.41−2.40NS

NS = Not Significant


🦷 Dentoalveolar & Intermaxillary Effects

VariableTwin Block (Mean Change)AdvanSync2® (Mean Change)Significance
U1-L1 (°)−2.51+2.97P < 0.05
Overjet (mm)−5.29−4.60NS
Overbite (mm)−1.48−2.27NS
Molar AP (mm)−4.21−5.18NS
ANB (°)−2.11−2.88NS
Wits (mm)−3.09−4.04NS

NS = Not Significant


🧍 Soft Tissue Changes

VariableTwin Block (Mean Change)AdvanSync2® (Mean Change)Significance
Upper Lip to E-plane (mm)−1.04−1.68NS
Lower Lip to E-plane (mm)+0.59+1.32NS
Nasolabial Angle (°)+2.09+3.12NS

NS = Not Significant

Biomechanics 101: Understanding Moments

Alright, future tooth wizards, let’s talk moments—no, not “romantic sunset” moments, but the kind that makes teeth twirl like ballet dancers! 🩰

1. Moment Basics: The “Push & Spin” Effect

Imagine your patient’s tooth is a stubborn door. If you push close to the hinges (aka the Center of Resistance, C Res), the door barely spins but slides sideways (translational effect). Push far from the hinges? The door swings open dramatically (rotational effect).

  • Moment Formula:
    Moment (M) = Force (F) × Perpendicular Distance (d)
    Units: gm-mm (like saying, “I bench-press 1000 gm-mm of torque!” 💪).

Diagram Alert! Check out Fig 1.15—it’s the OG of “force vs. distance” drama.

2. Clockwise or Anti-Clockwise? Let’s Settle This!

To predict the direction:

  1. Follow the line of action of the force.
  2. If it “wraps around” the C Res like a hug, you’ll see if it’s clockwise (👆) or anti-clockwise (👇).

Pro Tip: Flip the force’s direction or shift it to the other side of C Res, and the moment flips too! (Fig 1.16 demonstrates this ✨spicy✨ reversal).

3. Force Couples: The Pure Rotation Party!

Ever seen two kids spinning a merry-go-round? That’s a force couple—two equal, opposite forces not on the same line.

  • Example: Your ortho pliers applying a twist to a wire.
  • Math Magic:
    Total Moment = Force × Distance *between* the forces
    (No matter where you apply the couple—it’s a free vector, like that one friend who’s always down to party anywhere 🎉).

Diagram Time! Fig 1.17 shows a couple causing pure rotation (teeth spinning like a TikTok 

trend). 

Fig 1.18? Pure concentric circles—no translation, just vibes.

4. Real-Life Ortho Examples

  • Single Force (Mf):
    If you push a bracket off-center, the tooth both tilts and moves (like trying to nudge a cat off the couch—it’ll squirm and hiss).
  • Couple (Mc):
    Use a closing loop in your archwire. The loop creates two forces, rotating the tooth without sliding it sideways—pure spin! Example: 100gm forces 10mm apart = 1000 gm-mm moment (💃 Cue the tooth tango!).

5. Why This Matters

  • Bracket Positioning: Closer to C Res = more translation (good for intruding/extruding).
  • Loops & Springs: Couples = pure rotation (perfect for derotating that snaggletooth).

Fun Fact: Couples are “free vectors”—apply them anywhere on the tooth, and the moment stays the same. It’s like gossip in dental school—it spreads everywhere but the effect is identical. 😜