Q1. What is finishing in orthodontics? Finishing is the final stage before debonding where teeth are positioned to achieve optimal stability, esthetics, function, and periodontal health.
Q2. How did McLaughlin define finishing? Correction of previous errors, overcorrection where required, and settling of occlusion.
Q3. What is detailing? Precise 3D positioning of individual teeth involving tip, torque, in-out, and rotational corrections.
Q4. Finishing vs detailing? Finishing is overall occlusal optimization; detailing is individual tooth refinement.
🔹 Concepts in Finishing
Q5. What is arch-bound condition? A situation where stiff rectangular wires prevent complete seating of teeth into ideal occlusion due to limited play.
Q6. Why is settling required? Because rigid wires prevent complete intercuspation; settling allows final occlusal seating.
Q7. Methods of settling?
Light round wires + vertical elastics
Posterior wire removal + vertical elastics
Tooth positioner after debonding
🔹 Dougherty & Keys
Q8. Who proposed finishing factors and when? Dougherty, 1976 (USC lecture series).
Q9. Mention Dougherty factors.
Think in 4 clusters:
1. Skeletal & AP
AP correction + overcorrection
Cephalometric goals
Profile evaluation
2. Tooth Position
Tip
Torque
Rotations
Root parallelism
3. Arch & Occlusion
Arch form/width
Interdigitation
Marginal ridges
Occlusal plane
4. Functional & Stability
Midlines
Space closure
TMJ function
Habits
Q10. What are Andrews’ six keys?
Interarch relationship
Crown angulation
Crown inclination
No rotations
Tight contacts
Curve of Spee
Q11. What is the seventh key? Tooth size proportion (Bolton analysis, 91.3%).
🔹 ABO & Evaluation
Q12. When were ABO goals established? June 2012.
Q13. How does ABO evaluate finishing? Using grading of study models and panoramic radiographs.
Q14. What are radiographic goals? Parallel roots and perpendicular to occlusal plane.
Q15. ABO model criteria?
Alignment
Marginal ridges
Buccolingual inclination
Occlusal contacts
Occlusal relationships
Overjet
Interproximal contacts
🔹 Overcorrection Concepts
Q16. Proffit’s view on overcorrection? 1–2 mm overcorrection to counter relapse.
Q17. Zachrisson’s recommendation? ~10% overcorrection for rotations/displacements.
Q18. McLaughlin protocol in Class II? End-to-end overcorrection + nighttime elastics → settle to Class I.
🔹 Root & Torque Concepts
Q19. What is Raleigh Williams key? Lower incisor apices should diverge distally; canine apex distal to crown.
Q20. What is rolling-in? Inward inclination of mandibular posteriors affecting interdigitation.
Q21. How is rolling-in corrected?
Upper: Buccal root torque
Lower: Lingual root torque
🔹 Archform & Records
Q22. Components of arch form?
Anterior curvature
Intercanine width
Posterior curvature
Intermolar width
Q23. Pre-finishing records?
OPG
Lateral ceph
Photographs
Study models
🔹 Cephalometric Evaluation
Q24. When is pre-debonding ceph taken? 3–4 months before debonding.
Q25. What parameters are assessed?
Soft tissue profile
Incisor AP position
Incisor torque
Mandibular plane
Skeletal and dental corrections
🔹 Mechanics & Wires
Q26. Ideal wire for torque in finishing? 0.019×0.025 TMA in 0.022 slot 0.017×0.025 TMA in 0.018 slot
Q27. Why TMA? Flexible with good torque expression.
🔹 Clinical Procedures
Q28. What is serpentine wiring? Ligature wiring from premolar to premolar after removing archwire to aid settling.
Q29. Indications of positioner?
Retention
Minor corrections
Good compliance
Tongue habits
Begg finishing
Q30. Contraindication of positioner? Deep bite.
🔹 Micro-esthetics & Surgery
Q31. Micro-esthetic procedures?
Gingival recontouring
Tooth reshaping
Q32. What is CSF (Edwards procedure)? Circumferential supracrestal fibrotomy to prevent rotational relapse.
🔹 Rapid Fire (Exam Finishers)
Q33. Most important goal of finishing? Stable, functional, esthetic occlusion.
Q34. Most common finishing error? Poor root parallelism.
Q35. Key to stability? Proper overcorrection + root positioning.
Q36. Most important ABO parameter? Root angulation.
Raymond P. Begg — Australian orthodontist; favourite student of Edward H. Angle
Trained under Angle using the edgewise appliance
Returned to Australia → patients came from very far away → wanted to see patients once every 6 weeks → needed a simple, low-compliance, efficient appliance
Developed the Light Wire Differential Force Technique (also called Begg technique)
Worked alongside AJ Wilcock, an Australian metallurgist, who designed the high-tensile wire specifically for Begg
Begg was NOT a self-promoter — no marketing, worked quietly → it was Kesling who propagated his work more than Begg himself
Why Begg Broke Away from Angle
Angle’s Philosophy
Begg’s New Philosophy
Non-extraction in ALL cases
Extraction when indicated
Occlusion-based treatment planning
Soft tissue profile + occlusion considered
Bodily movement (edgewise)
Uncontrolled tipping → then uprighting
High anchorage demand → headgear
Low anchorage demand → no headgear needed
Heavy rectangular wires
Light round wires (AJ Wilcock)
Key insight: Both Begg AND Tweed (also Angle students) observed massive relapse in non-extraction cases → jaws couldn’t accommodate all teeth → independently concluded extraction was necessary
PART 2: TWO THEORIES — PHILOSOPHICAL BACKBONE
Theory 1: Theory of Attritional Occlusion
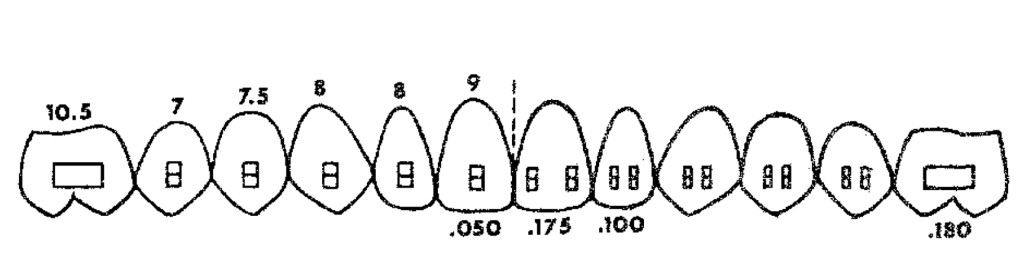
STONE AGE MAN
     │
     ├── Diet: Coarse food (bones, raw meat, grain)
     ├── Proximal attrition → 10.56 mm reduction/arch
     ├── Occlusal attrition → vertical dimension decreases
     └── Result: Space created for all 32 teeth including 3rd molars
               → Perfect alignment → No crowding

CIVILIZED MAN (Today)
     │
     ├── Diet: Soft, refined, melt-in-mouth food
     ├── No proximal attrition → no space gained
     ├── No occlusal attrition
     └── Result: Crowding → 3rd molar impaction → malocclusion
               = "Disease of Civilization"
               (like diabetes, hypertension)
NACF (Natural Anterior Component of Force):
Hereditary tendency for teeth to drift anteriorly
In Stone Age man: NACF + proximal attrition = accommodated 3rd molars
In modern man: NACF present but no attrition → crowding
NACF + continued eruption in absence of attrition → basis of Begg’s extraction philosophy
Begg’s quote:“When in doubt, extract” (Note: this is NOT followed in contemporary practice — we now use continuing diagnosis)
Sir’s clinical observation: Even second molars are now getting impacted — the same phenomenon Begg described is worsening generation by generation due to increasingly soft diets.
Theory 2: Theory of Differential Force (Storey & Smith)
⚠️ Exam trap: Experiment used edgewise brackets (NOT Begg brackets) and studied canine retraction ONLY (NOT entire anterior segment)
Force Applied
Effect on Canine
Effect on Molar
Outcome
Light (150–200g)
Optimal → Frontal resorption → Steady movement
Sub-optimal → Does NOT move
✅ Retraction + Anchorage preserved
Heavy (>200g)
Supra-optimal → Hyalinization → Lag phase → Sudden dump
Optimal → Molar PROTRACTS
❌ Anchorage LOST
Why this happens:
Ideal orthodontic force = 22–26 g/cm² of root surface area(must say “per cm²” for full marks)
Canine root area = small → 150–200g = OPTIMAL → frontal resorption → steady movement
Molar root area = large → 150–200g = SUB-OPTIMAL → no movement
Heavy force on canine → Hyalinization (avascular necrotic zone) → Undermining resorption (osteoclasts tunnel from adjacent bone) → Lag phase → sudden movement dump
Simultaneously heavy force on molar = OPTIMAL → molar protracts → anchorage LOST → “dishing in” of profile
PART 3: BEGG APPLIANCE — THREE KEY COMPONENTS
Component
Details
Function
Ribbonwise bracket (inverted Angle bracket)
Wire enters from gingival side, NOT occlusal side
Permits uncontrolled tipping in BOTH mesiodistal AND buccolingual planes
AJ Wilcock high-tensile wire
Zero stress relaxation; light force maintained for 6 weeks
Light, constant, lasting force — precursor to HANT wires
Round molar tube (0.022″)
Free sliding; double back bend pre-built in; two-point contact with round wire
Anchorage preservation + free anterior sliding
Ribbonwise Bracket — Orientation
ANGLE'S EDGEWISE BRACKET (original):
Wire enters from OCCLUSAL side
Slot: 0.022" × 0.028" rectangular
→ Bodily movement
→ High anchorage demand

BEGG BRACKET (inverted):
Wire enters from GINGIVAL side
Wide open slot → 0.022" round wire
→ Uncontrolled tipping freely in:
   ├── Mesiodistal plane (crown goes distal, root mesial)
   └── Buccolingual plane (crown goes labial/lingual freely)
→ Low anchorage demand ✓
→ Single point contact in both planes
→ EXCEPT for rotation: Two-point contact (wire touches base + bracket → generates couple)
Round Molar Tube — Two-Point Contact
ROUND WIRE IN ROUND TUBE:

        ┌───────────────────────┐
        │ ·                   · │ ← Two-point contact
        └───────────────────────┘
        Mesial end           Distal end

Two-point contact → COUPLE formed
Couple → aims at BODILY MOVEMENT of molar
Molar does NOT tip mesially → Anchorage preserved
Simultaneously: Wire slides FREELY anteriorly
→ Canine/anterior retraction with low friction ✓

BUT: Round wire in round tube = NO buccolingual control
→ In 5-extraction cases needing B-L molar control:
   → Use DOUBLE BACK BEND in oval tube
AJ Wilcock Wire — Properties & Comparison
Property
AJ Wilcock Wire
Heat-Activated NiTi (Modern)
Made by
AJ Wilcock (metallurgist)
Various manufacturers
Material
High-tensile stainless steel
Nickel-titanium
Stress relaxation
Zero
Very low
Force at 6-week recall
Same as day of placement
Near same
Historical significance
Precursor to all light-force wires
Modern equivalent
Recall interval
6 weeks
6–8 weeks
PART 4: CLASSIFICATION OF BEGG TECHNIQUE
BEGG TECHNIQUE
      │
      ├── CONVENTIONAL / TRADITIONAL BEGG
      │   ├── Ribbonwise bracket (original Begg bracket)
      │   ├── AJ Wilcock wire
      │   ├── Original 3-stage philosophy
      │   └── Propagated by: Kesling, Fletcher, Viazis
      │
      ├── MODIFIED BEGG
      │   ├── SAME philosophy as conventional
      │   ├── DIFFERENT bracket (NOT ribbonwise)
      │   └── Brackets: PAGE bracket, Chun Hoon bracket
      │
      └── REFINED BEGG (Dr. VP Jayade)
          ├── SAME Begg ribbonwise bracket
          ├── SAME basic Begg tenets
          ├── CHANGED mechanics
          ├── 10° and 5° offset incorporated into molar tube
          └── More emphasis on finishing
📖 Reference: Refined Begg — book by Dr. VP Jayade; Dr Manjunath Sir personally studied each page of this book with Dr. Jayade during PG training
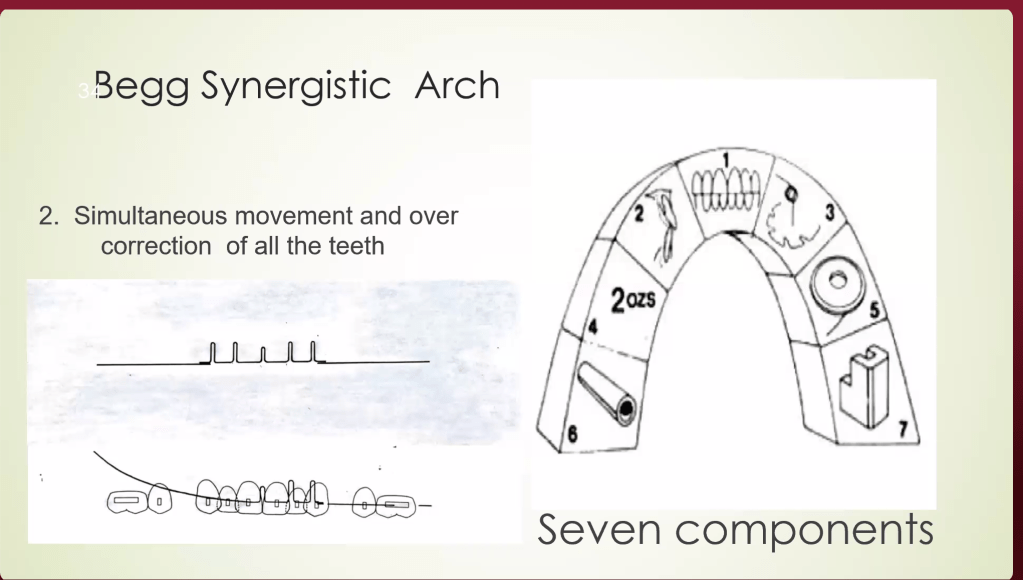
PART 5: BEGG SYNERGISTIC ARC (Kesling — 7 Components)
#
Component
Details
1
Diagnosis & Treatment Planning
Accounts for lack of attrition; extraction justified; overcorrection planned from start
2
Simultaneous movement
All teeth move at once (NOT sequential like standardized wire)
3
Simultaneous overcorrection
Both teeth AND jaws corrected simultaneously
4
Light intermaxillary elastics (IME)
Class II elastics used throughout treatment; light force
Permits uncontrolled tipping in B-L and M-D planes
7
AJ Wilcock wire
High-tensile; zero stress relaxation; light force
Begg separated crown-moving and root-moving forces into different stages → that’s why NO headgear, NO TPA was needed even in critical anchorage cases
PART 6: THREE STAGES OF BEGG TREATMENT
BEGG 3-STAGE TREATMENT FLOWCHART

┌──────────────────────────────────────────────────────────────┐
│                         STAGE 1                              │
│                  ALIGNMENT & LEVELING                        │
│                                                              │
│ Wire: AJ Wilcock 0.014" round                                │
│ Auxiliaries: Anchor bends, tip-back bends, Class II IME      │
│ Pin used: STAGE 1 PIN (more play → free tipping)             │
│ Wire type: MULTI-LOOP ARCH WIRE (MLAW) for crowded cases     │
│ Movement: Uncontrolled tipping (alignment)                   │
│ Anchorage: FRIENDLY — no anchorage taxation ✓                │
│ Deep bite: Anchor bend → intrusion anteriors                 │
└─────────────────────────┬────────────────────────────────────┘
                          │
                          ▼
┌──────────────────────────────────────────────────────────────┐
│                         STAGE 2                              │
│                     SPACE CLOSURE                            │
│                                                              │
│ Wire: AJ Wilcock 0.016" round                                │
│ Auxiliaries: Class II IME, space closure springs             │
│ Pin used: STAGE 2 PIN (moderate play)                        │
│ Movement: Uncontrolled DISTAL tipping of anterior crowns     │
│ Anchorage: STILL FRIENDLY ✓                                  │
│ Molar tube: Wire slides back freely; two-point contact       │
│             prevents mesial molar tipping                    │
└─────────────────────────┬────────────────────────────────────┘
                          │
                          ▼
┌──────────────────────────────────────────────────────────────┐
│                         STAGE 3                              │
│               TORQUING + UPRIGHTING (Root Movement)          │
│                                                              │
│ Wire: AJ Wilcock 0.020" round                                │
│ Auxiliaries: Torquing auxiliaries, uprighting springs        │
│              (passive BRAKING springs — thick wire gauge)    │
│ Pin used: STAGE 3 / HOOK PIN (minimal play → root control)   │
│ Movement: Controlled ROOT movement                           │
│ Crowns: HELD in place by braking springs                     │
│ Roots: Moved lingually/distally (torquing + uprighting)      │
│ ⚠️ ANCHORAGE CRITICAL HERE — root movement forces tend       │
│    to move crown labially → anchorage taxation               │
└──────────────────────────────────────────────────────────────┘
PART 7: ⭐ ANCHORAGE — CRITICAL PHASE COMPARISON (VIVA FAVOURITE)
Dr Manjunath Sir specifically called this a favourite VIVA question
Appliance
Anchorage Critical In
Reason
MBT / Straight Wire
Stage 1 — Alignment
Inbuilt mesial tip in all brackets (central, lateral, canine) → when full-size wire placed → mesial tipping → pulls molars mesially → anchorage loss → need TPA
Begg
Stage 3 — Torquing & Uprighting
Root movement forces → crown tends to move labially → anchorage taxation. Stages 1 & 2 are tipping against bodily movement of posteriors → anchorage FRIENDLY
PART 8: ⭐ BRAKING MECHANICS (MAJOR SECTION — EXAM IMPORTANT)
Braking = Preventing UNWANTED tooth movement to BUILD UP ANCHORAGE in the anterior segment
Braking in the Mesiodistal Plane:
SITUATION: Applying force for PROTRACTION of posteriors
Problem: Anterior crowns want to tip DISTALLY (unwanted)

SOLUTION: Uprighting spring on anterior teeth
          ↓
Crown pushed MESIALLY
Root goes distally
Crown does NOT move distally
          ↓
Posteriors come forward ✓
Anteriors are held (braked) ✓
Braking in the Buccolingual Plane:
SITUATION: Force applied → Begg bracket permits free tipping
Problem: Anterior crowns want to tip LINGUALLY (unwanted)

SOLUTION: Torquing auxiliary = PALATAL ROOT TORQUE (PRT)
          ↓
PRT → Labial crown torque
Crown does NOT go lingually
          ↓
Anteriors held (braked) in B-L plane ✓
Braking in Contemporary Straight Wire:
Problem
Solution
Lower anterior torque in MBT = –6° = crown lingual
Increase lingual root torque in 0.019 × 0.025 wire
Crown going distal during protraction
V-bend (Gable bend) next to canines → anterior = anchorage unit
Key: Gable bend next to canines → moment is higher on anterior segment → aims at bodily movement → anterior = anchorage unit
PART 9: ⭐ CONTEMPORARY PROTRACTION MECHANICS
Sir explained the full sequence for posterior protraction in contemporary practice:
STEP 1: Consolidation → Figure-of-8 ligation from 3 to 3 → Entire anterior root surface combined → Force applied on posteriors becomes SUBOPTIMAL for anteriors to move → Posteriors come forward, anteriors stay ✓
STEP 2: Wire Cylinderization (posterior segment) → Thin/round wire in posterior → Less friction → posteriors slide forward more easily
Sir’s teaching:“You should be biomechanically strong. Without TADs, without headgear, you can treat critical anchorage cases with correct biomechanics alone.”
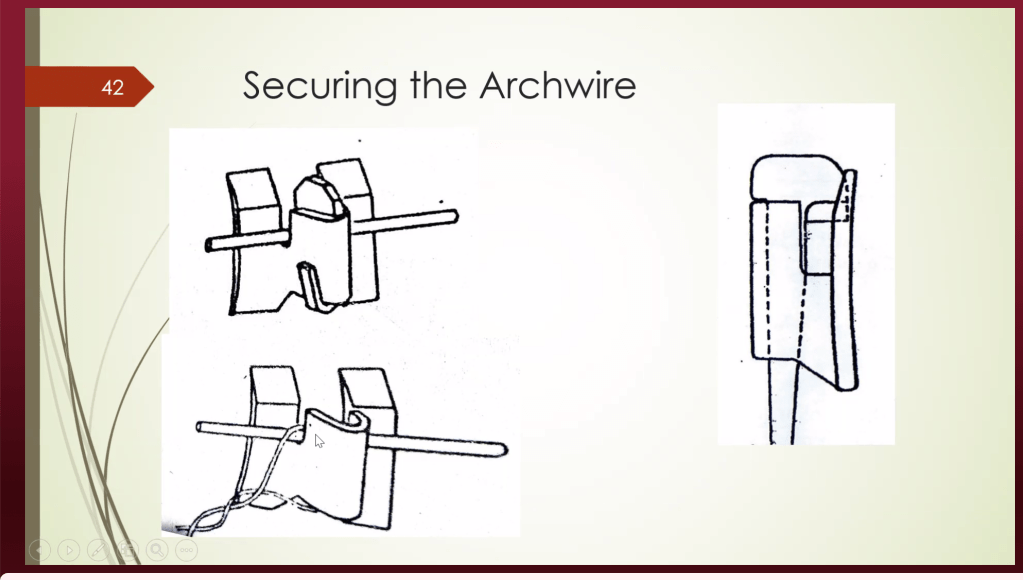
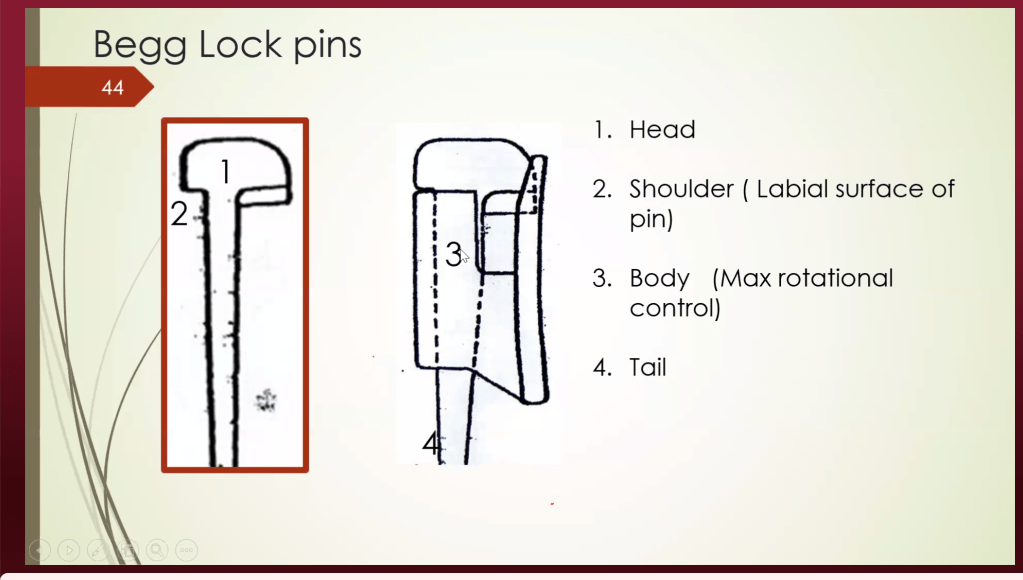
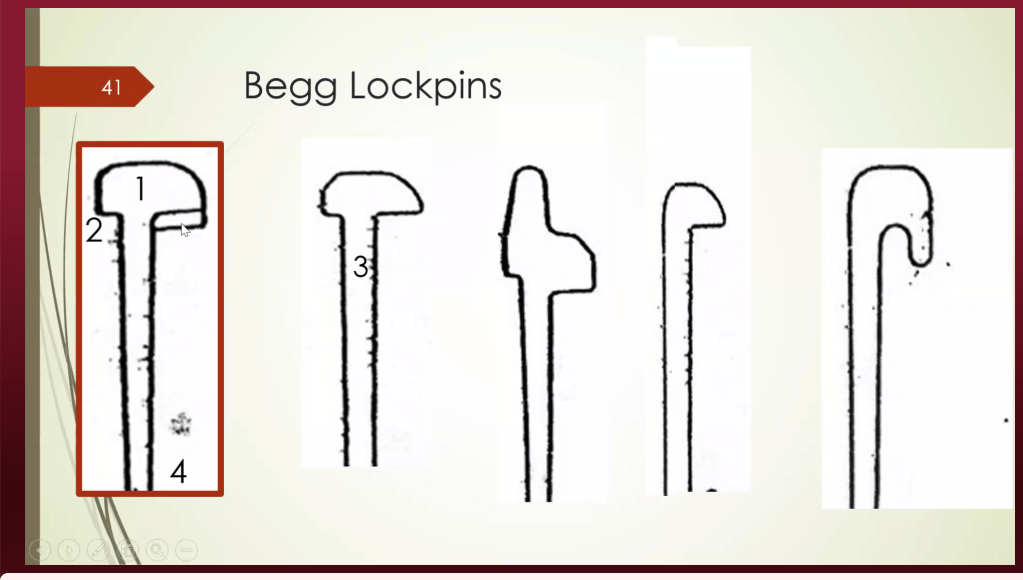
PART 10: BEGG BRACKETS — LOCK PINS (DETAILED)
The wire in the Begg bracket is held using brass lock pins, NOT ligature wires:
Root movement (torquing + uprighting); holds all corrections achieved in Stage 1 & 2
🔑 More play in pin → more tipping. Less play → more crown control → root movement.
PART 11: MULTI-LOOP ARCH WIRES (MLAW)
A unique Begg Stage 1 feature — used for severe crowding:
MLAW — MECHANISM:

Loops added into AJ Wilcock stainless steel wire
        │
        ├── Increases LENGTH of wire
        ├── Increases FLEXIBILITY in looped segment
        └── Rigid end → canine tipping/retraction
            Looped end → aligns crowded anteriors simultaneously

SIMULTANEOUS ACTIONS IN STAGE 1:
┌─────────────────────────────────────────┐
│ 1. Space creation (distal tip of canine)│
│ 2. Alignment of crowded anteriors       │
│ 3. Intrusion (deep bite correction)     │
│ 4. Derotation (bends incorporated)      │
└─────────────────────────────────────────┘

Contemporary equivalent:
Rigid sectional wire on anchor segment +
Flexible sectional wire on crowded segment
→ Same simultaneous correction principle
PART 12: ANCHOR BEND = GABLE BEND — BIOMECHANICAL PRINCIPLE
ANCHOR BEND (Begg) = GABLE BEND (Contemporary)

Examples:
• Anchor bend closer to MOLAR → Molar = anchorage → Intrusion of anteriors
• Gable bend next to CANINE → Anterior = anchorage → Safe for protraction
PART 13: TIP EDGE — BEGG’S MODERN EQUIVALENT
Tip Edge Appliance by Kesling = uses Differential Straight Wire Technique
Same philosophy as Begg: tipping first, then uprighting
Tip Edge bracket = Begg tipping freedom + edgewise finishing capability in ONE bracket
If you cannot practice conventional Begg in your college → learn Tip Edge → same biomechanical principles
PART 14: CLINICAL CASE — RELAPSE LESSON
Sir presented a 25-year-old female, non-extraction spacing case, relapsed after 4 years with space reopening lateral to lateral:
Causes of relapse:
Eruption / mesial drift of third molar → NACF → lower incisors procline → upper space reopens
Bolton’s discrepancy (smaller lateral incisors) → if retracted without build-up/IPR → relapse inevitable
Untreated soft tissue imbalance → profile not corrected → relapse
Retainer note: Sir does NOT give fixed retainer canine to canine (canine occlusion breaks it). Fixed retainer lateral to lateral + Hawley in upper arch.
Clinical pearl:“Always warn patients — maintain retainers until third molars have fully erupted or been extracted.”
PART 15: EXTRACTION vs. NON-EXTRACTION — CLINICAL DECISION MAKING
Sir’s clinical guidelines (from 23 years of experience):
Junior bracket (smallest of all) — named “Sajesh Singh”
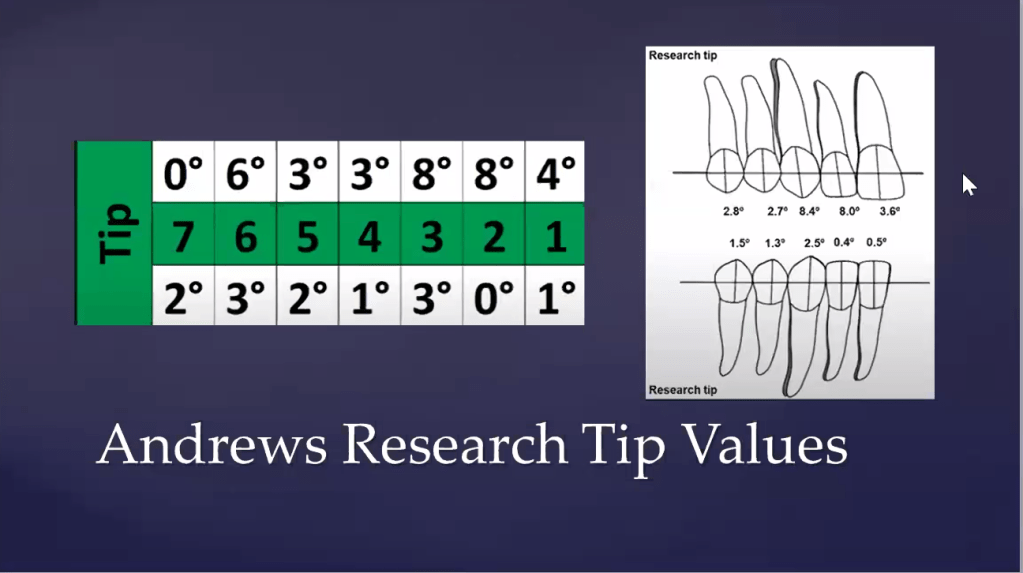
3. ANDREWS & THE 6 KEYS TO OPTIMAL OCCLUSION
Andrews studied 120 individuals with ideal untreated occlusion (1962–1972) to derive these keys:
Key
Description
Key 1 – Molar Relationship
MB cusp of upper 1st molar in buccal groove of lower 1st molar; mesiolingual cusp of upper 1st molar in central fossa of lower 1st molar; distal ridge of upper 1st molar occludes with distal ridge of lower 2nd molar
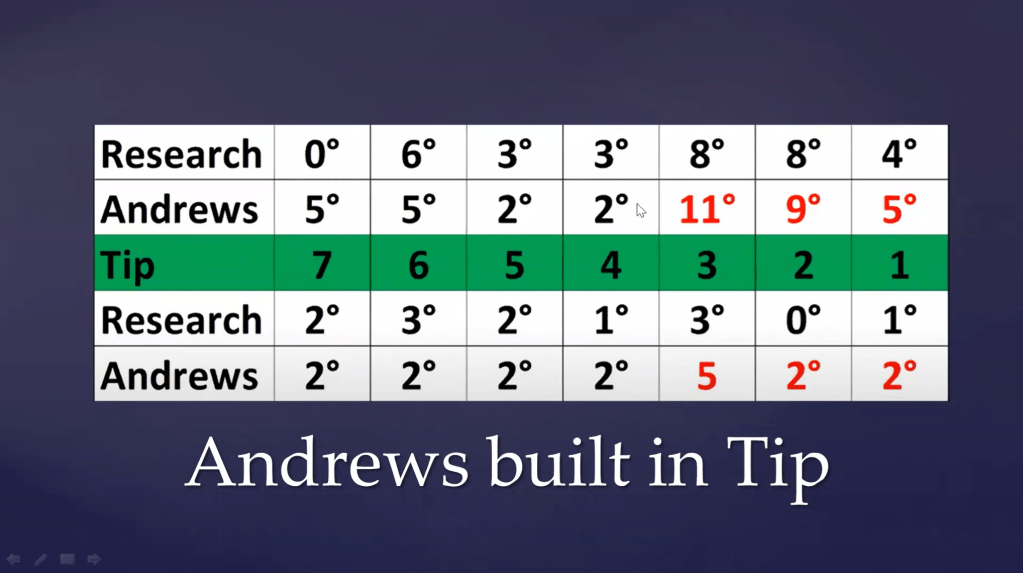
Key 2 – Crown Angulation (Tip)
Crown is mesially inclined; gingival portion of long axis is distal to crown — present in all teeth; needed for mesial component of force and masticatory efficiency
Key 3 – Crown Inclination (Torque)
Crown is labially inclined in anteriors; progressively lingually inclined in posteriors; facilitates mutual protected occlusion
Key 4 – Absence of Rotation
No unwanted rotations = no premature contacts, no untoward crossbites
Key 5 – Tight Contacts
No spacing; prevents tooth migration and secondary malocclusion
Key 6 – Curve of Spee (Flat)
Curve of Spee ≈ flat (0–1.5 mm); deep curve → crowding; reversed curve → spacing
Retract only on full-size rectangular SS wire (0.019×0.025 in 0.022 slot) to prevent roller-coaster effect mechanically
E-chain retraction should not begin on lighter wires
Changes MBT Made:
Parameter
Change vs Roth
Reason
Tip (Canine)
Reduced
Preserve anchorage from start; tip expressed gradually, not at initial arch stage
Torque (Anteriors)
Increased
Adding torque → causes tip loss (wagon wheel effect) — so extra torque compensates for this and also addresses roller-coaster effect without using high tip values
Retraction wire
0.019×0.025 SS in 0.022 slot
Full engagement, maximum slot fill = less play = more torque expression
MBT for Lingually Placed Mandibular Lateral Incisor:
Built-in torque of −6° (lingual crown torque) in MBT for lower incisors
When aligning a lingually displaced lower lateral, as the crown is brought labially, the built-in torque counteracts the tendency for lingual root torque — no additional torque bending required
7. TORQUE EXPRESSION & SLOT SIZE
Slot Size Comparison
Slot
Advantages
Preferred For
0.018″
More torque expression with full-size wire; less play; better for torque-sensitive cases
Non-extraction cases, torque control priority
0.022″
More play; works well with E-chain retraction on large wire; better sliding mechanics
Extraction cases, anchorage management
For maximum torque expression:
Use 0.018 slot + 0.016×0.022 SS wire (only 2° play)
Wire stiffness: SS > TMA for torque; TMA acceptable for 2nd order bends
Round wires cannot express 3rd order (torque) — must use rectangular wire
Bracket Placement Height & Torque
Placement
Effect on Root Torque
Cervical
Lingual root torque (less expression)
Mid-crown (ideal)
Ideal torque expression
Incisal
Labial root torque (more expression)
SAP (Straight Arch wire Placement) protocol: Must be very precise in bracket placement height as it directly controls torque expression
8. WAGON WHEEL CONCEPT (Andrews)
Torque induces tip loss in a ratio of 4:1
For every 4° of torque expressed → 1° of mesial tip is lost
20° torque = 5° mesial tip loss
40° torque = 10° mesial tip loss
90° torque = 23° mesial tip loss
Mesial tip loss → all roots diverge → anchorage loss + tendency for spacing
Clinical implication: When using full-torque expression (e.g., MBT on SS), anchor cinch and proper retraction strategy are critical
9. ANTI-ROTATION BUILT INTO BRACKETS
During space closure with E-chain, unwanted rotations occur as side effects:
Tooth
E-chain Side Effect
Built-in Anti-Rotation
Canine
Mesial-in, distal-out
Mesial-out, distal-in built into bracket
Premolar
Mesial-in, distal-out
Mesial-out, distal-in (opposite)
One wing is placed slightly further than the other to generate a counter-moment
Net rotation = zero → tooth translates bodily
10. IN-OUT (PROMINENCE) DIFFERENCE
Why different stem heights between brackets?
Tooth
Prominence
Stem Height
Max. Central Incisor
Most prominent
Least stem height
Max. Lateral Incisor
Set-in lingually
More stem height added
Canine
Intermediate
Intermediate
Mand. 2nd Premolar
Smaller than adjacent
Extra offset added
Molar
More buccal
Offset bend or increased stem
All brackets, when placed, should bring all slots to the same labial level (level slot)
MBT Molar Tube (Buccal Tube) Features:
Placed parallel to occlusal cusp → automatic 10° offset (takes care of molar in-out discrepancy)
Zero degree tip
~14° torque built in
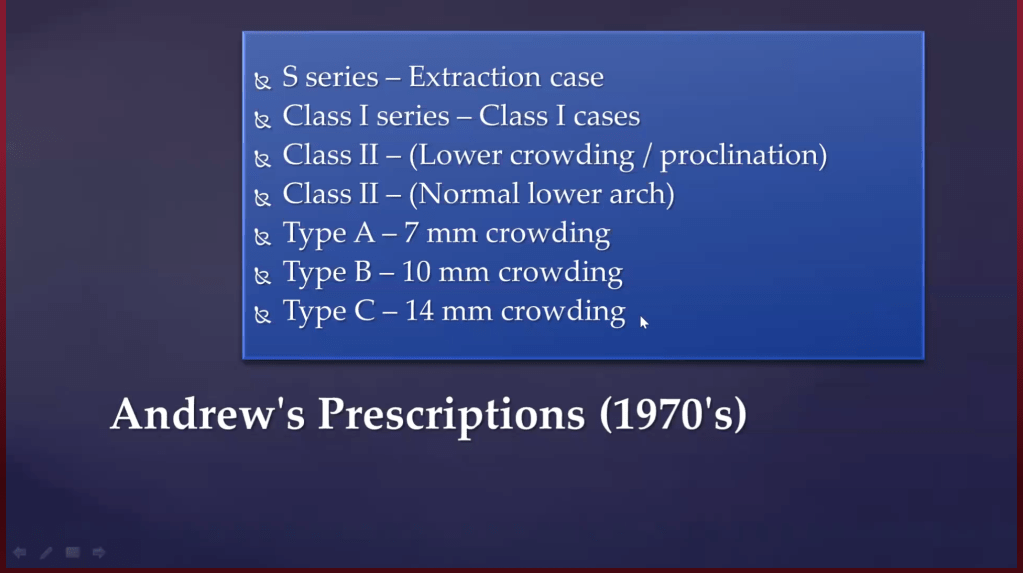
11. PRESCRIPTION CHOICE BY MALOCCLUSION
Malocclusion/Situation
Preferred Prescription
Reason
Class II Div 1 — Critical anchorage
MBT
Zero/reduced tip in posterior = maximum anchorage conservation
Class II — Class 2 elastics
MBT
Excellent torque values; better force management
Class III — Class 3 elastics
Roth
Built-in torque assists in managing Class III dentoalveolar compensation
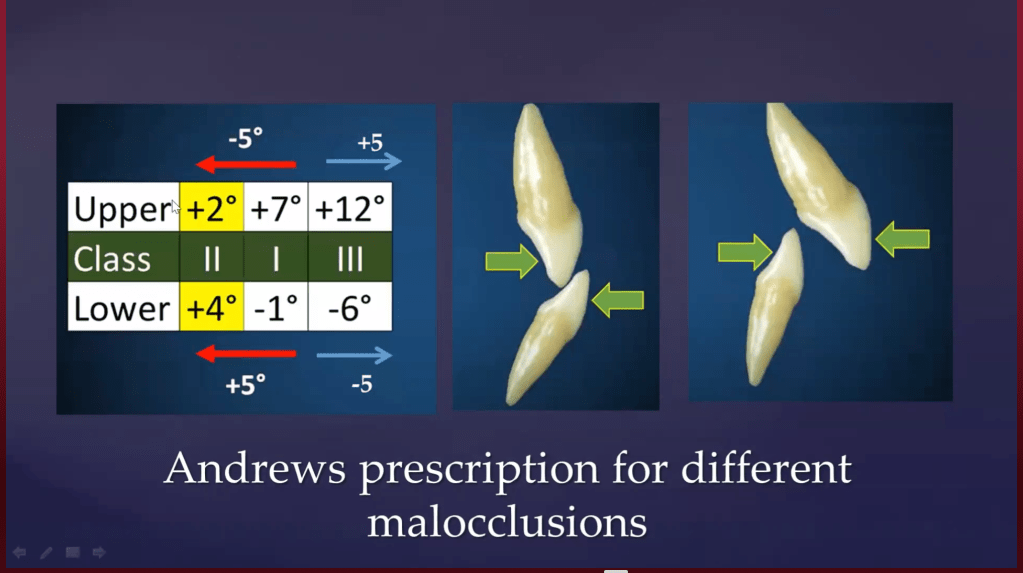
Important caveat: Any prescription can be used for any case, but side effects must be compensated with appropriate wire bends, especially 3rd-order (torque) bends
Class II Finishing — Contralateral Molar Tube Trick
In Class II finishing, using a lower 2nd molar tube on the contralateral upper 1st/2nd molar provides the needed rotation for Class II molar relationship without wire bending
12. TRAMPOLINE EFFECT
When an active tieback is placed, the masticatory forces act on it like a trampoline
The bouncing (juggling) forces of mastication continuously reactivate the tieback
Forces are maintained for up to 3 months without patient revisit
Clinical significance: Active tiebacks maintain space closure forces between appointments, unlike passive tiebacks or E-chains alone
13. KEY CLINICAL TIPS FROM DR. TARULATHA
Torque is ONLY for root movement — never use the term for crown inclination changes alone
Retraction should be done on full-size rectangular SS wire (MBT philosophy) to prevent roller-coaster effect
Round wires cannot express 3rd order bends — always go to rectangular for torque needs
Bracket placement height is critical — especially in SAP protocol; even 1 mm error changes torque expression significantly
For torque expression: SS > TMA; use TMA only for 2nd order corrections
Group A anchorage cases → use MBT; avoid Roth in high-anchorage-demand cases
Play (Degrees of Freedom) by Slot & Wire Combination
Slot Size
Arch Wire
Play (°)
Torque Expression
0.018″
0.016×0.022 SS
6.8°
Moderate
0.018″
0.018×0.025 SS
1.2°
Excellent
0.022″
0.016×0.022 SS
~19.8°
Poor
0.022″
0.019×0.025 SS
~11.2°
Better; standard for MBT retraction
0.022″
0.021×0.025 SS
~minimal
Near-complete torque expression
Key rule: To achieve full/complete torque expression, the slot must be filled snugly → requires 0.021×0.025″ SS in 0.022 slot
Summary: For best torque expression → prefer 0.018 slot with appropriate rectangular SS wire (only 1.2° play with 0.018×0.025 SS)
16. PRESCRIPTION CHOICE FOR CLASS II DIVISION 2
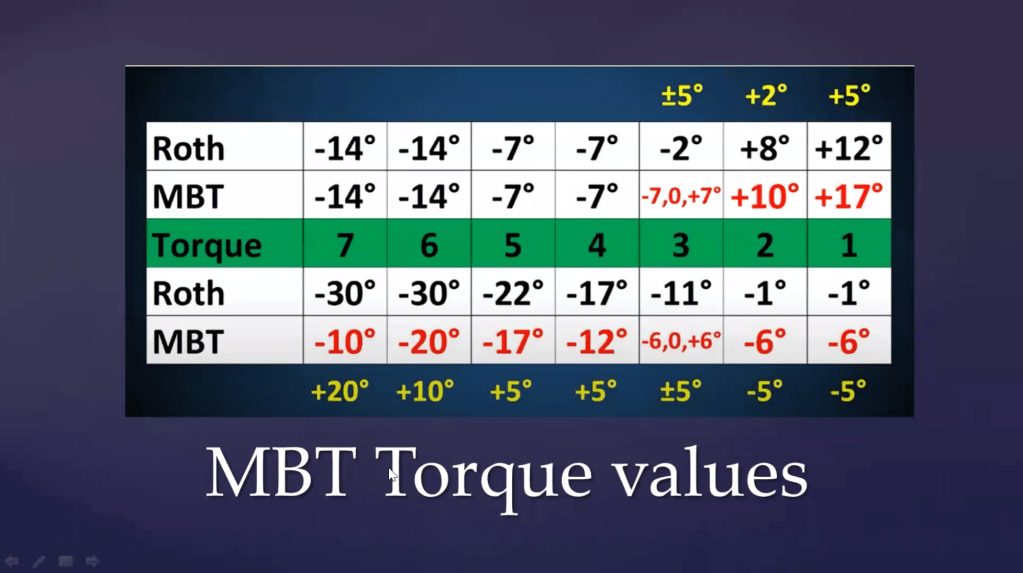
Centrals are retroclined → roots are labially placed → need positive palatal root torque → MBT (+17°) is ideal for centrals
Laterals are proclined (Class II Div 2 Type 1 laterals) → need roots to go labially → Roth (+8°) preferred for laterals
Andrews (+7°) for centrals has less torque in comparison and may be insufficient for this caseConcept: You can mix prescriptions tooth-by-tooth within the same arch based on individual tooth requirements — this is called hybridizing or bracket prescription maneuvering
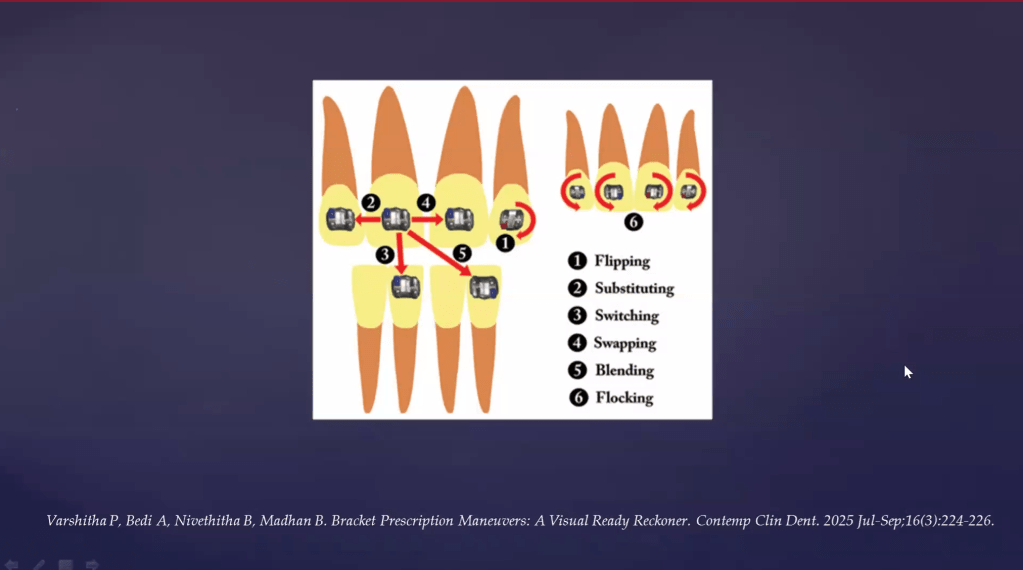
17. BRACKET PRESCRIPTION MANEUVERING — DETAILED
Using the same bracket inventory in alternative ways — inverting, switching, swapping, or substituting — to achieve a variable/customized prescription without needing custom brackets.
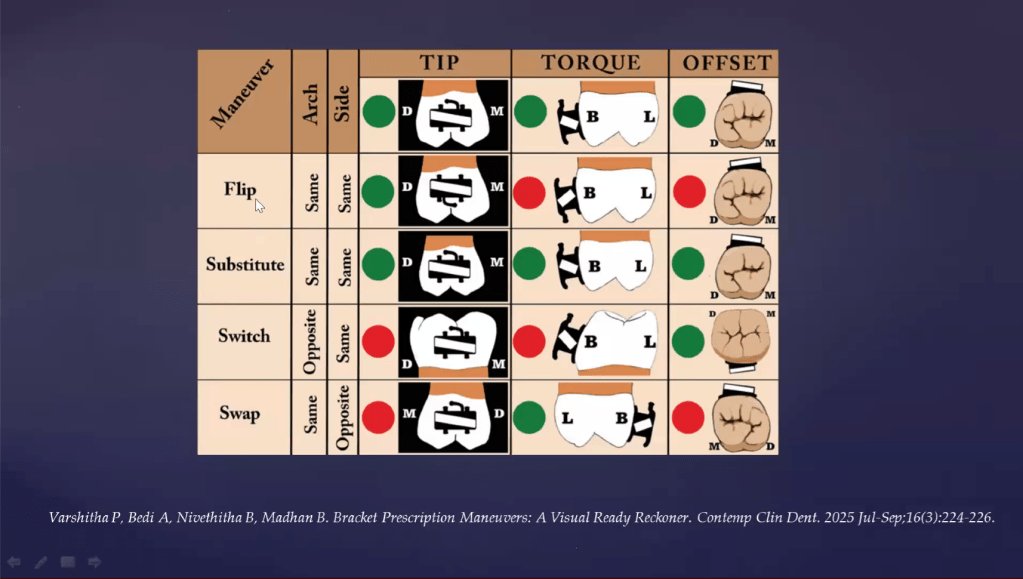
Types of Maneuvering
Type
Description
Effect on Tip/Torque
Flipping
Bracket is inverted (turned upside down) on the same tooth
Bracket of one tooth placed on an adjacent/different tooth (e.g., lateral incisor bracket on canine in lateral agenesis)
No change in tip or torque — same values, just expressed on different tooth
Switching
Maxillary incisor bracket transferred to mandibular incisor of same side (inter-arch, same side)
Changes both tip and torque (upper vs lower tooth anatomy differs)
Swapping
Bracket transferred across midline within the same arch (intra-arch maneuvering)
Reverses tip direction; used in Class III camouflage
Blending
Combination of switching + flipping
Compound changes to tip and torque
Flocking
Inverting all incisor brackets of maxillary anterior segment at once
Bulk torque alteration for the anterior segment
Clinical Applications of Maneuvering
Clinical Situation
Maneuvering Used
Rationale
Lingually placed lateral incisor
Flipping (inverting bracket)
Converts lingual crown torque to labial crown torque to erupt lingual tooth
Lateral agenesis — canine in lateral space
Substituting (lateral bracket on canine)
Expresses lateral incisor tip/torque on canine for aesthetic finishing
Fixed functional appliance (e.g., Forsus)
MBT brackets on lower anteriors
Built-in lingual crown torque in MBT counteracts proclination tendency from FF appliance
Class III camouflage — retroclination of lower anteriors
Swapping (cross midline)
Converts mesial tip to distal tip → root moves mesially, crown tilts distally = retroclination
Class III with fixed functional — prevent proclination
MBT lower incisor brackets
Lingual torque of MBT resists labial tipping from functional forces
18. CLASS III MANAGEMENT WITH BRACKET MANEUVERING
In Class III camouflage, you want retroclination of lower incisors (crown distal, root mesial)
When you use a swapped bracket (e.g., crossing the midline — right bracket placed on left side), the built-in mesial tip of the bracket is now expressed as distal crown tip
FF appliances generate a mesial component on lower incisors → proclination risk
By using MBT brackets on lower anteriors, the built-in lingual crown torque (negative torque) of MBT naturally counteracts the proclination tendency
19. TORQUE & TIP INTERACTION — ADDITIONAL NUANCE (MBT vs Roth)
MBT reduced tip, increased torque — rationale:
Reduced tip → less anchor loss from the start (no canine mesial movement in initial arch wires)
Increased torque → compensates for roller-coaster effect
When torque is expressed → tip is lost (wagon wheel, 4:1 ratio); by pre-loading torque, the tip loss from torque expression itself becomes the corrective force against roller-coaster
MBT mandates retraction only on 0.019×0.025 SS in 0.022 slot to ensure all these torque values are actually expressed before and during retraction
20. FLIPPING — DETAILED MECHANISM FOR LINGUALLY PLACED LATERAL INCISOR
Normally, MBT upper lateral has a positive torque (labial crown torque / lingual root torque)
For a lingually placed (palatally displaced) upper lateral incisor, if you simply engage, the wire will tip the crown labially but the root may not follow correctly
By inverting/flipping the lateral incisor bracket:
The positive torque (lingual root torque) is reversed to labial root torque
This drives the root labially and corrects the lingually impacted position without additional 3rd-order wire bends
RECOMMENDED READING
Harris Khan’s Textbook on Bracket Prescription (available on ResearchGate)
Mo Al-Mzani & Harris Khan articles on variable bracket prescription
Andrews’ original research (1972–1989) and SWA textbook (1989)
Orthodontic brackets are much more than simple attachments bonded to teeth. They serve as the medium through which orthodontic forces are expressed, allowing controlled tooth movement and the achievement of ideal occlusion.
According to Lawrence F. Andrews and subsequent prescription developers such as Roth and McLaughlin-Bennett-Trevisi (MBT), the success of orthodontic treatment depends on incorporating specific biomechanical requirements directly into the bracket design. This concept led to the evolution of the pre-adjusted edgewise appliance, commonly known as the Straight Wire Appliance.
What is a Bracket?
A bracket is a passive orthodontic attachment bonded to the tooth surface that acts as a handle for force application.
Functions of a Bracket
Serves as an attachment for archwires
Transfers force from the archwire to the tooth
Guides tooth movement in three dimensions
Helps achieve ideal tooth alignment and occlusion
Materials Used
Material
Characteristics
Stainless Steel
Strong, durable, most commonly used
Ceramic
Esthetic but brittle
Plastic
Esthetic but less durable
Titanium
Biocompatible and corrosion-resistant
Historical Evolution of Orthodontic Appliances
Timeline of Development
Year
Appliance
Developer
Significance
1904
E-Arch Appliance
Edward H. Angle
First fixed appliance
1910
Pin and Tube Appliance
Angle
Improved tooth positioning
1915
Ribbon Arch Appliance
Angle
First bracket-like design
1928
Edgewise Appliance
Angle
Horizontal slot introduced
1950s
Begg Appliance
P.R. Begg
Light-wire technique
1970
Straight Wire Appliance
Lawrence F. Andrews
Built-in prescription system
Andrews’ Six Keys to Normal Occlusion
The foundation of modern bracket prescription is Andrews’ landmark study of untreated individuals with ideal occlusion.
Table: Andrews’ Six Keys
Key
Description
1
Correct molar relationship
2
Proper crown angulation (Tip)
3
Proper crown inclination (Torque)
4
Absence of rotations
5
Tight proximal contacts
6
Flat or mild Curve of Spee
Why Was the Straight Wire Appliance Developed?
Before Andrews, orthodontists had to place numerous bends in archwires to achieve ideal tooth positioning.
Number of Bends Required in Edgewise Technique
Type
Approximate Number
Total Primary Bends
76
For Tip, Torque & Offset
46
For Prominence & Slot Positioning
30
This process was:
Time consuming
Technique sensitive
Difficult to reproduce
Dependent on operator skill
Andrews solved this by incorporating these adjustments directly into the bracket.
Orders of Wire Bending
First Order Bends
Purpose
Correction of buccolingual position (In-Out).
Also Called
Horizontal bends
Offset bends
Examples
Lateral incisor offsets
Premolar offsets
Molar offsets
Second Order Bends
Purpose
Correction of mesiodistal angulation (Tip).
Also Called
Vertical bends
Artistic bends
Examples
Step-up bends
Step-down bends
Anchor bends
Gable bends
Third Order Bends
Purpose
Correction of root position (Torque).
Examples
Labial root torque
Lingual root torque
Palatal root torque
Summary Table
Order
Movement Controlled
Clinical Term
First
Buccolingual position
In-Out
Second
Mesiodistal angulation
Tip
Third
Root inclination
Torque
Components of Bracket Prescription
Modern brackets incorporate three major prescriptions:
1. Tip
Mesiodistal angulation built into the bracket slot.
Importance
Produces proper tooth angulation
Maintains smile arc
Improves esthetics
Enhances occlusal function
2. Torque
Labiolingual root positioning built into the bracket.
Importance
Controls root movement
Maintains incisor inclination
Critical in extraction cases
Influences facial profile
3. In-Out
Controls buccolingual prominence differences between teeth.
Importance
Allows a straight archwire to align teeth of different thicknesses.
Parts of an Orthodontic Bracket
Component
Function
Wings
Ligature engagement
Slot
Archwire insertion
Face
Visible surface
Stem
Contains torque expression
Base
Bonding surface
Identification Mark
Right-left orientation
Tip Expression
Tip is expressed when the archwire contacts opposite corners of the bracket slot.
Factors Affecting Tip Expression
Factor
Effect
Archwire stiffness
Greater stiffness = greater expression
Bracket width
Wider bracket = greater moment
Archwire size
Larger wire = more expression
Slot size
Smaller play = greater expression
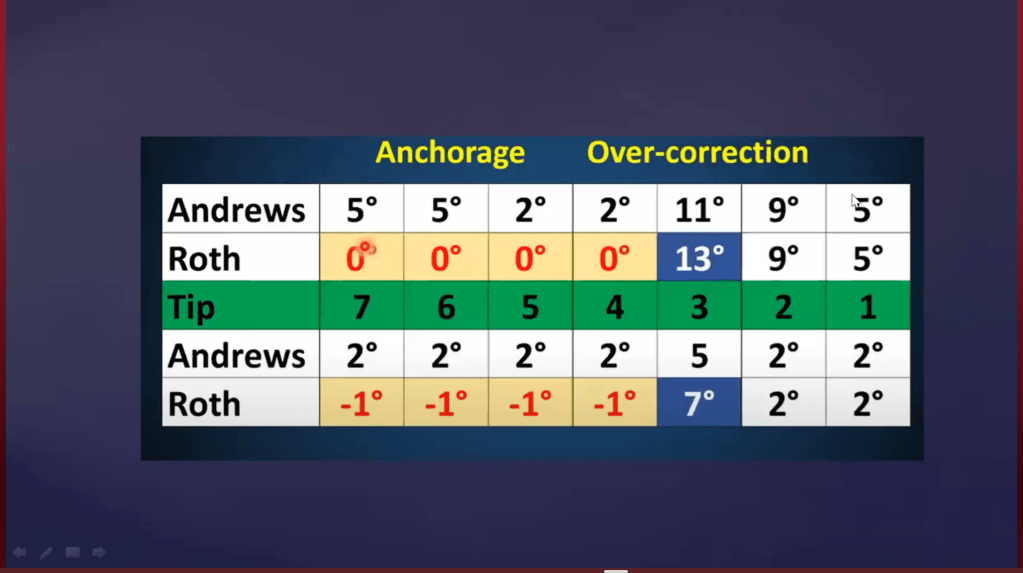
Andrews, Roth and MBT Prescriptions
Tip Philosophy
Maxillary Teeth
Tooth
Andrews
Roth
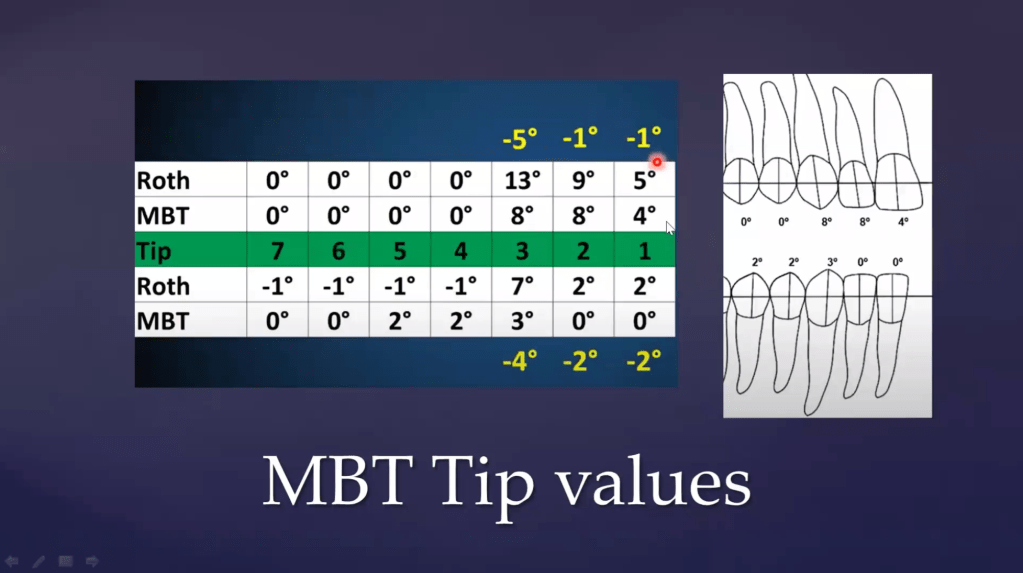
MBT
Central Incisor
5°
5°
4°
Lateral Incisor
9°
9°
8°
Canine
11°
13°
8°
Key Observation
MBT significantly reduced anterior tip values to minimize anchorage loss and rowboat effect.
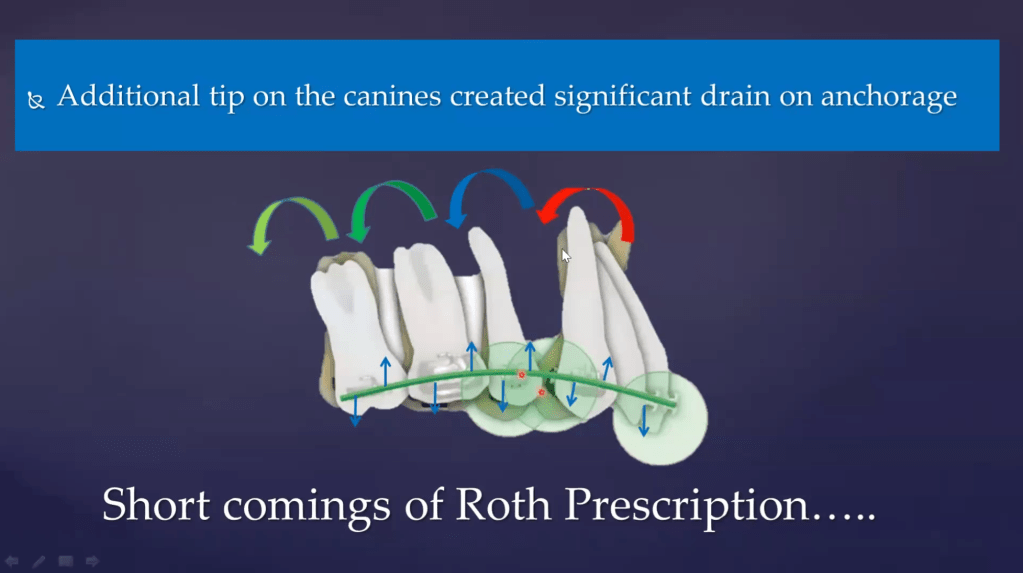
The Rowboat Effect
Definition
Anchorage loss produced by excessive built-in mesial tip, particularly in canines.
Mechanism
Mesial crown movement occurs.
Distal root movement follows.
Reciprocal forces act on posterior teeth.
Premolars and molars drift mesially.
Extraction space is lost.
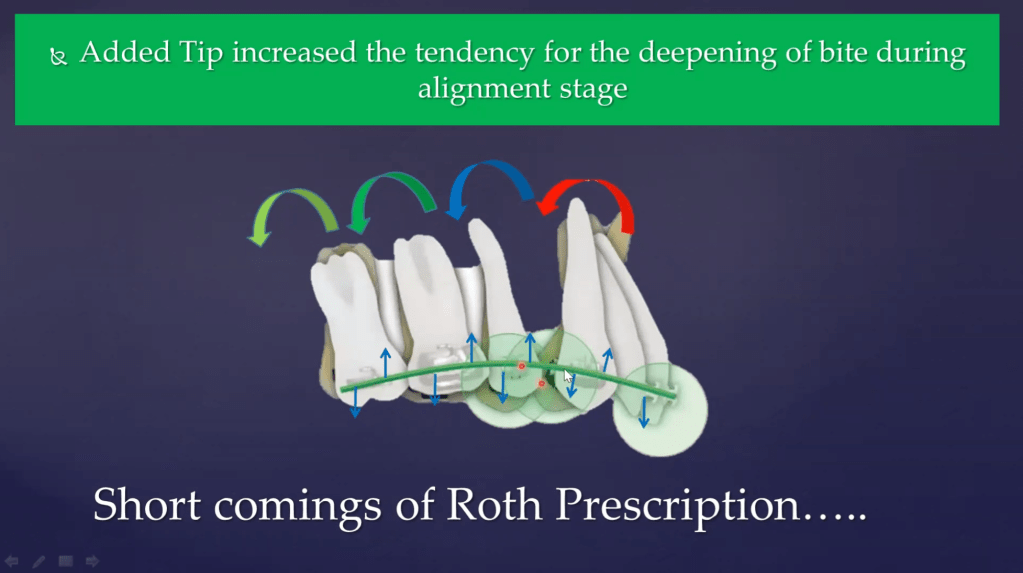
Clinical Consequences
Anchorage loss
Space closure difficulty
Deepening of bite
Prevention
Method
Mechanism
Lacebacks
Prevent canine mesial movement
TADs
Provide absolute anchorage
MBT prescription
Reduced canine tip
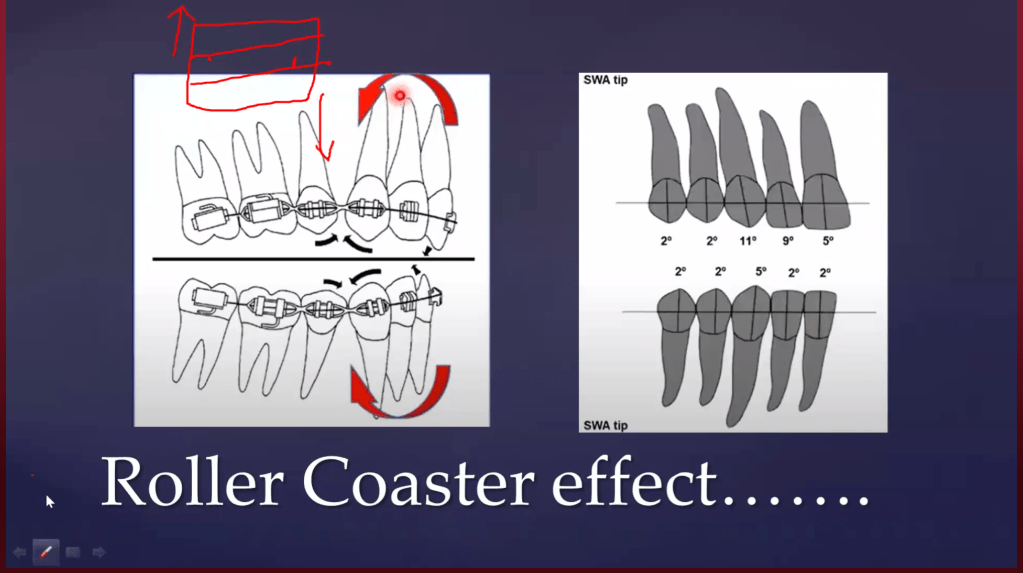
Roller Coaster Effect
Definition
Development of deep bite anteriorly and open bite posteriorly during space closure.
Causes
Excessive retraction force
Inadequate tip control
Undersized archwires
Features
Region
Effect
Anterior
Deep bite
Canine
Distal tipping
Posterior
Open bite tendency
Prevention
Use built-in tip prescriptions
Controlled force application
Appropriate archwire sequence
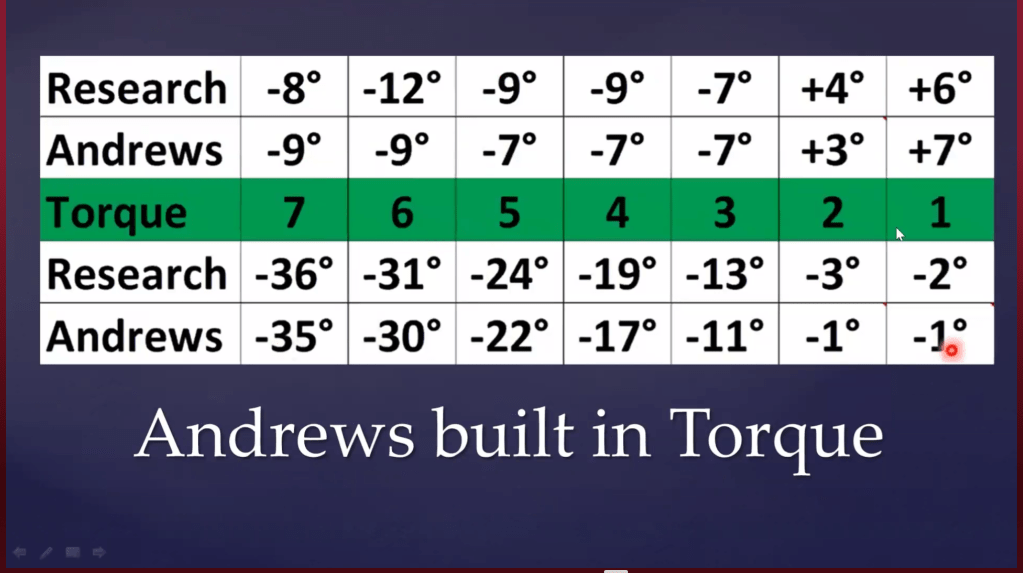
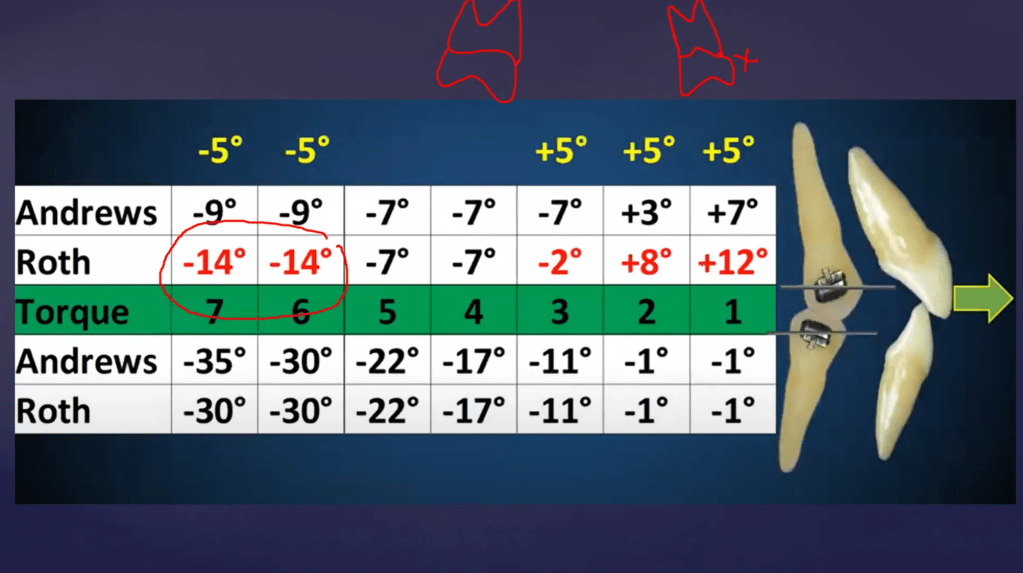
Torque Expression
Torque is primarily a root movement phenomenon.
Types of Torque
Type
Root Movement
Positive Torque
Root moves palatally/lingually
Negative Torque
Root moves labially/buccally
Factors Affecting Torque Expression
Factor
Effect
Wire stiffness
More stiffness = more torque
Wire size
Larger wire = more torque
Slot depth
Less play = more torque
Slot size
Smaller slot = more torque
Slot Size Comparison
0.018 Slot System
Advantages
Better torque control
Less play
Earlier expression
Disadvantages
Less working range
0.022 Slot System
Advantages
Greater flexibility
Larger wire sequence options
Easier alignment phase
Disadvantages
More torque play
Delayed torque expression
Comparison Table
Feature
0.018 Slot
0.022 Slot
Torque Expression
Better
Less
Play
Less
More
Finishing Control
Better
Moderate
Flexibility
Less
More
Wagon Wheel Effect
Definition
Loss of anchorage resulting from excessive torque expression.
Special attention is required during bracket placement protocols because even small vertical placement errors can alter final root position significantly.
MBT vs Roth vs Andrews: Clinical Selection
Clinical Situation
Preferred Prescription
Maximum Anchorage Cases
MBT
Routine Extraction Cases
Roth
Natural Occlusion Philosophy
Andrews
Class II Division 2
MBT Anterior Torque
Cases Requiring High Torque
MBT
Cases Requiring Conservative Torque
Roth
Key Examination Pearls
Andrews introduced the Straight Wire Appliance.
Six Keys to Normal Occlusion form the basis of bracket prescription.
First-order bends = In-Out corrections.
Second-order bends = Tip corrections.
Third-order bends = Torque corrections.
MBT reduced tip values to reduce anchorage loss.
Lacebacks help prevent Rowboat Effect.
Built-in tip helps prevent Roller Coaster Effect.
0.018 slot provides superior torque expression.
Torque expression depends on wire size, slot size, and wire stiffness.
Conclusion
The evolution from Angle’s edgewise appliance to Andrews’ Straight Wire Appliance revolutionized orthodontics by transferring biomechanical complexity from the archwire into the bracket itself. Modern prescriptions such as Andrews, Roth, and MBT differ primarily in their tip and torque values, allowing clinicians to select the most suitable prescription based on treatment objectives, anchorage requirements, and malocclusion characteristics.
A thorough understanding of bracket prescription, tip, torque, in-out compensation, and associated biomechanical effects such as Rowboat and Roller Coaster effects is essential for efficient and predictable orthodontic treatment.
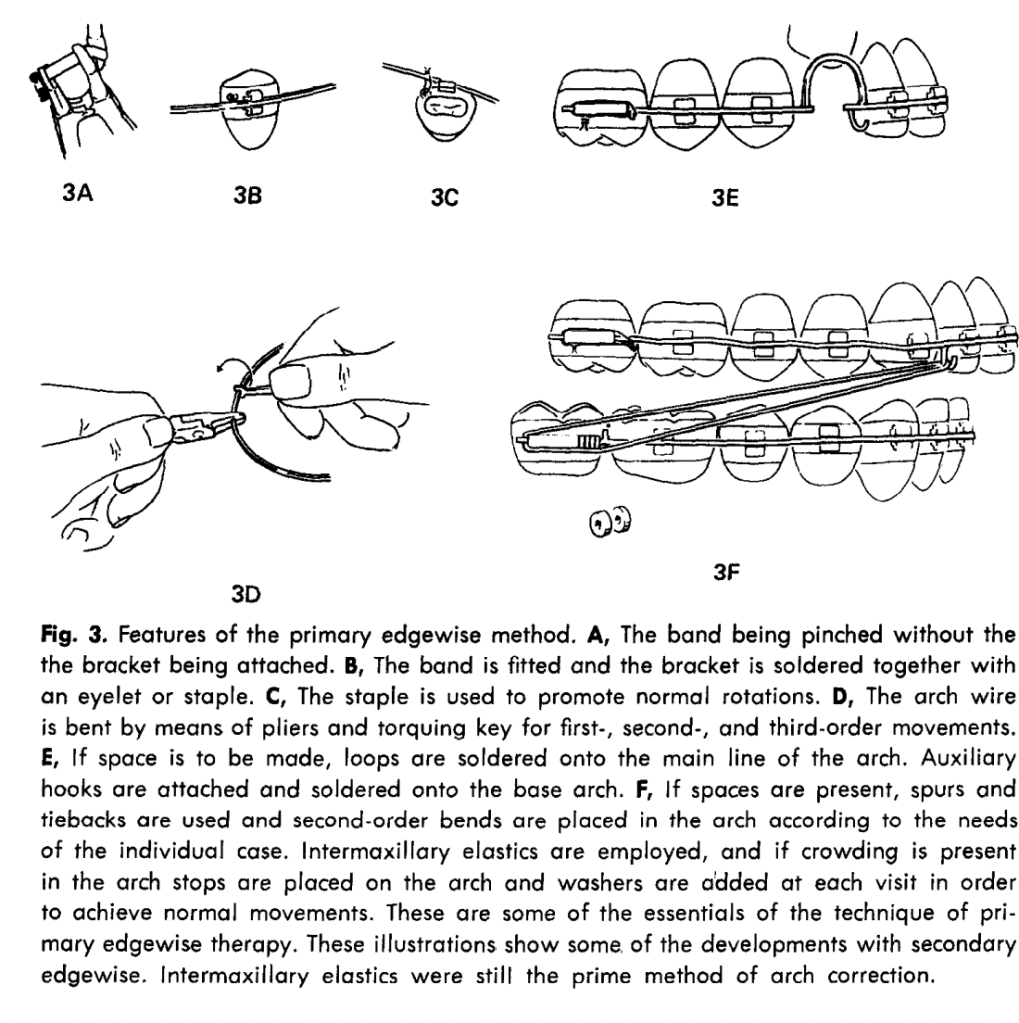
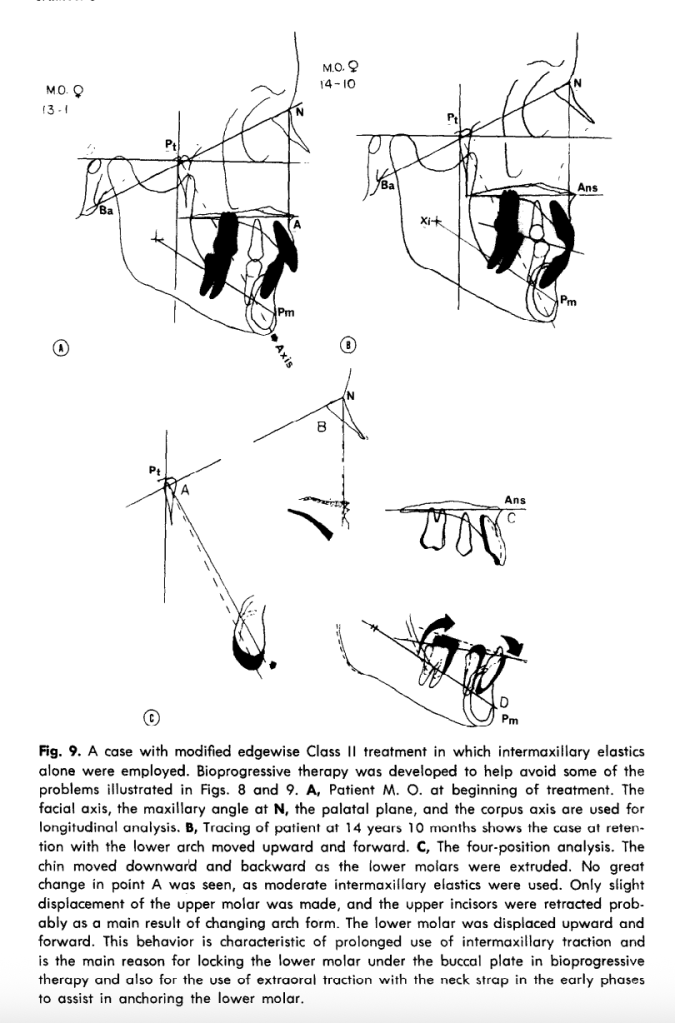
Bioprogressive therapy was developed to correct the limitations of conventional edgewise treatment, especially anchorage loss, unwanted incisor flaring, occlusal plane dumping, and overreliance on heavy mechanics. Ricketts emphasizes that treatment should be built around biologic force levels, cortical bone considerations, and prefabricated appliance components rather than endless chairside wire bending.
Historical progression
Stage
Main feature
Main drawback
Primary edgewise
Fully banded, custom bends, gold bands, heavy manual finishing
Time-consuming, rigid, depends on full eruption, difficult finishing
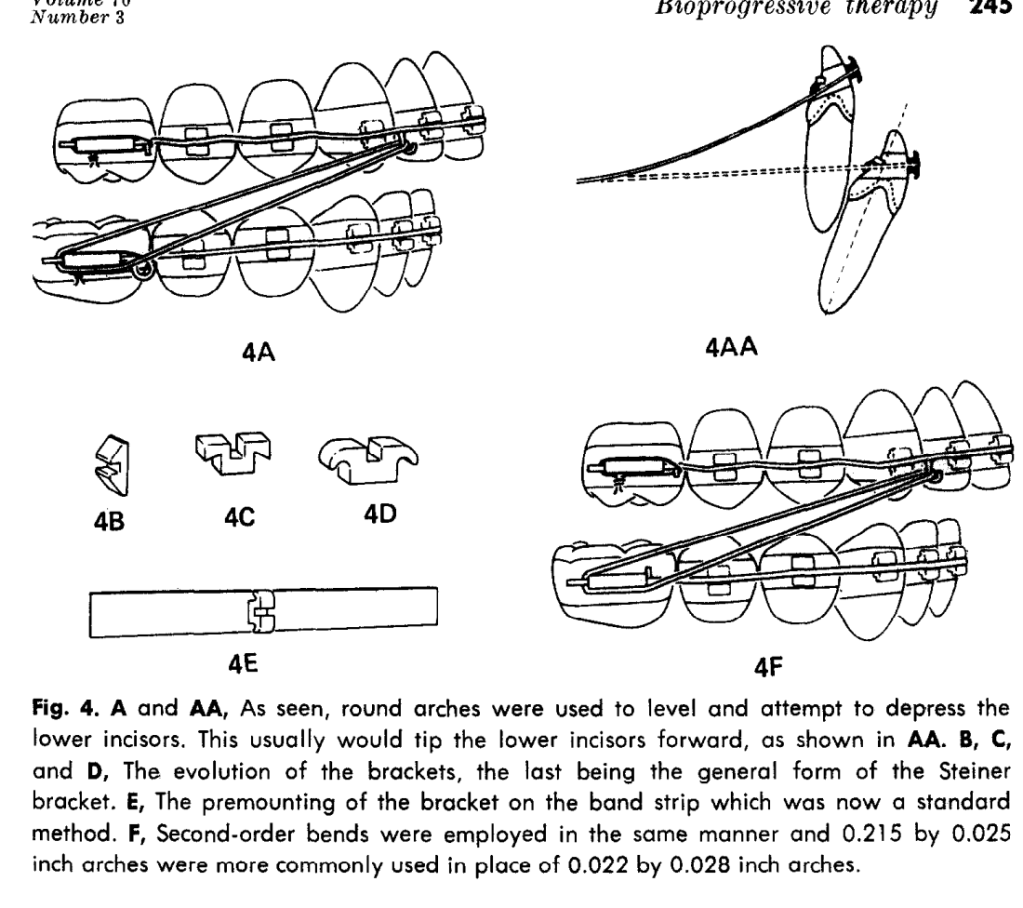
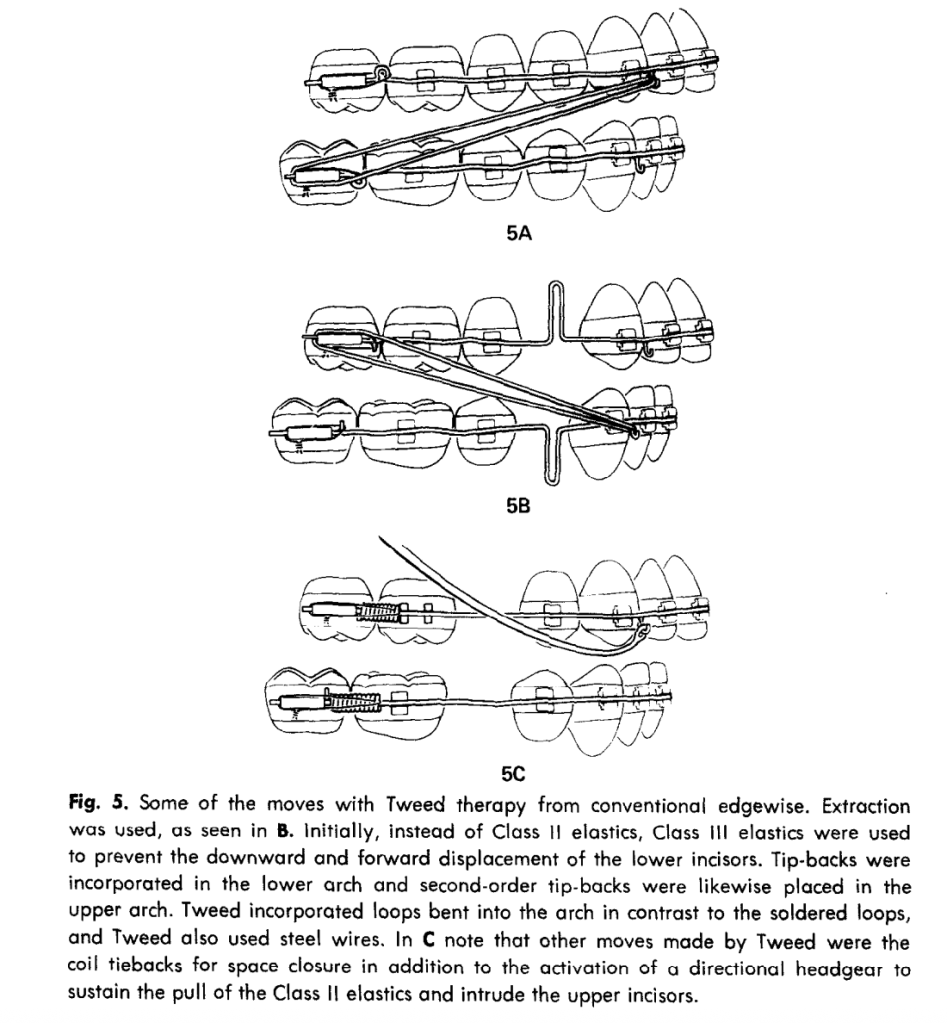
Secondary edgewise
Round wire used more often, later rectangular finishing
Flaring, anchorage loss, protrusion in nonextraction cases
Requires thoughtful planning and case-specific customization
Why bioprogressive emerged
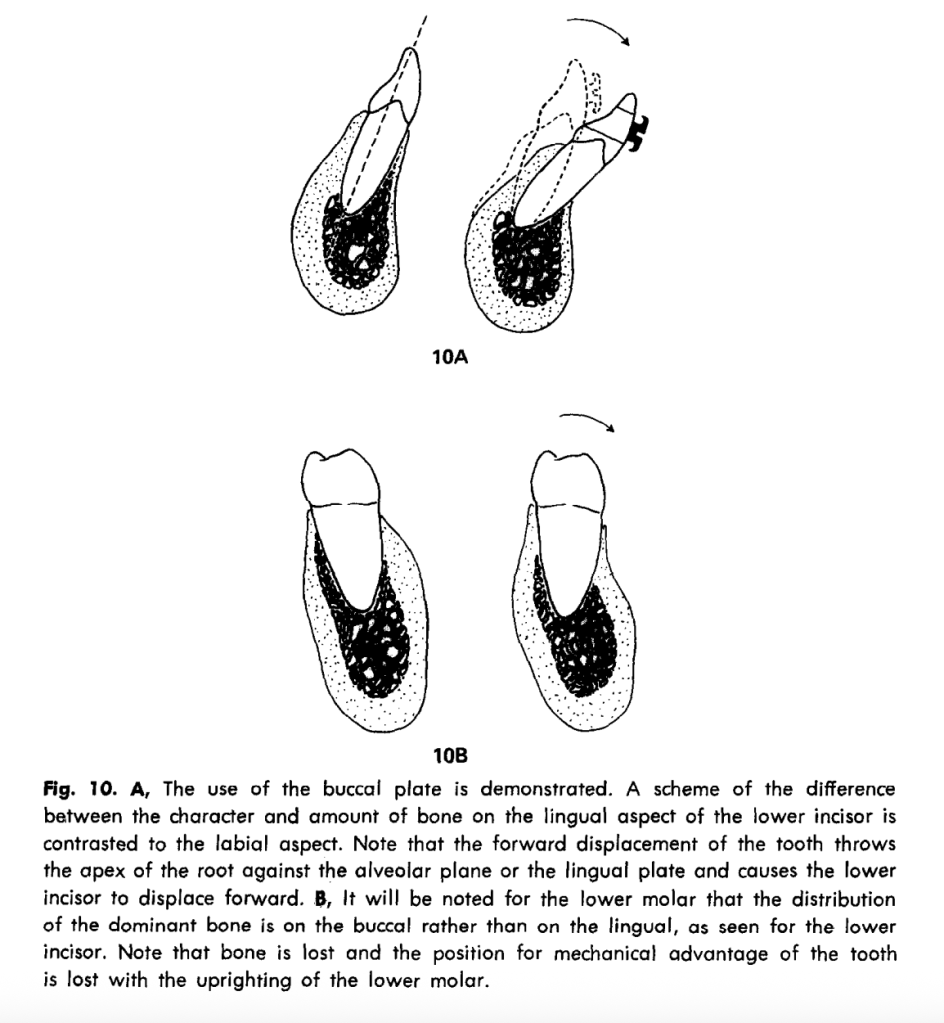
The author’s main criticism of older systems is that round-wire leveling and heavy intermaxillary mechanics often caused unwanted tooth movement, especially forward tipping of lower incisors and extrusion of molars. He links these problems to cortical bone resistance and shows that orthodontic movement is not just about moving teeth through cancellous bone; the compact bone plates matter greatly
Force and biology
Concept
Exam point
Light forces
Favored for biologic efficiency and reduced tissue damage
Optimal force range
Storey and Smith’s canine retraction work is cited as supporting 150–300 g for translatory retraction
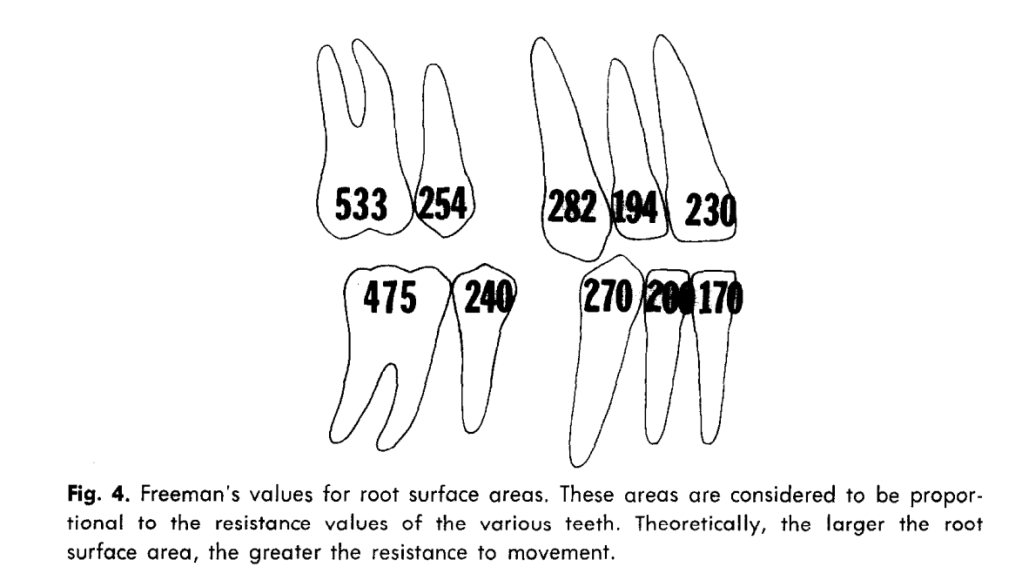
Pressure concept
Force should be considered relative to root surface area and tissue response
Cortical bone
Lower incisors and molars behave differently because bone support differs by site
Appliance logic
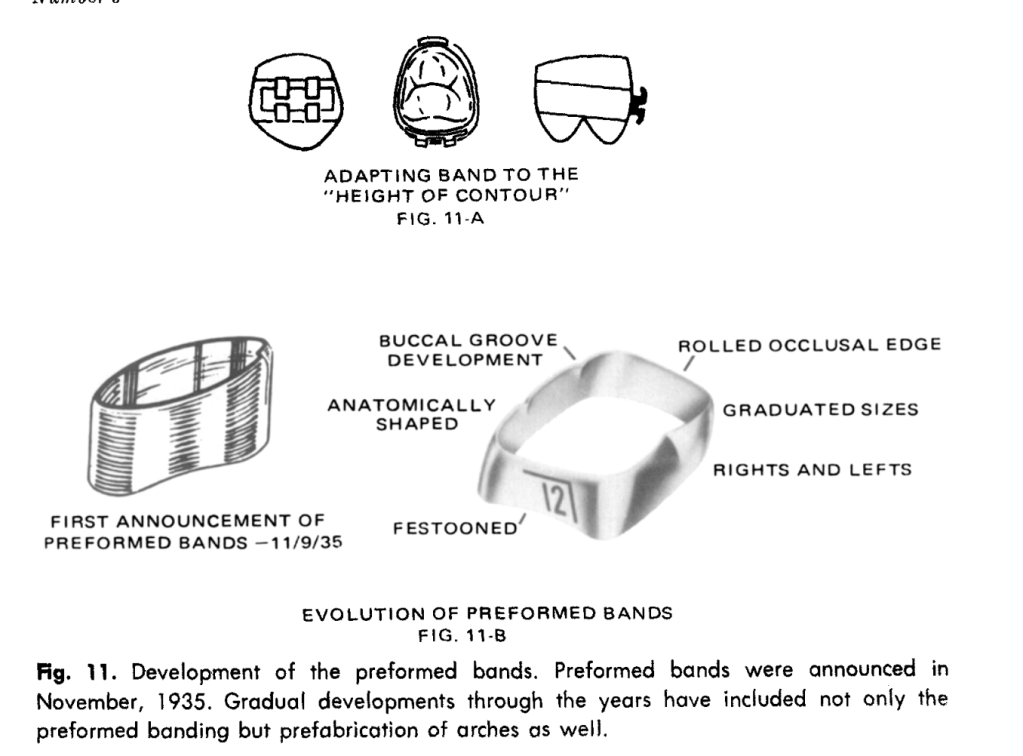
Bioprogressive therapy uses a prefabricated system with bands, brackets, and arch forms designed in advance, reducing chairside bending and standardizing control. Ricketts’ philosophy is that the appliance should do more of the work, while the clinician still retains control through selective adjustments and overtreatment where needed.
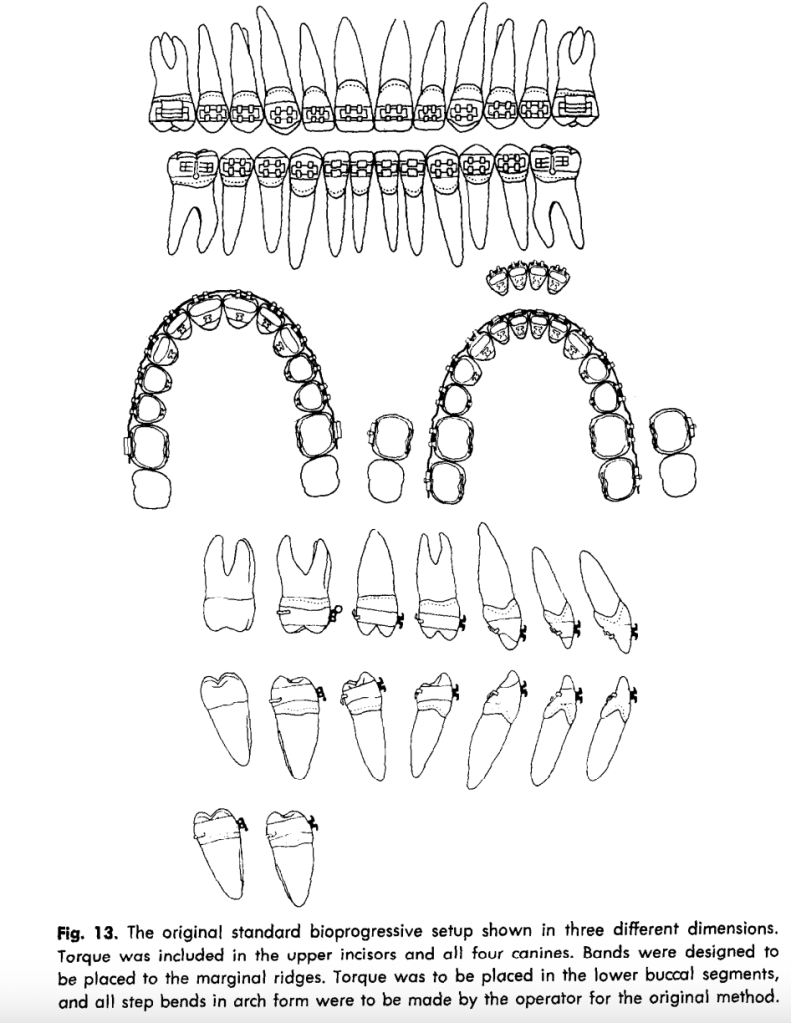
Three bioprogressive setups
Setup
Main design idea
Best use
Standard bioprogressive
Torque built into upper incisors and canines; lower torque largely managed in wire
General cases and balanced control
Full-torque bioprogressive
Adds lower posterior torque to the standard setup
Cases needing more complete torque control
Triple-control bioprogressive
Adds step-outs/step-ins and more overtreatment of rotations and posterior segments
Cases needing maximal built-in control and less wire bending
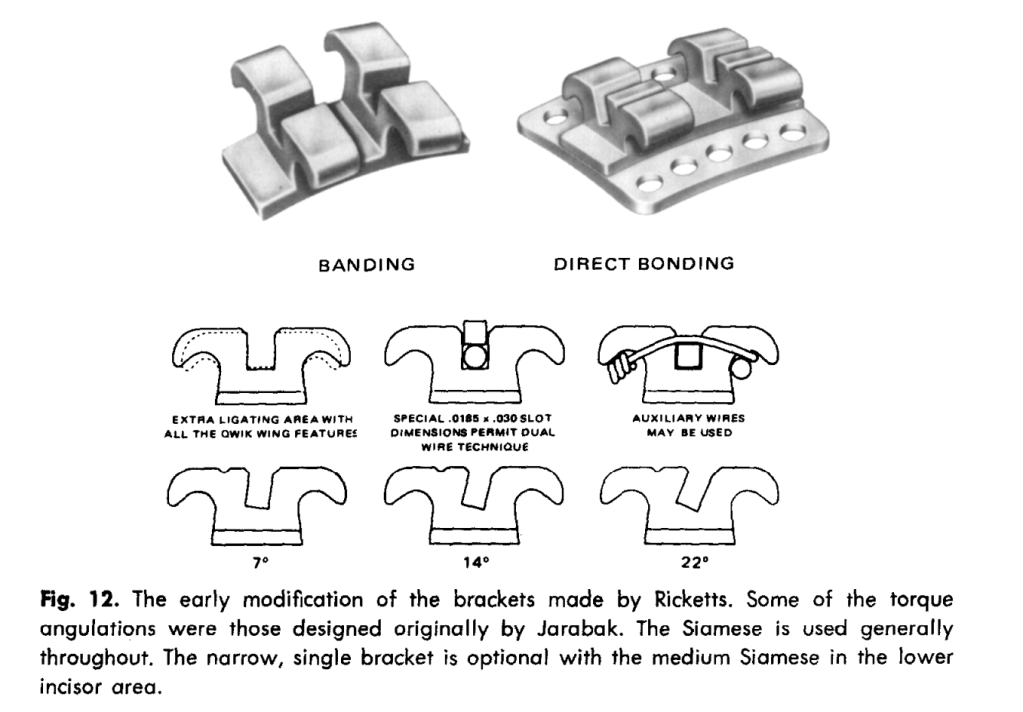
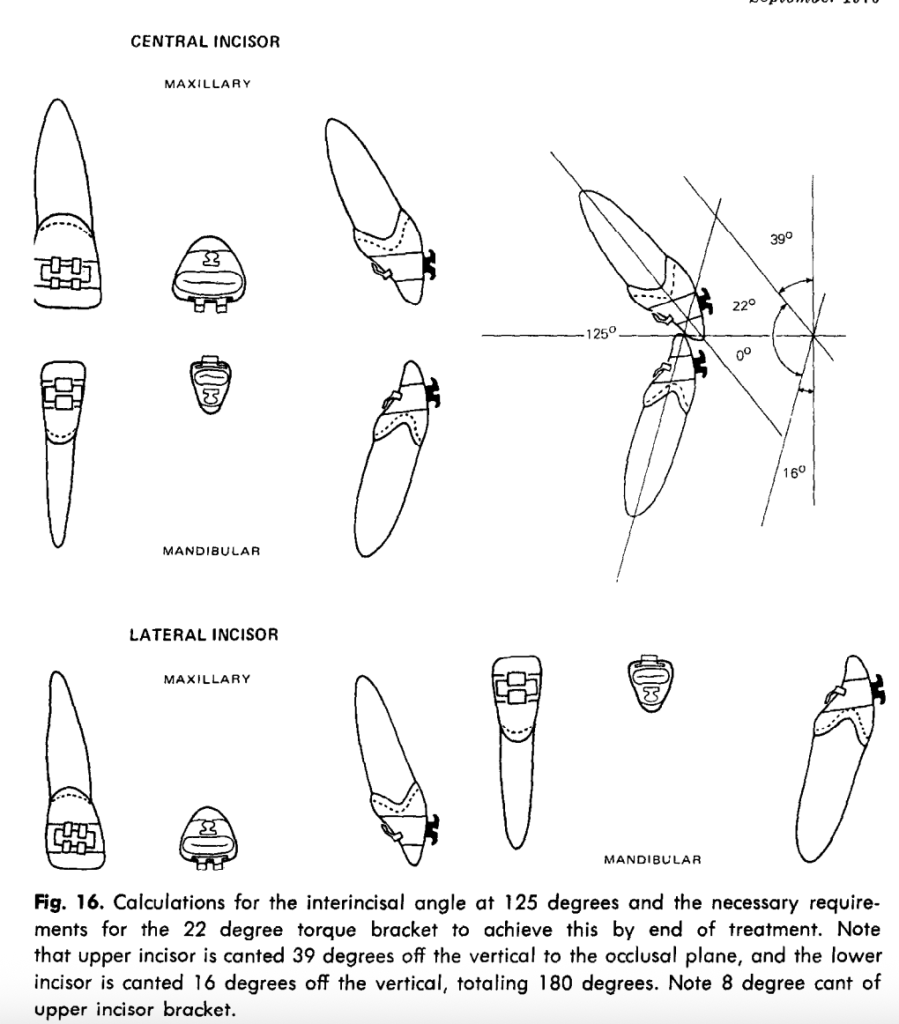
Bracket prescriptions
Tooth group
Prescription emphasized in the paper
Upper central incisors
22 degrees root to palatal
Upper lateral incisors
14 degrees root to palatal, 8 degrees tip down distally
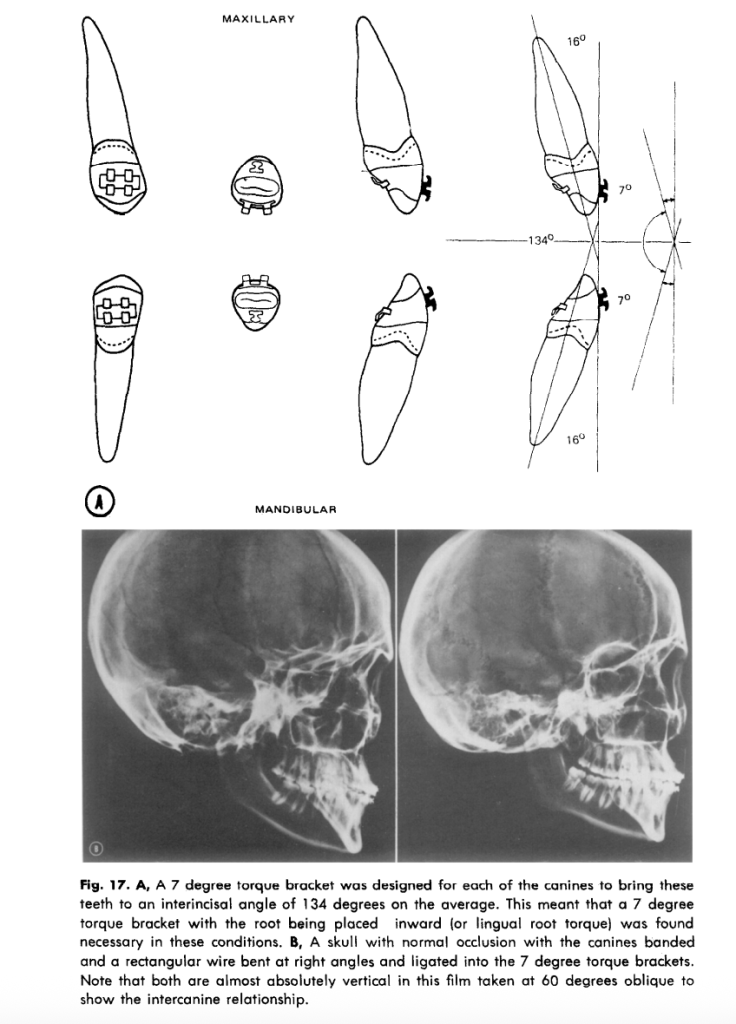
Upper canines
7 degrees root to palatal, 5 degrees tip down distally
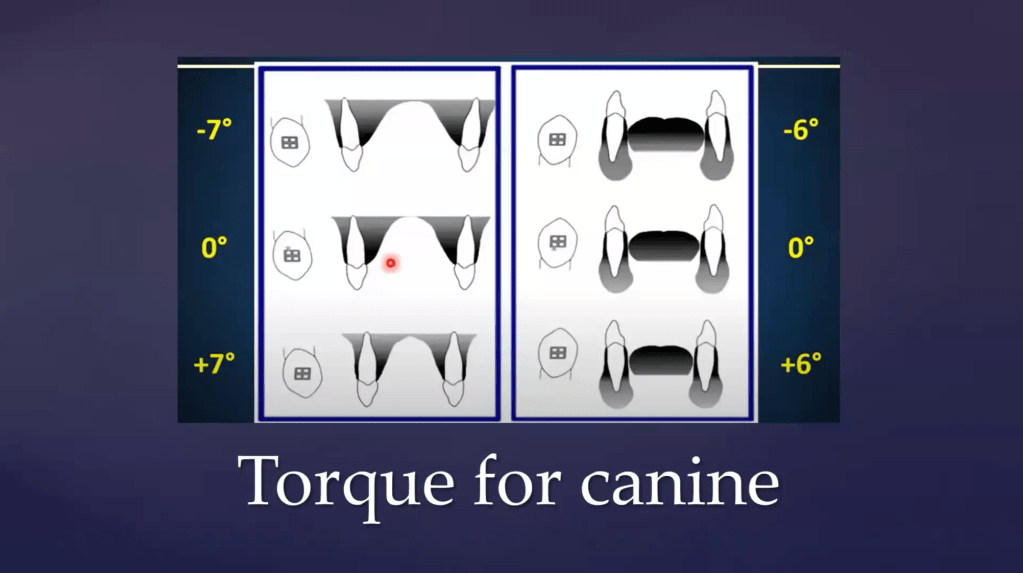
Lower canines
7 degrees root to lingual, 5 degrees tip down distally
Lower second premolars
14 degrees root to buccal in full-torque and triple-control setups
Lower first molars
22 degrees root to buccal in full-torque and triple-control setups
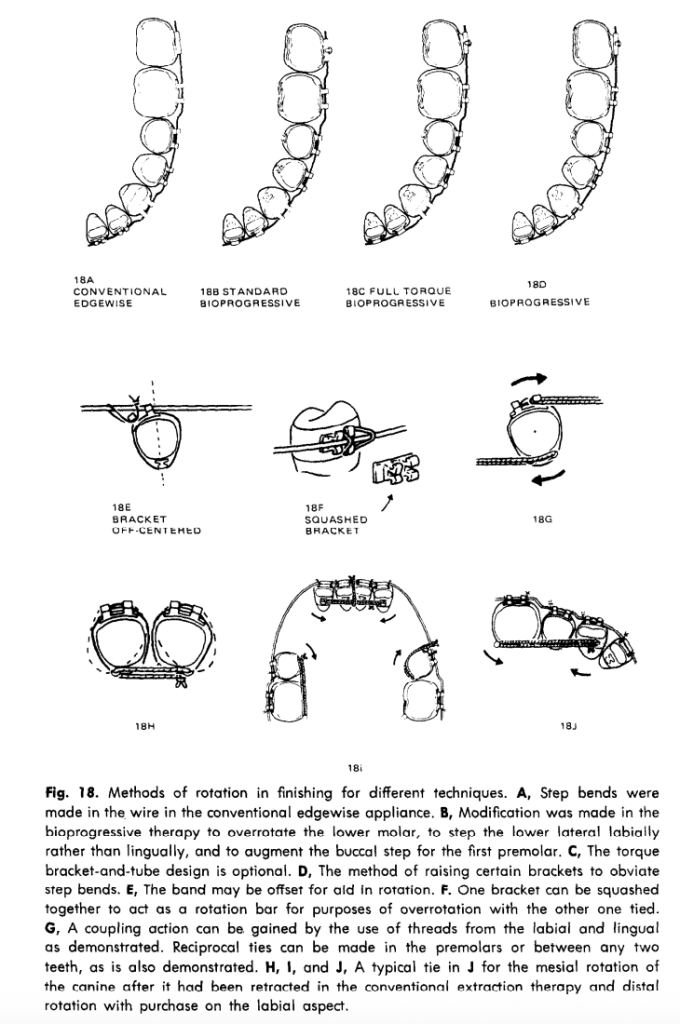
Rotation and step control
Ricketts treats rotation as an essential part of first-order control and provides multiple methods to overcorrect or maintain rotation without excessive archwire complexity. These include off-centering the band, squashing a bracket, reciprocal ties, and lingual cleats, showing that the system is flexible rather than purely “straight wire.”
Second molars and anchorage
Second molars are not automatically banded in every case, especially upper second molars, because they may erupt into better function later and can complicate treatment if included too early. Lower second molars, however, are usually important for anchorage and proper arch development, and the system is designed to accommodate them without full rebanding.
Viva-style one-liners
Bioprogressive therapy is a biologically oriented evolution of edgewise mechanics.
Its philosophy is light force, preformed components, and anchorage preservation.
Ricketts strongly emphasizes cortical bone and regional tooth behavior.
The system reduces chairside bending by using standardized bands, brackets, and arches.
Standard, full-torque, and triple-control are the three major setups described in Part I
The first kind enters the mouth like it’s invading a small country.
Heavy wires. Heavy forces. Heavy drama.
The second kind walks in quietly, carrying a 0.016″ Australian wire and the confidence of a man who has studied Stone Age skulls for fun.
That was Percy Raymond Begg.
And honestly? Orthodontics has never fully recovered.
Because Begg didn’t just invent a technique. He started a rebellion against brute-force orthodontics.
His differential force method whispered something radical:
“Maybe teeth move better when we stop attacking them.”
Groundbreaking.
The Philosophy Behind Begg Mechanics
Most orthodontists looked at crowded teeth and thought:
“Push harder.”
Begg looked at ancient Australian Aboriginal dentitions and thought:
“Wait… these people had edge-to-edge bites, massive attrition, minimal crowding, and functional stability. What if nature already solved this?”
That observation changed everything.
Instead of forcing rigid bodily movement with heavy rectangular wires, Begg used:
Light continuous forces
Free tipping mechanics
Differential force distribution
Simulated physiologic attrition
Minimal friction
Biological tolerance
In short:
The edgewise appliance behaved like a strict military school.
Begg mechanics behaved like jazz.
Why Is It Called “Differential Force”?
Because not all teeth deserve equal suffering.
A molar has giant roots and excellent anchorage.
An incisor has the root surface area of a stressed intern.
So why apply the same force to both?
Begg’s answer was elegant: Use light resilient wires that naturally deliver smaller forces to anterior teeth and relatively greater anchorage resistance posteriorly.
The Core Philosophy of Begg Technique
Principle
What It Means Clinically
Light forces
Less pain, less tissue damage
Free crown tipping
Faster alignment
Differential force
Small-rooted teeth move easily
Simulated attrition
Extraction/IPR compensates for absent wear
Continuous force
Long activation with fewer visits
Root correction later
Stage III handles torque/uprighting
Anchor molar control
Prevents anchorage loss
The Appliance Design: Tiny Brackets, Big Personality
Begg brackets look deceptively simple.
Which is exactly why edgewise-trained orthodontists underestimate them.
The modified ribbon-arch bracket was intentionally designed to allow:
Free tipping
Minimal friction
Sliding mechanics
Efficient elastic traction
Meanwhile the wire?
Australian stainless steel wire.
The Beyoncé of orthodontic wires.
Flexible. Resilient. Dramatic when activated.
The Three Stages of Begg Therapy
Begg treatment is beautifully organized.
Like a three-act movie where every tooth has character development.
The Three Stages of Begg Mechanotherapy
Stage
Main Goal
Key Wire
Signature Mechanics
Stage I
Alignment + bite opening
0.016″ round wire
Anchor bends, tipping
Stage II
Space closure
0.020″ passive wire
Class II/III elastics
Stage III
Root paralleling
0.020″ rigid base wire
Uprighting springs, torque auxiliaries
Stage I: Controlled Chaos
This is where Begg mechanics become entertaining.
The teeth tip freely.
Crowding unravels rapidly.
Deep bites open dramatically.
And edgewise orthodontists watching nearby start sweating.
The goal of Stage I is simple:
Get the teeth into an edge-to-edge relationship while maintaining molar anchorage.
Stage I Objectives
Objective
Mechanics Used
Eliminate overbite
Anchor bends
Align incisors
Light round wire
Correct rotations
Rotating springs
Correct AP discrepancy
Class II elastics
Coordinate arches
Continuous light mechanics
Maintain molar anchorage
Upright molars + anchor bends
The Famous Anchor Bend
Orthodontic residents learn about anchor bends the same way people learn taxes:
Slowly. Painfully. Against their will.
But the anchor bend is biomechanical genius.
It:
Opens the bite
Controls molars
Helps maintain anchorage
Allows anterior depression
Tiny bend. Massive consequences.
Rotating Springs: Tiny Orthodontic Chaos Goblins
Begg rotating springs are wonderfully aggressive little creatures.
Their entire purpose is:
“You rotated? Excellent. Rotate more.”
Because Begg philosophy believes in overcorrection.
A tooth corrected to “perfect” usually relapses.
A tooth corrected beyond perfect becomes stable.
Orthodontics is apparently emotionally unavailable like that.
Stage II: Space Closure Without Panic
Now comes the elegant part.
Instead of dragging teeth through rigid friction-heavy mechanics, Begg used:
Passive heavy wires
Interarch elastics
Sliding mechanics
Differential force distribution
And suddenly extraction spaces begin closing efficiently.
Stage II Mechanics
Goal
Appliance Feature
Maintain corrections
Passive 0.020″ wire
Close spaces
Elastics
AP correction
Class II/Class III elastics
Preserve overcorrection
Bayonet bends
Control canine-premolar relation
Sliding mechanics
The Begg Philosophy on Anchorage
Most techniques:
“Protect anchorage with rigidity.”
Begg:
“Protect anchorage biologically.”
Molars remain upright.
Anterior teeth tip freely.
Forces remain light.
And because the wire slides instead of binds, movement becomes efficient.
It’s less: “Hold the fort!”
More: “Let physics do the paperwork.”
Stage III: The Redemption Arc
Critics loved saying:
“Begg only tips teeth.”
And Begg responded:
“Please continue reading until Stage III.”
Because Stage III is where roots get disciplined.
This stage includes:
Root paralleling
Torque correction
Axial inclination control
Finishing and detailing
Stage III Auxiliaries
Auxiliary
Purpose
Uprighting spring
Mesiodistal root movement
Torquing auxiliary
Labiolingual root correction
Spring pins
Controlled uprighting
Heavy base wire
Stabilization
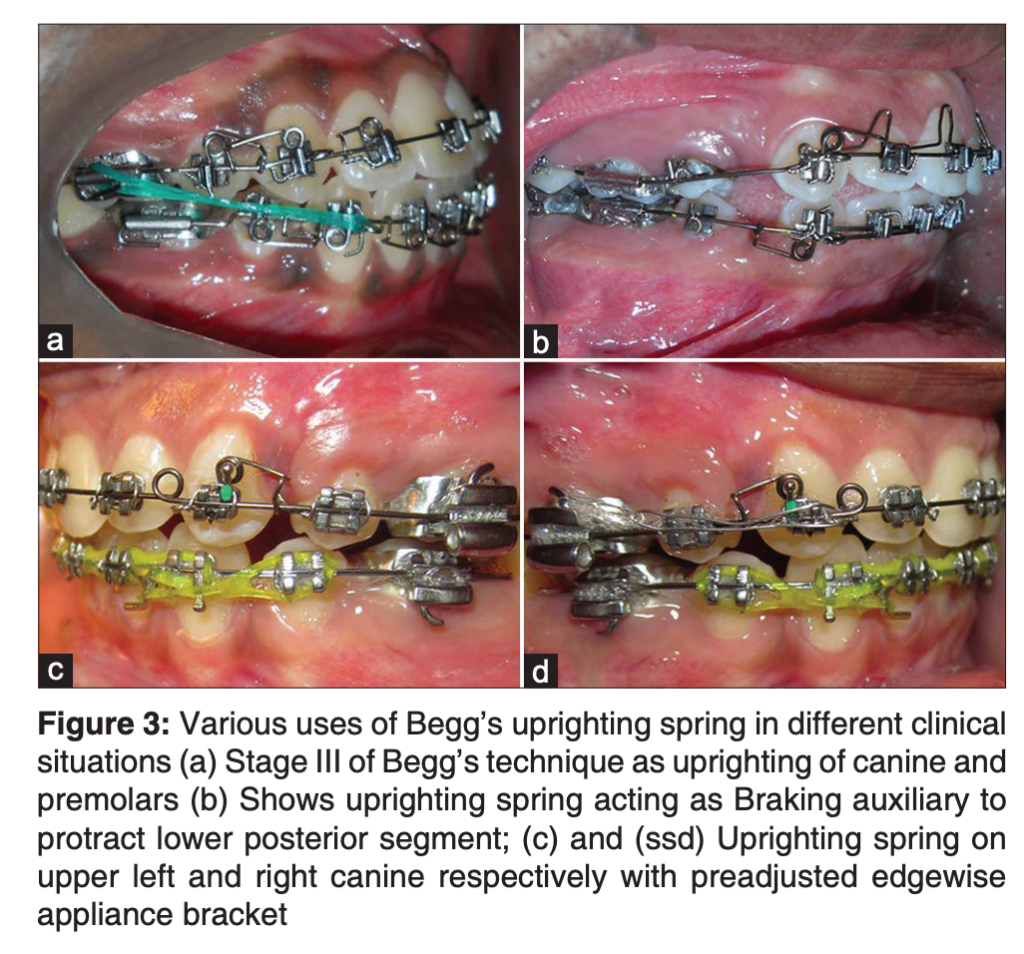
The Legendary Uprighting Spring
The Begg uprighting spring deserves its own Netflix documentary.
Tiny wire.
Tiny coil.
Terrifyingly effective.
Viva Essentials for Uprighting Springs
Feature
Value
Coil turns
2½
Angle
135°
Coil index
6:1
Wire
Usually 0.009″ Australian wire
Stage used
Stage III
Why Patients Loved Begg Therapy
Imagine being treated in the era of heavy edgewise appliances…
…and then suddenly someone offers:
Less pain
Fewer visits
Faster alignment
Better comfort
Long activation intervals
Begg mechanics felt futuristic.
Appointments could be 6–8 weeks apart because Australian wire remained active for long durations.
Residents today panic if aligners aren’t changed every 7 days.
Begg was casually activating wires for months.
Advantages of Begg Technique
Advantage
Why It Happens
Faster alignment
Free tipping
Reduced pain
Light forces
Less root resorption
Biologic force levels
Better anchorage control
Differential mechanics
Fewer appointments
Long-acting resilient wires
Efficient bite opening
Anchor bend mechanics
Excellent stability
Overcorrection philosophy
But Yes… It Had Disadvantages
No orthodontic technique escapes criticism.
Not even the ones worshipped in postgraduate seminars.
Disadvantages of Begg Technique
Limitation
Reason
Initial tipping
Root correction delayed
High elastic dependence
Requires compliance
Technique sensitive
Auxiliary fabrication important
Finishing difficult
Torque control complex
Less esthetic
Visible springs and auxiliaries
The Stone Age Theory That Changed Orthodontics
Begg’s biggest contribution may not have been the appliance.
It was the idea that modern malocclusion exists partly because civilized humans stopped wearing their teeth down.
Stone Age humans had:
Attrition
Mesial migration
Edge-to-edge bites
Less crowding
Functional occlusion
Modern humans?
Soft diets
Deep bites
Crowding
Impacted molars
Orthodontic loans
Progress is complicated.
Stone Age Occlusion vs Civilized Occlusion
Feature
Stone Age Dentition
Modern Dentition
Attrition
Heavy
Minimal
Overbite
Edge-to-edge
Deep
Crowding
Rare
Common
Mesial migration
Compensated
Causes irregularity
Tooth wear
Physiologic
Absent
Occlusal stability
High
Relapse tendency
Viva Pearls Every PG Should Know
Viva Question
One-Line Answer
Why “differential force”?
Different teeth receive different effective forces
Hallmark of Stage I?
Free tipping
Which stage closes spaces?
Stage II
Which stage corrects roots?
Stage III
Why light forces?
Biologic tolerance
Why overcorrect rotations?
High relapse tendency
Most iconic auxiliary?
Uprighting spring
Why Australian wire?
High resiliency
Stability secret?
End-on bite + overcorrection
Final Thoughts
Begg mechanics reminds us of something modern orthodontics occasionally forgets:
Teeth are biologic structures.
Not furniture.
The brilliance of Begg wasn’t that he moved teeth faster.
It was that he understood why teeth wanted to move in the first place.
And honestly, there’s something deeply satisfying about a technique built on:
anthropology,
biomechanics,
light forces,
and mild disrespect for heavy edgewise wires.
Somewhere in an orthodontic department drawer right now, there’s an old Begg plier waiting patiently beside a dusty spool of Australian wire.
Somewhere in every orthodontic department, there’s a forgotten drawer. Inside? Old Begg pliers, Australian wire, random elastomeric chains—and one underrated genius of biomechanics: the Begg’s uprighting spring.
Modern orthodontics loves sleek prescriptions, digital setups, and aligner simulations. But when anchorage falters or teeth tip uncontrollably, this vintage auxiliary stages a silent comeback.
What Is It?
A light-wire auxiliary for mesiodistal root uprighting, anchorage reinforcement, controlled movement, and braking during space closure. Born in Percy Raymond Begg’s differential force technique, it now aids preadjusted edgewise systems with vertical slots.
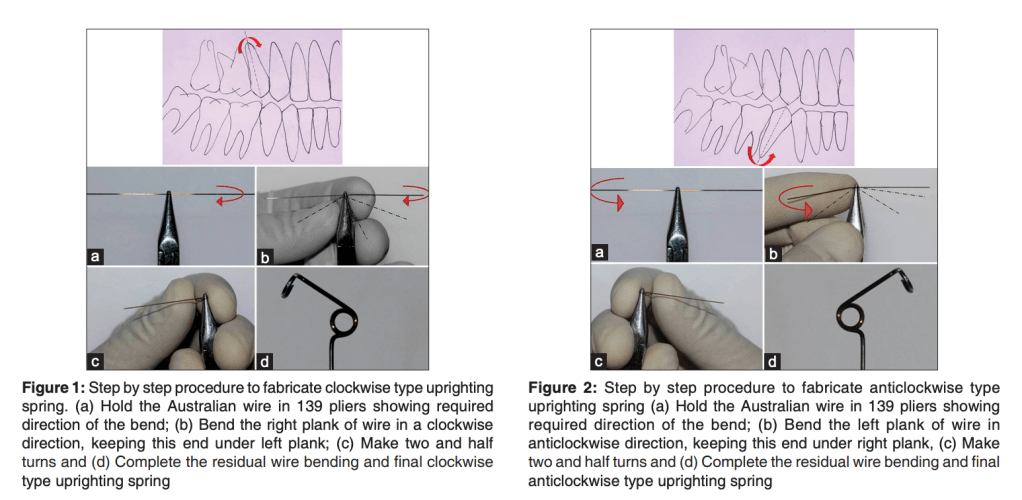
Core Principle: Moments Matter
Decide root movement first—clockwise or anticlockwise. This sets coil direction for precise moments.
Desired Movement
Spring Type
Clockwise uprighting
Clockwise coil
Anticlockwise uprighting
Anticlockwise coil
Fabrication Essentials
Wire: 0.009″–0.018″ Australian for resilience and activation range.