Q1. What is finishing in orthodontics? Finishing is the final stage before debonding where teeth are positioned to achieve optimal stability, esthetics, function, and periodontal health.
Q2. How did McLaughlin define finishing? Correction of previous errors, overcorrection where required, and settling of occlusion.
Q3. What is detailing? Precise 3D positioning of individual teeth involving tip, torque, in-out, and rotational corrections.
Q4. Finishing vs detailing? Finishing is overall occlusal optimization; detailing is individual tooth refinement.
🔹 Concepts in Finishing
Q5. What is arch-bound condition? A situation where stiff rectangular wires prevent complete seating of teeth into ideal occlusion due to limited play.
Q6. Why is settling required? Because rigid wires prevent complete intercuspation; settling allows final occlusal seating.
Q7. Methods of settling?
Light round wires + vertical elastics
Posterior wire removal + vertical elastics
Tooth positioner after debonding
🔹 Dougherty & Keys
Q8. Who proposed finishing factors and when? Dougherty, 1976 (USC lecture series).
Q9. Mention Dougherty factors.
Think in 4 clusters:
1. Skeletal & AP
AP correction + overcorrection
Cephalometric goals
Profile evaluation
2. Tooth Position
Tip
Torque
Rotations
Root parallelism
3. Arch & Occlusion
Arch form/width
Interdigitation
Marginal ridges
Occlusal plane
4. Functional & Stability
Midlines
Space closure
TMJ function
Habits
Q10. What are Andrews’ six keys?
Interarch relationship
Crown angulation
Crown inclination
No rotations
Tight contacts
Curve of Spee
Q11. What is the seventh key? Tooth size proportion (Bolton analysis, 91.3%).
🔹 ABO & Evaluation
Q12. When were ABO goals established? June 2012.
Q13. How does ABO evaluate finishing? Using grading of study models and panoramic radiographs.
Q14. What are radiographic goals? Parallel roots and perpendicular to occlusal plane.
Q15. ABO model criteria?
Alignment
Marginal ridges
Buccolingual inclination
Occlusal contacts
Occlusal relationships
Overjet
Interproximal contacts
🔹 Overcorrection Concepts
Q16. Proffit’s view on overcorrection? 1–2 mm overcorrection to counter relapse.
Q17. Zachrisson’s recommendation? ~10% overcorrection for rotations/displacements.
Q18. McLaughlin protocol in Class II? End-to-end overcorrection + nighttime elastics → settle to Class I.
🔹 Root & Torque Concepts
Q19. What is Raleigh Williams key? Lower incisor apices should diverge distally; canine apex distal to crown.
Q20. What is rolling-in? Inward inclination of mandibular posteriors affecting interdigitation.
Q21. How is rolling-in corrected?
Upper: Buccal root torque
Lower: Lingual root torque
🔹 Archform & Records
Q22. Components of arch form?
Anterior curvature
Intercanine width
Posterior curvature
Intermolar width
Q23. Pre-finishing records?
OPG
Lateral ceph
Photographs
Study models
🔹 Cephalometric Evaluation
Q24. When is pre-debonding ceph taken? 3–4 months before debonding.
Q25. What parameters are assessed?
Soft tissue profile
Incisor AP position
Incisor torque
Mandibular plane
Skeletal and dental corrections
🔹 Mechanics & Wires
Q26. Ideal wire for torque in finishing? 0.019×0.025 TMA in 0.022 slot 0.017×0.025 TMA in 0.018 slot
Q27. Why TMA? Flexible with good torque expression.
🔹 Clinical Procedures
Q28. What is serpentine wiring? Ligature wiring from premolar to premolar after removing archwire to aid settling.
Q29. Indications of positioner?
Retention
Minor corrections
Good compliance
Tongue habits
Begg finishing
Q30. Contraindication of positioner? Deep bite.
🔹 Micro-esthetics & Surgery
Q31. Micro-esthetic procedures?
Gingival recontouring
Tooth reshaping
Q32. What is CSF (Edwards procedure)? Circumferential supracrestal fibrotomy to prevent rotational relapse.
🔹 Rapid Fire (Exam Finishers)
Q33. Most important goal of finishing? Stable, functional, esthetic occlusion.
Q34. Most common finishing error? Poor root parallelism.
Q35. Key to stability? Proper overcorrection + root positioning.
Q36. Most important ABO parameter? Root angulation.
Raymond P. Begg — Australian orthodontist; favourite student of Edward H. Angle
Trained under Angle using the edgewise appliance
Returned to Australia → patients came from very far away → wanted to see patients once every 6 weeks → needed a simple, low-compliance, efficient appliance
Developed the Light Wire Differential Force Technique (also called Begg technique)
Worked alongside AJ Wilcock, an Australian metallurgist, who designed the high-tensile wire specifically for Begg
Begg was NOT a self-promoter — no marketing, worked quietly → it was Kesling who propagated his work more than Begg himself
Why Begg Broke Away from Angle
Angle’s Philosophy
Begg’s New Philosophy
Non-extraction in ALL cases
Extraction when indicated
Occlusion-based treatment planning
Soft tissue profile + occlusion considered
Bodily movement (edgewise)
Uncontrolled tipping → then uprighting
High anchorage demand → headgear
Low anchorage demand → no headgear needed
Heavy rectangular wires
Light round wires (AJ Wilcock)
Key insight: Both Begg AND Tweed (also Angle students) observed massive relapse in non-extraction cases → jaws couldn’t accommodate all teeth → independently concluded extraction was necessary
PART 2: TWO THEORIES — PHILOSOPHICAL BACKBONE
Theory 1: Theory of Attritional Occlusion
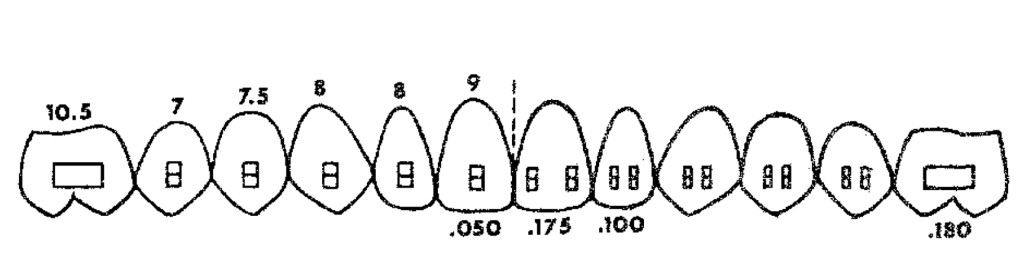
STONE AGE MAN
     │
     ├── Diet: Coarse food (bones, raw meat, grain)
     ├── Proximal attrition → 10.56 mm reduction/arch
     ├── Occlusal attrition → vertical dimension decreases
     └── Result: Space created for all 32 teeth including 3rd molars
               → Perfect alignment → No crowding

CIVILIZED MAN (Today)
     │
     ├── Diet: Soft, refined, melt-in-mouth food
     ├── No proximal attrition → no space gained
     ├── No occlusal attrition
     └── Result: Crowding → 3rd molar impaction → malocclusion
               = "Disease of Civilization"
               (like diabetes, hypertension)
NACF (Natural Anterior Component of Force):
Hereditary tendency for teeth to drift anteriorly
In Stone Age man: NACF + proximal attrition = accommodated 3rd molars
In modern man: NACF present but no attrition → crowding
NACF + continued eruption in absence of attrition → basis of Begg’s extraction philosophy
Begg’s quote:“When in doubt, extract” (Note: this is NOT followed in contemporary practice — we now use continuing diagnosis)
Sir’s clinical observation: Even second molars are now getting impacted — the same phenomenon Begg described is worsening generation by generation due to increasingly soft diets.
Theory 2: Theory of Differential Force (Storey & Smith)
⚠️ Exam trap: Experiment used edgewise brackets (NOT Begg brackets) and studied canine retraction ONLY (NOT entire anterior segment)
Force Applied
Effect on Canine
Effect on Molar
Outcome
Light (150–200g)
Optimal → Frontal resorption → Steady movement
Sub-optimal → Does NOT move
✅ Retraction + Anchorage preserved
Heavy (>200g)
Supra-optimal → Hyalinization → Lag phase → Sudden dump
Optimal → Molar PROTRACTS
❌ Anchorage LOST
Why this happens:
Ideal orthodontic force = 22–26 g/cm² of root surface area(must say “per cm²” for full marks)
Canine root area = small → 150–200g = OPTIMAL → frontal resorption → steady movement
Molar root area = large → 150–200g = SUB-OPTIMAL → no movement
Heavy force on canine → Hyalinization (avascular necrotic zone) → Undermining resorption (osteoclasts tunnel from adjacent bone) → Lag phase → sudden movement dump
Simultaneously heavy force on molar = OPTIMAL → molar protracts → anchorage LOST → “dishing in” of profile
PART 3: BEGG APPLIANCE — THREE KEY COMPONENTS
Component
Details
Function
Ribbonwise bracket (inverted Angle bracket)
Wire enters from gingival side, NOT occlusal side
Permits uncontrolled tipping in BOTH mesiodistal AND buccolingual planes
AJ Wilcock high-tensile wire
Zero stress relaxation; light force maintained for 6 weeks
Light, constant, lasting force — precursor to HANT wires
Round molar tube (0.022″)
Free sliding; double back bend pre-built in; two-point contact with round wire
Anchorage preservation + free anterior sliding
Ribbonwise Bracket — Orientation
ANGLE'S EDGEWISE BRACKET (original):
Wire enters from OCCLUSAL side
Slot: 0.022" × 0.028" rectangular
→ Bodily movement
→ High anchorage demand

BEGG BRACKET (inverted):
Wire enters from GINGIVAL side
Wide open slot → 0.022" round wire
→ Uncontrolled tipping freely in:
   ├── Mesiodistal plane (crown goes distal, root mesial)
   └── Buccolingual plane (crown goes labial/lingual freely)
→ Low anchorage demand ✓
→ Single point contact in both planes
→ EXCEPT for rotation: Two-point contact (wire touches base + bracket → generates couple)
Round Molar Tube — Two-Point Contact
ROUND WIRE IN ROUND TUBE:

        ┌───────────────────────┐
        │ ·                   · │ ← Two-point contact
        └───────────────────────┘
        Mesial end           Distal end

Two-point contact → COUPLE formed
Couple → aims at BODILY MOVEMENT of molar
Molar does NOT tip mesially → Anchorage preserved
Simultaneously: Wire slides FREELY anteriorly
→ Canine/anterior retraction with low friction ✓

BUT: Round wire in round tube = NO buccolingual control
→ In 5-extraction cases needing B-L molar control:
   → Use DOUBLE BACK BEND in oval tube
AJ Wilcock Wire — Properties & Comparison
Property
AJ Wilcock Wire
Heat-Activated NiTi (Modern)
Made by
AJ Wilcock (metallurgist)
Various manufacturers
Material
High-tensile stainless steel
Nickel-titanium
Stress relaxation
Zero
Very low
Force at 6-week recall
Same as day of placement
Near same
Historical significance
Precursor to all light-force wires
Modern equivalent
Recall interval
6 weeks
6–8 weeks
PART 4: CLASSIFICATION OF BEGG TECHNIQUE
BEGG TECHNIQUE
      │
      ├── CONVENTIONAL / TRADITIONAL BEGG
      │   ├── Ribbonwise bracket (original Begg bracket)
      │   ├── AJ Wilcock wire
      │   ├── Original 3-stage philosophy
      │   └── Propagated by: Kesling, Fletcher, Viazis
      │
      ├── MODIFIED BEGG
      │   ├── SAME philosophy as conventional
      │   ├── DIFFERENT bracket (NOT ribbonwise)
      │   └── Brackets: PAGE bracket, Chun Hoon bracket
      │
      └── REFINED BEGG (Dr. VP Jayade)
          ├── SAME Begg ribbonwise bracket
          ├── SAME basic Begg tenets
          ├── CHANGED mechanics
          ├── 10° and 5° offset incorporated into molar tube
          └── More emphasis on finishing
📖 Reference: Refined Begg — book by Dr. VP Jayade; Dr Manjunath Sir personally studied each page of this book with Dr. Jayade during PG training
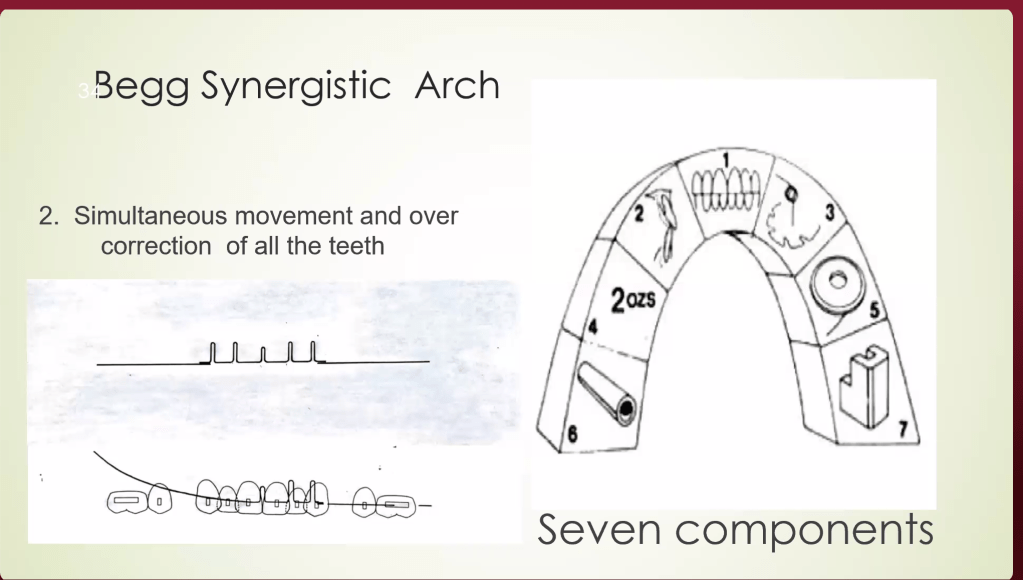
PART 5: BEGG SYNERGISTIC ARC (Kesling — 7 Components)
#
Component
Details
1
Diagnosis & Treatment Planning
Accounts for lack of attrition; extraction justified; overcorrection planned from start
2
Simultaneous movement
All teeth move at once (NOT sequential like standardized wire)
3
Simultaneous overcorrection
Both teeth AND jaws corrected simultaneously
4
Light intermaxillary elastics (IME)
Class II elastics used throughout treatment; light force
Permits uncontrolled tipping in B-L and M-D planes
7
AJ Wilcock wire
High-tensile; zero stress relaxation; light force
Begg separated crown-moving and root-moving forces into different stages → that’s why NO headgear, NO TPA was needed even in critical anchorage cases
PART 6: THREE STAGES OF BEGG TREATMENT
BEGG 3-STAGE TREATMENT FLOWCHART

┌──────────────────────────────────────────────────────────────┐
│                         STAGE 1                              │
│                  ALIGNMENT & LEVELING                        │
│                                                              │
│ Wire: AJ Wilcock 0.014" round                                │
│ Auxiliaries: Anchor bends, tip-back bends, Class II IME      │
│ Pin used: STAGE 1 PIN (more play → free tipping)             │
│ Wire type: MULTI-LOOP ARCH WIRE (MLAW) for crowded cases     │
│ Movement: Uncontrolled tipping (alignment)                   │
│ Anchorage: FRIENDLY — no anchorage taxation ✓                │
│ Deep bite: Anchor bend → intrusion anteriors                 │
└─────────────────────────┬────────────────────────────────────┘
                          │
                          ▼
┌──────────────────────────────────────────────────────────────┐
│                         STAGE 2                              │
│                     SPACE CLOSURE                            │
│                                                              │
│ Wire: AJ Wilcock 0.016" round                                │
│ Auxiliaries: Class II IME, space closure springs             │
│ Pin used: STAGE 2 PIN (moderate play)                        │
│ Movement: Uncontrolled DISTAL tipping of anterior crowns     │
│ Anchorage: STILL FRIENDLY ✓                                  │
│ Molar tube: Wire slides back freely; two-point contact       │
│             prevents mesial molar tipping                    │
└─────────────────────────┬────────────────────────────────────┘
                          │
                          ▼
┌──────────────────────────────────────────────────────────────┐
│                         STAGE 3                              │
│               TORQUING + UPRIGHTING (Root Movement)          │
│                                                              │
│ Wire: AJ Wilcock 0.020" round                                │
│ Auxiliaries: Torquing auxiliaries, uprighting springs        │
│              (passive BRAKING springs — thick wire gauge)    │
│ Pin used: STAGE 3 / HOOK PIN (minimal play → root control)   │
│ Movement: Controlled ROOT movement                           │
│ Crowns: HELD in place by braking springs                     │
│ Roots: Moved lingually/distally (torquing + uprighting)      │
│ ⚠️ ANCHORAGE CRITICAL HERE — root movement forces tend       │
│    to move crown labially → anchorage taxation               │
└──────────────────────────────────────────────────────────────┘
PART 7: ⭐ ANCHORAGE — CRITICAL PHASE COMPARISON (VIVA FAVOURITE)
Dr Manjunath Sir specifically called this a favourite VIVA question
Appliance
Anchorage Critical In
Reason
MBT / Straight Wire
Stage 1 — Alignment
Inbuilt mesial tip in all brackets (central, lateral, canine) → when full-size wire placed → mesial tipping → pulls molars mesially → anchorage loss → need TPA
Begg
Stage 3 — Torquing & Uprighting
Root movement forces → crown tends to move labially → anchorage taxation. Stages 1 & 2 are tipping against bodily movement of posteriors → anchorage FRIENDLY
PART 8: ⭐ BRAKING MECHANICS (MAJOR SECTION — EXAM IMPORTANT)
Braking = Preventing UNWANTED tooth movement to BUILD UP ANCHORAGE in the anterior segment
Braking in the Mesiodistal Plane:
SITUATION: Applying force for PROTRACTION of posteriors
Problem: Anterior crowns want to tip DISTALLY (unwanted)

SOLUTION: Uprighting spring on anterior teeth
          ↓
Crown pushed MESIALLY
Root goes distally
Crown does NOT move distally
          ↓
Posteriors come forward ✓
Anteriors are held (braked) ✓
Braking in the Buccolingual Plane:
SITUATION: Force applied → Begg bracket permits free tipping
Problem: Anterior crowns want to tip LINGUALLY (unwanted)

SOLUTION: Torquing auxiliary = PALATAL ROOT TORQUE (PRT)
          ↓
PRT → Labial crown torque
Crown does NOT go lingually
          ↓
Anteriors held (braked) in B-L plane ✓
Braking in Contemporary Straight Wire:
Problem
Solution
Lower anterior torque in MBT = –6° = crown lingual
Increase lingual root torque in 0.019 × 0.025 wire
Crown going distal during protraction
V-bend (Gable bend) next to canines → anterior = anchorage unit
Key: Gable bend next to canines → moment is higher on anterior segment → aims at bodily movement → anterior = anchorage unit
PART 9: ⭐ CONTEMPORARY PROTRACTION MECHANICS
Sir explained the full sequence for posterior protraction in contemporary practice:
STEP 1: Consolidation → Figure-of-8 ligation from 3 to 3 → Entire anterior root surface combined → Force applied on posteriors becomes SUBOPTIMAL for anteriors to move → Posteriors come forward, anteriors stay ✓
STEP 2: Wire Cylinderization (posterior segment) → Thin/round wire in posterior → Less friction → posteriors slide forward more easily
Sir’s teaching:“You should be biomechanically strong. Without TADs, without headgear, you can treat critical anchorage cases with correct biomechanics alone.”
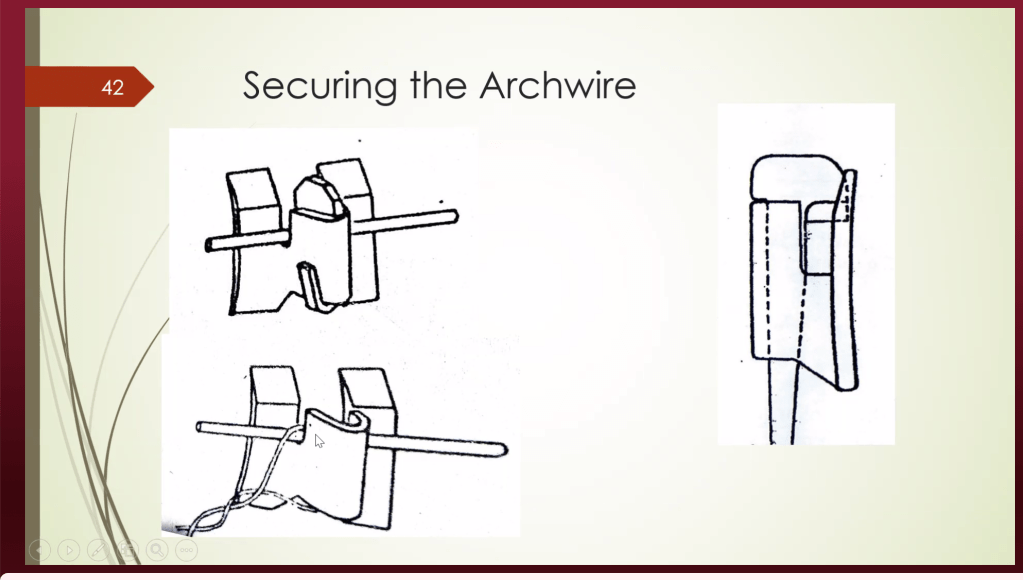
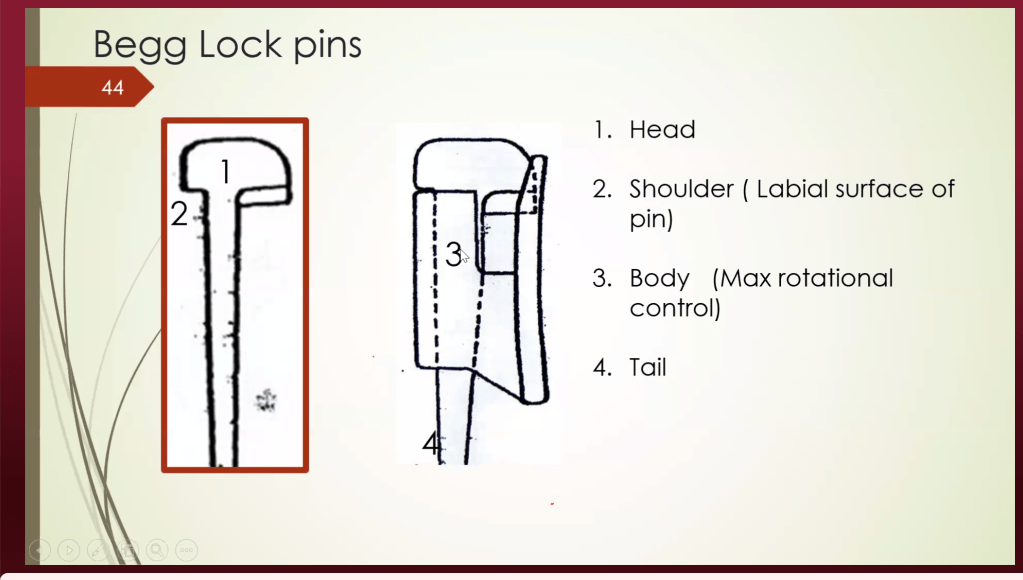
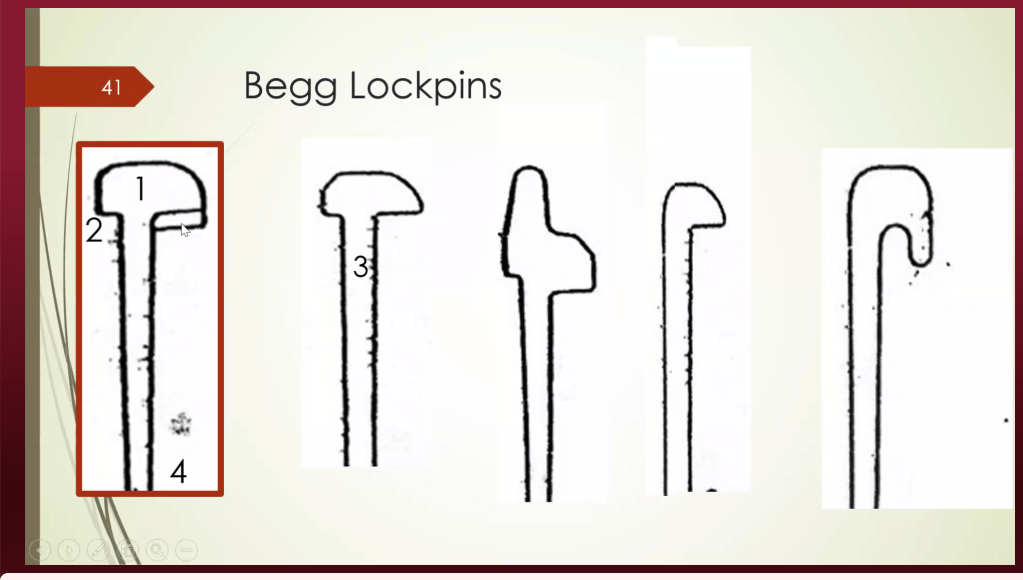
PART 10: BEGG BRACKETS — LOCK PINS (DETAILED)
The wire in the Begg bracket is held using brass lock pins, NOT ligature wires:
Root movement (torquing + uprighting); holds all corrections achieved in Stage 1 & 2
🔑 More play in pin → more tipping. Less play → more crown control → root movement.
PART 11: MULTI-LOOP ARCH WIRES (MLAW)
A unique Begg Stage 1 feature — used for severe crowding:
MLAW — MECHANISM:

Loops added into AJ Wilcock stainless steel wire
        │
        ├── Increases LENGTH of wire
        ├── Increases FLEXIBILITY in looped segment
        └── Rigid end → canine tipping/retraction
            Looped end → aligns crowded anteriors simultaneously

SIMULTANEOUS ACTIONS IN STAGE 1:
┌─────────────────────────────────────────┐
│ 1. Space creation (distal tip of canine)│
│ 2. Alignment of crowded anteriors       │
│ 3. Intrusion (deep bite correction)     │
│ 4. Derotation (bends incorporated)      │
└─────────────────────────────────────────┘

Contemporary equivalent:
Rigid sectional wire on anchor segment +
Flexible sectional wire on crowded segment
→ Same simultaneous correction principle
PART 12: ANCHOR BEND = GABLE BEND — BIOMECHANICAL PRINCIPLE
ANCHOR BEND (Begg) = GABLE BEND (Contemporary)

Examples:
• Anchor bend closer to MOLAR → Molar = anchorage → Intrusion of anteriors
• Gable bend next to CANINE → Anterior = anchorage → Safe for protraction
PART 13: TIP EDGE — BEGG’S MODERN EQUIVALENT
Tip Edge Appliance by Kesling = uses Differential Straight Wire Technique
Same philosophy as Begg: tipping first, then uprighting
Tip Edge bracket = Begg tipping freedom + edgewise finishing capability in ONE bracket
If you cannot practice conventional Begg in your college → learn Tip Edge → same biomechanical principles
PART 14: CLINICAL CASE — RELAPSE LESSON
Sir presented a 25-year-old female, non-extraction spacing case, relapsed after 4 years with space reopening lateral to lateral:
Causes of relapse:
Eruption / mesial drift of third molar → NACF → lower incisors procline → upper space reopens
Bolton’s discrepancy (smaller lateral incisors) → if retracted without build-up/IPR → relapse inevitable
Untreated soft tissue imbalance → profile not corrected → relapse
Retainer note: Sir does NOT give fixed retainer canine to canine (canine occlusion breaks it). Fixed retainer lateral to lateral + Hawley in upper arch.
Clinical pearl:“Always warn patients — maintain retainers until third molars have fully erupted or been extracted.”
PART 15: EXTRACTION vs. NON-EXTRACTION — CLINICAL DECISION MAKING
Sir’s clinical guidelines (from 23 years of experience):
The first kind enters the mouth like it’s invading a small country.
Heavy wires. Heavy forces. Heavy drama.
The second kind walks in quietly, carrying a 0.016″ Australian wire and the confidence of a man who has studied Stone Age skulls for fun.
That was Percy Raymond Begg.
And honestly? Orthodontics has never fully recovered.
Because Begg didn’t just invent a technique. He started a rebellion against brute-force orthodontics.
His differential force method whispered something radical:
“Maybe teeth move better when we stop attacking them.”
Groundbreaking.
The Philosophy Behind Begg Mechanics
Most orthodontists looked at crowded teeth and thought:
“Push harder.”
Begg looked at ancient Australian Aboriginal dentitions and thought:
“Wait… these people had edge-to-edge bites, massive attrition, minimal crowding, and functional stability. What if nature already solved this?”
That observation changed everything.
Instead of forcing rigid bodily movement with heavy rectangular wires, Begg used:
Light continuous forces
Free tipping mechanics
Differential force distribution
Simulated physiologic attrition
Minimal friction
Biological tolerance
In short:
The edgewise appliance behaved like a strict military school.
Begg mechanics behaved like jazz.
Why Is It Called “Differential Force”?
Because not all teeth deserve equal suffering.
A molar has giant roots and excellent anchorage.
An incisor has the root surface area of a stressed intern.
So why apply the same force to both?
Begg’s answer was elegant: Use light resilient wires that naturally deliver smaller forces to anterior teeth and relatively greater anchorage resistance posteriorly.
The Core Philosophy of Begg Technique
Principle
What It Means Clinically
Light forces
Less pain, less tissue damage
Free crown tipping
Faster alignment
Differential force
Small-rooted teeth move easily
Simulated attrition
Extraction/IPR compensates for absent wear
Continuous force
Long activation with fewer visits
Root correction later
Stage III handles torque/uprighting
Anchor molar control
Prevents anchorage loss
The Appliance Design: Tiny Brackets, Big Personality
Begg brackets look deceptively simple.
Which is exactly why edgewise-trained orthodontists underestimate them.
The modified ribbon-arch bracket was intentionally designed to allow:
Free tipping
Minimal friction
Sliding mechanics
Efficient elastic traction
Meanwhile the wire?
Australian stainless steel wire.
The Beyoncé of orthodontic wires.
Flexible. Resilient. Dramatic when activated.
The Three Stages of Begg Therapy
Begg treatment is beautifully organized.
Like a three-act movie where every tooth has character development.
The Three Stages of Begg Mechanotherapy
Stage
Main Goal
Key Wire
Signature Mechanics
Stage I
Alignment + bite opening
0.016″ round wire
Anchor bends, tipping
Stage II
Space closure
0.020″ passive wire
Class II/III elastics
Stage III
Root paralleling
0.020″ rigid base wire
Uprighting springs, torque auxiliaries
Stage I: Controlled Chaos
This is where Begg mechanics become entertaining.
The teeth tip freely.
Crowding unravels rapidly.
Deep bites open dramatically.
And edgewise orthodontists watching nearby start sweating.
The goal of Stage I is simple:
Get the teeth into an edge-to-edge relationship while maintaining molar anchorage.
Stage I Objectives
Objective
Mechanics Used
Eliminate overbite
Anchor bends
Align incisors
Light round wire
Correct rotations
Rotating springs
Correct AP discrepancy
Class II elastics
Coordinate arches
Continuous light mechanics
Maintain molar anchorage
Upright molars + anchor bends
The Famous Anchor Bend
Orthodontic residents learn about anchor bends the same way people learn taxes:
Slowly. Painfully. Against their will.
But the anchor bend is biomechanical genius.
It:
Opens the bite
Controls molars
Helps maintain anchorage
Allows anterior depression
Tiny bend. Massive consequences.
Rotating Springs: Tiny Orthodontic Chaos Goblins
Begg rotating springs are wonderfully aggressive little creatures.
Their entire purpose is:
“You rotated? Excellent. Rotate more.”
Because Begg philosophy believes in overcorrection.
A tooth corrected to “perfect” usually relapses.
A tooth corrected beyond perfect becomes stable.
Orthodontics is apparently emotionally unavailable like that.
Stage II: Space Closure Without Panic
Now comes the elegant part.
Instead of dragging teeth through rigid friction-heavy mechanics, Begg used:
Passive heavy wires
Interarch elastics
Sliding mechanics
Differential force distribution
And suddenly extraction spaces begin closing efficiently.
Stage II Mechanics
Goal
Appliance Feature
Maintain corrections
Passive 0.020″ wire
Close spaces
Elastics
AP correction
Class II/Class III elastics
Preserve overcorrection
Bayonet bends
Control canine-premolar relation
Sliding mechanics
The Begg Philosophy on Anchorage
Most techniques:
“Protect anchorage with rigidity.”
Begg:
“Protect anchorage biologically.”
Molars remain upright.
Anterior teeth tip freely.
Forces remain light.
And because the wire slides instead of binds, movement becomes efficient.
It’s less: “Hold the fort!”
More: “Let physics do the paperwork.”
Stage III: The Redemption Arc
Critics loved saying:
“Begg only tips teeth.”
And Begg responded:
“Please continue reading until Stage III.”
Because Stage III is where roots get disciplined.
This stage includes:
Root paralleling
Torque correction
Axial inclination control
Finishing and detailing
Stage III Auxiliaries
Auxiliary
Purpose
Uprighting spring
Mesiodistal root movement
Torquing auxiliary
Labiolingual root correction
Spring pins
Controlled uprighting
Heavy base wire
Stabilization
The Legendary Uprighting Spring
The Begg uprighting spring deserves its own Netflix documentary.
Tiny wire.
Tiny coil.
Terrifyingly effective.
Viva Essentials for Uprighting Springs
Feature
Value
Coil turns
2½
Angle
135°
Coil index
6:1
Wire
Usually 0.009″ Australian wire
Stage used
Stage III
Why Patients Loved Begg Therapy
Imagine being treated in the era of heavy edgewise appliances…
…and then suddenly someone offers:
Less pain
Fewer visits
Faster alignment
Better comfort
Long activation intervals
Begg mechanics felt futuristic.
Appointments could be 6–8 weeks apart because Australian wire remained active for long durations.
Residents today panic if aligners aren’t changed every 7 days.
Begg was casually activating wires for months.
Advantages of Begg Technique
Advantage
Why It Happens
Faster alignment
Free tipping
Reduced pain
Light forces
Less root resorption
Biologic force levels
Better anchorage control
Differential mechanics
Fewer appointments
Long-acting resilient wires
Efficient bite opening
Anchor bend mechanics
Excellent stability
Overcorrection philosophy
But Yes… It Had Disadvantages
No orthodontic technique escapes criticism.
Not even the ones worshipped in postgraduate seminars.
Disadvantages of Begg Technique
Limitation
Reason
Initial tipping
Root correction delayed
High elastic dependence
Requires compliance
Technique sensitive
Auxiliary fabrication important
Finishing difficult
Torque control complex
Less esthetic
Visible springs and auxiliaries
The Stone Age Theory That Changed Orthodontics
Begg’s biggest contribution may not have been the appliance.
It was the idea that modern malocclusion exists partly because civilized humans stopped wearing their teeth down.
Stone Age humans had:
Attrition
Mesial migration
Edge-to-edge bites
Less crowding
Functional occlusion
Modern humans?
Soft diets
Deep bites
Crowding
Impacted molars
Orthodontic loans
Progress is complicated.
Stone Age Occlusion vs Civilized Occlusion
Feature
Stone Age Dentition
Modern Dentition
Attrition
Heavy
Minimal
Overbite
Edge-to-edge
Deep
Crowding
Rare
Common
Mesial migration
Compensated
Causes irregularity
Tooth wear
Physiologic
Absent
Occlusal stability
High
Relapse tendency
Viva Pearls Every PG Should Know
Viva Question
One-Line Answer
Why “differential force”?
Different teeth receive different effective forces
Hallmark of Stage I?
Free tipping
Which stage closes spaces?
Stage II
Which stage corrects roots?
Stage III
Why light forces?
Biologic tolerance
Why overcorrect rotations?
High relapse tendency
Most iconic auxiliary?
Uprighting spring
Why Australian wire?
High resiliency
Stability secret?
End-on bite + overcorrection
Final Thoughts
Begg mechanics reminds us of something modern orthodontics occasionally forgets:
Teeth are biologic structures.
Not furniture.
The brilliance of Begg wasn’t that he moved teeth faster.
It was that he understood why teeth wanted to move in the first place.
And honestly, there’s something deeply satisfying about a technique built on:
anthropology,
biomechanics,
light forces,
and mild disrespect for heavy edgewise wires.
Somewhere in an orthodontic department drawer right now, there’s an old Begg plier waiting patiently beside a dusty spool of Australian wire.
~Precision in action: Retrieving a fractured implant abutment screw to restore implant function and stability
Dental implants have revolutionized the way we replace missing teeth. With proper planning and execution, they offer excellent long-term success. However, like any mechanical system, implants can occasionally face complications. One situation clinicians may encounter is- loosening or fracture of an implant abutment screw. Although it may initially seem alarming, a fractured abutment screw does not necessarily mean the implant has failed. In many cases, the screw fragment can be retrieved safely with the right technique and instruments.
Why Do Abutment Screws Loosen or Fracture?
Implant abutment screws are designed to withstand significant functional forces. Factors which may lead to loosening or eventual fracture:
1)Inadequate torque during placement 2)Occlusal overload 3)Poor implant–abutment fit 4)Parafunctional habits such as bruxism 5)Repeated screw loosening causing metal fatigue
Over time, these factors can weaken the screw and lead to fracture within the implant.
How Do You Recognize the Problem?
Patients may report that their implant crown feels loose or unstable while chewing. Sometimes they may simply notice a slight movement in the prosthesis. Clinically, you might observe:
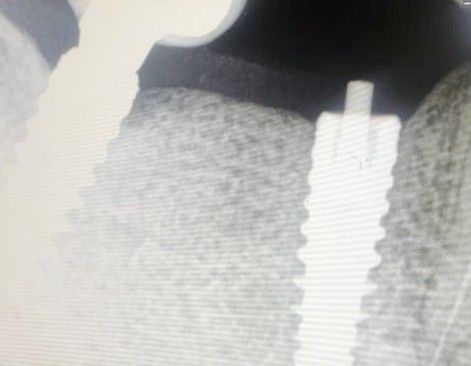
1)Mobility of the implant crown 2)Difficulty tightening the prosthesis 3)Occlusal discomfort 4)Radiographic evidence of a separated screw fragment
Once confirmed, the next step is careful retrieval of the remaining screw fragment.
Armamentarium Needed:
Having the right instruments makes the procedure much easier. Commonly used tools include: 1)Implant screw retrieval kit 2)Ultrasonic scaler with fine tips 3)Dental explorer or probe 4)Round or carbide bur 5)High-speed handpiece 6)Magnification (loupes or microscope) 7)Micro forceps or endodontic files
Step-by-Step Method for Screw Retrieval:
1. Careful Assessment Begin with a thorough clinical and radiographic evaluation to determine the position of the fractured screw fragment. 2. Remove the Prosthesis The crown or prosthetic component should be removed to allow clear access to the implant platform. 3. Visualize the Screw Fragment Good lighting and magnification are extremely helpful at this stage. Clear visualization helps prevent damage to the implant threads. 4. Attempt Gentle Counter-Clockwise Rotation Often, fractured screws lose their preload and are not tightly engaged. Using a sharp explorer, ultrasonic tip, or a fine endodontic file, gently attempt to rotate the fragment in a counter-clockwise direction. 5. Use a Retrieval Kit If the fragment does not move easily, a manufacturer-specific screw retrieval kit can be used. These kits contain specially designed instruments that engage the broken screw and help remove it safely. 6. Create a Small Slot (If Necessary) In some cases, a tiny slot can be prepared on the surface of the screw using a small bur. This allows a flat driver to engage the fragment and unscrew it. 7. Ultrasonic Assistance Ultrasonic vibration may help loosen the fragment by disrupting the mechanical binding between the screw and implant. 8. Inspect the Implant Once the screw fragment is removed, the internal implant threads should be carefully examined and cleaned to ensure there is no debris or damage. 9. Place a New Screw A new abutment screw should be inserted and tightened according to the manufacturer’s recommended torque value. 10. Reinstall the Prosthesis Finally, the prosthesis can be repositioned and secured after confirming the stability of the new screw.
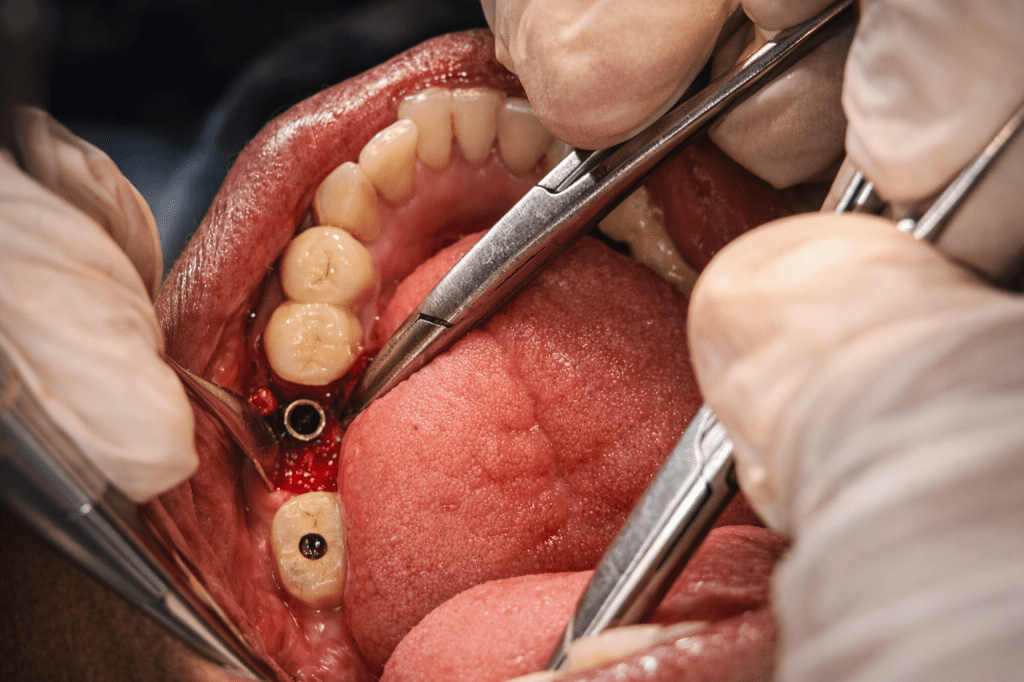
The clinical case which is illustrated in this blog post ,the abutment screw fracture happened inrt 46.Implant placement was done inrt 46 47 around 3 years ago and individual implant crowns (FP1) were placed .The patient reported with Dislodged implant crown inrt 46 .Radigraphic examination shows abutment screw fractured and lodged within the implant fixture.
Treatment planning included careful retrieval of abutment screw after mid crestal incision and flap elevation followed by retrieval using engaging the visible screw tip with artery forcep with firm press and anticlockwise rotation to disengage the screw from the fixture.This was followed by placing of healing abutment inrt 46 and suturing and follow up after 1 week for suture removal.
Practical Tips for Clinicians:
-Always work under magnification and proper illumination -Apply minimal force to protect the implant threads -Use manufacturer-specific retrieval kits when available -Take your time—patience often makes the difference
Preventing Future Screw Complications:
Prevention is always better than repair. The following steps can help reduce the risk of screw loosening or fracture: 1)Following correct torque protocols 2)Designing proper occlusion 3)Applying principles of implant-protected occlusion 4)Scheduling regular follow-ups for maintenance
Final Thoughts~
A fractured implant abutment screw can feel like a frustrating complication, but in most cases it is manageable with careful technique and the right instruments. With proper diagnosis and a systematic retrieval approach, the implant itself can often be preserved, allowing the prosthesis to continue functioning successfully for years.
Picture this: a young dental student staring at a microscope, trying to figure out why her physiology textbook looks more like a foreign language manual than a path to making people smile. Enter Dr. Anukrati Srivastava—the woman who took that confusion, added a sprinkle of stubbornness, a dash of curiosity, and bam!—turned it into a dental career that makes patients beam and teachers proud. With an All India Rank of 97, a master’s degree, and an obsession with magnification and illumination, she’s not just treating teeth; she’s rewriting the rulebook on what it means to be a dentist who actually cares.
Think of her as the stand-up comedian of dentistry—only instead of punchlines, she delivers precision, patience, and those little “aha!” moments that make you go, “Wow, I never knew dental school could be like this.”
1) Can you share how your path in the dental profession began and the key milestones that shaped it?
My journey in dentistry began with a bit of resistance. During the first year, I wasn’t particularly interested, as the subjects like physiology and biochemistry seemed far removed from clinical dentistry. It didn’t feel relevant to what I wanted to do—treat patients and create smiles.
Everything changed in the third year when I joined a private clinic to experience dentistry beyond textbooks. That hands-on exposure taught me that dentistry is not just about treating teeth—it’s about patience, communication, and understanding the financial and emotional aspects of patient care.
A major milestone during my internship was preparing for the pre-PG exam. I began studying not just to pass, but to truly understand subjects and connect concepts. With guidance from exceptional teachers across India, patience, and consistent effort, I achieved AIR 97 and completed my master’s—a challenging journey that brought immense satisfaction.
Another pivotal moment came when I committed to performing all my cases under proper isolation, using magnification and illumination. I believe every dental student should use at least 3.5X magnification. Without it, you miss details that are crucial for becoming a better dentist.
2) What inspires you to stay passionate and committed to dentistry, even during challenging times?
I was fortunate to complete my bachelor’s and master’s at a prestigious institution—Govt. Dental College, Jaipur—with faculty who truly inspired me. Watching teachers work, understanding their thought process, and seeing their dedication to patients—not for money but for the joy of delivering excellent care—motivated me to push myself. Their example has been my anchor during challenging times, reminding me to always give my best.
3) Who is your role model in the dental field, and how has this person influenced your approach to patient care, academics, or professional growth?
While I’ve learned from many, I must mention Dr. Lalit Likhiyani and Dr. Manoj Aggarwal. They taught me to strive to be a better person every day and to deliver dentistry better than I did yesterday. During my student life, I often thought, “What would they say if they saw this?”—a question that drove me to excellence.
Academically, they never gave me straight answers. Instead, they asked more questions, encouraging me to explore literature, dig into articles, and develop reasoning. This approach instilled in me a love for learning and a habit of critical thinking.
4) Could you discuss the strategies you use to manage academic responsibilities alongside your personal interests or hobbies?
Balancing academics, clinical responsibilities, and personal life has been challenging. I realized early on the importance of prioritizing personal life. Some rules I follow include:
No work calls after 7 PM.
Weekly days off with my husband, who is also an orthodontist, with no appointments.
Allocating time for House of Endodontics in my calendar.
Maintaining an afternoon nap that I never compromise.
I also make time for painting, gardening with a cup of coffee, and long drives—simple joys that help me recharge. Sticking to a routine has been key to maintaining balance.
5) What advice would you give to current dental students and aspiring dentists?
Yes, dentistry is challenging. Yes, it requires patience and perseverance. Yes, you will be self-critical about your cases. But the satisfaction of growing, learning, and creating beautiful smiles makes it all worthwhile. Stay curious, embrace mentorship, and never stop improving.
Conclusion:
So, what’s the takeaway from Dr. Anukrati Srivastava’s story? Simple. Dentistry is tough, exams are tougher, and yes, sometimes your coffee might get cold while you’re deep in a case. But passion, perseverance, and a touch of sass can turn all that chaos into something magical.
She’s living proof that you can love what you do, learn endlessly, and still have time to sip your coffee, paint a masterpiece, or take a Sunday drive. If dental students remember one thing from her journey, let it be this: don’t just aim to fix teeth—aim to shine brighter than the overhead lamp in your operatory. And maybe, just maybe, make it look effortless while you’re at it.
Every orthodontic student reaches a moment in clinic where a 9-year-old with Class II malocclusion is sitting in the chair—and the faculty asks:
“So… headgear or functional appliance?”
The confusion is understandable. One appliance pulls the maxilla back, the other pushes the mandible forward. But do they actually produce different outcomes?
Evidence says something interesting: 👉 They reach the same destination—using different roads.
Let’s break this down logically.
The Clinical Question
Are headgears and functional appliances equally effective in correcting Class II malocclusions in children before comprehensive treatment?
Short answer
✅ Yes. Both appliances produce similar overall Class II correction, especially in terms of ANB reduction and overjet correction.
Evidence at a Glance
5 prospective randomized clinical trials
Children aged 7–10 years
Phase I treatment only (no fixed appliances)
Compared headgear vs functional appliances vs controls
📚 Databases used: PubMed & Cochrane Library
Study
N
Age
Duration
Appliances
Key Design
Jakobsson (1990)
57
8.5 yr
18 mo
Cervical headgear vs Andresen activator vs control
Random, all Class II
Tulloch (1998)
166
9.4 yr
15 mo
Straight-pull headgear vs mod. Bionator vs control
Headgears and functional appliances are equally effective in early Class II correction in children. The difference lies not in how much correction occurs, but in how that correction is achieved—headgear acts mainly on the maxilla, while functional appliances rely largely on dentoalveolar changes and mandibular positioning.
Class III malocclusion is diagnostically easy to spot and frustratingly hard to treat. Parents see a negative overjet and come in early, but what you actually inherit is a complex mix of maxillary retrusion, mandibular excess, dentoalveolar compensation, and growth uncertainty. Functional Regulator‑3 (FR‑3) is one of the classic early‑treatment tools aimed at modifying growth in Class III children, introduced by Rolf Frankel in 1970 and designed to work not directly on teeth, but on the perioral and buccal soft tissues.
Levin, McNamara and co‑workers published a landmark retrospective controlled study in 2008 that, for the first time, followed an FR‑3 group and matched untreated Class III controls from pre‑puberty all the way past the pubertal spurt (about 9 years total). All FR‑3 patients were treated personally by Rolf Frankel, had good compliance, and wore the same appliance first full‑time (about 2.5 years), then part‑time (about 3 years) using his original protocol. For you as a student, that makes this study a practical “gold standard” for what FR‑3 can really do when the technique and compliance are not the problem
First, a Mental Reset: What FR-3 Is NOT
Before we discuss effects, let’s clear misconceptions:
❌ FR-3 does not stop mandibular growth ❌ FR-3 does not pull the maxilla forward like a facemask ❌ FR-3 does not “fix” all Class III cases
👉 FR-3 is not a force-delivery appliance 👉 It is a functional environment modifier
That distinction changes everything.
🔹 Components and Their Purpose
Component
Primary Function
Clinical Logic
Buccal shields
Remove cheek pressure
Allows transverse & sagittal maxillary development
Lip pads
Reduce upper lip pressure
Facilitates forward maxillary displacement
Lower labial wire
Controls mandibular incisors
Prevents excessive lingual tipping
Lingual support
Influences tongue posture
Improves oral seal & functional balance
One of the biggest mistakes students make with functional appliances is assuming that all changes seen during treatment are permanent. FR-3 is a perfect example of why time-segmented thinking (T1–T2 vs T2–T3) matters.
TIME POINTS (Keep these fixed in your head)
Time Point
Meaning
T1
Start of FR-3 treatment
T2
End of full-time wear (~2.5 years)
T3
Long-term follow-up after puberty (≈9 years from T1)
PART 1: Short-Term Effects (T1 → T2)
What changes while the child wears FR-3 full-time
Between T1 and T2, FR-3 patients were compared with untreated Class III controls. This comparison is crucial—because growth alone can fool you.
1. Maxilla: Real Growth + Modest Forward Positioning
📌 Key Finding
The maxilla does not just “look better”—it actually grows more.