Let’s dive into one of orthodontics’ eternal debates — how extraction patterns affect relapse in Class II malocclusion cases. Or, as some call it, “Should we yank two teeth, four teeth, or none at all — and will the molars stay where we put them?”
So here’s the punchline first — long-term stability doesn’t seem to care that much about the number of premolars you extract. Shocking, I know. Whether you go with two maxillary premolars or a full four-premolar extraction, the occlusal stability is pretty much the same.
Now, that’s not a green light to start extracting premolars like you’re harvesting crops — but it is a nice reminder that there’s no rigid extraction formula tied to relapse.
Here’s something else to chew on: There’s no solid evidence that finishing Class II cases with Class I molar relationships gives you better long-term outcomes. Yeah — you heard that right. You’re not legally or biologically bound to force every molar into Class I just to impress your ortho mentors or keep your cephs symmetrical.
In fact, a case-control study showed that treating a Class II case by extracting two maxillary premolars and finishing with a Class II molar relationship was actually more efficient than trying to wrestle the entire molar segment into Class I. So not only is it okay — it might actually save you time and effort.
And later studies backed it up: Whether you end with Class I molars or Class II molars, the long-term occlusal results are basically the same. That’s right. The molars don’t seem to care as long as the rest of the arch is harmonious, the bite is functional, and the patient stops chewing ice with their canines.
So to sum it all up: Extraction pattern? Choose based on case needs, not relapse paranoia. Class I molar finish? Nice, but not mandatory. Long-term stability? Not dependent on textbook-perfect molar positioning.
Bottom line? Orthodontics isn’t always about achieving the prettiest occlusal photo — it’s about functional, stable results that stick around longer than your patient’s post-treatment whitening.
You’ve got options, Class II warriors. Choose wisely — but don’t stress if the molars decide to stay Class II. Stability won’t judge you.
Hey tooth warriors! 🦷💥 Today, we’re diving into the world of Class II malocclusion—aka when the upper jaw says, “I’m moving ahead,” and the lower jaw whispers, “Wait for me!” 😅
This condition happens when there’s a mismatch in jaw positioning—either the lower jaw is shy (mandibular retrusion)or the upper jaw is a bit too bold (maxillary prognathism). But spoiler alert: most of the time, it’s the mandible lagging behind. 🐢
🎯 GROWING PATIENTS = GROWING OPPORTUNITIES
If your patient’s still growing (yay puberty! 🎉), you’ve got options to guide those jaws like a dental GPS:
Functional appliances = Tell the mandible, “Come on buddy, time to move forward.” 🦷➡️
Headgear = Tap the brakes on that upper jaw growth. 🛑👃
👉 These options work best before the growth spurt ends, so early detection is key!
👄 REMOVABLE VS. FIXED APPLIANCES – THE BATTLE BEGINS ⚔️
We’ve got two major contenders:
1. Twin Block (Removable Champ)
Invented by Clark (nope, not Superman 🦸).
Worn like retainers—you can pop them in and out. 😬
Works like a charm when patients actually wear them (compliance alert 🚨).
Great for boosting mandibular growth and improving jaw harmony. 🎵
2. AdvanSync2® (Fixed Fighter)
A glow-up of the classic Herbst appliance.
Created by the Dischinger duo in 2008 (dental bros! 👨🔬👨🔬).
Cemented on molars (yep, no backing out now 😅).
Works full-time (24/7 hustle 😤) with telescopic rods to push that mandible forward.
Bonus: You can slap on braces while using it! 💪
Wait… what happened to the original Herbst?
Well, it kinda had a bad rep:
Bulky 🙄
Cheek-poking parts 😵
Maintenance nightmare 🪛
So, enter AdvanSync2®—smaller, sleeker, and less ouch-y! 🙌
🤓 WHY THIS STUDY MATTERS:
Most past studies compared AdvanSync2® with other fixed appliances. But let’s face it—compliance with removable appliances is like relying on a teenager to do chores 🧹 (sometimes it happens, sometimes… not so much).
👉 That’s why this study asks: “What really happens when we compare Twin Block (removable) to AdvanSync2® (fixed)?”
They measured:
Skeletal changes (how the jaws move 🦴)
Dentoalveolar changes (what the teeth and surrounding structures do 🦷)
Soft tissue effects (how the face changes 😮)
And just to keep things scientific (and dramatic), they had a null hypothesis: “No difference between the two.”
But are they really that similar? 🤔
🧪 Study Design Recap:
This was a retrospective study (no time machines, just old records), comparing 10–15 year olds at CVMI stages 2–4 (hello puberty 👋). No control group here because, ethically, you can’t just not treat a kid who needs help 😬.
👉 Group I: Twin Blockers (Avg age 12.1) 👉 Group II: AdvanSync2® gang (Avg age 12.8)
Perfect timing—just around the growth spurt, which, as Baccetti says, is the sweet spot for jaw growth magic! ✨
🧠 Cranial Base Variables
Both groups showed a little reshaping action up at the top:
Translation? 👇 Both appliances helped bring the mandible forward relative to the cranial base—a win for both sides! 🙌
🦴 Maxillary Skeletal Variables
The whole idea here is to chill out maxillary growth (aka the “headgear effect” 😤🛑).
Twin Block: Co-Pt A increased a bit (+2.15 mm) due to normal growth or orthopedic stimulation, but SNA dropped slightly (−0.52°).
AdvanSync2®: Also showed some changes, but surprisingly, not a major maxillary growth restriction this time!
📚 PS: Other studies hyped up AdvanSync2® as a maxilla tamer… not quite here. 🤷♀️
😮💨 Mandibular Skeletal Variables – The Main Event!
Here’s where things get really spicy 🌶️
✅ Twin Block Results:
Co-Gn (mandibular length): +2.87 mm
SNB (mandible angle): +1.59°
Pog-N perpendicular: +0.84 mm
💬 Verdict: A decent push forward, but not groundbreaking.
✅ AdvanSync2® Results:
Co-Gn: A whopping +5.34 mm 📏
SNB: +3.11° 🎯
Pog-N perpendicular: +3.69 mm
Ar-Go (ramus length): +1.89 mm
😱 That’s some serious forward growth, folks!
📣 AdvanSync2® went full beast mode, proving why fixed appliances are often preferred when compliance is shaky. No “oops, I forgot to wear it today” moments here! 😅
You know it’s serious when we start talking ANB angle and Wits appraisal—that’s dental code for “How far is that lower jaw lagging behind?” 🏃♂️💨
📉 ANB Angle + Wits = Both Took a Dive
Twin Block: 🟢 ANB dropped by −2.11° 🟢 Wits dropped by −3.09 mm
AdvanSync2®: 🔵 ANB dropped even more – −2.88° 🔵 Wits dropped more too – −4.04 mm
🎯 Translation: Both appliances moved the lower jaw forward, reducing the gap between upper and lower jaws. But hey, AdvanSync2® had a slight edge—probably thanks to that all-day, everyday action. 💪
🔍 Maxillary–Mandibular Differential (aka Who Grew More?)
Twin Block: +0.94 mm
AdvanSync2®: +2.39 mm
Why the difference? The mandible had a growth spurt, thanks to being pushed forward like a coach yelling, “Get in the game!” 🗣️🏈
💬 It’s not just growth, it’s functional ortho magic! ✨ The telescopic mechanism of AdvanSync2® = more forward jaw movement + better skeletal change. Boom. ✅
📏 Vertical Skeletal Variables – Are We Growing Up… or Just Forward?
Heads up! 📐 Let’s look at how the face stretched vertically during treatment. (Because yes, your face can grow “taller,” too!)
Variable
Twin Block
AdvanSync2®
What It Means 😅
Na-Me (ant. facial height)
+0.63 mm
+2.82 mm
You got taller. Sort of. 🧍♂️
S-Go (post. facial height)
+1.02 mm
+1.73 mm
Back of the face grew, too! 🧠➡️🦷
ANS-Me (lower face)
+0.96 mm
+2.13 mm
Hello, chin drop! 🪞
Mandibular plane angle
+0.89°
+1.12°
Slight clockwise jaw rotation 🔁
👉 So both appliances caused the lower face to elongate and the jaw to rotate a bit downward and forward. Why? That sneaky posterior bite block in the Twin Block lifts the bite, guiding the growth downward. AdvanSync2® does similar things, just without being removable. 🛠️
Interdental and Soft Tissue Shenanigans
(Or in ortho-speak: “Did we fix the bite, and does the face care?”)
We’re wrapping up our headgear-free saga with the final act: interdental movements, soft tissue glow-ups, and what this all means for your future ortho plans. Let’s bite in! 🍴
🦷 Interdental Variables – Where the Teeth Party Happens 🎉
✅ Twin Block Group:
U1-L1 angle (interincisal): Dropped by −2.51° = incisors tipped toward each other 📉
Overjet: Reduced by −5.29 mm 😲
Overbite: Down by −1.48 mm
Molar correction: A solid +4.21 mm
💬 Why? Because Twin Block tends to retrocline upper incisors and procline lowers. The bite evens out as the jaws come together and molars do a sweet lil’ shift—maxillary molars move back, mandibular molars step forward like a bold dance move. 💃🕺
✅ AdvanSync2® Group:
U1-L1 angle: Went up by +2.97°, though not significantly = incisors slightly angled apart 📐
Overjet: Reduced by −4.60 mm
Overbite: Also decreased −2.27 mm
Molar correction: A powerful −5.18 mm
💬 So AdvanSync2® corrected molar position and bite depth quite well—just like Twin Block—but didn’t tweak those incisors as much. It’s a fixed appliance, so it works around the clock 🕒, giving it an edge with molar shifts and bite correction even when patients forget they’re wearing it. 😉
🦷 Moral of the story: If your patient has big overjet and deep overbite—either appliance is your pal. But if you need more precise incisor control, Twin Block might give you the edge (assuming they wear it 🤞).
👄 Soft Tissue Changes – The Face-Off (Literally) 🤳
Time to find out: Did these appliances do the orthodontic equivalent of contouring?
✅ Twin Block:
Upper lip to E-plane: Moved back −1.04 mm (that’s subtle retraction)
Lower lip: Nudged forward +0.59 mm (barely noticeable)
Nasolabial angle: Slightly up +2.09°
➡️ Basically: Minor lip shifts, mostly due to how the upper incisors moved back. Nothing major—think more like a light Instagram filter than a full makeover. 😅
✅ AdvanSync2®:
Upper lip to E-plane: Also retracted −1.68 mm
Lower lip: Slightly forward +1.32 mm
Nasolabial angle:+3.12° (again, mild)
💬 Bottom line? Not a dramatic change here either. Some studies say AdvanSync2® can puff out the lower lip, but in this study: changes weren’t significant.
📸 Takeaway: Don’t promise your patients a new selfie look—these appliances fix bites, not faces. 😄
🧪 Final Diagnosis: Who Wins the Ortho Crown? 👑
✅ Both Twin Block and AdvanSync2®:
Correct overjet and molar relationship beautifully
Promote mandibular growth
Deliver mild soft-tissue and vertical skeletal changes
🏆 AdvanSync2® stands out for:
More effective mandibular length gain
Greater SNB increase (hello forward jaw!)
No worries about compliance because… they can’t take it out 😏
🤝 Twin Block shines for:
More controlled incisor movement
Still effective—but requires that magical thing called “patient cooperation” 🙃
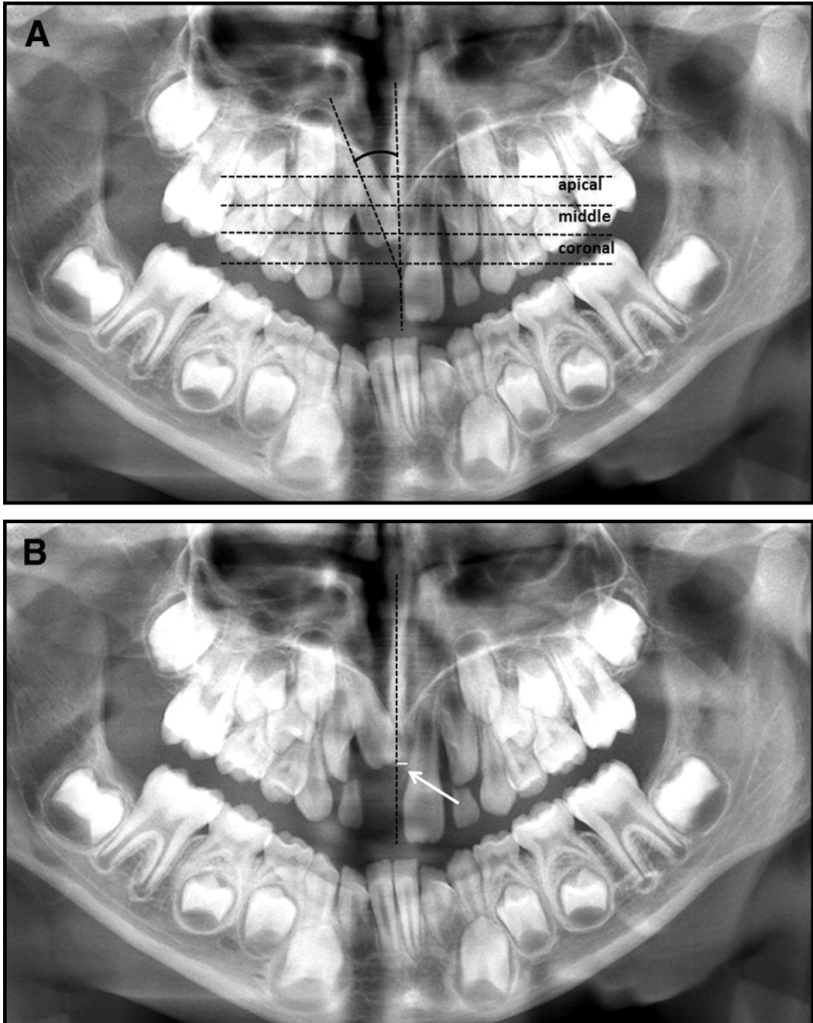
Let’s start with a word that sounds like it belongs in a Harry Potter spellbook: DILACERATION.
Imagine this: a developing tooth is growing peacefully like a tiny plant underground, and then BAM 💥—a trauma happens (like your toddler faceplanting on a coffee table), and the tooth takes a detour.
That detour results in the tooth bending its root like it’s doing a deep downward dog. 🧘♂️ This abnormal bend or curve in the root or crown is what we call dilaceration.
👶 How Does Trauma Cause Dilaceration?
📌 Let’s break it down like a dance move:
Age of Injury
Where’s the Permanent Tooth Germ?
Result of Trauma
2–3 years
Palatal & superior to primary root
Crown gets pushed up; root curves later
4–5 years
Shifts labially, closer to resorbing primary root
Oblique force causes root to start forming in a new angle
💡 Key Point: The force direction matters more than how strong the trauma was. Even a little bump from a sippy cup can cause drama for that developing tooth. 😵💫
🔬 Dr. Walia et al. (2016) explain that trauma gets transmitted via the primary incisor’s apex to the Hertwig’s Epithelial Root Sheath of the developing permanent tooth. This damages its root-forming potential and leads to—you guessed it—root yoga (aka dilaceration). 🧘♀️
🚫 When Central Incisors Don’t Erupt: Why?
An unerupted maxillary central incisor is rare, but when it happens—it’s a BIG deal for the child and the parents (cue the panic: “My baby’s smile is ruined! 😱”).
👶 Since most patients are young, long-term prosthetics aren’t ideal. And orthodontists love keeping natural teeth (like Pokémon—you gotta catch ’em all! 😄).
🎯 Does Spontaneous Eruption Happen?
Short answer: sometimes… 🤷♀️
Studies say after removing the blockage (like a supernumerary), autonomous eruption happens in only 54–78% of cases. But even then, you might have to wait 3 years ⏳—and the alignment still might not be great.
Traditionally, many opted for surgical repositioning or extraction. But now, thanks to the brave hearts of ortho pioneers (👩🔬🧑🔬), more case reports show orthodontic-surgical approaches are possible—even successful!
🧪 Yet, data is limited. Some studies report 100% success, but… the samples are not always clear if they were cherry-picked.
Stage
Name
Duration
Notes
T1
Leveling + Space Opening
~5 months
Brackets + wires party begins 🎉
T2
Traction
~9 months
Pull that bad boy down! ⛓️
T3
Finishing
~8 months
Align, torque, upright — orthodontic polish time ✨
🎯Factors That Really Mattered
1️⃣ Etiology
Biggest game-changer! Dilacerated incisors = longer treatment, more chance of failure. 🚩
Obstructive impactions fared much better (P = 0.02)
2️⃣ Initial Height
Higher up the tooth, longer the rescue mission (especially T2 stage). ⏳
3️⃣ Age
Older = longer finishing time (T3). Teen angst, but in tooth form.
This “loose connective tissue” isn’t just chilling—it’s DIRECTING THE SHOW. Here’s the tea:
Bone Resorption: Follicles send out signals like “Hey osteoclasts, wreck this bone!” to carve a path for the tooth. Think of it as a tiny demolition crew. 💥
Deciduous Tooth Roots: They also dissolve baby teeth roots. RIP, milk teeth—you served us well. 🍼⚰️
No Follicle? No Eruption. It’s like trying to launch a rocket without fuel. 🚀🙅♂️
Fun fact: If follicles throw a tantrum, you get eruption disturbances. Cue the ortho panic. 🆘
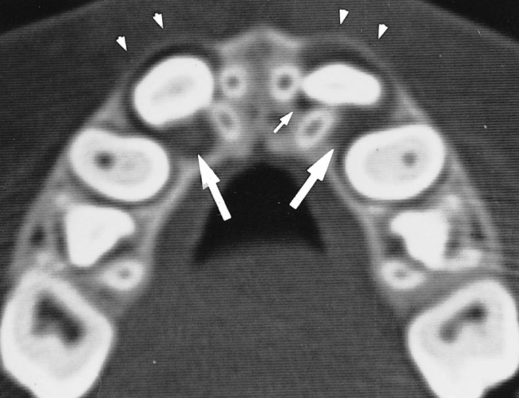
The Maxillary Canine: Ortho’s Problem Child 🦸♀️🦷
Ah, the upper canine—the Beyoncé of teeth (fierce, essential, but sometimes diva). When it decides to stay buried, you’ve got an impacted canine on your hands.
Prevalence: 1-1.8% of people. More common in palatal positions (85%!). Ethnicity matters—some groups get hit harder. 🌍📊
Gender Wars: Most studies say females > males, but Israeli data says it’s a tie. Canines don’t care about your gender norms. ✨⚧️
📌 Subject Selection: Not Random, But Relevant!
Before diving into imaging techniques, let’s address a key factor: selection bias. 📌 The kids in this study weren’t randomly picked—they were referred due to high risk of resorption from ectopic maxillary canines.
Does this affect the results? 🤔 ➡️ Maybe, but not by much! The findings remain clinically relevant, though they might not be 100% applicable to a general school population.
🦷 Assessing the Dental Follicle: The Imaging Dilemma
So, how do we normally assess a follicle?
✔️ Clinical examination—Good for basics, but we need more. ✔️ Intraoral films—Useful, but might not show the full picture. ✔️ Conventional panoramic & full-mouth X-rays—Can sometimes fail at visualizing the true relationship between the ectopic canine and adjacent roots.
👉 Enter CBCT! This game-changer allows us to study the follicle in 3D, revealing its true shape, width, and relationship to other teeth.
⚠️ Radiation & Cost: Is CBCT Worth It?
CBCT is not all sunshine and rainbows. 🌦️ It comes with: ❌ Higher radiation exposure (2 to 8 times more than panoramic/conventional films). ❌ Increased cost.
But before you toss out your CBCT scanner, consider this:
✅ It provides a clearer, more accurate diagnosis, especially in high-risk resorption cases. ✅ The clinical benefits outweigh the risks, especially when determining treatment prognosis for ectopic canines.
📊 What Did CBCT Reveal About Follicle Width?
By analyzing scan by scan, we found:
✔️ Follicle width ranged from 0.5 mm to 7 mm. ✔️ Mean width: 2.9 mm (Confidence Interval: 2.7–3.2 mm). ✔️ Some follicles were 2 to 3 times wider than normal, indicating cystic transformation! 🦠
👉 In other words, big follicle = possible cystic changes, making CBCT invaluable for early intervention.
🦷 Cystic or Degenerative Changes in Dental Follicles
📌 Fact: During tooth eruption, dental follicles can undergo cystic or degenerative changes. 📌 Key Concern: Some wide follicles in this study had cystic degeneration, but they didn’t cause deviation in adjacent teeth—a usual warning sign.
👀 Why does this matter? ➡️ If a dental follicle undergoes cystic degeneration, it may turn into a dentigerous cyst—which is most common with maxillary canines.
🤔 Can We Reliably Detect Cystic Transformation?
🔍 Intraoral Films: ❌ Cannot reliably differentiate between a cyst and normal eruption-related changes.
🔍 CT Scans (Including CBCT): ❌ Even with CBCT, we still can’t reliably distinguish a physiologically enlarged follicle from one undergoing cystic transformation.
👆 Why? Because both might appear as enlarged follicles, and the distinction is only clear histologically.
👉 BUT WAIT! Do we always need to worry?
🛑 When Should We Be Concerned?
✅ Normally erupting canines? No big deal! As the tooth erupts, both the normal follicle and any cystic follicle will self-destruct when the crown reaches the gingiva. 🚀 ✅ Ectopically positioned or embedded canines? ⚠️ These require monitoring during growth because they behave differently.
📌 Risk of Dentigerous Cysts in Impacted Teeth:
1 in 150 unerupted teeth may develop a dentigerous cyst (Mourshed & Toller).
Risk increases after age 20, especially for impacted third molars.
📍 Canine Position & Follicle Width: What We Know
🔹 Buccally & Apically Displaced Canines 🟢 ✅ Have wider follicles than normally positioned canines. ✅ More space → More follicle expansion!
🔹 Lingually Displaced Canines 🔵
🔹 Normally Positioned Canines 🟡 ✅ Follicle width is about the same for both groups.
💡 What Does This Tell Us?
🦴 Hard tissue barriers—like adjacent incisor roots or a thick cortical bone layer (lingual to the alveolar process)—may restrict follicular expansion. 🦷 In contrast, thin cortical bone and spongeous bone allow the follicle to expand more freely.
📌 Key Takeaway: Follicle size is not random—it’s influenced by local bone density & space availability.
🔍 Follicle Shape & Jaw Bone Structure
📸 CBCT Scans Reveal an Interesting Pattern:
🟠 Loosely spongeous bone + spacious jaws → Follicle adapts a spherical shape 🔵
🔺 Limited space for expansion → Follicle takes on an irregular shape 🟠
🧐 Surprisingly, this hasn’t been reported before in literature!
🔬 Histological Findings (A.K.A. What’s Inside the Follicle?)
A total of 17 dental follicles underwent histological analysis, and here’s what was found: ✅ Loose connective tissue matrix—kind of like an unorganized dental construction site. ✅ Fragments of reduced enamel epithelium—because teeth love to shed layers. ✅ PMN cells (polymorphonuclear leukocytes)—a fancy way of saying “immune cells lurking around.” ✅ Microcysts or full cystic degeneration in 4 cases—a follicle’s way of saying, “I need space!”
⚠️ Do Enlarged Follicles Increase Root Resorption Risk?
👶 A Common Practice: To prevent ectopic eruption, orthodontists often extract deciduous canines if the permanent canines have enlarged follicles. Why? 🔹 Some believe widened follicles may: 1️⃣ Cause deviations in adjacent permanent roots. 2️⃣ Induce root resorption in neighboring incisors.
🔬 What This Study Says: ❌ No evidence confirms that widened dental follicles cause adjacent incisor root displacement. ❓ Root resorption risk remains unclear—this hasn’t been thoroughly investigated.
💡 Do Wide Follicles Push Teeth Around?
🔎 A common assumption is that large dental follicles could push adjacent teeth out of alignment. 📊 Reality Check: This study found that: ✅ Follicles expanded into spongeous bone → sometimes causing the alveolar cortex to bulge ✅ ❌ But they did NOT interfere with or deviate adjacent teeth!
👀 What actually caused root deviations? ➡️ Ectopically positioned canines exerting eruptive forces, NOT the follicles themselves!
📌 Do Sex, Age, or Eruption Stage Affect Follicle Size?
🟢 Nope! This study found NO significant relationships between:
Follicle width & sex
Follicle width & age
Follicle width & canine eruption stage
🚀 Surprising Find: No difference in follicle size was found between canines still in the bone crypt and those nearing eruption—unlike past radiographic studies. 📸
🔬 What Else Affects Follicle Size?
📊 Regression Analysis Says… 📉 The R² values suggest there are still unknown factors influencing follicle width. What could they be? 🤔
Hey future tooth architects! 🦷⚒️ Let’s dive into the ~controversy~ that’s been brewing longer than your morning coffee: En Masse Retraction vs. Two-Step Retraction. Think of it as the orthodontic version of “Avengers: Endgame” – everyone has strong opinions, and the stakes are high (literally, for your anchorage). Let’s break it down.
The Great Extraction Debate: A Century-Old Tug-of-War ⚔️
For over 100 years, orthodontists have wrestled with extraction decisions 🦷💥. While modern clinicians have found a middle ground, space closure mechanics remain critical. Two methods dominate: 1️⃣ Sliding mechanics (frictional: think power chains and elastics). 2️⃣ Closing loops (frictionless: bendy wires doing the work).
With pre-adjusted edgewise appliances (thank you, Dr. Andrews! 🙌), sliding mechanics took over—no more endless wire bends! But which sliding technique reigns supreme? Let’s compar
En Masse Retraction: The “All-In” Approach 🚀
“Retract all six anteriors at once!”
Pros:
⏳ Faster treatment time (one phase vs. two).
🔧 Simplified mechanics (fewer wire changes).
🎯 Potentially better anterior control (if anchorage is solid).
Cons:
⚓ Higher anchorage loss risk (more strain on molars).
📉 Root resorption? (Heavy forces on multiple teeth at once).
Two-Step Retraction: The “Divide & Conquer” Strategy 🛠️
“First canines, then incisors!”
Pros:
⚓ Better anchorage preservation (smaller active unit = less strain).
Headgear = relies on patient compliance → 3 mm molar creep steals retraction space!
Space Allocation:
En Masse: All extraction space (e.g., ~7-8 mm) goes to incisor retraction.
Two-Step: Molars hog 3 mm → incisors only get ~6.3 mm.
Group 2: En Masse/Miniscrews vs. Two-Step/Conventional
Meta-Analysis of 5 Studies:
Metric
En Masse/Miniscrews
Two-Step/Conventional
Std. Mean Difference
P-value
Incisor Retraction (UI)
Slightly more (🔝)
Slightly less
-0.38 mm (CI: -0.70–-0.06)
<0.05 ✅
Molar Movement (U6)
Molars distalized (🦷↩️)
Molars moved mesially 1.5–3.2 mm (🔴)
-2.55 mm (CI: -2.99–-2.11)
<0.001 💥
Treatment Time
Mixed results: 1 study said 4.7 months faster 🏎️; others found no difference 🐢
Why such a massive difference in molar movement?
En masse + miniscrews: Absolute anchorage → molars distalize slightly (friction from sliding mechanics? 🤔).
Two-step + conventional: Molars creep mesially, stealing 2.5 mm of space → clinically HUGE(affects occlusion, profiles!).
Group 3: En Masse/Headgear vs. Two-Step/Headgear
Metric
En Masse/Headgear
Two-Step/Headgear
P-value
Incisor Retraction (UI)
5.7 mm (SD 2.0)
5.7 mm (SD 2.4)
NS 😑
Molar Movement (U6)
4.1 mm (SD 2.0)
4.5 mm (SD 2.2)
NS 😑
Treatment Time
2.5 years vs. 2.6 years
No difference 🕒
NS 😑
Takeaway: When both use headgear, no difference in outcomes. Anchorage type > retraction method!
Group 4: En Masse/Conventional vs. Two-Step/Conventional
Metric
En Masse/Conventional
Two-Step/Conventional
P-value
Space Closure Time
5.8 months (SD 1.4) �🚀
7.9 months (SD 1.8) 🐢
<0.001 💥
Root Resorption (UI)
0.42 mm vs. 0.45 mm
No difference 🦴
NS 😑
Takeaway: Even with conventional anchorage, en masse is faster—but root resorption risks are equal.
The Root Resorption Lowdown 🌱
No significant differences in RR between methods in ANY group.
Maxillary incisors: ~0.4–0.6 mm resorption (similar across the board).
Surprise! Force distribution (en masse vs. two-step) doesn’t spike RR risks.
Bias Alert & Sensitivity Analysis 🚨
Risk of Bias: Excluded low-quality studies (RCTs with high bias + non-randomized trials).
Heterogeneity Tests: Used I², Tau², chi-squared. Results held firm after sensitivity checks.
But… Small study numbers in Groups 1,3,4 ➔ interpret with caution!
Clinical Pearls for the Elite 🎓
1️⃣ Miniscrews + En Masse = Anchorage MVP
Less molar movement (-2.55 mm!), solid incisor retraction. 2️⃣ Two-Step Needs Strong Anchorage
Conventional anchorage? Molars creep forward 1.5–3.2 mm 😬 3️⃣ Time Crunch? Go En Masse
Saves ~2 months in Group 4 (even without miniscrews!). 4️⃣ Root Resorption? Chill.
No method is riskier. Focus on force control, not mechanics.
Final Verdict 🏁
Factor
En Masse
Two-Step
Anchorage Loss
🟢🟢 (with miniscrews!)
🔴🔴 (conventional)
Treatment Speed
🏎️ Faster
🐢 Slower
Simplicity
🟢 Fewer steps
🔴 More adjustments
So… Match the method to your anchorage strategy! Miniscrews + en masse = modern efficiency. 🚀
Anchorage Loss: En Masse vs. Two-Step Retraction
Anchorage loss = unwanted mesial movement of posterior teeth (like the upper first molar, U6) when retracting anterior teeth. It’s a big deal because losing anchorage can sabotage treatment goals (think: compromised profiles or bite issues 😬).
🧪 The Methods Compared
En Masse Retraction + Miniscrews
Retract all 6 anterior teeth at once.
Reinforce anchorage with miniscrews (absolute anchorage).
Two-Step Retraction + Conventional Anchorage
Retract canines first, then incisors.
Use traditional methods (e.g., Nance button, transpalatal arch).
📊 Key Findings from 7 Studies
Comparison Group
Anchorage Loss (En Masse)
Anchorage Loss (Two-Step)
Key Takeaway
Group 1🧩
0.7 mm (U6 movement)
Higher loss
Movement likely happened before miniscrew placement (during leveling).
Group 2🚀
Anchorage GAIN 😱
Significant loss
NiTi coils + friction from wires distalized U6!SMD: -2.55 mm (💥 Clinically huge!).
Group 3🎭
-0.36 mm (NS difference)
Similar loss
Data inconsistency? “Intratechnique variability” might skew results.
🤔 Why the Differences?
En Masse Wins 🏆:
Miniscrews = absolute anchorage.
Friction from sliding mechanics can even distalize molars (Davoody et al.).
NiTi coils kept working post-contact, pushing molars distally (smart! 🧠).
Two-Step Struggles 😥:
Prolonged treatment phases = more time for molar drift.
Conventional anchorage (e.g., Nance) can’t compete with miniscrews.
💡 Clinical Pearls
Max Anchorage Cases: En masse + miniscrews is king 👑 (saves ~2.5 mm space!).
Two-Step Isn’t Dead: Use it if you need canine-first retraction (e.g., severely crowded incisors).
Timing Matters: Place miniscrews early to avoid molar movement during leveling! ⏰
📊 Amount of Retraction: En Masse vs. Two-Step
🔍 Key Findings from the Studies
Out of 7 studies:
5/7 studies found NO significant difference in retraction between en masse and two-step methods.
2/7 studies (Liu et al. and Saleh et al.) reported more incisor retraction in the en masse group.
Wait, why the discrepancy? 🤔 Both “outlier” studies focused on Class II cases with overjet >5 mm 🏋️♂️, while others looked at bimaxillary proclination or milder Class II cases. Big overjets = more space for incisors to move!
📉 Data Synthesis: Stats vs. Clinical Reality
Metric
Result (Std. Mean Difference)
Significance
Retraction Amount
-0.38 mm
Statistically significant
Clinical Impact
❌ Not clinically meaningful
(Less than 0.5 mm!)
Why such a tiny difference?
The measurement (UI tip to SV line) mixes bodily movement + tipping 🌀, not pure retraction.
Archwire type and operator mechanics varied across studies (e.g., sliding vs. loop mechanics).
🤯 The Paradox: Anchorage Loss ≠ More Retraction?
Earlier studies showed 2.5 mm less anchorage loss with en masse/miniscrews. But why didn’t that translate to more incisor retraction?
Bimaxillary proclination cases: Extraction space is used to upright incisors (not retract them). Think: “Tipping correction > AP movement.” 📐
Lower arch control: Upper incisor retraction is limited by the position of the lower incisors. If the lower arch isn’t retracted, the upper can’t go wild! 🛑
🦷 Case Type Matters!
Case Type
Retraction Potential
Why?
Severe Class II (Overjet >5 mm)
✅ Higher retraction
Space is used for AP correction.
Bimaxillary Proclination
❌ Limited retraction
Space prioritizes uprighting, not retraction.
💡 Clinical Takeaways
Overjet >5 mm? En masse might give slightly more retraction. 🎯
Bimaxillary proclination? Focus on incisor inclination, not just AP position. 🔄
Hey future ortho experts! Let’s dive into a study that’s all about why timing matters in treating skeletal discrepancies. Spoiler: Early intervention can be a game-changer!
🚨 Why Bother with Early Treatment?
Traditional orthodontic correction (think braces alone) often fails to improve facial aesthetics in patients with major skeletal discrepancies (like severe Class II). Worse, it might even worsen the profile! 😱 The solution? Target the skeleton early—during mixed dentition—to harness growth and guide jaw development.
📚 Study Snapshot
Patients
28 Italian kids (12 boys, 16 girls) in early mixed dentition (DS2 stage).
Common issues: Increased overjet, distal molar relationship, varying vertical bites (open to deep), and lip incompetence.
Appliance Design
Custom maxillary splint with full tooth coverage (except incisors for aesthetics).
Kloehn facebow attached to molar tubes for high-pull headgear (45° upward/backward force, 400–500g/side).
Bite plate adjusted for occlusal contact or bite opening.
Extras: Tongue grid for open bites, “circum-arch” elastics for incisor retroclination.
Wear Time
Nightly + daytime use (10–18 hrs/day for 6–18 months). Compliance was key! Non-responders (no change in 6 weeks) were excluded.
Using cephalometric analysis (Björk’s superimposition method), the study revealed:
Headgear & RME: A Dynamic Duo or Just Extra Work? 🤔
Class II malocclusion—aka the “overbite situation”—is like a dental tug-of-war between the maxilla (upper jaw) and mandible (lower jaw). Sometimes, the upper jaw is a little too enthusiastic and needs to be held back while the lower jaw plays catch-up. Enter headgear, the OG of growth modification since the 1950s! 🎩🦷
Why Headgear?
Think of it as a seatbelt for your upper jaw—it stops excessive forward movement while letting the lower jaw grow at its own pace. 🚗💨 Studies show headgear can reduce facial convexity (goodbye, profile selfies with extra chin tucks!) and improve the sagittal relationship between the upper and lower dental arches. 📏✨
But What About a Narrow Upper Jaw?
Class II cases often come with maxillary constriction, meaning the upper arch is too narrow—like trying to fit a king-size blanket on a twin bed. 🛏️ Solution? Rapid Maxillary Expansion (RME)! 💥 By widening the upper arch, RME makes more space for the teeth and helps balance the bite.
The Real Question: RME + Headgear = Worth It?
Some say expanding the maxilla first helps headgear work even better. Others wonder, “Why add more hardware when headgear alone does the job?” 🤷♂️ That’s exactly what this study aims to find out—comparing maxillary skeletal and dental effects when using combined headgear alone vs. headgear + RME.
👨⚕️ The Study Setup: Who, What, Where?
🔬 Study Type: Experimental (aka, “let’s test this on real people!”) 📍 Location: Pontifícia Universidade Católica do Rio Grande do Sul, Brazil 🇧🇷 👦👧 Participants: 41 kids with Class II, Div 1 malocclusion + 20 Class I controls 🦷 Treatment: Combined Headgear (CH) alone vs. RME + CH 📏 Assessment Tool: Lateral cephalograms 📸
📊 How Were They Grouped?
Group
Who’s In?
What’s Happening?
Group 1 (CH)
20 Class II kids (8 boys, 12 girls)
Wore combined headgear 12-14 hrs/day for 6 months 🕒
Group 2 (RME+CH)
21 Class II kids (10 boys, 11 girls)
First did RME for 14 days, then combined headgear for 6 months🔧🦷
Group 3 (Control)
20 Class I kids (8 boys, 12 girls)
Just space supervision, no fancy gadgets 🚫
📏 Baseline Skeletal Stats (T1): Were They Even Comparable?
Measurement
Group 1 (CH)
Group 2 (RME+CH)
Group 3 (Control)
Mandibular Plane Angle (SN.GoGn)
36.9° ± 3.9°
36.4° ± 6.3°
36.9° ± 4.1°
ANB Angle (Class II if > 4°)
5° ± 1.9°
5.9° ± 1.8°
3.7° ± 2.2°
✔️ All groups had similar skeletal patterns (slightly hyperdivergent). ✔️ Class II groups (CH & RME+CH) had significantly higher ANB than controls (duh!).
⚙️ Treatment Protocols: How Did They Torture—Err, Treat—The Kids?
🦷 Group 1 (CH Only):
✅ Headgear worn 12-14 hours/day for 6 months ✅ Inner bow expanded 2mm before insertion into molar tubes ✅ Force applied: 300g/f per side in cervical + parietal directions ✅ Resultant force vector: 424g/f
🦷 Group 2 (RME + CH):
🔧 Step 1: RME Phase (14 days)
Modified Haas Expander (banded from 1st molars → premolars/deciduous molars)
Activated 4x on day 1, then 2x/day until transverse overcorrection achieved 💥
🦷 Step 2: CH Therapy (6 months)
Same headgear protocol as Group 1 (CH), just started 7 days into expansion
📸 Follow-Up (T2): What Happened Next?
📅 Timeline:
Experimental groups (CH & RME+CH): Cephs taken once Class I molar relationship achieved (~6 months)
Control group: Cephs taken 6 months later (nothing changed, just grew normally)
👀 Cephalometric Analysis:
Blinded operator digitized landmarks using Dentofacial Planner Plus (DFP 2.0)
Statistical Analysis:
Student’s t-test for before-after comparisons
ANOVA & Tukey’s tests for inter-group differences
Headgear vs. RME + Headgear: Who Wins the Class II Battle? 🦷⚔️
So, what really happened after 6 months of headgear and expansion drama? Did we just push teeth back, or did we actually fix something?
🔬 The Molar Drama: Distalization, Tipping & More!
When you strap a headgear on a patient, you expect those maxillary molars to back off a little, right? Well, they did! But let’s get into the juicy details.
Molar Effects 🦷
Group 1 (CH Only)
Group 2 (RME + CH)
Significance 📌
Maxillary molars moved distally
✅ Yes
✅ Yes
Both groups had distal movement!
Maxillary molars tipped distally
✅ Yes (6.4°)
❌ No tipping (1.4°)
Tipping only in CH group!
Difference in tipping between groups?
❌ No significant difference
❌ No significant difference
Tipping happened, but RME didn’t change the game!
Maxillary molar extrusion?
❌ Nope
❌ Nope
No molars were harmed in the making of this study! 😂
🎯 Key Takeaway:
Headgear alone (CH) made maxillary molars tip backward.
Adding RME (CH + RME) prevented tipping, but the amount of distal movement was the same in both groups.
Neither group showed molar extrusion. So, no unwanted gummy smiles! 😃
🏠 What Happened to the Maxilla?
Did we actually hold that maxilla back, or did we just give the patient extra metal to wear?
Maxillary Effects 🏠
Group 1 (CH Only)
Group 2 (RME + CH)
Significance 📌
Clockwise maxillary rotation?
✅ Yes
❌ No
Only CH group showed rotation!
Forward maxillary growth restriction?
❌ No
✅ Yes
RME + CH held maxilla back better!
Difference in maxillary changes between groups?
❌ No significant difference
❌ No significant difference
Effects were subtle between groups.
📌 Clockwise rotation of the maxilla was seen in Group 1 (Cervical Headgear Alone) but was not significantly different from Group 2 (Cervical Headgear + RME).
🧐 Why does this matter?
Molars act as anchors for headgear forces. If the force is applied at a lower level, the maxilla tilts clockwise⏩🔄.
This tilts the occlusal plane and can make deep bite & excessive gingival exposure worse! 😱
Ortho Wisdom of the Day:
❌ Class II + Deep Bite + Excess Gingival Display = BAD combo for cervical headgear alone! ✅ Use high-pull headgear instead—its force vector passes through or above the maxilla’s center of resistance, preventing excessive rotation. 💡
🎯 Key Takeaway:
Headgear alone (CH) rotated the maxilla clockwise a bit.
RME + CH restricted forward growth of the maxilla.
No major differences between groups—so, was RME really necessary? 🤔
⏳ How Long Did It Take to Achieve Class I?
Let’s face it, patients hate long treatments. So, which group got to a Class I molar relationship faster?
Group
Time to Class I Molar Relationship
CH Only (Group 1)
⏳ 6.5 ± 1 months
RME + CH (Group 2)
⏳ 5.5 ± 1.1 months
🎉 Winner: RME + CH shaved off 1 month! But was it worth the extra hassle? 🤷♂️
🦷 Why Headgear? And Which One?!
If you’ve ever had a patient ask, “Why do I have to wear this medieval torture device?”—here’s your answer:
Type of Headgear 🎭
Best For… 👩⚕️
Why? 🤓
Cervical Headgear (CH)
Hypodivergent or mesodivergent faces
Allows some molar extrusion, doesn’t mess with facial esthetics. ✅
High-Pull Headgear
Hyperdivergent faces, open bites
Keeps molars in check, prevents jaw from tipping backward. 🚫
Combined Headgear (CH + High-Pull Forces)
Mesodivergent & hyperdivergent faces
Controls molar movement while keeping things balanced. ⚖️
🎯 Key Takeaway:
Cervical headgear? Great for low-angle cases, but it can increase vertical growth. 😬
High-pull headgear? Best for high-angle cases to prevent open bite.
Combined headgear (CH)? The middle ground—good for most Class II, especially hyperdivergent cases!
So, if your Class II patient is growing like a giraffe 🦒, go for combined or high-pull headgear. Otherwise, cervical may do the trick!
🦷 The Science Behind Headgear Design
The way a headgear is designed determines its effects. Let’s take a look at what happens when we tweak the outer bow:
Headgear Bow Design 🎭
Effect on Molars 🦷
Impact on Mandible 👀
Longer & Downward Angled
More vertical force, avoids extrusion, but increases distal tipping 📉
Can help in hyperdivergent cases! ✅
Shorter Outer Bow (Cervical Headgear)
More horizontal force, prevents excessive molar tipping
Keeps mandible stable 📏
Upward Angled Bow 🚀
Eliminates tipping, but causes extrusion! 😱
Leads to clockwise mandibular rotation(bad for Class II) 🚨
🎯 The Takeaway:
If you don’t want molars tipping too much, keep the bow shorter!
If you’re worried about extrusion messing up the occlusion, avoid upward-angled bows!
🦷 What About Transverse Maxillary Deficiency?
Class II Division 1 isn’t just about protruded upper teeth—there’s often a hidden transverse problem! 😲
Issue 🤯
How It Affects Class II? 📉
Solution? ✅
Narrow maxillary arch
Makes the mandible sit back
RME to unlock forward mandibular growth! 🏗️
Constricted canine region
Pushes the lower jaw backward
Widen it to allow natural AP growth! 📈
🎯 Key Takeaway:
If the maxilla is too narrow, mandibular growth gets blocked—making Class II even worse!
RME before headgear?Yes! Expanding first means the mandible can move forward naturally.
So, if your Class II patient has a narrow upper arch, don’t just throw headgear at them—widen it first! 🚀
🤓 Headgear vs. Headgear + RME – Which is Better
Feature 🔬
CH Alone
CH + RME
Distal molar movement 🚀
✅ Good
✅ Good
Distal tipping 🤷♂️
6.4° (More) 📉
1.4° (Less) ✅
Molar extrusion 📏
❌ None
❌ None
Clockwise maxillary rotation 🔄
✅ Happened
❌ Prevented
Restriction of forward maxillary growth ⏳
❌ No significant restriction
✅ More restriction 📉
🦷 The Final Takeaway: What Should YOU Do?
🔹 If your Class II patient has a narrow maxilla, use RME before headgear—it’s a game-changer! 🎮 🔹 High-pull headgear might be a better choice if you want to avoid maxillary rotation. 🏗️ 🔹 No single approach is perfect—your treatment should be customized based on facial pattern & occlusion.
📜 Conclusion: The Ortho Cheat Sheet 📜
✅ Distal movement of maxillary molars happens with both CH & CH+RME. ❌ Distal tipping occurs ONLY with CH alone. ❌ Clockwise rotation of the maxilla happens more with CH alone. ⚡ RME before headgear speeds up treatment & minimizes unwanted side effects!
Let’s talk about anterior maxillary osteotomy—a fancy way of saying “pushing your upper jaw back into place because your teeth decided to go rogue.” Now, before we dive into the nitty-gritty, let’s acknowledge the real heroes here: the orthodontists and surgeons who spend their days nudging bones like a very sophisticated game of Jenga.
Maxillary osteotomies have been around longer than your grandma’s secret recipe for laddoos. But unlike her kitchen skills, these techniques come with scalpels, screws, and a significant chance of making your nose twitch for weeks.
We have three classic moves in the Maxillary Osteotomy Dance:
1. Wassmund osteotomy – Named after a guy who probably spent too much time thinking about cutting bones.
2. Wunderer osteotomy – Wunderer…because wondering if your face will move correctly afterward is part of the thrill.
3. Anterior maxillary downfracture osteotomy – For those who like their surgery with a side of gravity.
While all three techniques get the job done, they differ in their “access route”, like Google Maps giving you three ways to get to the same dental conference—one scenic, one straightforward, and one with a questionable dirt road.
The Problem With Pushing Forward
Now, if you thought moving the anterior maxilla forward was easy, think again. The palatal mucosa is like an overprotective mother—it does not stretch easily. If you try too hard, you might end up with an oronasal or oroantral fistula. (For those unfamiliar, that’s a fancy way of saying, “Congratulations, you now have an accidental bonus airway!”)
In fact, the only reported case of maxillary advancement via osteotomy happened in 1968—shoutout to William Bell, the original maxillary daredevil. He moved the maxilla forward, bone-grafted the leftover gap, and then—because 1968 was a wild time—popped in a removable denture like a dental Band-Aid.
Enter Distraction Osteogenesis – The Slow and Steady Approach
The dental world eventually realized that gradual movement is the way to go (kind of like convincing your cat to take a bath). So, we borrowed a trick from orthopedics: distraction osteogenesis. Originally developed for cleft lip and palate cases, this technique slowly moves bones using:
External distractors – Big, bulky, and very “Mad Max.”
Orthodontic face masks – Like Invisalign’s overachieving cousin.
Internal distractors – The discreet VIP section of distraction devices.
But here’s the twist: these are mostly used to move the whole maxilla forward (Le Fort I style), rather than just the anterior segment. That’s like moving an entire apartment building when all you really needed was to shift the balcony.
The Unexpected Hero: The Palatal Distractor
Palatal distractors have traditionally been used for expansion, helping kids (and the occasional brave adult) widen their maxilla to correct collapsed buccal occlusion. But someone (probably while holding a coffee and staring at a dog study) thought, “Hey, what if we used this thing to move the maxilla forward?”
The results?
Tooth-borne distractors were tested on dogs (lucky them), and they did successfully move the anterior maxilla forward—along with a lot of dental movement.
Bone-borne distractors came in to save the day, ensuring that actual bone (not just teeth) was being moved.
And guess what? There’s exactly ONE reported case of a palatal distractor being used to advance a retruded maxilla in a non-cleft patient. Just one. That’s rarer than an orthodontist who doesn’t own at least three pairs of loupes.
Who Needs This? (Besides People Who Want to Look Like Their Own X-Ray)
This technique is perfect for patients with maxillary hypoplasia in both the anteroposterior and transverse planes—especially if they have cleft lip and palate. Think of it like a strategic battlefield move:
Crossbite limited to anterior and premolars? Check.
Molars behaving themselves in normal buccal occlusion? Check.
Dental crowding making your orthodontist sigh dramatically? Check.
The beauty of this approach? As your maxilla gradually advances, new bone forms in its wake—meaning your displaced teeth can be politely guided into their new positions with post-surgical orthodontics.
The Surgical Game Plan: Step-by-Step (or Slice-by-Slice)
Step 1: Build Your Secret Weapon – The Hyrax Appliance
Before the surgery even starts, we need our mechanical hero: the Hyrax orthodontic appliance (which sounds like a prehistoric creature but is actually a German-made expansion screw). Unlike its usual role in expanding palates sideways, we tweak it to push forward instead of out.
4 arms of the appliance:
2 anterior arms → Soldered to canines or first premolars
2 posterior arms → Soldered to first or second molars
This is the equivalent of securing a medieval battering ram before storming the castle walls.
Step 2: Knock Knock, It’s Surgery Time!
Under general anesthesia (because no one wants to be awake for this), we begin:
1. Vestibular incision – From first molar to first molar (basically, a wide front door for the maxilla).
2. Mucoperiosteal flap reflection – Peeling back the gums like opening a well-wrapped gift… but with scalpels.
3. Buccal linear osteotomy – A clean cut above the maxillary teeth from pyriform rim to distraction site.
4. Lateral nasal wall cut – Because your nose needs to be in on the action too.
5. Septal osteotomy – The nasal septum gets a trim at its base (like a very aggressive haircut).
At this point, your maxilla is thinking, “What did I do to deserve this?”
Step 3: The Grand Downfracture (Because Upfracturing Isn’t a Thing)
Vertical interdental osteotomy → First, a light cut through the buccal cortex, then deepened carefully (like slicing a layered cake).
Palatal osteotomy → Extending the cut medially to separate the segment without puncturing the palatal mucosa (because who needs a hole in their mouth?).
Downfracturing the anterior maxilla → A gentle wiggle and push to mobilize it forward (think of convincing a cat to move off your laptop).
Important Rule: Do not mess with the palatal mucosal pedicle—it’s keeping everything alive!
Step 4: Installing the Hyrax & Hitting the Snooze Button
1. Cement the appliance onto the selected teeth. (Your maxilla is now officially in a mechanical relationship.)
2. Close the surgical wound. (Because we don’t want to leave things open-ended.)
3. Let the bone chill for five days. (Surgery is tiring. Even for your face.)
Step 5: The Big Move – Slow & Steady Wins the Maxilla Race
On post-op day five, we start activating the Hyrax:
1mm per day (Because bones like to take their time).
2 to 4 activation rhythms per day (Like an orthodontic drumbeat).
The anterior maxilla keeps moving forward until a normal overjet is achieved.
Once it’s in place? Lock it in for 6 weeks—because good things take time (and so does new bone formation).
The Good, The Bad & The Orthodontist Who Has to Deal With It
✅ The Benefits:
⭐ No need for bone grafts – Your body does all the hard work. ⭐ Improved soft tissue support – Upper lip & paranasal area get a free upgrade. ⭐ Better space for orthodontic alignment – Less need for tooth extractions. ⭐ Stability – Unlike nonvascularized bone grafts, this bone won’t shrink over time.
⚠️ The Potential Drama:
🚨 Anchorage issues – If the patient lacks premolars/molars, the posterior teeth might move instead of the maxilla. 🚨 Tooth proclination – If the palatal osteotomy isn’t done properly, the front teeth might tip forward instead. 🚨 Appliance limitations – Tooth-borne distractors provide great control, but bone-borne devices might be more stable.
Move over, braces—there’s a new sheriff in town, and it’s called the Lip Bumper (LB)! Okay, not exactly new, but definitely underrated. If you thought orthodontic appliances were just about pulling teeth in different directions, LB is here to expand your perspective—literally!
Let’s break down the magic of LB, one millimeter at a time.
Orthodontic treatment often involves making critical decisions about space management in the mandibular dental arch. One conservative approach that has gained attention is lip bumper (LB) therapy, which may serve as an effective alternative to future space deficiency resolution, reducing the necessity for tooth extractions.
LB Therapy: The Good, The Bad, and The Bulky
The Good: More Space, Less Crowding
Studies suggest that LB therapy can help gain mandibular arch circumference by: ✔️ Distally angulating the first molars (M1) ✔️ Proclining the incisors (hello, newfound space!) ✔️ Buccally tipping the deciduous molars/premolars ✔️ Preventing mesial migration of molars (keeping that precious E space intact!)
This results in increased arch width, length, and perimeter, making it a solid alternative for managing mild to moderate crowding.
The Bad: Unpredictability & Side Effects
Before you rush to prescribe LBs to every borderline crowding case, let’s talk about the flip side: ❌ High uncertainty about the exact amount of movement per tooth ❌ Risk of M2 impaction or ectopic eruption (ouch!) ❌ Potential excessive buccal tipping of incisors, leading to periodontal concerns ❌ Social struggles—lips looking permanently puffed out (not ideal for the self-conscious teen)
The Bulky: Activation Matters
Not all LBs are created equal—activation protocols vary across studies. The amount of activation differs depending on the region:
Tooth Region
Activation Range (mm)
Molars (M1)
2 – 5 mm
Premolars/Primary Molars
3 – 8 mm
Canines
3 – 5 mm
Incisors
1 – 3 mm
More activation ≠ better results. Too much force can lead to M2 eruption disturbances, especially if the LB is worn for over two years.
LBs: A Space Maker or a Space Stealer?
While LB therapy is great for anterior crowding relief, posterior space management often gets overlooked. If not planned carefully, gaining space in the front can mean losing it in the back—resulting in impacted second molars (M2).
🚨 Negative Predictors for M2 Impaction:
Pre-treatment M2 inclination >30°
LB treatment duration >2 years
So before jumping on the LB train, check that M2 position! Otherwise, you’ll be trading one problem (crowding) for another (impacted molars and potential future surgeries).
Final Thoughts: The Patient Factor
If LB therapy had a motto, it would be: “Cooperation is key.” A patient who refuses to wear their LB (or removes it every chance they get) is on the fast track to treatment failure. In some cases, orthodontists have resorted to tying the LB in place—because desperate times call for desperate measures.
🔹 Max LB duration in studies: 28 months 🔹 Ideal duration: As short as possible while achieving stable results
Bottom Line:
✔️ LB therapy can increase arch length and reduce crowding. ❌ But it comes with unpredictability, risk of M2 impaction, and social discomfort. 💡 Plan wisely, evaluate molar positions, and keep treatment durations reasonable!
Class II malocclusions are a common orthodontic challenge, often requiring precise management of maxillary dentition to achieve ideal outcomes. Extraoral forces, such as those applied via headgear, have long been used to either distalize upper molars or restrict their forward migration. Understanding the physics behind these forces and their application is key to maximizing treatment efficacy and minimizing undesirable side effects.
Orthodontic forces can be represented as vectors, which help visualize the direction and magnitude of applied forces. When multiple forces converge on a tooth, a resultant vector can be calculated. This resultant vector can then be resolved into components parallel and perpendicular to the tooth axis, allowing for precise analysis of force magnitudes in these directions. This fundamental principle of physics underpins the design and application of combined headgear, which uses cervical and high-pull vectors to achieve targeted outcomes.
One of the critical considerations in orthodontic treatment is the direction of applied forces. Studies show that molars tipped back during distalization tend to relapse quickly unless occlusal forces act to upright them. For bodily movement of upper molars, force must be applied through the center of resistance. Cervical headgear, which applies forces below the center of resistance, can cause extrusion of upper molars and an undesirable opening of the mandible. Conversely, occipital traction—preferred for patients with open bite tendencies—is less effective in altering maxillary structures anteroposteriorly.
Addressing Challenges with Combined Headgear
The limitations of traditional cervical and high-pull headgear in treating Class II malocclusions with high mandibular plane angles necessitate alternative approaches. Combined headgear, which integrates forces from both cervical and high-pull vectors, offers a promising solution. By optimizing the resultant force vector, combined headgear can:
Minimize molar extrusion.
Reduce the likelihood of mandibular plane angle alterations.
Improve anteroposterior control of maxillary structures.
Evidence Supporting Combined Headgear
Research highlights the potential of combined headgear to address the shortcomings of single-vector approaches. For instance, bending the outer arms of cervical headgear downward by 15° has been shown to reduce extrusion. Moreover, studies by Baumrind and colleagues suggest that mandibular plane angle remains stable when combined headgear is used, likely due to the balanced application of forces.
This study examined three treatment groups, each using a different force ratio: 1:1, 2:1, and 1:2.
Treatment Group
Force Adjustment (High-Pull : Cervical)
Inner Bow Expansion
Wear Time
Treatment Duration
1:1
150 gm per side : 150 gm per side
Not expanded
20 hours/day
2 to 9 months
2:1
200 gm per side : 100 gm per side
Not expanded
20 hours/day
3 to 7 months
1:2
100 gm per side : 200 gm per side
Not expanded
20 hours/day
2 to 7 months
The goal? To understand how these variations impact the displacement of the maxilla and mandible, molar positioning, and even occlusal plane inclination. Here’s what they found.
Changes Through the Treatment
Parameter
1:1 Treatment Group
2:1 Treatment Group
1:2 Treatment Group
ANB Angle
Significant decrease
Significant decrease
Significant decrease
SNB Angle
Significant increase
Significant increase
No significant change
SN/GoGn
No significant change
Significant decrease
No significant change
SN/OP
No significant change
Significant increase
Significant decrease
Upper Molar/ANS-PNS (Angle)
No significant change
No significant change
Significant decrease
Upper Molar/ANS-PNS (mm)
Significant decrease
Significant decrease
Significant increase
Lower Molar MP (mm)
Significant increase
No significant change
No significant change
Maxillary and Mandibular Displacement
In the third treatment group, with a 1:2 force ratio, the maxilla was displaced backward. Interestingly, this aligns with findings from previous studies by O’Reilly and Boecler, who observed similar effects with cervical headgear. However, the mandible’s forward growth remained consistent across all groups, resulting in no significant differences in the ANB angle. This reinforces the idea that headgear’s primary role is in influencing the maxilla rather than the mandible.
Upper Molar Movement
Now, let’s talk molars. Superimposition analyses showed that the upper first molar was distalized by 3.6 to 4.0 millimeters across all groups. This distalization played a significant role in correcting molar relationships. However, the type of headgear affected how these molars moved. For example, high-pull headgear resulted in greater horizontal displacement, as noted by Baumrind et al., while cervical headgear tended to cause more vertical changes.
Occlusal Plane Inclination
One fascinating finding was the tipping of the upper molars. In the third group, there was a significant decrease in angulation and a mesial displacement of the molar apex. This aligns with Baumrind’s observations and highlights how force direction can influence tooth movement. Meanwhile, Badell’s study on combined headgear treatments showed a notable distal tipping, which was less pronounced in other groups.
Vertical changes were also noteworthy. In the 1:2 group, the downward force component caused molar extrusion, a pattern commonly seen with cervical headgear. Conversely, the 1:1 and 2:1 groups showed molar intrusion, consistent with high-pull headgear studies. This difference in vertical displacement also impacted the occlusal plane. The second group, with a 2:1 force ratio, showed a significant increase in occlusal plane inclination, mirroring findings from Badell and Watson.
Mandibular Plane Angle (MP)
Beyond the teeth, headgear also influences skeletal structures. The mandibular plane angle—a key indicator of vertical facial growth—remained largely unchanged in the 1:2 group, likely due to a modest increase in ramus height. However, the second group showed a significant decrease in the SN/Go-Gn angle, suggesting a more pronounced impact on vertical growth patterns.hames et al. and Badell, highlighting the interplay between force systems and vertical growth patterns.
Intercanine Width
And finally, let’s touch on intercanine width. Mitani and Brodie’s research showed an increase in this variable with cervical headgear, and this study confirmed those findings. The third group, with the greatest distalization, exhibited the most significant increase in intercanine width, highlighting the interplay between molar movement and arch expansion.
So, what’s the takeaway? Headgear therapy is a versatile and effective tool, but its outcomes depend heavily on the force system used. From molar distalization to occlusal plane changes, every detail matters. This study not only builds on decades of research but also underscores the importance of tailoring treatment to individual patient needs.