Morphometric analysis of cervical vertebrae in relation to mandibular growth

CVM Basics

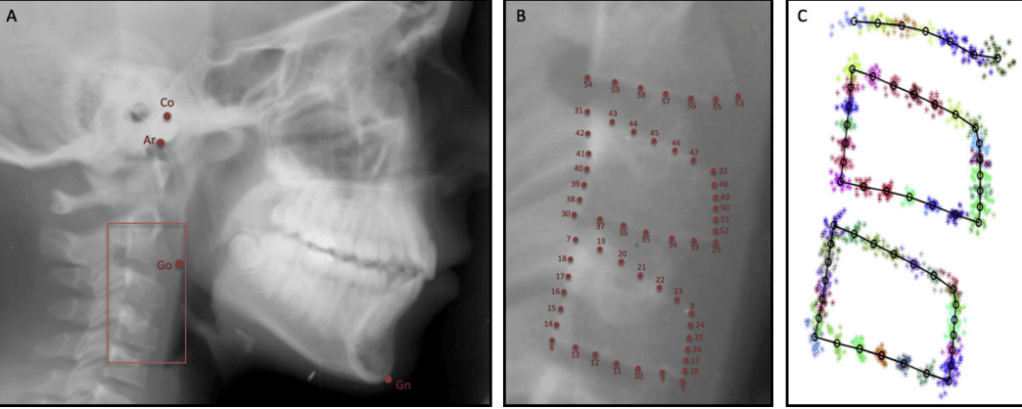
  • Vertebrae used: C2, C3, C4
  • Visible on lateral cephalogram (no extra radiation)
  • Traditionally used to estimate skeletal maturity & mandibular growth peak

CVM Stages (Baccetti et al.)

  • CS1 – Inferior borders of C2–C4 flat; bodies trapezoidal.
  • CS2 – Concavity begins at C2 lower border.
  • CS3 – Concavity at C2 & C3; bodies less trapezoid.
  • CS4 – Distinct concavities at C2–C4; bodies nearly rectangular.
  • CS5 – Strong concavities; square vertebrae.
  • CS6 – Deep concavities; taller than wide.

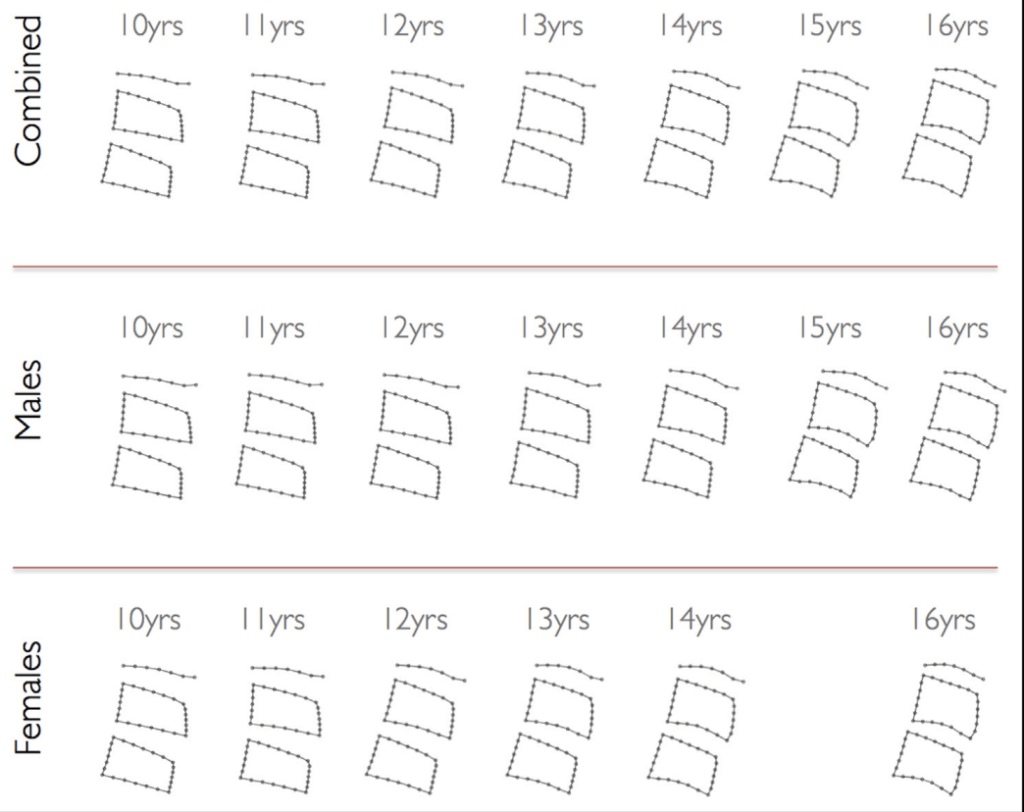
CVM Shape Changes with Age

  • C2–C4 Inferior Borders → Concavity increases with age
  • C3 & C4 Height → Becomes taller, shape transitions trapezoid → rectangular/square
  • Sex Difference: Girls reach each stage earlier than boys

Study Findings (Gray et al., 2016)

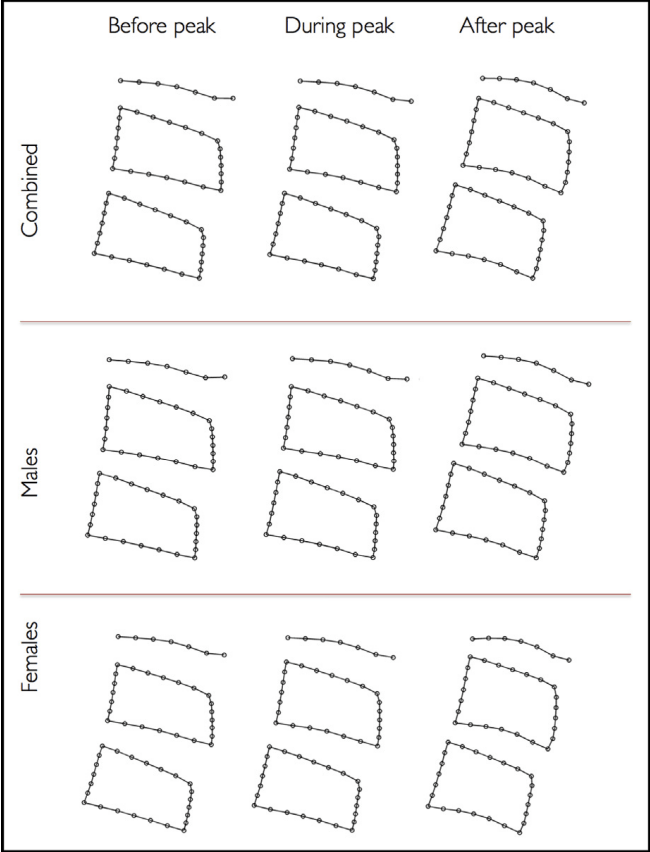
✅ Morphometric changes match classic CVM descriptions
❌ CVM stages did not reliably predict mandibular growth peak
👉 Growth peak often occurred before or after CS3, not always between CS3–CS4

Peak mandibular growth: typically occurs around CS3, but study shows high variability:

  • 32% after CS3
  • 28% after CS1
  • 20% after CS2
  • 20% after CS4
  • No growth peak at CS5 or CS6

Clinical Pearls

  • CVM can confirm if peak growth has passed, but
  • Chronologic age is often a better predictor than CVM alone
  • Always combine with:
    • Secondary sex characteristics
    • Height/weight velocity
    • Dental development
    • Clinical growth indicators

📌 Quick Rule of Thumb

  • Before CS3 → Growth spurt may still be coming.
  • At CS3 → Possible growth peak (but variable).
  • After CS4 → Growth peak has passed.

Clinical MCQs – Cervical Vertebrae & Mandibular Growth


Q1.

A 12-year-old boy presents for orthodontic evaluation. His lateral cephalogram shows concavity in the inferior borders of C2 and C3, but not yet in C4. The vertebral bodies are less trapezoid, approaching rectangular.
What can be inferred about his mandibular growth peak?

A. Growth peak is most likely already passed
B. Growth peak is occurring now or will occur soon
C. Growth peak cannot occur at this stage
D. Growth peak will only occur at CS5–CS6

Answer: B
Explanation: Concavities at C2 and C3 correspond to CS3, which is often associated with the timing of peak mandibular growth. However, variability exists (some peak after CS1, CS2, or CS4).


Q2.

During a growth assessment, a girl’s cephalogram shows all three cervical vertebrae (C2–C4) with distinct concavities, and the vertebral bodies appear rectangular and taller. She is 14 years old.
What is the most likely clinical implication?

A. She is approaching mandibular growth peak
B. She is currently at growth peak
C. She has already passed mandibular growth peak
D. She will have another growth spurt at CS6

Answer: C
Explanation: Distinct concavities and rectangular vertebrae (CS4 or later) suggest the growth peak has passed.


Q3.

Which of the following statements best reflects the findings of the study?

A. CVM staging alone is a reliable predictor of mandibular growth peak
B. Morphometric analysis can clearly differentiate “before” and “during” mandibular growth peak
C. Chronologic age is a better predictor of mandibular growth peak than CVM stage
D. Mandibular growth always occurs after CS3

Answer: C
Explanation: The study found chronologic age correlated more consistently with mandibular growth than CVM staging. Morphometric differences were only clear after the peak, not before vs during.


Q4.

An orthodontist uses CVM staging to plan functional appliance therapy in a boy. His CVM stage is CS3. According to the study, what percentage of children actually reach peak mandibular growth after CS3?

A. 20%
B. 28%
C. 32%
D. 50%

Answer: C
Explanation: Only 32% of participants reached peak mandibular growth after CS3, highlighting variability.


Q5.

Which of the following sex differences were observed in the study regarding mandibular growth peak timing?

A. Boys reached peak earlier (mean 11.7 yrs) than girls (mean 12.8 yrs)
B. Girls reached peak earlier (mean 11.7 yrs) than boys (mean 12.8 yrs)
C. No sex differences were found in timing of growth peak
D. CVM stage timing was identical in both sexes

Answer: B
Explanation: Girls reached mandibular growth peak earlier (mean 11.7 years) than boys (12.8 years).


Three-dimensional soft tissue analysis of the face following micro-implant-supported maxillary skeletal expansion

MSE and the face: what actually changes

Micro‑implant‑supported maxillary skeletal expansion (MSE) applies orthopedic forces through palatal mini-implants to split the midpalatal suture, yet its soft‑tissue effects have been less clear than its skeletal outcomes

This study used 3D stereophotogrammetry to quantify facial soft‑tissue changes immediately after expansion and at one‑year retention, revealing significant, stable changes localized to the paranasal region, upper lip, and both cheeks.

🔹 Protocol

  • Appliance: MSE with 4 palatal mini-implants
  • Activation: 0.25 mm turns, 1–2/day (per Cantarella protocol)
  • Monitoring: Midline diastema + CBCT confirmation

🔹 Soft Tissue Effects (3D Analysis)

  • Paranasal area → mean displacement 1.3–1.5 mm
  • Cheeks → greater displacement (R: 2.4 mm, L: 2.9 mm)
  • Direction: forward + lateral (dominant anterior)
  • Stable at 1-year retention

🔹 Clinical Pearls

✅ Changes most visible around cheeks and paranasal areas
✅ Facial symmetry can vary → expansion often slightly asymmetric
✅ 3D scans are superior to 2D photos for monitoring changes
✅ No significant relapse after 1 year

🔹 Quick Comparison

ExpanderEffectNotes
Tooth-borne (Hyrax/Haas)Dentoalveolar tippingRisk of root resorption
Bone-borne (MSE)True skeletal expansionStable soft tissue changes

Bottom line

MSE produces significant, forward‑lateral soft‑tissue enhancement centered on the paranasal/upper lip and cheeks, with the cheeks showing the largest and most clinically perceptible displacements that remain stable at one year

External root resorption and rapid maxillary expansion: TB vs BB comparison at post-retention

So, we’ve all sat through those ortho lectures where the professor keeps throwing around terms like “external root resorption” and “tooth-borne versus bone-borne expanders,” and honestly, at first, it feels like way too much. But here’s the simple breakdown of what’s actually happening.

Rapid Maxillary Expansion (RME) is used to fix transverse maxillary deficiency. The problem? The forces aren’t exactly gentle—they’re around 0.9 to 4.5 kg—and sometimes your roots pay the price. That’s where ERR (External Root Resorption) comes in.

Now, there are two main types of expanders:

  • Tooth-borne (Hyrax type): All the force is on the teeth.
  • Bone-borne (MARPE type): Screws in the palate take the load instead.

Now, how do we actually see ERR? That’s where CBCT comes in. It’s almost as accurate as micro-CT (which is super precise but can only be used on extracted teeth). Studies using CBCT showed that first molars (M1) and first premolars (P1) lose root volume after expansion, and even second premolars (P2) — the ones not holding the appliance — can get affected too. Forces spread everywhere!

Here’s the important point: most studies only looked at ERR right after expansion. But remember, cementum can repair itself a bit over time. So if you only check right away, you might overestimate the “permanent” damage. That’s why this study looked at ERR after 6 months of retention — to see what happens once the dust settles.

Here’s what the research shows:

  • Tooth-borne RME → more ERR. First molars lose the most root volume (around 17 mm³), followed by premolars. Even second premolars, which aren’t directly attached, still show resorption.
  • Bone-borne RME → less ERR. Molars only lose about 3 mm³. There’s still some resorption, but it’s way less compared to tooth-borne.

📊 Findings (6-month post-retention, CBCT-based)

ToothERR Volume Loss (mm³)TB GroupBB Group
M1 (1st molar)Highest17.033.11
P1 (1st premolar)Moderate6.421.04
P2 (2nd premolar)Least5.261.24
  • All teeth showed ERR (anchored + unanchored).
  • M1 palatal root most affected in length shortening.
  • ERR localized to apical, bucco-apical & bucco-medial areas.
  • Greater in TB vs. BB, but differences clinically questionable.
  • Mechanism of ERR: The buccal forces from the RME appliance compress the periodontal ligament, leading to tissue hyalinization. ERR occurs during the subsequent removal of this necrotic tissue on the compressed (buccal) side of the root. The root apex is also a sensitive area due to high force concentration and denser bone.

⚠️ Clinical Insights

  • Amount of root shortening (~0.3 mm) unlikely to affect longevity.
  • Bone-borne expanders ↓ ERR risk but do not eliminate it.
  • Cementum repair may occur post-retention.

📖 Citation

Leonardi R, Ronsivalle V, Barbato E, Lagravère M, Flores-Mir C, Lo Giudice A.
External root resorption and rapid maxillary expansion: TB vs BB comparison at post-retention.
Progress in Orthodontics. 2022; 23:45.

Maxillary Expansion in Skeletally Mature Patients with TADs

Why is Expansion Challenging in Adults?

  • Sutural resistance is much stronger due to interdigitation.
  • Main resistance sites:
    • Zygomatic buttress
    • Pterygopalatine suture
    • Midpalatal suture

👉 Viva Q: What are the main resistance structures?
✔️ A: Zygomatic buttress, pterygopalatine suture, midpalatal suture.

Conventional Approaches

SARPE (Surgically Assisted Rapid Palatal Expansion)

  • Weakens sutures via osteotomies.
  • Allows expansion in adults.
  • Produces V-shaped expansion (more anterior widening).
  • Invasive: hospitalization + morbidity.

👉 Contrast Viva: SARPE vs Tooth-borne RPE

  • Both → V-shaped expansion.
  • SARPE works in adults; RPE only in growing patients.
  • SARPE invasive; RPE non-invasive.

Revolution with TADs

MARPE (Microimplant-Assisted Rapid Palatal Expansion)

  • Miniscrews placed anterior palate (thick bone)
  • More anterior/inferior expansion than posterior/superior
  • Fewer dental side effects vs RPE

👉 Viva Q: Why does MARPE show more anterior expansion?
✔️ Because implants are anterior to posterior resistance sites.


MSE (Maxillary Skeletal Expander)

  • Developed by Won Moon (2003)
  • Posterior + superior force application
    • Acts on zygomatic buttress, pterygopalatine & midpalatal sutures
  • Design:
    • 4 microimplants (Ø 1.5–1.8 mm × 11 mm)
    • Bicortical engagement (palatal + nasal cortex)
  • Effects:
    • Parallel skeletal expansion (not V-shaped)
    • Minimal tipping/lateral rotation
    • Nasal cavity expansion → improved airway
    • Stability proven up to 5 years

👉 Contrast Viva: MARPE vs MSE

  • MARPE: anterior implants, anterior/inferior expansion, may allow tipping
  • MSE: posterior bicortical implants, parallel expansion including posterior & superior, minimizes tipping

Indications (MARPE/MSE)

✅ Skeletally mature patients with narrow arch
✅ Bilateral posterior crossbite
✅ Nasal airway obstruction
✅ Non-surgical alternative to SARPE
✅ Need for posterior/superior nasal cavity expansion

Contraindications

❌ Poor posterior palatal bone quality
❌ Active periodontal disease
❌ Palatal bone <4 mm
❌ Poor compliance
❌ Medical contraindications to minor surgery

APPLIANCE COMPONENTS of MARPE

  • Jackscrew: Positioned between maxillary first molars
  • Microimplants: Four implants (1.5-1.8mm Ø, 11mm length)
  • Engagement: Bicortical (palatal + nasal cortex)
  • Framework: Rigid design for parallel expansion

PLACEMENT PROTOCOL of MARPE

  • Pre-op CBCT for bone thickness
  • Site: T-zone (distal to 3rd rugae, 2nd premolar region)
  • Align force vectors toward zygomatic buttress (center of resistance)
  • Tight adaptation to palatal vault
  • Ensure bicortical penetration

👉 Viva Q: Why is MARPE positioned anterior to the soft palate (T-zone)?
✔️ To direct forces through the palatal vault toward the zygomatic buttress, optimizing skeletal expansion and reducing tipping.

The MSE was specifically designed to apply expansion force more posteriorly against the zygomatic buttress bones and pterygopalatine sutures, and more superiorly against the midpalatal suture and superiorly positioned perimaxillary suture

The MARPE appliance is sited anterior to the soft palate—in the T-zone at the level of the second premolars—so that its miniscrews deliver force vectors through the palatal vault directly toward the zygomatic buttress, optimizing skeletal expansion and minimizing dental tipping. With expansion, a lateral force is applied directly to the midplatal suture medial to the zygomatic buttress. This force distribution promotes more even expansion anteroposteriorly

Biomechanical Rationale:
The zygomatic buttress is the center of resistance of the maxillary complex during transverse expansion. Positioning MARPE miniscrews in the T-zone aligns the force vector with this buttress, shortening the moment arm to skeletal resistance points and producing more parallel, translational movement of the maxillary halves rather than rotational tipping of the alveolar processes or teeth.

T-Zone Landmark:

  • Defined by Poorsattar-Bejeh Mir et al. as the area distal to the third rugae, corresponding clinically to the second premolar region in the anterior palate.
  • This zone offers maximal palatal bone thickness with minimal soft tissue height, ensuring bicortical engagement and implant stability.

The amount of lateral rotation seen with an MSE is associated with the archial movement of the hemi-midface, with a fulcrum near the frontozygomatic sutures

With a high‑lateral fulcrum at the frontozygomatic region, the hemi‑midface opens like a fan around that pivot, producing outward archial rotation of the zygomatico‑maxillary block and relatively parallel separation of the maxillary halves

One‐line Answer
“Engaging both palatal and nasal cortical plates at the implant neck and apex distributes load across two dense bony layers, minimizing microimplant neck bending and internal strain.”

Biomechanical Explanation

When a microimplant is bicortically engaged, its neck is stabilized by the thin palatal cortical plate while its apex is anchored in the thicker nasal (or floor) cortical plate. Under lateral expansion forces, this dual‐plane engagement creates a load path through two rigid cortices rather than a single bone interface. Consequently, bending moments and shear stresses at the implant neck are significantly reduced, decreasing risk of neck‐plate microfracture and implant loosening.

ACTIVATION PROTOCOL

PhaseRateDurationEndpoint
Initial0.5-0.8mm dailyUntil diastema appearsMidline separation
Maintenance0.2-0.27mm dailyUntil adequate expansionMax width > Mand width

SUCCESS INDICATORS

  • ✓ Midline diastema formation
  • ✓ Patient reports breathing improvement
  • ✓ Parallel sutural opening on CBCT
  • ✓ Stable implants (no mobility)
  • ✓ Manageable pain/swelling levels

RETENTION PROTOCOL

  • Keep MSE body as skeletal retainer (6+ months)
  • Remove expansion arms after space closure
  • Immediate orthodontic space closure recommended
  • Long-term stability documented up to 5 years

TROUBLESHOOTING

ProblemSolution
Implant failureCheck bicortical engagement
Asymmetric expansionVerify implant stability
Excessive painReduce activation rate
No diastemaRe-evaluate bone maturity
Tissue inflammationNormal healing response

Midpalatal suture bone repair after miniscrew‑assisted rapid palatal expansion in adults

Maxillary constriction is a common problem we face in orthodontics. In younger patients, rapid palatal expansion (RPE) works beautifully because the midpalatal suture is still immature and repairs predictably. But in adults, things get tricky. Conventional RPE is often insufficient, and that’s where miniscrew-assisted rapid palatal expansion (MARPE)comes in.

A recent study by Naveda et al. (2022) looked into how the midpalatal suture actually repairs in adults after MARPE. And the findings are important for how we plan retention and manage expectations in this age group.

🦴 Midpalatal Suture Repair (16 months post-MARPE)

  • Incomplete repair common in adults
  • Bone density ↓ (vs. pre-expansion):
    • Anterior: –34%
    • Median: –77%
    • Posterior: –52%
  • Anterior region always repaired (100%)
  • Middle third = weakest (57% unrepaired)
  • >50% repair in 81% of patients

📊 Repair Scoring (0–3 scale)

ScoreDescriptionFrequency
0No repair0%
1<50% repair19%
2>50% repair38%
3Complete repair43%

🔑 Clinical Takeaways

✔ Expect slower & incomplete repair in adults
✔ Anterior + posterior heal better (vascular supply)
✔ Middle third caution → miniscrew zone, less vascularity
✔ Always reinforce retention

🔒 Retention Protocol

  • Maintain expander in situ: 12 months
  • After removal → place 0.8 mm stainless steel TPA
  • Monitor with CBCT + visual scoring
  • Inform patients: repair ≠ full ossification even after 16 months

Cup of Coffee with Dr.Khushal Makhija

“Dentistry is saturated,” they said.
“Pick MBBS,” they said.
But Dr. Khushal Makhija? He looked at that mountain called Dentistry and thought—why not climb Everest instead? 🏔️✨

Armed with a NEET rank most would trade for, he still chose the drill over the stethoscope. And thank God he did—because his idea of success isn’t just fillings and crowns, it’s making sure no patient ever leaves the chair unsatisfied.

And here’s the kicker: in a world where most see limits, he sees opportunity. While others sigh at saturation, he smirks—because that’s just fewer people to compete with on his way to the top two percent.

Trust me, this is one interview you don’t want to skip. If you’ve ever wondered “Is dentistry really worth it?”—here’s your answer, served with grit, wit, and a little sparkle.

👉 Read the full interview in Dentowesome Monsoon 2025 | Issue No. 3 — 

Molar Intrusion with Temporary Anchorage Devices

🔎 Indications

  • Supraerupted molars (commonly due to early loss of opposing tooth)
  • Need for posterior intrusion to re-establish occlusion
  • Minimally invasive alternative to surgery, headgear, or prosthetic crown reduction

🛠 TAD Design

  • Material: Titanium alloy
  • Size: 6–12 mm length, 1.2–2.0 mm diameter
  • Fixation: Mechanical grip to cortical bone (not osseointegrated)
  • Placement:
    • Minimally invasive
    • Often only topical anesthesia
    • Inserted through gingiva into bone with hand driver
    • Optional: mucosal punch/pilot hole in thick tissue or dense bone
  • Loading: Immediate
  • Removal: Simple hand unscrewing
  • Failure rate: 9–30%

🔩 Types of TADs

1. Self-tapping

  • Conical design, threaded shaft, tapered tip
  • Requires pilot hole → then inserted with hand driver

2. Self-drilling

  • Corkscrew design, threaded shaft, sharp tip
  • Cuts through bone, expels debris
  • Placed directly with hand driver (no pilot hole)

👩‍⚕️ Patient Selection

  • ≥ 12 years (FDA approved)
  • Avoid: growing patients (palatal suture), heavy smokers, bone metabolic disorders

Optimal Placement

  • Maxilla:
    • Between 2nd premolar & 1st molar (5–8 mm from alveolar crest)
    • Angle: 30–45° to occlusal plane (posterior region)
    • Palatal slope (avoid greater palatine nerve)
    • Midpalatal region = D1/D2 bone
  • Mandible:
    • Either side of 1st molar (~11 mm from crest)
    • Angle: 30–45° to occlusal plane
  • Bone Density (Misch classification):
    • Best: D1–D3 (dense cortical, anterior regions, palatal, posterior mandible)
    • Avoid: D4 (tuberosity – failure rate up to 50%)
    • Mnemonic“One Oak, Two Pine, Three Balsa, Four Foam”
  • Soft Tissue Health
    • Better: Keratinized (attached) tissue → ↓ failure
    • Worse: Nonkeratinized mucosa → gingival inflammation, overgrowth
    • Tip: In buccal posterior, if risk of root proximity → place in alveolar mucosa
TypeHU RangeLocationAnalogyTAD Suitability
D1>1250 HUAnterior mandible, buccal shelf, midpalatalOak 🌳✔ Best, may need pilot hole
D2850–1250 HUAnt. maxilla, midpalatal, post. mandiblePine 🌲✔ Good
D3350–850 HUPost. maxilla & mandible (thin cortex)Balsa wood✔ Acceptable
D4150–350 HUTuberosity regionPolystyrene foam❌ High failure (35–50%)

Bone Availability (Safe Zones)

RegionBest SiteDistance from Crest
Maxilla (posterior)Between 2nd premolar & 1st molar5–8 mm
Mandible (posterior)Either side of 1st molar~11 mm
Anterior (maxilla & mandible)Between canine & lateral incisor

If inadequate space:

  • Palatal placement
  • Root divergence before insertion

Insertion Technique

RegionAngle of InsertionRationale
Posterior Maxilla30°–45° to occlusal planeCortical anchorage; balance safety & stability
Anterior Maxilla / Posterior Edentulous Maxilla~90° to occlusal plane (parallel to sinus floor)Avoid sinus perforation, biomechanically better for molar intrusion
Mandible30°–45° to occlusal planeGreater contact with thick cortical bone

🔹 Tip: Orthodontic wire surgical stent may be used to guide accurate insertion

Force Loading Guidelines

ConditionRecommended ForceNotes
General loading limit≤ 300 gBeyond this = risk of failure
Thin cortical bone~50 g(Dalstra)
Dense mandibular boneStable up to 900 g(Buchter)
Maxillary molar intrusion (children)90 g(Kalra)
Maxillary molar intrusion (adults)50 g(Melsen)
Miniscrew-supported max molar intrusion100–200 gOptimal range
En-masse intrusion (PM2 + M1 + M2)200–400 g/sideRequires more force
Miniplate-supported mand molar intrusion500 g(Umemori)

Post-Insertion Care

Chlorhexidine Rinse (0.12%)

  • 10 mL BID for 1 week (continue if needed)
  • Prevents soft tissue inflammation & overgrowth
  • Slows epithelialization → keeps miniscrew head accessible

⚠️ Important Instruction for Patients:

  • Wait 30 min after rinsing before brushing with fluoridated toothpaste (to avoid inactivation of chlorhexidine by anionic agents in toothpaste).
TechniquePlacementControl of TippingNotes
Single TADBuccal dentoalveolus (between PM2 & M1 at mucogingival junction)Transpalatal arch (TPA) with buccal root activationTPA raised 3–5 mm → tongue pressure aids intrusion
Two TADsBuccal: between M1 & M2 Palatal: slope between PM2 & M1 (medial to greater palatine nerve)Elastic chain / NiTi coil passes diagonally across occlusal tableRisk of palatal tipping → may need partial braces
Palatal / MidlineMidline or palatal slope if interradicular space inadequateExtension arm to reach slope; partial braces for controlUsed when buccal bone insufficient

Intrusion Rates

Root Resorption Risks

  • Mechanism: Intrusive force concentrates at apex → PDL compression → possible necrosis & resorption
  • Evidence:
    • Molars = second highest risk (after incisors)
    • Documented in molars with:
      • Tip-back mechanics
      • High-pull headgear intrusion
      • Distalization forces
    • Range: 25–240 g can cause histologic resorption (Reitan)
  • Controversy:
    • Some studies show no significant difference between light (50 g) vs heavy (200 g) forces in resorption risk (Owman-Moll)
    • Ari-Demirkaya et al. → Mean apical resorption only 0.18 ± 0.18 mm after 7 months
    • Comparable to conventional orthodontics → not clinically significant
  • Sinus floor effects:
    • Intruding palatal root may lift sinus floor membrane intranasally
    • Usually without complications

Risks & Complications

ComplicationClinical NoteManagement / Prognosis
Root traumaInjury to PDL/root → possible vitality loss or ankylosisIf no pulp involvement → repair in 3–4 months
Anchorage failureMiniscrews may loosen, tip, or extrudeMobile screw → must be replaced; usually due to thin cortical bone or excessive force
Soft tissue irritationMore common in loose alveolar mucosa → inflammation, overgrowth, ulcersPrefer keratinized tissue; hygiene + CHX rinse
Nerve injuryGreater palatine nerve risk in palatal slope (5–15 mm from gingival border, lateral to M2/M3)Careful site selection & angulation
Sinus perforationSmall (<2 mm) usually self-heals, no effect on stabilityLarge perforation → possible sinusitis or oroantral fistula
RelapseExtrusion of intruded molars commonAverage relapse ≈ 30%

Treatment of open bite with microscrew implant anchorage

🔎 Diagnosis

  • Skeletal Class II with anterior open bite
  • High mandibular plane angle (FMA ~45°)
  • Large overjet, anterior open bite (~2.5 mm)
  • Mesially tipped mandibular molars, posterior crossbite possible

⚖️ Biomechanics

  • Maxillary microscrews: Between 2nd premolar & 1st molar →
    • Anterior retraction.
    • Posterior intrusion.
  • Mandibular microscrews: Between 1st & 2nd molars →
    • Prevent mesial tipping.
    • Uprighting & forward movement of molars.
  • Result: Counterclockwise mandibular rotation → improved profile.

🛠️ Treatment Progress

  • Fixed pre-adjusted edgewise appliance (0.022”).
  • Initial NiTi archwire (0.014”).
  • Loading microscrews after 2 weeks (150 g).
  • Forces Applied
    • Elastic thread from microscrews → molars for uprighting
    • Ni-Ti coil springs → anterior retraction
    • Transpalatal bar → stabilize arch, prevent buccal tipping
    • Intrusion forces applied to both arches

📌 Key Clinical Pearls

  • Safe placement: 30–40° angulation, avoids root damage
  • Vertical control of posterior teeth = critical in open bite management
  • Microscrew implants → prevent anchorage loss, eliminate need for intermaxillary elastics (avoids molar extrusion)
  • Intrusion & uprighting posterior teeth → counterclockwise mandibular rotation → improves profile

Nonsurgical Management of Anterior Open Bite: Review of Options

Anterior open bite has always been one of the most challenging malocclusions to treat. Patients often present with esthetic concerns, speech difficulties, and compromised function. While orthognathic surgery is a definitive option for severe skeletal open bites, not all patients are candidates—or willing—for surgery. Fortunately, nonsurgical strategies can offer promising results when case selection is appropriate.

🔍 Understanding the Problem

Open bite malocclusion can be dental or skeletal in origin:

  • Dental open bite:
    ▸ Normal craniofacial pattern
    ▸ Proclined incisors, under-erupted anterior teeth
    ▸ Often linked to habits like thumb/finger sucking
  • Skeletal open bite:
    ▸ Long face syndrome, ↑ mandibular plane angle, retrognathic mandible
    ▸ Greater vertical growth pattern
    ▸ More difficult to manage without surgery

Key Diagnostic Tools

  • UAFH : LAFH ratio (<0.65 → poor prognosis for orthodontics)
  • Overbite Depth Indicator (ODI)
    ▸ Mean: 74.5°
    ▸ ≤65° → open bite tendency

Treatment Approaches

A. Dental Open Bite

  • Extractions & retraction (first premolars) → “drawbridge effect” closes the bite by uprighting incisors.
  • Best suited for patients with:
    ✅ Proclined incisors
    ✅ Minimal gingival display
    ✅ ≤2–3 mm incisor show at rest

B. Skeletal Open Bite (Nonsurgical Options)

Skeletal open bite is much harder to correct nonsurgically than dental open bite. The central challenge lies in controlling vertical dimension—particularly by preventing or reducing molar eruption.

Goals: prevent posterior extrusion, allow anterior bite closure.

⚖️ Key Treatment Principles

  • Prevent extrusion of upper posterior teeth
  • Prevent eruption of lower molars
  • Maintain or create a curve of Spee
  • ❌ Avoid Class II & III elastics (encourage posterior extrusion)
  • ❌ Avoid anterior vertical elastics (incisors already over-erupted)
  • Posterior extractions preferred if needed (e.g., caries, premature contact, etc.)

👉 Clinical insight: For every 1 mm molar intrusion, you can achieve about 3 mm anterior bite closure through mandibular counterclockwise rotation.

MethodKey Points
High-pull headgear, lingual arches, bite blocksPrevent molar eruption; maintain curve of Spee.
Implants / MiniplatesPosterior intrusion (3–5 mm possible); counterclockwise mandibular rotation.
Multiloop Edgewise Archwire (MEAW)
Multilooped .016 × .022 SS wires + heavy anterior elastics
Molar intrusion + incisor extrusion; alters occlusal plane; mainly dentoalveolar effects. Not ideal in patients with already excessive dentoalveolar height.
Passive Posterior Biteblocks
extend 3–4 mm beyond rest position
Inhibit molar eruption; Restrict buccal dentoalveolar eruption → allow mandibular autorotation forward, hence more effective in growing patients; can be spring-loaded or magnetic (more effective; ~3 mm improvement vs 1.3 mm for spring type)
Functional Appliances – Open bite is worsened by faulty orofacial muscle posture.FR-4 (Frankel regulator):
Alters dentoalveolar eruption, retracts incisors.
Some evidence of forward mandibular rotation.

Bionator/Activator:
Restricts maxillary molar eruption, mild decrease in facial height (~1.3 mm).
Used mainly in Class II with mild anterior open bite, not severe skeletal cases.
Active Vertical Corrector (AVC) – using samarium cobalt magnets embedded in acrylic.Magnetic molar intrusion; worn 12–24 hrs; ~3 mm bite closure avg, bulky (7 mm interocclusal opening needed)
Vertical Pull ChincupUseful for patients with excessive vertical dimension and backward mandibular rotation tendencies. ↓ mandibular plane angle, restricts molar extrusion; compliance dependent.
GlossectomyOnly in true macroglossia cases.
If tongue is normal in size but thrusting, it often adapts after bite closure → surgery not needed.
If tongue is truly enlarged relative to oral cavity → partial glossectomy may improve stability.

🔄 The Retention Challenge

One of the biggest hurdles in open bite management is long-term stability.

  • Studies show relapse rates of 35–43%.

  • Relapse is often due to dentoalveolar rebound rather than skeletal relapse.

  • Retention strategies:

    • Long-term/fixed retainers

    • Retainers with occlusal coverage to limit molar eruption

    • Tongue crib when tongue posture is contributory

DOWNLOAD THE PAPER HERE:

SPOTIFY EPISODE LINK: https://creators.spotify.com/pod/profile/dr-anisha-valli/episodes/Nonsurgical-Management-of-Anterior-Open-Bite-e376eng

A Cup of Coffee with Dr Akansha Kashyap

🎤 “So here’s the thing — most people pick a career because their parents told them to, or because they panicked after Class 12. But Dr. Akansha Kashyap? Nope. She picked dentistry like it was a love affair between science and art — and guess what? She got the gold medal to prove it. 🏅✨

She’s the kind of dentist who can fix your smile in the morning and sell you a handmade art piece in the evening. Honestly, if she wasn’t drilling cavities, she’d probably be designing album covers. 🎨🦷

In this interview, she spills about:
💡 How to juggle academics without losing your mind (or your hobbies)
🌟 Why mentors + creativity = survival kit in dentistry
🖊️ And a piece of advice so good, you’ll want to embroider it on your scrubs.

So… why are you still here? Go read the full interview — it’s like fluoride for your brain. 🧠💎

DOWNLOAD THE MAGAZINE TO READ!