So, we’ve all sat through those ortho lectures where the professor keeps throwing around terms like “external root resorption” and “tooth-borne versus bone-borne expanders,” and honestly, at first, it feels like way too much. But here’s the simple breakdown of what’s actually happening.
Rapid Maxillary Expansion (RME) is used to fix transverse maxillary deficiency. The problem? The forces aren’t exactly gentle—they’re around 0.9 to 4.5 kg—and sometimes your roots pay the price. That’s where ERR (External Root Resorption) comes in.
Now, there are two main types of expanders:
Tooth-borne (Hyrax type): All the force is on the teeth.
Bone-borne (MARPE type): Screws in the palate take the load instead.
Now, how do we actually see ERR? That’s where CBCT comes in. It’s almost as accurate as micro-CT (which is super precise but can only be used on extracted teeth). Studies using CBCT showed that first molars (M1) and first premolars (P1) lose root volume after expansion, and even second premolars (P2) — the ones not holding the appliance — can get affected too. Forces spread everywhere!
Here’s the important point: most studies only looked at ERR right after expansion. But remember, cementum can repair itself a bit over time. So if you only check right away, you might overestimate the “permanent” damage. That’s why this study looked at ERR after 6 months of retention — to see what happens once the dust settles.
Here’s what the research shows:
Tooth-borne RME → more ERR. First molars lose the most root volume (around 17 mm³), followed by premolars. Even second premolars, which aren’t directly attached, still show resorption.
Bone-borne RME → less ERR. Molars only lose about 3 mm³. There’s still some resorption, but it’s way less compared to tooth-borne.
📊 Findings (6-month post-retention, CBCT-based)
Tooth
ERR Volume Loss (mm³)
TB Group
BB Group
M1 (1st molar)
Highest
17.03
3.11
P1 (1st premolar)
Moderate
6.42
1.04
P2 (2nd premolar)
Least
5.26
1.24
All teeth showed ERR (anchored + unanchored).
M1 palatal root most affected in length shortening.
ERR localized to apical, bucco-apical & bucco-medial areas.
Greater in TB vs. BB, but differences clinically questionable.
Mechanism of ERR: The buccal forces from the RME appliance compress the periodontal ligament, leading to tissue hyalinization. ERR occurs during the subsequent removal of this necrotic tissue on the compressed (buccal) side of the root. The root apex is also a sensitive area due to high force concentration and denser bone.
⚠️ Clinical Insights
ERR occurs in both abutment and non-abutment teeth.
Amount of root shortening (~0.3 mm) unlikely to affect longevity.
Bone-borne expanders ↓ ERR risk but do not eliminate it.
Cementum repair may occur post-retention.
📖 Citation
Leonardi R, Ronsivalle V, Barbato E, Lagravère M, Flores-Mir C, Lo Giudice A. External root resorption and rapid maxillary expansion: TB vs BB comparison at post-retention. Progress in Orthodontics. 2022; 23:45.
✅ Skeletally mature patients with narrow arch ✅ Bilateral posterior crossbite ✅ Nasal airway obstruction ✅ Non-surgical alternative to SARPE ✅ Need for posterior/superior nasal cavity expansion
Contraindications
❌ Poor posterior palatal bone quality ❌ Active periodontal disease ❌ Palatal bone <4 mm ❌ Poor compliance ❌ Medical contraindications to minor surgery
APPLIANCE COMPONENTS of MARPE
Jackscrew: Positioned between maxillary first molars
Microimplants: Four implants (1.5-1.8mm Ø, 11mm length)
Engagement: Bicortical (palatal + nasal cortex)
Framework: Rigid design for parallel expansion
PLACEMENT PROTOCOL of MARPE
Pre-op CBCT for bone thickness
Site: T-zone (distal to 3rd rugae, 2nd premolar region)
Align force vectors toward zygomatic buttress (center of resistance)
Tight adaptation to palatal vault
Ensure bicortical penetration
👉 Viva Q:Why is MARPE positioned anterior to the soft palate (T-zone)? ✔️ To direct forces through the palatal vault toward the zygomatic buttress, optimizing skeletal expansion and reducing tipping.
The MSE was specifically designed to apply expansion force more posteriorly against the zygomatic buttress bones and pterygopalatine sutures, and more superiorly against the midpalatal suture and superiorly positioned perimaxillary suture
VIVA: Why is MARPE positioned anterior to the soft palate
The MARPE appliance is sited anterior to the soft palate—in the T-zone at the level of the second premolars—so that its miniscrews deliver force vectors through the palatal vault directly toward the zygomatic buttress, optimizing skeletal expansion and minimizing dental tipping. With expansion, a lateral force is applied directly to the midplatal suture medial to the zygomatic buttress. This force distribution promotes more even expansion anteroposteriorly
Biomechanical Rationale: The zygomatic buttress is the center of resistance of the maxillary complex during transverse expansion. Positioning MARPE miniscrews in the T-zone aligns the force vector with this buttress, shortening the moment arm to skeletal resistance points and producing more parallel, translational movement of the maxillary halves rather than rotational tipping of the alveolar processes or teeth.
T-Zone Landmark:
Defined by Poorsattar-Bejeh Mir et al. as the area distal to the third rugae, corresponding clinically to the second premolar region in the anterior palate.
This zone offers maximal palatal bone thickness with minimal soft tissue height, ensuring bicortical engagement and implant stability.
Viva Question: How does having a fulcrum near the frontozygomatic sutures influence hemi-midface movement during maxillary expansion with an MSE?
The amount of lateral rotation seen with an MSE is associated with the archial movement of the hemi-midface, with a fulcrum near the frontozygomatic sutures
With a high‑lateral fulcrum at the frontozygomatic region, the hemi‑midface opens like a fan around that pivot, producing outward archial rotation of the zygomatico‑maxillary block and relatively parallel separation of the maxillary halves
Viva Question: Explain how dual cortical support of microimplants reduces internal strain at the implant neck.
One‐line Answer “Engaging both palatal and nasal cortical plates at the implant neck and apex distributes load across two dense bony layers, minimizing microimplant neck bending and internal strain.”
Biomechanical Explanation
When a microimplant is bicortically engaged, its neck is stabilized by the thin palatal cortical plate while its apex is anchored in the thicker nasal (or floor) cortical plate. Under lateral expansion forces, this dual‐plane engagement creates a load path through two rigid cortices rather than a single bone interface. Consequently, bending moments and shear stresses at the implant neck are significantly reduced, decreasing risk of neck‐plate microfracture and implant loosening.
Maxillary constriction is a common problem we face in orthodontics. In younger patients, rapid palatal expansion (RPE) works beautifully because the midpalatal suture is still immature and repairs predictably. But in adults, things get tricky. Conventional RPE is often insufficient, and that’s where miniscrew-assisted rapid palatal expansion (MARPE)comes in.
A recent study by Naveda et al. (2022) looked into how the midpalatal suture actually repairs in adults after MARPE. And the findings are important for how we plan retention and manage expectations in this age group.
🦴 Midpalatal Suture Repair (16 months post-MARPE)
Incomplete repair common in adults
Bone density ↓ (vs. pre-expansion):
Anterior: –34%
Median: –77%
Posterior: –52%
Anterior region always repaired (100%)
Middle third = weakest (57% unrepaired)
>50% repair in 81% of patients
📊 Repair Scoring (0–3 scale)
Score
Description
Frequency
0
No repair
0%
1
<50% repair
19%
2
>50% repair
38%
3
Complete repair
43%
🔑 Clinical Takeaways
✔ Expect slower & incomplete repair in adults ✔ Anterior + posterior heal better (vascular supply) ✔ Middle third caution → miniscrew zone, less vascularity ✔ Always reinforce retention
🔒 Retention Protocol
Maintain expander in situ: 12 months
After removal → place 0.8 mm stainless steel TPA
Monitor with CBCT + visual scoring
Inform patients: repair ≠ full ossification even after 16 months
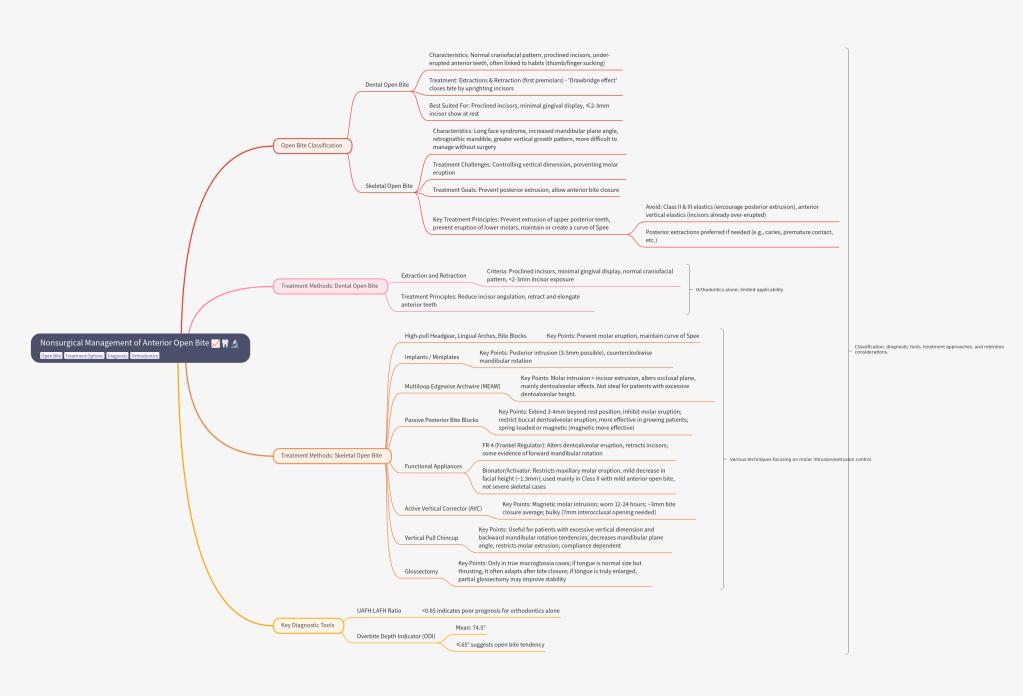
Anterior open bite has always been one of the most challenging malocclusions to treat. Patients often present with esthetic concerns, speech difficulties, and compromised function. While orthognathic surgery is a definitive option for severe skeletal open bites, not all patients are candidates—or willing—for surgery. Fortunately, nonsurgical strategies can offer promising results when case selection is appropriate.
🔍 Understanding the Problem
Open bite malocclusion can be dental or skeletal in origin:
Dental open bite: ▸ Normal craniofacial pattern ▸ Proclined incisors, under-erupted anterior teeth ▸ Often linked to habits like thumb/finger sucking
Skeletal open bite: ▸ Long face syndrome, ↑ mandibular plane angle, retrognathic mandible ▸ Greater vertical growth pattern ▸ More difficult to manage without surgery
Key Diagnostic Tools
UAFH : LAFH ratio (<0.65 → poor prognosis for orthodontics)
Extractions & retraction (first premolars) → “drawbridge effect” closes the bite by uprighting incisors.
Best suited for patients with: ✅ Proclined incisors ✅ Minimal gingival display ✅ ≤2–3 mm incisor show at rest
B. Skeletal Open Bite (Nonsurgical Options)
Skeletal open bite is much harder to correct nonsurgically than dental open bite. The central challenge lies in controlling vertical dimension—particularly by preventing or reducing molar eruption.
Posterior extractions preferred if needed (e.g., caries, premature contact, etc.)
👉 Clinical insight: For every 1 mm molar intrusion, you can achieve about 3 mm anterior bite closure through mandibular counterclockwise rotation.
Method
Key Points
High-pull headgear, lingual arches, bite blocks
Prevent molar eruption; maintain curve of Spee.
Implants / Miniplates
Posterior intrusion (3–5 mm possible); counterclockwise mandibular rotation.
Multiloop Edgewise Archwire (MEAW) Multilooped .016 × .022 SS wires + heavy anterior elastics
Molar intrusion + incisor extrusion; alters occlusal plane; mainly dentoalveolar effects. Not ideal in patients with already excessive dentoalveolar height.
Passive Posterior Biteblocks extend 3–4 mm beyond rest position
Inhibit molar eruption; Restrict buccal dentoalveolar eruption → allow mandibular autorotation forward, hence more effective in growing patients; can be spring-loaded or magnetic (more effective; ~3 mm improvement vs 1.3 mm for spring type)
Functional Appliances – Open bite is worsened by faulty orofacial muscle posture.
FR-4 (Frankel regulator): Alters dentoalveolar eruption, retracts incisors. Some evidence of forward mandibular rotation.
Bionator/Activator: Restricts maxillary molar eruption, mild decrease in facial height (~1.3 mm). Used mainly in Class II with mild anterior open bite, not severe skeletal cases.
Active Vertical Corrector (AVC) – using samarium cobalt magnets embedded in acrylic.
Magnetic molar intrusion; worn 12–24 hrs; ~3 mm bite closure avg, bulky (7 mm interocclusal opening needed)
Vertical Pull Chincup
Useful for patients with excessive vertical dimension and backward mandibular rotation tendencies. ↓ mandibular plane angle, restricts molar extrusion; compliance dependent.
Glossectomy
Only in true macroglossia cases. If tongue is normal in size but thrusting, it often adapts after bite closure → surgery not needed. If tongue is truly enlarged relative to oral cavity → partial glossectomy may improve stability.
🔄 The Retention Challenge
One of the biggest hurdles in open bite management is long-term stability.
Studies show relapse rates of 35–43%.
Relapse is often due to dentoalveolar rebound rather than skeletal relapse.
Retention strategies:
Long-term/fixed retainers
Retainers with occlusal coverage to limit molar eruption
Anterior open bite is one of the trickiest malocclusions we deal with in orthodontics. It’s not just about teeth — skeletal, dental, functional, and even habitual factors play a role.
🔹 Traditional Approaches
For decades, open bites in adults were often corrected by:
Extruding anterior teeth orthodontically (which works dentoalveolarly but doesn’t do much for facial esthetics in skeletal cases).
Orthognathic surgery (Le Fort I osteotomy, sometimes two-jaw surgery) to reposition the maxilla.
These surgical approaches improve facial esthetics but come with a catch — relapse.
Denison et al. found a 21% relapse at 1-year post-surgery.
Proffit et al. reported 7–12% overbite reduction within 3 years after Le Fort I surgery.
🔹 The Game Changer: Skeletal Anchorage
With the introduction of absolute anchorage (miniscrews, miniplates), things got exciting. Now, orthodontists could correct open bites without surgery, by intruding the posterior teeth and letting the mandible autorotate upward and forward.
Kuroda et al.: Skeletal anchorage makes open-bite treatment simpler than surgery.
Sugawara et al.: Used miniplates to intrude mandibular molars; reported ~30% relapse after 1 year.
Lee & Park: Miniscrew intrusion of maxillary molars → only 10.4% relapse in molars and 18.1% relapse in overbite at 1 year.
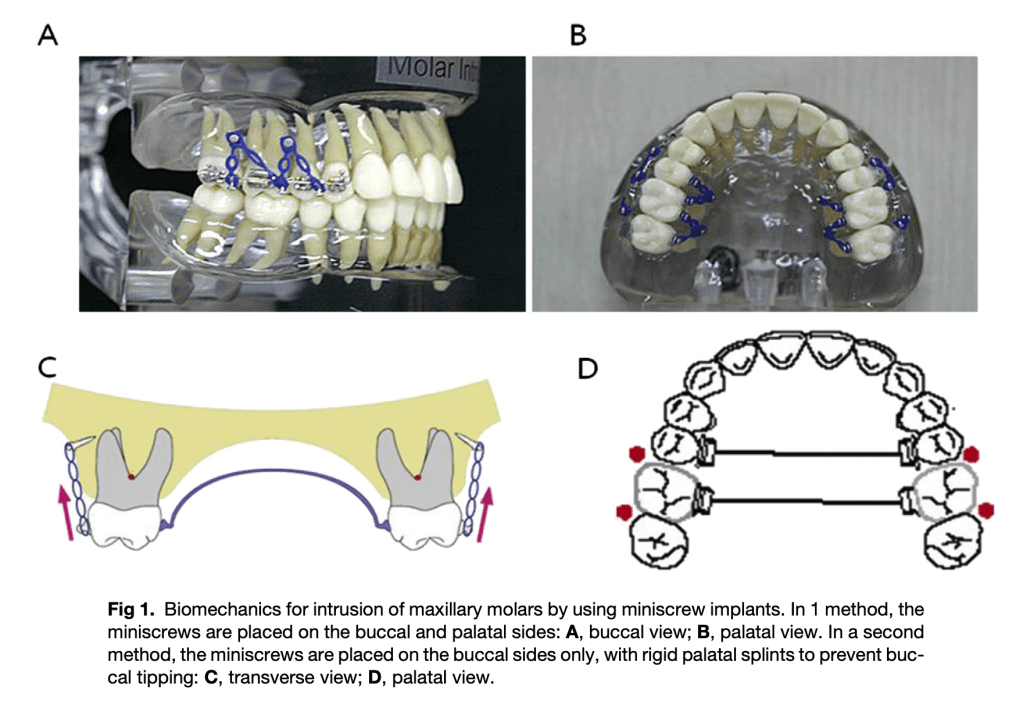
🛠️ How Was Intrusion Done?
Two different miniscrew protocols were used:
1️⃣ Buccal + Palatal Screws
Screws placed between roots of 2nd premolar–1st molar and 1st–2nd molar.
Intrusive force applied with elastomeric chains after 1–2 weeks.
2️⃣ Buccal Screws Only
Screws placed on buccal side at the same sites.
Rigid transpalatal arch (TPA) added to prevent buccal tipping.
Interpretation: It’s not just teeth—it’s also muscles & soft tissue adaptation trying to return to “old balance.”
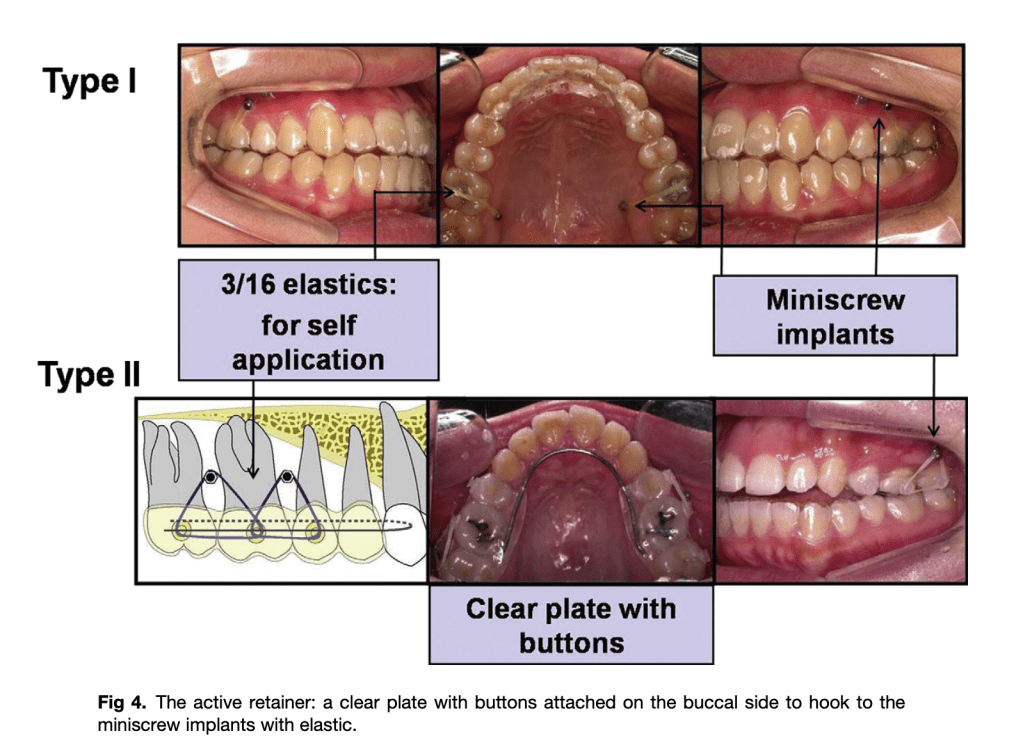
🔹 Role of Retention & Soft Tissue
Tongue posture, perioral muscles, and habits play a huge role.
Myofunctional therapy after treatment improves stability.
Standard retainers (lingual + circumferential) aren’t enough for intruded molars — because intrusion is inherently less stable than tipping or mesiodistal movement.
Authors suggest an “active retainer”: clear retainer with buccal buttons that can be hooked to miniscrews with elastics to hold molars in place.
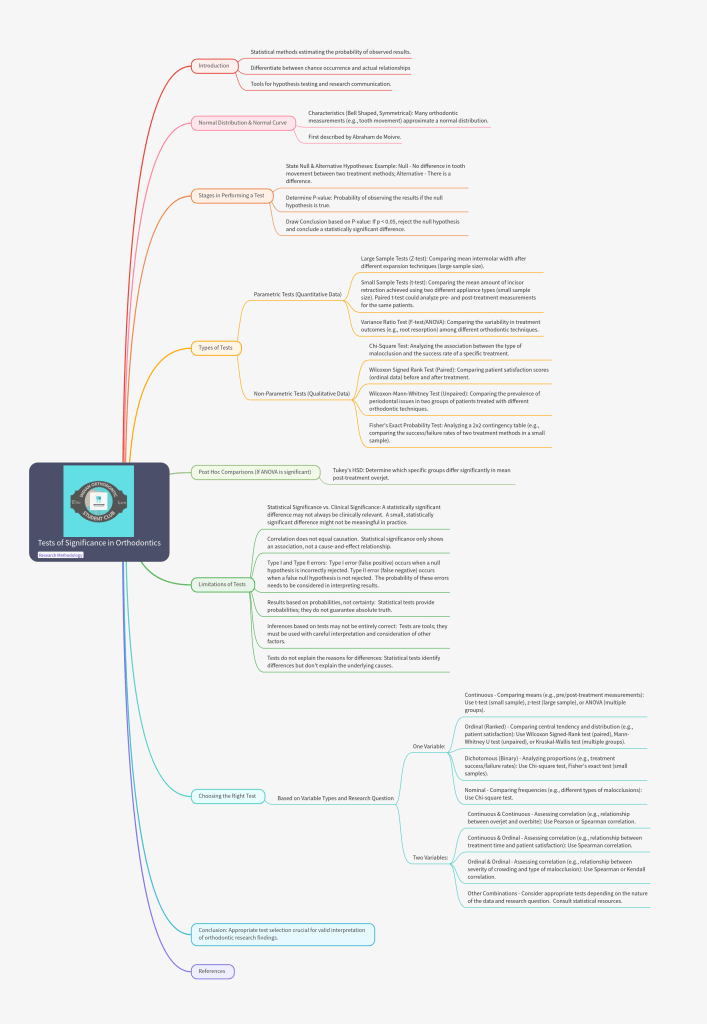
Unlock the complexities of statistical analysis in clinical research with our detailed “Tests of Significance” mindmap! This structured visual guide distills everything you need to know about parametric and non-parametric tests, normal distribution, step-by-step procedures, and the essential criteria for choosing the right test.
Managing skeletal anterior open bite (AOB) is one of the trickiest problems you’ll see in clinic. Decisions about which teeth to extract — or whether to extract at all — can change the vertical facial pattern, molar position, and ultimately whether the mandible rotates closed (helpful) or stays/re-rotates open (problematic). Understanding how extraction pattern, tooth movement, and growth stage interact helps you plan smarter treatments and set realistic expectations.
The study in one line
A prospective cephalometric study compared vertical/rotational changes in AOB patients treated with three extraction patterns: first premolars (E4), second premolars (E5), and first molars (E6) — and found that extraction choice (plus how posterior teeth move) influenced mandibular rotation.
1. Extraction Choice & Mandibular Rotation
Extraction Pattern
Skeletal Open Bite Involvement
Effect on Mandibular Rotation
1st Premolars (E4)
Anterior teeth only
No significant rotation.
2nd Premolars (E5)
Extends to posterior teeth
Closing rotation
1st Molars (E6)
Extends to posterior teeth
Greatest closing rotation
The logic behind those findings comes down to three biomechanical factors:
Where the extraction space is (anterior vs. posterior in the arch)
How molars move to close that space (translation vs. extrusion)
How that movement interacts with mandibular rotation mechanics
The more teeth you move forward, the harder it is to prevent some extrusion of molars during protraction (especially without TADs or intrusion mechanics).
This shorter movement path makes vertical control easier — fewer teeth to drag along, less tendency for extrusion.
Reduced extrusion allows the posterior occlusal contacts to move out of the “palatomandibular wedge” and encourages mandibular closing rotation (SN–GoGn, SGn–NBa decrease).
E6: Large forward movement of molars with minimal extrusion → maximum rotation.
Posterior occlusal “block” is eliminated quickly, and molars protract mostly horizontally rather than extruding.
With posterior teeth moving forward and out of the wedge, the mandible is free to rotate up and forward the most.
3. Cephalometric Change Patterns
Variable
E4
E5
E6
SN–GoGn
↔ (no change)
↓
↓↓ (largest decrease)
SGn–NBa
↔
↑
↑↑
ANS–Me / Na–Me
↑↑ (largest increase)
↑
↑ (smallest)
Upper Molar–Palatal Plane
↑↑
↑
↑
Lower Molar–Mand. Plane
↑↑ (largest)
↑
↑
4. Clinical Tips
For AOB limited to anterior teeth: First premolar extraction may not help rotation—consider vertical control strategies.
Use gable bends, TADs for anchorage/vertical control, intrusion mechanics if needed.
Avoid mechanics or auxiliaries that encourage molar extrusion during space closure.
For AOB involving posterior teeth: Second premolar or first molar extraction preferred to facilitate mandibular closing rotation.
Minimize posterior tooth extrusion during protraction to enhance rotation.
Treat after peak pubertal growth spurt – less natural extrusion tendency — greater chance of controlled molar protraction and closing rotation.
5. Pearls for exams & case presentations
When presenting a case, include: vertical pattern, extent of AOB, growth indicators (hand–wrist/CS stage), extraction rationale, and how you’ll control vertical molar movement.
Don’t equate “extraction = guaranteed closing rotation.” The pattern of tooth movement (extrusion vs. translation) and growth stage are decisive.
When a maxillary lateral incisor is missing, substituting the canine into its place can produce excellent esthetic and functional results — but only if torque control is done right. One of the most common errors? Inadequate palatal root torque in the relocated canine.
Why Torque Matters
The canine crown is bulkier, and without enough palatal root torque, its prominence can disrupt smile esthetics and compromise occlusion. The right bracket choice helps counteract this.
Bracket Options & Prescriptions (MBT*)
Bracket Choice
Torque / Tip
Key Advantages
Notes
Maxillary Central Incisor
+17° torque / 4° tip
Maximum palatal root torque
Enameloplasty needed; add up to +4° distal root tip
Maxillary Lateral Incisor
+10° torque / 8° tip
Good torque & tip control; easy placement
Enameloplasty needed
Flipped Maxillary Canine
+7° torque / 8° tip
Torque & tip control without reshaping
May not give enough torque
Flipped Mandibular 2nd Premolar
+17° torque / 2° tip
Max torque without enameloplasty
Remove bracket posts after bonding
*Modified for Roth or Damon prescriptions if needed.
Torque Tips
“1 to 5 Rule”: Every .001″ slot–wire play ≈ 5° torque loss
.017″×.025″ in .018″ slot → 5° loss
.019″×.025″ in .022″ slot → 10–15° loss
This is why an .018 slot system with .017×.025 wire tends to have better torque control than a .022 slot with .019×.025 wire, assuming same bracket prescription.
If you want to minimize torque loss, you either:
Use the largest possible wire for that slot
Or add auxiliary torque (e.g., torquing springs, step-out bends)
Labial step-out bends shift the canine root palatally, improving torque and interproximal contact while minimizing occlusal interference.
Example 1: .017″ × .025″ wire in a .018″ slot
Slot height = 0.018″
Wire height = 0.017″
Difference (play) = 0.001″
Torque loss = 0.001″ × 5° = ≈ 5° loss
So even with a nearly full-size wire, you can’t get 100% torque expression — there’s some rotational freedom before the wire contacts the slot walls.
Example 2: .019″ × .025″ wire in a .022″ slot
Slot height = 0.022″
Wire height = 0.019″
Difference (play) = 0.003″
Torque loss = 0.003″ × 5° = ≈ 15° loss
Why the guide says 10–15° instead of exactly 15°:
Theoretical loss = 15° (from math)
In practice, clinical torque loss is often slightly less because:
Residual tip in the tooth means the wire contacts sooner than expected
Manufacturing tolerances (slots often oversized, wires slightly undersized or rounded)
The wire may seat differently under ligation forces
Other Factors Influencing Torque
Archwire material (SS > TMA > NiTi for high torque)
Bracket material
Type of ligation
Interbracket distance
Tooth morphology & biology
Clinical Pearls
Delay enameloplasty if unsure → choose flipped mandibular 2nd premolar for torque & base fit.
Canine extrusion improves gingival architecture but monitor occlusion.
For high torque (>24°), beta titanium is safer than SS for bends.
Beta titanium offers a balance between torque delivery and flexibility, making it preferable for large bends compared to the stiffness of stainless steel.