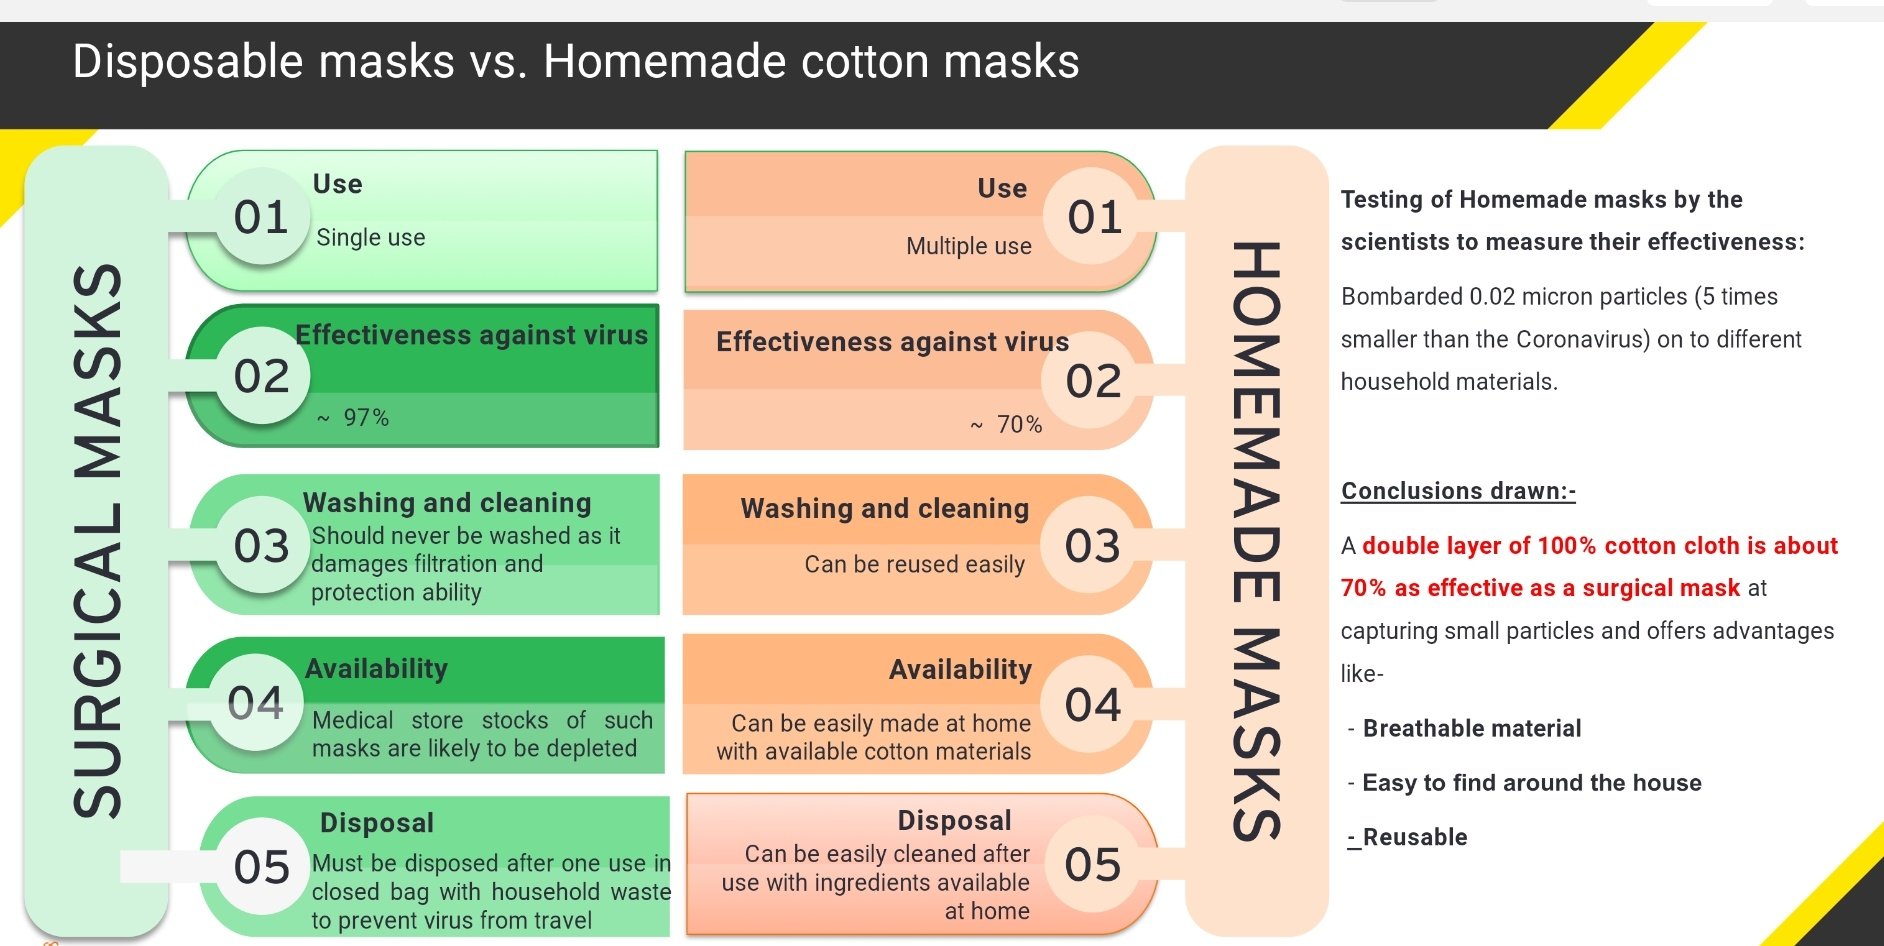
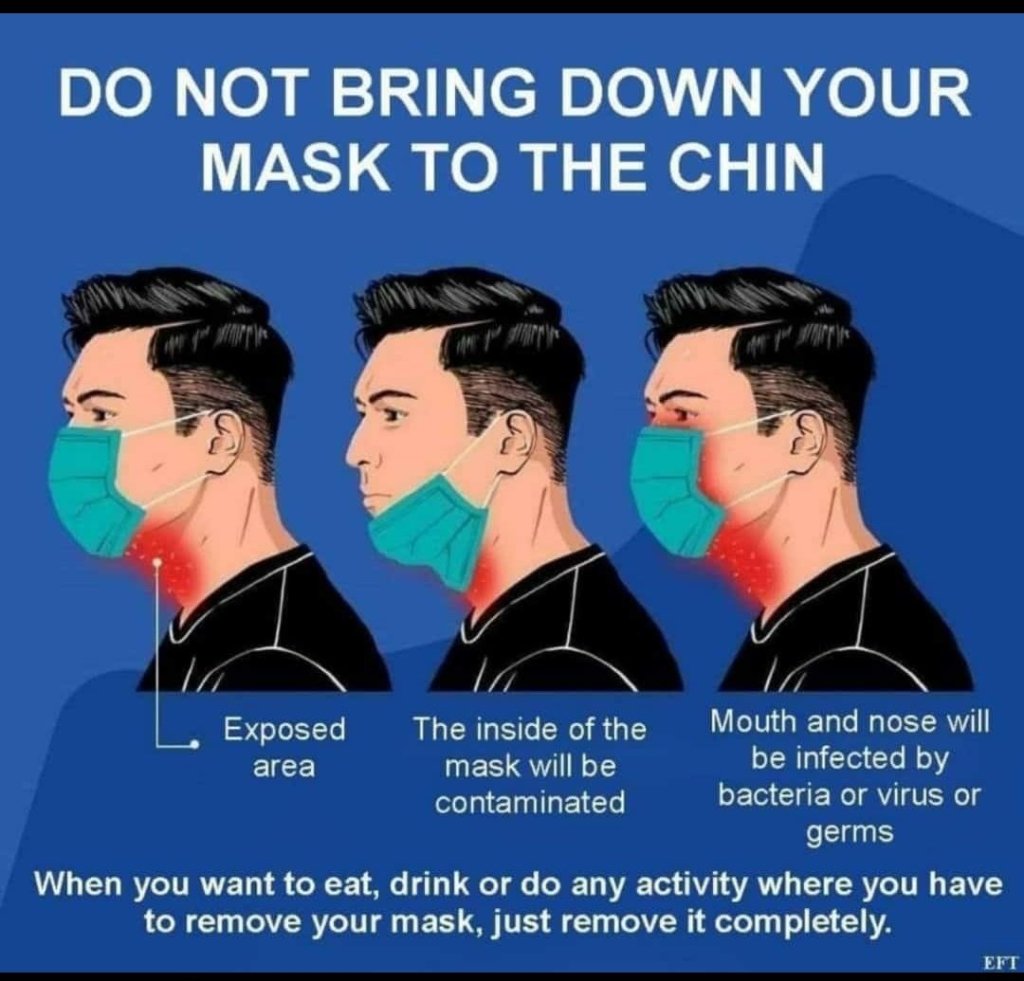
A medical mask should not be used as it creates a false sense of security that can lead to neglecting other essential measures . Resort to other measures like – washing hands , cover your nose and mouth while sneezing , monitor your body temperature and oxygen levels .
So when should you use medical mask ( apart from medical health care workers ) :
When a person develops symptoms like cough or fever , while visiting a health care facility .
Taking care of an ill person .
If your family member is a suspected or confirmed case undergoing home care .
ENSURE PROPER FIT OF MASK
Washing your hands :
Washing your hands frequently is essential . Use soap and water for atleast 20 seconds for most effective results .
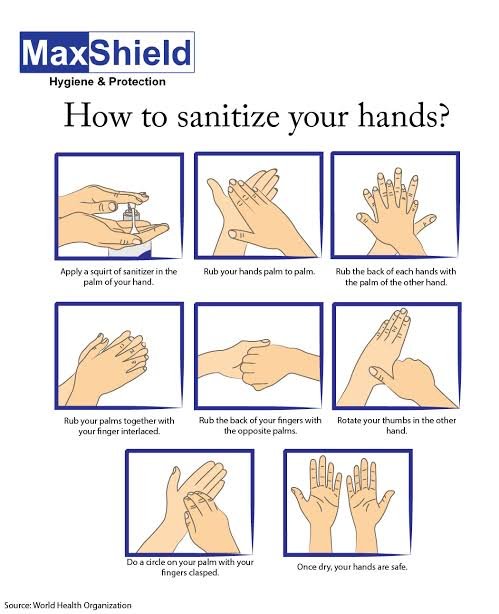
Sanitizing your hands :
Hand sanitizers are to be used , when hand wash was not possible . An alcohol based sanitizer with 70% alcohol content must be used for 20 seconds .
Name suggested by Willis. Most common neoplasm of salivary gland tumor. Benign neoplasm- consisting of cells exhibiting the ability to differentiate to epithelial (ductal and nonductal) cells and mesenchymal (chondroid, myxoid, osseous) cells. Other names:
Branchioma,
enclavoma,
teratoma,
cyindroma,
myxochondrocarcinoma.
Salivary gland tumor origin: EPITHELIAL
Shows cytogenic abnormalities in chomosomes- 12q13-15. Putative pleomorphic adenoma gene(PLAG1) has been mapped to chromosomes 8q12
Histogenesis:-
Currently, numerous theories centre around the myoepithelial cell and the reserve cell in the intercalated duct.
Ultrastructural studies have confirmed the presence of both ductal and myoepithelial cells in pleomorphic adenomas.
It follows that possibly either or both may play active roles in the histogenesis of the tumour.
Hubner and his associates:- have postulated that the myoepithelial cell is responsible for the morphological diversity of the tumour, including the production of the fibrous, mucinous, chondroid and osseous areas.
Regezi and Batsakis:- postulated that the intercalated duct reserve cell can differentiate into ductal and myoepithelial cells, and the latter, in turn, can undergo mesenchymal metaplasia, since they inherently have smooth muscle-like properties. Further differentiation into other mesenchymal cells then can occur.
Batsakis:- has discussed salivary gland tumourigenesis, and while still implicating the intercalated duct reserve cell as the histogenetical precursor of the pleomorphic adenoma, stated that the role of the myoepithelial cell is still uncertain and that it may be either an active or a passive participant histogenetically.
Finally, Dardick and his associates have questioned the role of both ductal reserve and myoepithelial cells. They stated that a neoplastically altered epithelial cell with the potential for multidirectional differentiation might be histogenetically responsible for pleomorphic adenoma.
CLINICAL FEATURES:-
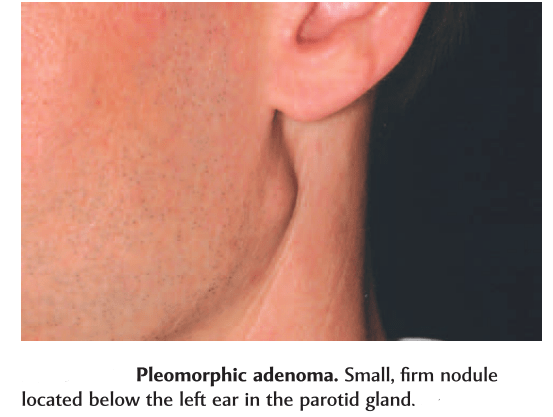
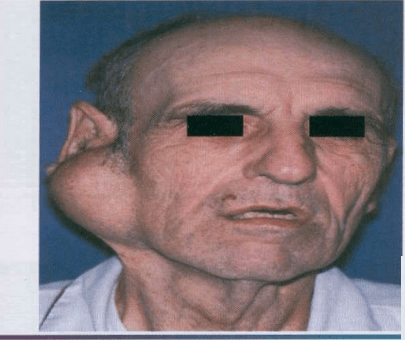
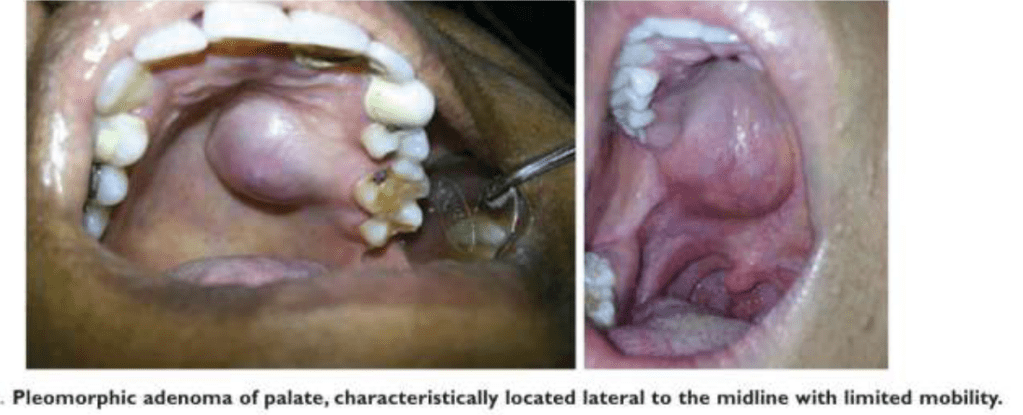
Most common tumor. Rate of occurance: 60-70%- parotid glands 40-60%- submandibular glands 40-70%- minor salivary glands seldomly- sublingual glands Age: 30-50 years Sex: female> male – 3:1 – 4:1 In parotid- presents in the lower lobe of the superior lobe as a mass over the angle of the mandible, below and infront of the ear.
Clinical presentation: painless, slow growing, firm mass, initially small in size and begins to increase in size. Initially movable but with continued growth become more nodular and less movable. Recurrent tumor- multinodular, fixed on palpation. Palate – intraorally common site. Seldom ulcerated- unless secondarily traumatized.
Slowly growing tumor of The parotid gland.
HISTOPATHOLOGY:-
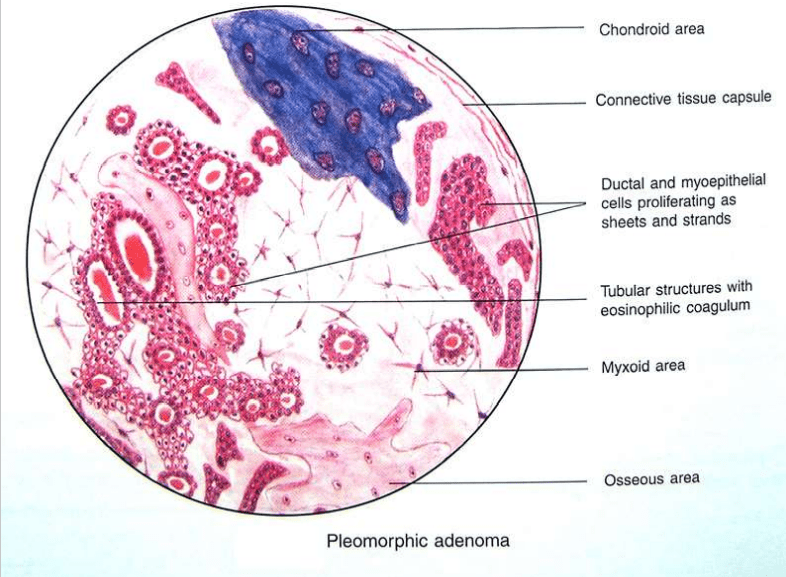
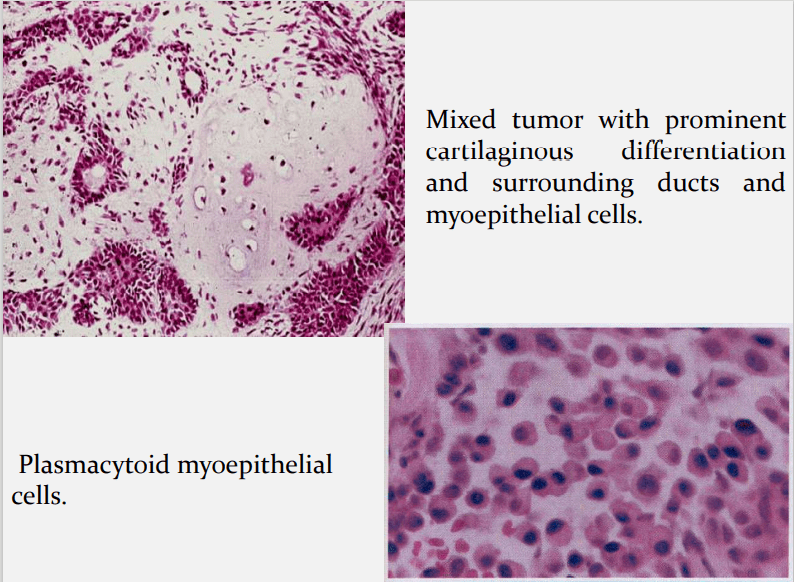
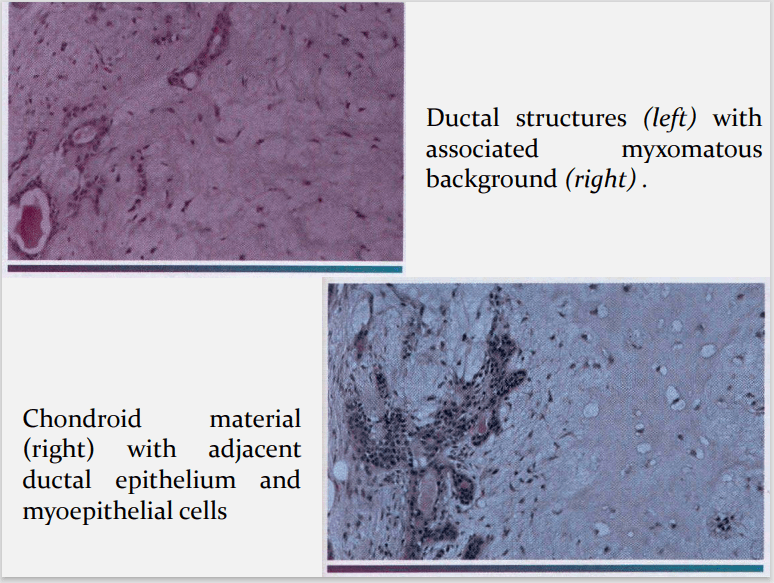
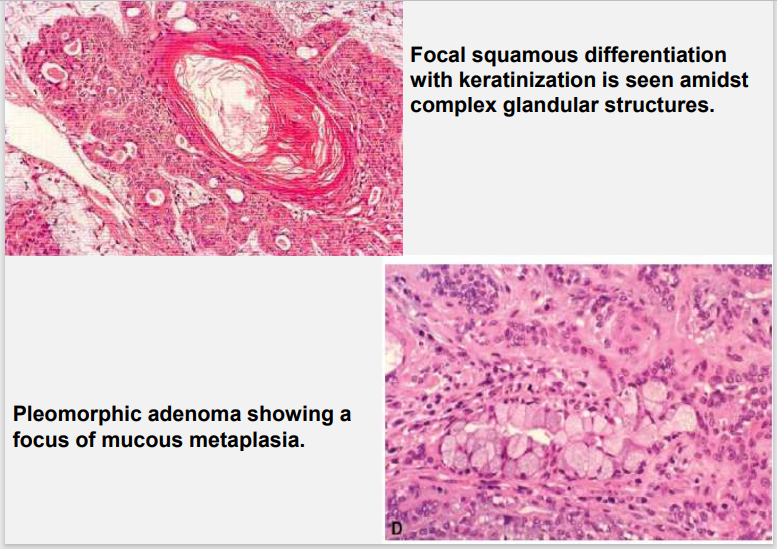
HALLMARK: Morphologic Diversity. Charecterized by- Variable, Diverse, Structural & histologic patterns. It demonstrate glandular epithelium and mesenchyme like tissue and the proportion of each component varies widely. Typically a well-circumscribed encapsulated tumor The epithelium often forms ducts and cystic structures or may occur as islands or sheets of cells , anastomosing cords and foci of Keratinizing squamous cells and spindle cells .
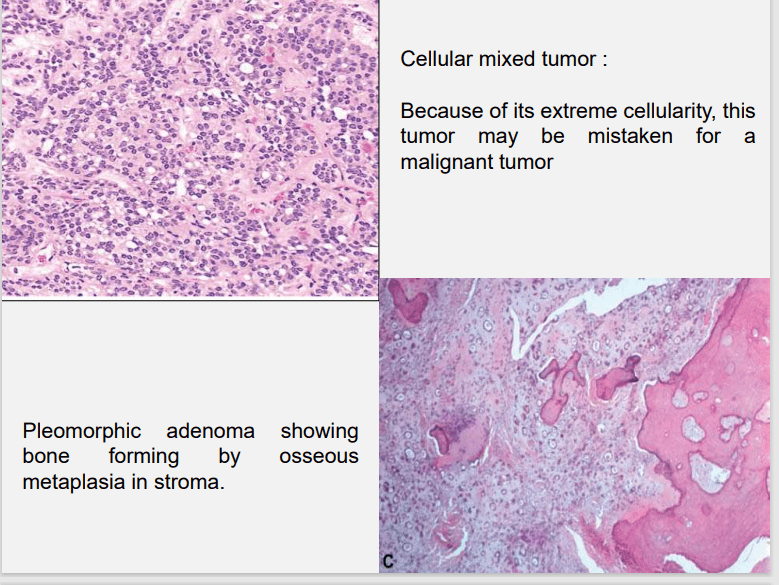
Foote and Frazell (1954) categorized PA into: a) Primarilly myxoid (36%) b) Myxoid and cellular component in equal proportions (30%) c) Predominantly cellular (22%) d) Extremely cellular (12%)
Myoepithelial cells are major component of PA. Have variable morphology- sometimes appearing as angular or spindled, some with eccentric nucleus resembling plasma cells. Are responsible for characteristic mesenchyme like changes. Vacuolar degeneration of myoepithelial cells can produce a chondroid appearance. the stroma exhibits areas of an eosinophilic hyalinized change, fat or osteoid also is seen.
Surgical excision Superficial parotidectomy with preservation of the facial nerve Local enucleation should be avoided – resulting in seeding of the tumor bed. Deep lobe of the parotid- total parotidectomy is usually necessary also with preservation of the facial nerve.
Submandibular tumors – Total removal of the gland with the tumor. Malignant degeneration is a potential complication, resulting in a carcinoma ex pleomorphic adenoma. The risk of malignant transformation is probably small, but it may occur in as many as 5% of all cases.
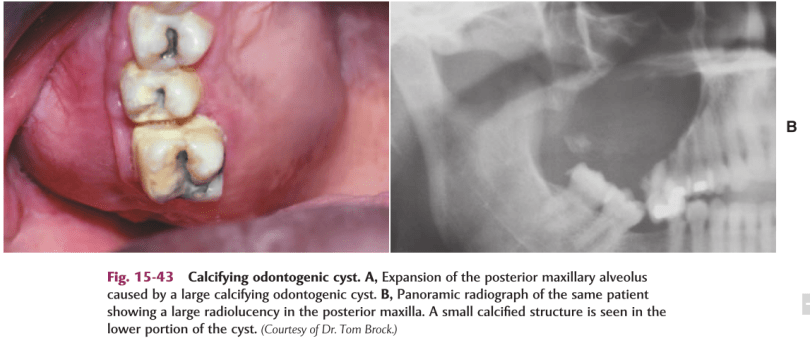
DEF:-Calcifying odontogenic cyst (COC), previously known as Gorlin cyst, is a rare, well-circumscribed, solid or cystic lesion derived from odontogenic epithelium that resembles follicular ameloblastoma but contains ‘ghost cells’ and spherical calcifications.
It Has many features of odontogenic tumor, therefore it is placed in the category of tumors in the latest WHO classification of odontogenic cysts and tumors.
In the latest WHO publication on odontogenic tumours (Prætorius and Ledesma-Montes, 2005) it was classified as a benign odontogenic tumour and was renamed calcifying cystic odontogenic tumour (CCOT).
CLINICALFEATURES:-
Age : Wide range, peak in 2nd decade.
Sex : Equal.
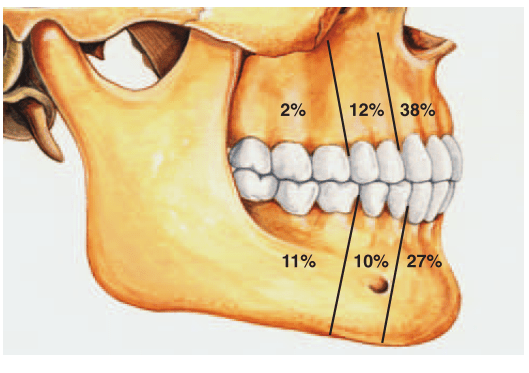
Site : Anterior segment of both jaws
Calcifying odontogenic cysts that are associated with odontomas tend to occur in younger patients, with a mean age of 17 years.
PATHOGENESIS:-
COC is a unicystic process and develops from the reduced dental epithelium or remnants of dental lamina.
The cyst lining has the potential to induce formation of dentinoid or even odontoma in adjacent CT wall.
CLASSIFICATION OF THE ODONTOGENIC GHOST CELLLESIONS:-
Group 1 : ‘Simple’ cysts Calcifying odontogenic cyst (COC)
Group 2 : Cysts associated with odontogenic hamartomas or benign neoplasms: calcifying cystic odontogenic tumours (CCOT).
Group 3 : Solid benign odontogenic neoplasms with similar cell morphology to that in the COC, and with dentinoid Formation
.Group 4 : Malignant odontogenic neoplasms with features similar to those of the dentinogenic ghost cell tumour Ghost cell odontogenic carcinoma.
SIGNS &SYMPTOMS:-
Swelling is the commonest complaint, seldom associated with pain.
Intraosseous lesions can cause hard bony expansion and resulting facial asymmetry.
Displacement of teeth can also occur.
RADIOLOGICALFEATURES:-
Intraosseous lesions produce well defined lucency which is usually unilocular.
Irregular calcified masses of varying sizes may be seen within the lucency.
Displacement of root/roots with or without root resorption and expansion of cortical plates also seen.
*Radiograph of a calcifying odontogenic cyst with well-demarcated margins extending from the right to the left premolar regions of the mandible. Numerous calcifications are present, some suggestive of small denticles.
HISTOLOGICALFEATURES:-
Lining is usually thin about 6 – 8 cell thick, may be thickened in other areas.
Lining shows characteristic odontogenic features with reversely polarized basal cell layer.
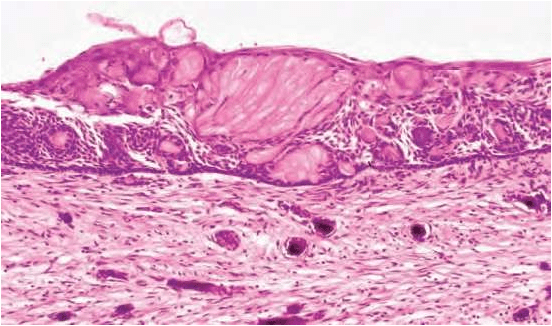
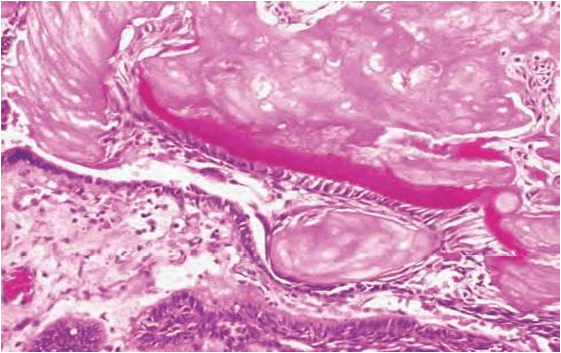
TYPICALLY – GHOST CELLS may be seen in thicker areas of lining.
Ghost cells are enlarged, ballooned, ovoid, eosinophilic cells with well
defined cell boundaries.
5.Some times many cells may fuse.
6.They represent abnormal keratinization and frequently calcify.
7.Tubular dentinoid and even complex odontome may be found in connective tissue wall close to epithelial lining.
Histological features of a calcifying odontogenic cyst with clusters of fusiform ghost cells and focal calcifications, lying in a stratified squamous epithelium.In this calcifying odontogenic cyst, there are sheets of ghost cells and a focal area in which there has been induction of a strip of dysplastic dentine (dentinoid).
DIFFERENTIALDIAGNOSIS:-
Based on radiographic appearance, following lesions must be included in the provisional diagnosis –
Rubber dam was introduced byBarnum, a New York dentist in 1863
Advantages of using a rubber dam
• It is raincoat for the teeth • It helps in improving accessibility and visibility of the working area • It gives a clean and dry aseptic field while working • It protects the lips, cheeks and tongue by keeping them out of the way • It helps to avoid unnecessary contamination through infection control • It protects the patient from inhalation or ingestion of instruments and medicaments • It helps in keeping teeth saliva free while performing a root canal so that tooth does not get decontaminated by bacteria present in saliva • It improves the efficiency of the treatment • It limits bacterial laden splash and splatter of saliva and blood
• It potentially improves the properties of dental material. • It provides protection of patient and dentist.
Disadvantages of using a rubber dam
• Takes time to apply • Communication with patient can be difficult • Incorrect use may damage porcelain crowns/crown margins/ traumatize gingival tissues • Insecure clamps can be swallowed or aspirated.Contraindications of use of rubber dam
• Asthmatic patients • Allergy to latex • Mouth breathers • Extremely malpositioned tooth • Third molar (in some cases).
Rubber dam equipment
• Rubber dam sheet• Rubber dam clamp • Rubber dam forceps• Rubber dam frameRubber dam accessories•Lubricant/petroleum jelly• Dental floss• Rubber dam napkin.
Rubber Dam Sheet
The rubber dam sheet is normally available in size 5 × 5 or 6 × 6 squares in green or black color
It is available in three thicknesses, i.e. light, medium and heavy
The middle grade is usually preferred as thin is more prone to tearing and heavier one is more difficult to apply
Latex-free dam is necessary as number of patients are increasing with latex allergy
Flexi dam is latex-free dam of standard thickness with no rubber smell.
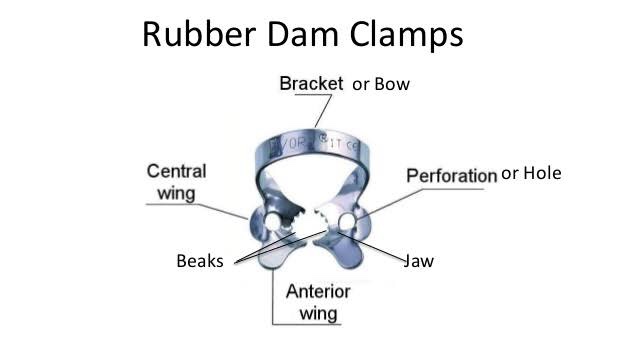
Rubber Dam Clamps
Rubber dam clamps, to hold the rubber dam onto the tooth are available in different shapes and sizes.
Clamps mainly serve two functions:
They anchor the rubber dam to the tooth.
Help in retracting the gingiva.
Rubber Dam Forceps
Rubber dam forceps are used to carry the clamp to the tooth.
They are designed to spread the two working ends of the forceps apart when the handles are squeezed together.
The working ends have small projections that fit into two corresponding holes on the rubber dam clamps.
The area between the working end and the handle has a sliding lock device which locks the handles in positions while the clinician moves the clamp around the tooth.
It should be taken care that forceps do not have deep grooves at their tips or they become very difficult to remove once the clamp is in place.
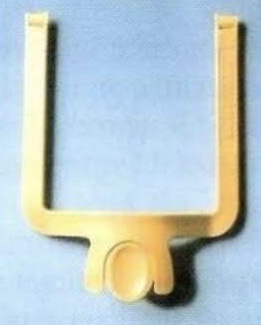
Rubber Dam Frame
Rubber dam frame supports the edges of rubber dam .Frames have been improved dramatically since their old style with the huge ‘butterflies’.Modern frames have sharp pins which easily grip the dam. These are mainly designed with the pins that slope backwards.
• Rubber dam frames are available in either metal or plastic.
• Plastic frames have advantage of being radiolucent. • When taut, rubber dam sheet exerts too much pull on the rubber dam clamps, causing them to come loose,especially clamps attached to molars. • To overcome this problem, a new easy-to-use rubber dam frame (Safe-T-Frame) has been developed that offers a secure fit without stretching the rubber dam sheet. Instead, its “snap-shut” design takes advantage of the clamping effect on the sheet, which is caused when its two mated frame members are firmly pressed together. In this way, the sheet is securely attached, but without being stretched. Held in this manner, the dam sheet is under less tension, and hence, exerts less tugging on clamps—especially on those attached to molars.
SAFE T FRAME
Rubber Dam Punch
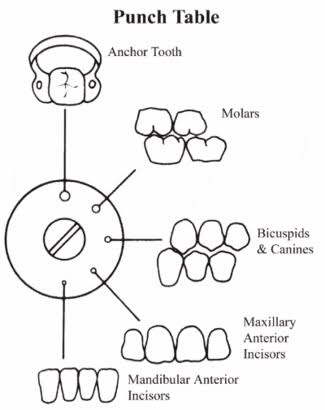
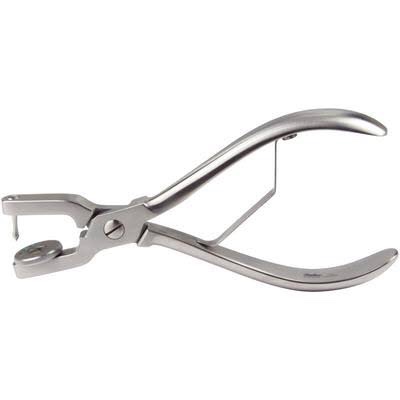
Rubber dam punch is used to make the holes in the rubber sheet through which the teeth can be isolated.
The working end is designed with a plunger on one side and a wheel on the other side.
This wheel has different sized holes on the flat surface facing the plunger.
The punch must produce a clean cut hole every time.
Two types of holes are made, single and multihole.
Single holes are used in endodontics mainly.
If rubber dam punch is not cutting cleanly and leavingbehind a tag of rubber, the dam will often split as it is stretched out.
Rubber Dam Template
It is an inked rubber stamp which helps in marking the dots on the sheet according to position of the tooth.
Holes should be punched according to arch and missing teeth.
Rubber Dam Accessories
Lubricant or Petroleum Jelly
It is usually applied on the undersurface of the dam.
It is helpful when the rubber sheet is being applied to theteeth.
dental floss
It is used as flossing agent for rubber dam in tight contact areas.
It is usually required for testing interdental contacts.
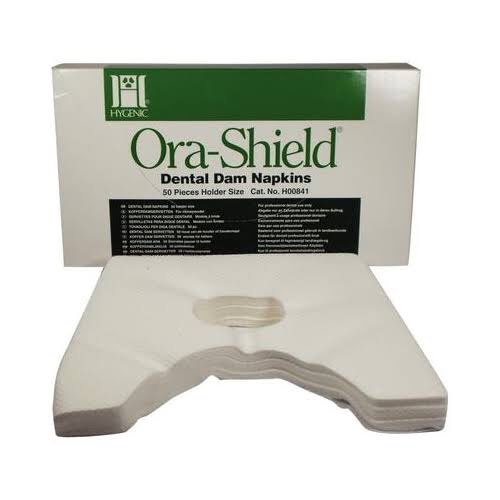
Rubber Dam Napkin
• This is a sheet of absorbent materials usually placed between the rubber sheet and soft tissues. • It is generally not recommended for isolation of single tooth.
REFERENCE – NISHA GARG TEXTBOOK OF ENDODONTICS AND GROSSMAN’S TEXTBOOK OF ENDODONTICS
Regularly and thoroughly clean your hands with an alcohol based hand rub or wash them with soap and water , specially after coming from outside . Avoid touching your eyes , nose and mouth .
Maintain atleast 4-6 feet distance between yourself and anyone who is coughing or sneezing . Avoid handshakes .
Follow a good respiratory hygiene . This means covering your mouth and nose with your bent elbow or tissue when you cough/ sneeze . Then dispose of the used tissue immediately .
Avoid or restrict unnecessary travel , participation in public gatherings . If you have fever , cough and difficulty in breathing , seek medical attention .
Practice social distancing . Keep a distance between you and other people so that you do not come in contact with their infected droplets . Avoid crowded places . Do not organize events where people have to get together . When people are at a crowded place , they touch objects , each other and may even exhale / inhale droplets .
A continuation of the previous post on syndromes and easy short forms to remember the key features. Hope you find it helpful. Sources: Shafers textbook of oral pathology,www.rxpg.com,instagram–@_dentistars_,@dental_exams,www.medinaz.com
Before placement of rubber dam, following procedures should be done:
Thorough prophylaxis of the oral cavity.
Check contacts with dental floss.
Check for any rough contact areas.
Anesthetize the gingiva if required.
Rinse and dry the operated field.
Methods of Rubber Dam Placement.
Method I: Clamp placed before rubber dam
Select an appropriate clamp according to the tooth size.
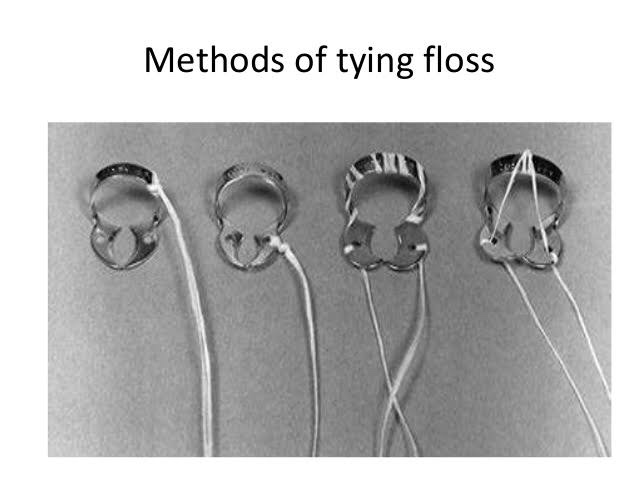
Tie a floss to clamp bow and place clamp onto the tooth
Larger holes are required in this technique as rubber dam has to be stretched over the clamp. Usually two or three overlapping holes are made.
Stretching of the rubber dam over the clamps can be done in the following sequence:
– Stretch the rubber dam sheet over the clamp
– Then stretch the sheet over the buccal jaw and allow tosettle into place beneath that jaw
– Finally, the sheet is carried to palatal/lingual side andreleased. This method is mainly used in posterior teeth in both adults and children except third molar.
Method II: Placement of rubber dam and clamp together
Select an appropriate clamp according to tooth anatomy.
Tie a floss around the clamp and check the stability.
Punch the hole in rubber dam sheet.
Clamp is held with clamp forceps and its wings are insertedinto punched hole.
Both clamp and rubber dam are carried to the oral cavityand clamp is tensed to stretch the hole.
Both clamp and rubber dam is advanced over the crown.First, jaw of clamp is tilted to the lingual side to lie on thegingival margin of lingual side.
After this, jaw of the clamp is positioned on buccal side.
After seating the clamp, again check stability of clamp.
Remove the forceps from the clamp.
Now, release the rubber sheet from wings to lie around thecervical margin of the tooth.
Method III: Split dam technique: This method is split dam technique in which rubber dam is placed to isolate the tooth without the use of rubber dam clamp. In this technique, two overlapping holes are punched in the dam. The dam is stretched over the tooth to be treated and over the adjacent tooth on each side. Edge of rubber dam is carefully teased through the contacts of distal side of adjacent teeth.
Split dam technique is indicated:
• To isolate anterior teeth • When there is insufficient crown structure • When isolation of teeth with porcelain crown is required. In such cases placement of rubber dam clamp over the crown margins can damage the cervical porcelain. • Dam is placed without using clamp. • Here two overlapping holes are punched and dam is stretched over the tooth to be treated and adjacent tooth on each side.