When managing a deep overbite, we often think about intrusion arches, curve of Spee leveling, or anterior bite turbos. But have you met the “base arch”?
This humble-looking yet biomechanically brilliant appliance does more than you expect — especially when molar control and occlusal plane leveling are your goals.
🔍 What Is the Base Arch?
Also called the intrusive arch, the base arch shares design features with the tip-back mechanism:
Buccal segments: 0.018 × 0.025 inch stainless steel
Anterior segment (from canine to canine): 0.016 inch or larger
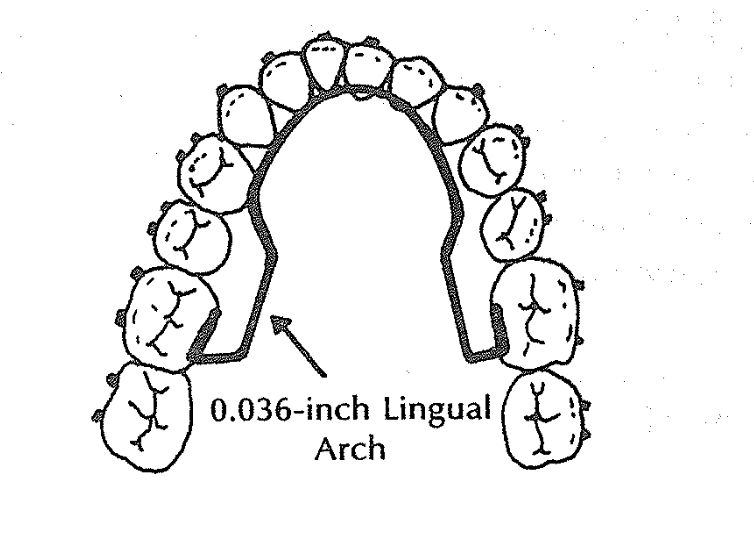
Lingual arch: mandatory to stabilize molars
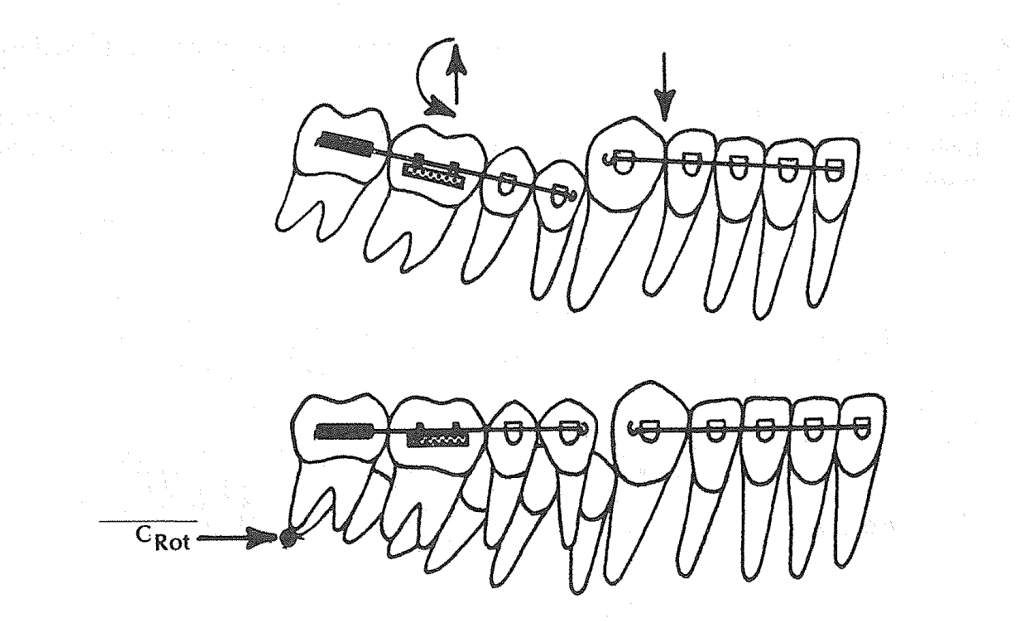
The base arch wire (0.017 × 0.025 inch TMA or 0.018 × 0.025 inch SS) includes helices or stops/washers.
But here’s the twist:
The base arch is tied back.
This fixes the hook in place — no sliding anteroposteriorly as in tip-back.
The center of rotation (Crot) shifts mesially, closer to the mesial root of the first molar.
💡 Clinical Scenario 1: Deep Bite Without Flaring Incisors
👩⚕️ Patient:
14-year-old female
Deep curve of Spee, increased overbite
Incisors well-aligned, not flared
Goal: Level curve of Spee without proclination
Treatment Plan:
A base arch is used with a lingual arch in place. The base arch is:
Preactivated and tied back
Not sliding (fixed helices or stops used)
Calibrated with a Dontrix gauge to deliver ~200g (100g per side)
What Happens Biomechanically?
The tied-back base arch applies an eruptive force to posterior teeth.
The Crot shifts mesially → molars rotate and erupt, reducing the curve of Spee.
Incisors remain stable, no flaring, thanks to tie-back ligature through helices.
You get vertical leveling without anterior dentoalveolar protrusion.
💡 Clinical Scenario 2: Deep Bite with Slight Incisor Flaring👨⚕️ Patient:
👨⚕️ Patient:
15-year-old male
Class I molar, but deep overbite
Mild lower incisor flaring, crowding resolved
Posterior bite is underdeveloped
Treatment Plan:
Use a base arch without tying it back, and no lingual arch is placed (intentional).
What Happens?
Incisors become more upright, which is desired in this case. Without a tie-back, the anterior segment is free → some lingual crown torque may develop. The lack of a lingual arch allows posterior eruption and rotation to happen more freely. Curve of Spee flattens.
How to Decide When to Use Base Arch and How to Modify It
Clinical Goal
Use Base Arch?
Tie Back?
Lingual Arch?
Expected Result
Deep bite, no flaring
✅ Yes
✅ Yes
✅ Yes
Eruption of molars, anterior stability
Deep bite with incisor flaring
✅ Yes
❌ No
❌ No
Posterior eruption + anterior uprighting
Need arch length gain
❌ No (use tip-back instead)
❌
❌
Base arch doesn’t increase arch length
Avoid incisor flaring
✅ Yes
✅ Yes
✅ Yes
No anterior proclination
🧠 Ask Yourself Before Using a Base Arch:
Is anterior flaring acceptable or not?
Do I need posterior eruption and rotation to flatten the curve?
Will the lingual arch block or assist the desired moment?
Is there any need to increase arch length (then consider tip-back instead)?
And an anterior crowding with slightly flared lower incisors.
You’re not quite ready for extractions, and distalization isn’t needed in full force. You just need a smart trick to upright the molars and gain that precious 1–2 mm of space per side. What do you do?
Enter the Tip-Back Mechanism.
🎯 What Is the Tip-Back Mechanism?
Think of the tip-back spring like a little lever system. It uses a negative moment to rotate the buccal segments (molars and premolars) upright, making them more vertical instead of tipped mesially.
When you do that, the buccal segments “tip back”, and voilà – a small but meaningful amount of arch length is gained anteriorly.
Key term:Crot (center of rotation) – in this case, found distal to the second molar, allowing effective rotation and eruption of the buccal segment.
🛠️ Components of a Tip-Back Setup
Here’s what goes into this appliance:
0.036” Lingual Arch – for anchorage.
0.018 × 0.025” Anterior Segment – typically from lateral to lateral or lateral to premolar.
Buccal Stabilizing Segments (BSS) – rectangular wires (0.018 × 0.025”) from molars to premolars.
The Tip-Back Hook/Spring – placed strategically to apply the eruptive & rotational force.
✅ Scenario 1: Hook Placed Between Canine and Lateral Incisor (Near CRes of Anterior Segment)
Patient: 13-year-old with mild lower incisor crowding, deep bite, and normal axial inclination of anteriors.
Clinical Findings:
Deep curve of Spee
Lower incisors are upright
Mandibular canines and lateral incisors are aligned but crowded
Slight arch length deficiency (~2 mm)
Hook Placement:
👉 Between lateral incisor and canine, i.e., near the center of resistance (CRes) of the anterior segment.
Biomechanical Reasoning:
When the hook is placed close to the CRes, the force system causes minimal rotational tendency on the anterior segment.
This results in controlled tip-back and uprighting of the molars without flaring or retraction of incisors.
Eruptive force is delivered to molars → distal crown tipping → space is gained mesial to first premolars.
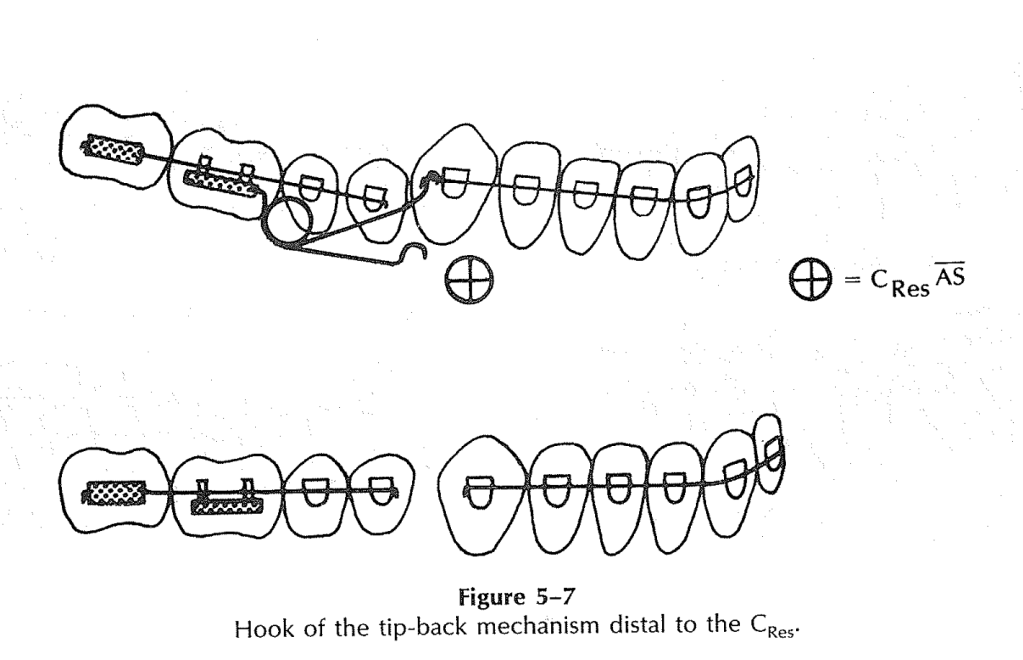
✅ Scenario 2: Hook Placed Distal to the Canine (Distal to the CRes of Anterior Segment)
Patient: 14-year-old with pseudo-Class III tendency and flared lower incisors
Clinical Findings:
Lower incisors show labial flaring
Canines are slightly higher (gingivally placed) than central incisors
There is mild lower anterior crowding
Patient shows forward functional shift of the mandible
Hook Placement:
👉 Distal to the CRes—typically between canine and first premolar
Biomechanical Reasoning:
Force acts below and behind the CRes of the anterior segment.
This creates a clockwise moment, causing the roots of the incisors to come forward, helping to upright flared anteriors.
It counteracts the labial inclination, resulting in a flatter occlusal plane.
Today, we’re diving into the long-term success of comprehensive Class II correction. That’s right—grab your elastics and settle in, because this one’s going to be more enlightening than a mid-treatment ceph.
Now, when it comes to treating Class II malocclusion, there’s a question that keeps popping up like a stubborn second molar: What makes the results last? I mean, sure, we can correct the bite, make it look Instagram-worthy at debond, but what stops it from bouncing right back like your patient’s missed appointment excuses?
Let’s start with timing. You might think that earlier is better—like catching a flight or beating the lunch line at a conference—but evidence says otherwise. A randomized controlled study—yes, the gold standard of scientific drama—looked at early headgear treatment and found that timing? Not critical. That’s right, early intervention is not the orthodontic version of calling shotgun. Turns out, what really matters is growth—good, old-fashioned, pubertal, awkward selfie-stage growth.
Specifically, we’re talking about favorable downward and forward mandibular growth. It’s like Mother Nature throwing you a bone—literally. If that mandible keeps chugging forward during and after treatment, your Class II correction has a fighting chance of holding up. It’s like the orthodontic version of having backup power on your spaceship. Without it, you’re just drifting in relapse space.
Speaking of relapse—and we must, because it’s as inevitable as a bracket popping off before prom—studies show that one of the main culprits in post-treatment change is the mesial movement of the upper molars. Yep, those sneaky maxillary molars are edging forward like they’re trying to photobomb your perfect occlusion.
But fear not! In adolescents, forward mandibular displacement comes to the rescue. It compensates for the relapse, counteracting that molar mischief by pushing things back into alignment. It’s like a Jedi mind trick, but with jawbones.
Now, let’s talk adults. You know, the ones who call to ask if they can get Invisalign but also admit they “might not wear it much.” In adult patients, we don’t have the same growth advantages. The dental and skeletal structures are basically on a “no more updates” setting. So post-treatment changes? Limited. But here’s the kicker—they still show a similar degree of relapse in sagittal molar correction as adolescents. Which feels unfair, but biology never signed a contract.
So, to sum it up, if you want long-term success in Class II correction, don’t obsess over starting early—focus on managing and maximizing growth. Monitor molar movement like it’s your ex’s new Instagram activity, and brace yourself for the fact that some relapse is part of the game, no matter the age.
And remember—Class II correction is a marathon, not a sprint. Or more accurately, a guided, biomechanically orchestrated, compliance-dependent crawl toward ideal occlusion. But hey—resistance is futile… especially if you ignore anchorage.
Until next time, keep those wires tight, those retainers in, and never underestimate the power of mandibular growth.
What do you do when a lateral incisor is missing from birth (congenitally)?
You’ve got three main options:
Option
Description
Pros
Cons
🦷 Space Closure
Canine takes the lateral’s place
No prosthetic needed
Canine isn’t a perfect aesthetic match
🧱 Resin-Bonded Bridge
A minimally invasive bridge
Saves adjacent teeth
53% survival in 10.5 yrs, may fall off
🛠️ Implant
Place a single-tooth implant
Long-term, tooth-friendly
Timing is tricky, needs bone support
📚 STUDY GOAL:
To find out: When is the best time to start orthodontic space opening if the goal is to place a single-tooth implant later?
👥 THE PATIENT CREW:
14 Caucasian teenagers (9 girls 👧, 5 boys 👦)
26 missing lateral incisors
All treated at University Hospital Carl Gustav Carus, Dresden (That’s in Germany 🇩🇪, folks!)
🦴 THE BONE CHRONICLES: T1 ➡️ T2 ➡️ T3
Timeline Translation:
Time Point
Age (Mean ± SD)
What’s Happening
T1
13.02 ± 1.49 yrs
Start of ortho treatment 👩⚕️
T2
15.55 ± 1.38 yrs
End of ortho treatment 🎉
T3
18.67 ± 2.83 yrs
Implant placement time 🔩🦷
📉 Bone Loss Over Time (Yikes!):
Time
Bone Deficiency (mm²)
Significance vs T1
T1
0.26 ± 0.69
–
T2
1.92 ± 1.54
✅ P = .044
T3
3.77 ± 3.07
✅ P = .028
👀 Observation: The longer you wait, the more bone disappears. So don’t dilly-dally with space opening if you’re planning an implant!
🕰️ EARLY vs. LATE TREATMENT – Who Wins?
Group
T1 Deficiency
T2 Deficiency
T3 Deficiency
Early Starters ⏰
0.44 mm²
2.05 mm²
2.61 mm² ✅
Late Starters 😴
0.00 mm²
1.78 mm²
4.93 mm² ❌
🏆 Winner: Early treatment group – less bone loss at implant time!
📐 Incisor Inclination Drama
Ortho mechanics led to incisor proclination during space opening. Let’s break it down:
Time
Inclination Angle (°)
Change
Start (T1)
22.1° ± 6.9
–
End (T2)
31.5° ± 7.2
+9.4°
⚠️ Why it matters: The implant angle needs to match the natural inclination of the incisors. Planning is 🔑!
🧪 IMPLANT PLACEMENT: A MINI MANUAL
Ideal implant size: 3.75 mm shaft, 4 mm collar (But minis like 3.0 mm are also used!)
Safe distance: At least 1 mm between implant and neighboring roots.
Required bone support: 6 mm × 12 mm = 72 mm² implant surface.
Gingival trick: Lateral incisor gingival margin is 1 mm higher than central incisor—so the implant must be placed 1 mm below the central’s margin.
🧠 Pro Tip: Use cephs and stone casts to assess inclination and bone volume before diving in!
📉 Alveolar Ridge Loss: When Bone Gets Ghosted
Here’s the tea ☕:
Once a tooth is missing (especially in the front upper jaw), the bone and soft tissue in that area start shrinking—kind of like a deflated balloon 🎈.
Researchers noticed something wild 😳:
🕒 Time Point
% Ridge Deficiency
T1 (Start of ortho treatment)
0.4%
T2 (End of ortho)
2.7%
T3 (Time of implant)
5.2%
👉 14x increase from T1 to T3! Yikes!
But wait…
The late treatment group had less bone loss at T2. But then they lost more bone by T3 compared to the early group. 🤔
Translation: It’s not just about when you start ortho—it’s about how the bone behaves later, and spoiler alert: it’s moody.
🧬 Blame It on Your Genes
There’s a strong genetic component to how much ridge loss happens—some people lose more, some less.
🔬 Why the variability?
Growth factors (hello, biology!) 📈
Differences in how people’s bones respond after treatment
Timing of canine eruption and extraction of baby teeth
🐶 Canines to the Rescue
If you remove the primary lateral, the canine erupts into that space. But if you remove the primary canine too early → 🥴 buccolingual resorption (bye bye, bone).
👉 Pro Tip: Only extract the baby canine just before you move the permanent one distally. This way, the root stretches the PDL and… 💥 Builds Bone Like a Boss 💪
📏 Kokich vs. This Study: A Bone-Off!
Study
What they found
Kokich (20 pts)
Less than 1% bone loss up to 4 years later 😇
This study
Up to 5.2% loss at implant time 😱
Why the difference? This study measured surface area (6–12 mm region), not just distances. Also, they only looked at maxillary cases, not mandibular or premolars. Apples vs. oranges… or molars vs. incisors 🧐🍊
📣 Final Orthodontic Pro Tips 🎓
🎯 1. Late is great (sometimes)
Starting treatment later (around age 16.5) = less time for ridge to disappear before implant.
But don’t be too late or you’ll miss the growth train 🛤️
📐 2. Watch those incisor angles!
Mean incisor proclination at T2 = 31.5° 😮
Standard = 22.1° → so 9.4° extra
Over-proclination = thin bone = implant trouble (think 👻 bone and 😬 visible crown margins)
📏 3. Don’t ignore root spacing!
Just because crowns look good doesn’t mean roots are happy 😬
Use wire bending or bracket repositioning to create that root party room 🎉🦷🦷🦷
🧠 Growth Matters: Don’t Jump the Implant Gun!
Since implants don’t move (hello, ankylosis 😑), don’t place them before facial growth is done.
📸 Take a ceph → wait 6 months → take another If Nasion to Menton doesn’t change = 💡 Growth done!
🧠 TL;DR for Ortho Ninjas 🥷
Takeaway
Why It Matters
Ridge loss is real!
And it gets worse with time ⏳
Canine movement = bone creation
But only if timed right 🕒
Late treatment can be helpful
Less waiting time till implant 🚀
Incisor proclination can hurt you
Implant survival needs a strong cervical bone base 🧱
Roots matter too!
Not just crown position 😅
So remember ortho fam: You’re not just aligning teeth—you’re sculpting bone for the future 💀➡️🦷✨
Alright, future tooth wizards, let’s talk moments—no, not “romantic sunset” moments, but the kind that makes teeth twirl like ballet dancers! 🩰
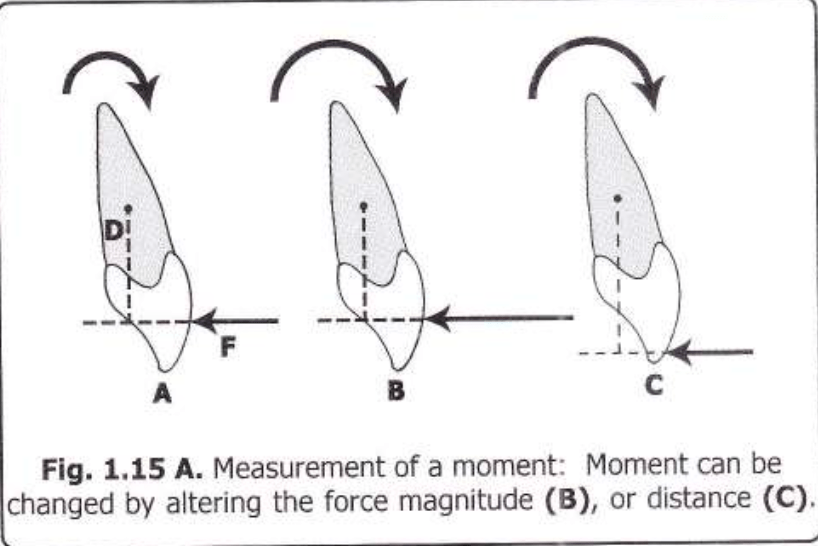
1. Moment Basics: The “Push & Spin” Effect
Imagine your patient’s tooth is a stubborn door. If you push close to the hinges (aka the Center of Resistance, C Res), the door barely spins but slides sideways (translational effect). Push far from the hinges? The door swings open dramatically (rotational effect).
Moment Formula: Moment (M) = Force (F) × Perpendicular Distance (d) Units: gm-mm (like saying, “I bench-press 1000 gm-mm of torque!” 💪).
Diagram Alert! Check out Fig 1.15—it’s the OG of “force vs. distance” drama.
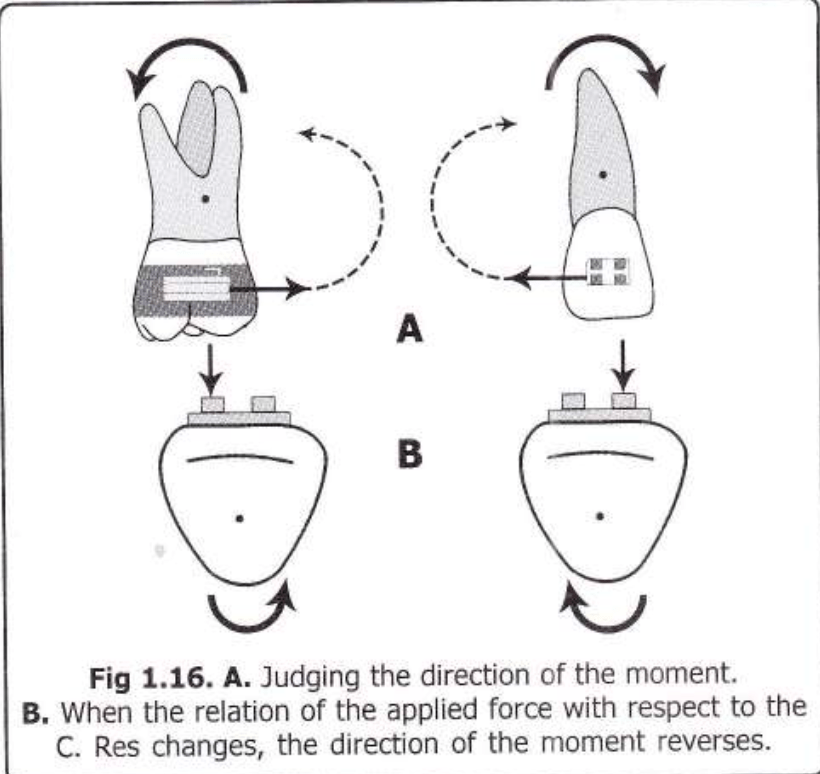
2. Clockwise or Anti-Clockwise? Let’s Settle This!
To predict the direction:
Follow the line of action of the force.
If it “wraps around” the C Res like a hug, you’ll see if it’s clockwise (👆) or anti-clockwise (👇).
Pro Tip: Flip the force’s direction or shift it to the other side of C Res, and the moment flips too! (Fig 1.16 demonstrates this ✨spicy✨ reversal).
3. Force Couples: The Pure Rotation Party!
Ever seen two kids spinning a merry-go-round? That’s a force couple—two equal, opposite forces not on the same line.
Example: Your ortho pliers applying a twist to a wire.
Math Magic: Total Moment = Force × Distance *between* the forces (No matter where you apply the couple—it’s a free vector, like that one friend who’s always down to party anywhere 🎉).
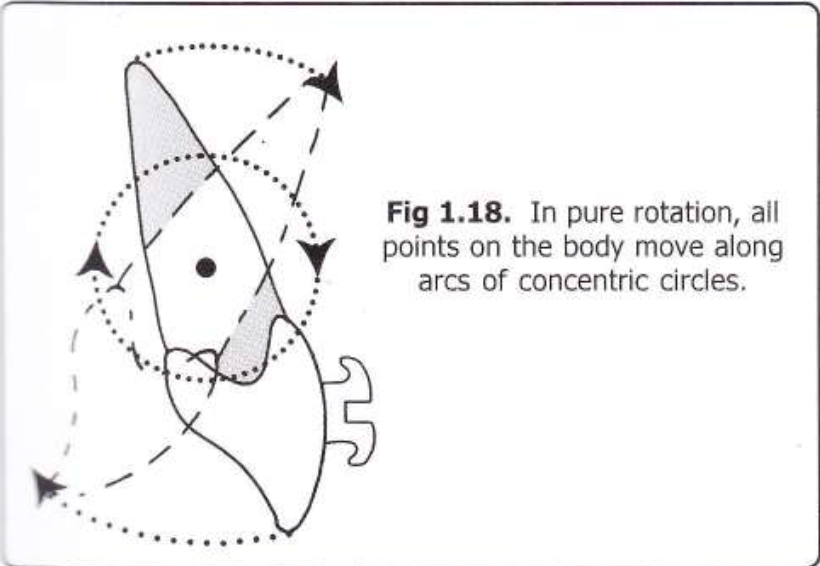
Diagram Time!Fig 1.17 shows a couple causing pure rotation (teeth spinning like a TikTok
trend).
Fig 1.18? Pure concentric circles—no translation, just vibes.
4. Real-Life Ortho Examples
Single Force (Mf): If you push a bracket off-center, the tooth both tilts and moves (like trying to nudge a cat off the couch—it’ll squirm and hiss).
Couple (Mc): Use a closing loop in your archwire. The loop creates two forces, rotating the tooth without sliding it sideways—pure spin! Example: 100gm forces 10mm apart = 1000 gm-mm moment (💃 Cue the tooth tango!).
5. Why This Matters
Bracket Positioning: Closer to C Res = more translation (good for intruding/extruding).
Loops & Springs: Couples = pure rotation (perfect for derotating that snaggletooth).
Fun Fact: Couples are “free vectors”—apply them anywhere on the tooth, and the moment stays the same. It’s like gossip in dental school—it spreads everywhere but the effect is identical. 😜
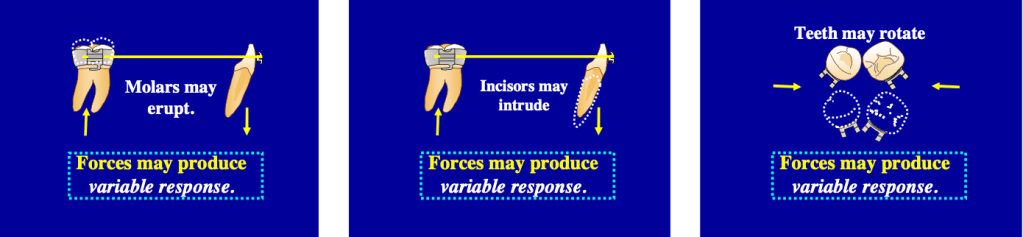
Non-Parallel Forces: Frenemies fighting 😤. Example: One spring pushing up, another pulling down = tooth confusion 🤯.
Golden Rule: If forces don’t cancel out, anchorage saves the day (aka, anchor teeth = the gym buddy spotting you 🏋️♀️). No anchorage? Congrats, you just moved ALL the teeth… and maybe the patient’s face. 😱
Why Grams > Newtons 📏🍔
“Orthos don’t do rocket science… unless it’s molar rockets.”
Science: Force = mass × acceleration (F=ma). But teeth move slowly, so acceleration ≈ Netflix binge speed 🐌.
Ortho Hack: Ignore physics class. Use grams (mass) instead. 1 Newton ≈ 100g (or “the weight of a hamster” 🐹).
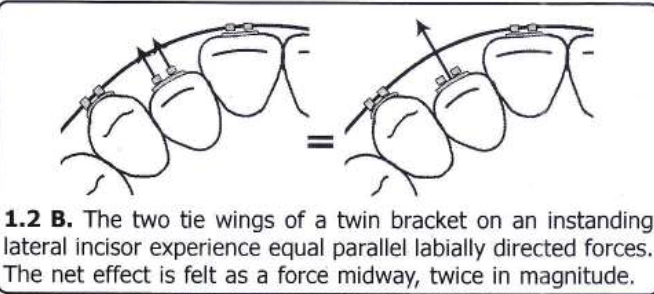
Parallel Forces: The “Double Trouble” Technique
“Two pushes > one push. Basic math.”
Scenario: Twin edgewise brackets on a tooth (like a twin-engine plane ✈️).
Science: Two equal, parallel forces in the same direction = combined force acting at the midpoint.
Example: Pushing a tooth labially from both tie wings = net force at the center (💥).
Why Care? Twin brackets = double the power without drama.
Force Couples: The Tooth Rotator 9000 🔄
“Push one side, pull the other. Chaos ensues.”
Force Couple: Two equal, parallel, but opposite forces (non-colinear).
Example: Rotating a tooth → one tie wing gets pushed, the other pulled (like twisting a jar lid 🍯).
Pro Tip: If forces are colinear (same line), they cancel out. Boring. Non-colinear = tooth spins like a Beyblade.
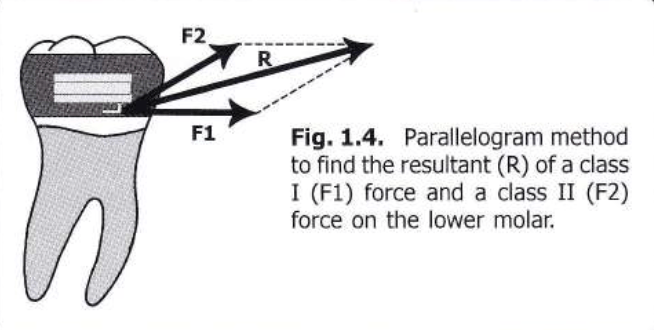
Non-Parallel Forces: The Parallelogram Party 📐🎉
“Forces going wild? Draw a parallelogram!”
Resultant Force: The diagonal of the parallelogram tells you where the tooth will move.
Example: Class I + Class II forces on a molar → diagonal = tooth’s escape route 🏃♂️.
Law of Transmissibility: Slide forces along their line of action to make them meet (like sliding DMs to your crush 💌).
Breaking Down Forces: The “What’s the Damage?” Move 🔍
“One force, two effects. Ortho magic!”
Resolving Forces: Split a single force into horizontal (retraction) and vertical (extrusion) components.
Example: Class II elastic → 70% retraction 😬, 30% extrusion 🦷.
Pro Hack: Use right angles for easy math (thanks, rectangles! 📏).
Multiple Forces: The Ortho Jenga Game 🧩
“Combine forces like a DJ mixes beats.”
Combine two forces → find the resultant.
Combine that resultant with the third force.
Repeat until you’ve tamed all forces.
Real Life: Headgear + distalizing spring = controlled chaos 🤯.
What’s the Big Deal with C.Res?
“It’s the GPS for moving teeth. Miss it, and you’re lost.”
C.Res = Tooth’s Boss: Imagine it’s the puppet master 🧙♂️ pulling strings. Where you apply force relative to C.Res decides if the tooth tips, intrudes, or does a cha-cha slide 💃.
Not the Center of Mass!
Center of Mass: For free bodies (like a tooth flying through space 🚀).
C.Res: For teeth stuck in bone (thanks, PDL! 🦴). Think of it as the tooth’s “democratic leader” swayed by bone, gums, and angry collagen fibers.
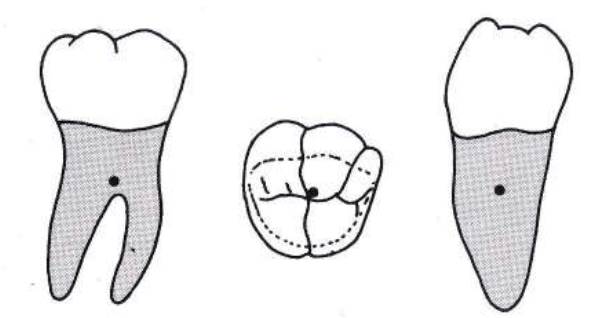
Where is C.Res Hiding? 🕵️♂️
Depends on the tooth’s roots and drama level:
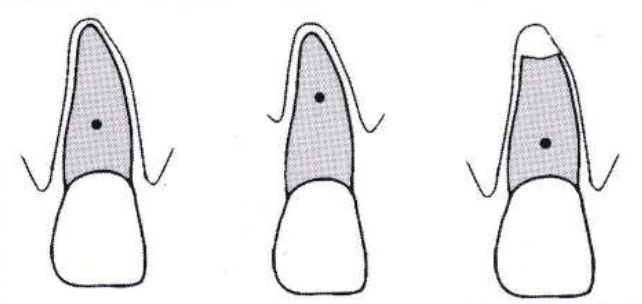
Single-rooted teeth (incisors/canines):
Location: Between alveolar crest & root apex.
Debate Alert: Some say 50% root length 🎯, others 25-33%
Hey future tooth whisperers! 👋 Let’s talk about Class II malocclusions—the “overjet squad” that keeps orthodontists up at night. 😴💤 You know, those cases where the upper jaw’s like, “I’m the star of the show!” and the mandible’s just… crickets. 🦗 The big debate: Do we treat these kids early with growth mods, or wait and let fate (or braces + surgery) decide? Let’s dive into this UNC study that’s spilling the tea. ☕
The Drama Unfolds � Class II malocclusions aren’t just a “teeth problem”—most have skeletal beef (maxilla vs. mandible). The study asked: Can we actually tweak jaw growth with early treatment, or are we just moving teeth around? 🤔 And does it even matter if we start when they’re 8 vs. 16? 🧒➡️👩🔬
Spoiler: Past studies were kinda sus. 🚨 Small samples, no control groups, and retrospective data (aka “let’s cherry-pick success stories”). This study? They went full NASA—prospective design, control group, and actual stats. 📈✨
The Contenders 🥊 They tested TWO EARLY TREATMENT APPROACHES:
Headgear: The OG “let’s hold back that maxilla” move. (Bonus: Makes kids look like they’re prepping for a Back to the Future sequel. 🚗⚡)
Functional Appliances: The “fake it till you make it” approach (Herbst, Twin Block—anything to nudge the mandible forward). 🦾
VS. Control Group: The “wait-and-see” squad. (Basically, the kids who got to binge Netflix while others had headgear selfies. 📸😅)
The Big Questions ❓ Skeletal Change or Just Tooth Yoga? 🧘♀️ Are we actually changing jaw growth, or just tipping teeth?
Which Appliance Wins? 🏆 Headgear vs. Functional—who’s the MVP?
Is Early Treatment Worth It? Or should we just chill until all the adult teeth arrive? 🦷🎉
The Big Picture 📊 ANOVA says: “Most of these numbers matter… except when they don’t.”
Statistically Significant: ANB angle, mandibular length, overjet—all lit up like a Christmas tree 🎄 (p < 0.01).
Not So Much: Maxillary length, Pog-NP, incisor angulation… crickets 🦗. Translation: You can’t fix everything, folks.
Gender? Nope. 🚫👦👧 Boys and girls reacted the same. No “boys grow more” myths here—equality wins! 🙌
Treatment Groups: The Good, The Bad, The Ugly 😎
1. Headgear Crew 🎯 Mission: “Restrain the maxilla!”
But… 20% of these kids grew less than the control group. 🥴 Why you gotta be like that, mandible?
3. Control Group 🍿
Mission: “Exist and vibe.”
Results: ANB angle improved naturally in most kids (🪄 growth magic!). Overjet? 50% got worse, 50% got better. It’s a coin flip! 💰
Spicy Take 🌶️
Early treatment works… kinda. It’s like using a GPS to reroute growth—sometimes it takes the detour, sometimes it ignores you and hits traffic. 🚦🗺️
Should you do it?
Pros: Might dodge extractions/surgery later.
Cons: Growth’s a fickle beast. No guarantees.
Verdict: Treat early if you’ve got a super cooperative patient (and parent). Otherwise… pray? 🙏
Let’s unpack this spicy discussion section—where UNC researchers throw shade at past studies, question everything we thought we knew, and basically say: “Growth modification? Hold our coffee.” ☕
The US vs. Europe Smackdown 🌍 USA: Headgear Nation 🇺🇸 – “Let’s hold back that maxilla!”
Europe: Functional Appliance Fanatics 🇪🇺 – “Mandible, grow forward or else!” But does either actually work long-term? UNC says: “Kinda… but also… maybe not?” 🤷♂️
Why RCTs Are the GOAT 🐐 (And Why Ortho Hates Them) Randomized Clinical Trials (RCTs) = the gold standard for proving if treatments work. But ortho trials are like:
Ethical Drama: “Is it cool to randomize kids to headgear vs. no treatment?” 😬
Time Sucks: Tracking patients from age 8 to 18? Orthodontists age faster than their patients. ⌛👵
Growth’s Plot Twist: Even if early treatment works, will puberty undo it? 🌱➡️🌳
Key Quote: “Enthusiastic treatment reports have no controls. Well-controlled reports have no enthusiasm.”
Variability was WILD: Some kids’ jaws fixed themselves (control group flexing 💪). Others said, “Nope, I’m here to sabotage your data.” 😈
Small Effects: Mean changes were tiny vs. natural growth chaos. Statistically significant ≠ clinically life-changing. 📉
Phase 2 Mystery: Will these early changes last? Or will puberty hit like a dumpster fire? 🔥 UNC’s like: “Stay tuned for Season 2!” 🍿
Shade Alert: Why Past Studies Are Sus 🕶️ Retrospective Bias: Old studies only included “success stories” (headgear kids who didn’t yeet their appliances out the window). 🪟🚫
Publication Bias: Journals only publish “positive” results. Negative data? Straight to the shredder. 🗑️
Same Data, Multiple Papers: Researchers recycling their one good sample like it’s a TikTok trend. ♻️
Bottom Line: We’ve been overhyping growth modification because bad science told us to. 😒
The Big Questions Still Unanswered ❓ Does Early Treatment Even Matter? If you treat at 8 vs. 12, does it change the endgame? Or are we just giving kids extra years of headgear memes? 🤡
Cost vs. Benefit: Is 2+ years of early treatment worth avoiding maybe one extraction later? 💸
Growth’s Plot Armor: Can we ever beat natural growth variability? Or are we just along for the ride? 🎢
Ortho Student Takeaway 🎓 RCTs = Painful But Necessary. They’re the only way to avoid “bro science” in ortho. 🧪
Growth Modification ≠ Guaranteed. It’s a gentle nudge, not a cure. Manage expectations (yours and the parents’). 🙏
Control Groups Are Heroes. Without them, we’re all just guessing. Shoutout to the kids who raw-dogged their Class II. 🙌
Final Thought: Treating Class II is like herding cats. 🐱🐾 You can try, but sometimes the cats win. Stay humble, future orthodontists. 😂
👋 Hey there, fellow ortho warriors! Today, we’re diving into the mysterious world of Class II malocclusion—where the maxilla likes to boss around the mandible, and our job is to restore the balance of power! 🦷⚖️
Why Does Class II Happen? 🤔
Class II malocclusion isn’t just about an overgrown maxilla or a shy mandible. It’s a whole party of skeletal structure, growth patterns, and dentoalveolar development (McNamara, 1981). Think of it as a complex relationship—sometimes it’s the maxilla’s fault, sometimes the mandible’s, and sometimes they just don’t get along. 😅
Treatment to the Rescue! 🦸♂️
To tame this rebellious jaw situation, orthodontists use: 📌 Extraoral force (a.k.a. the famous headgear) to put the maxilla in its place. 📌 Functional appliances (activators, Frankels, etc.) to give the mandible a growth boost. 📌 A combo of both when we want to play it safe—like pairing Batman & Robin for maximum crime-fighting (Meach, 1966; Bass, 1982).
What Happens When We Use High-Pull Headgear + Activator?
This legendary duo doesn’t just sit there looking pretty. It: ✅ Restricts maxillary growth (no more forward expansion party! 🎉) ✅ Stops maxillary teeth from going mesial & vertical (so they stay where they belong) ✅ Encourages better posterior tooth and condylar remodeling (remodeling isn’t just for houses! 🏠) ✅ Improves muscle patterns (stronger jaws = better function 💪)
💡 Remember: High-pull headgear is like a strict teacher holding the maxilla back, while the activator is the personal trainer pushing the mandible forward. 💪🦷
The Soft Tissue Side of the Story! 😍
We focus a lot on bones, but let’s be real—patients care about their face in the mirror! 🤳 Soft tissue changes in Class II treatment can be unpredictable, but here’s the gist: ✔ Lip retrusion happens (Forsberg & Odenrick, 1981) ✔ Soft tissue pogonion moves forward (McDonagh et al., 2001) ✔ The profile can flatten out (Hansson et al., 1997, 2000)
When we use high-pull headgear + activators, the maxilla doesn’t just sit there—it gets pulled back like a stubborn kid being dragged away from a candy store. 🍬🚫
✅ Point A shifts backward 📍 −1.4 mm (N Perpendicular) 📍 −2.3 mm (OLp)
This means we’re seeing true orthopedic retraction—aka maxillary restraint in action! 🚀 Why does this matter? Because a Class II case with maxillary excess needs more than just dental changes—we need to slow down forward maxillary growth! 🏃♂️💨
Is This a Proven Effect? 📜
Oh, you bet! Studies have been backing this up for decades (Pfeiffer & Grobéty, 1982; Pancherz, 1984; Van Beek, 1984, and many more!).
🧐 Key evidence? 📌 SNA decreased in the treatment group (yay, retraction! 🎉) 📌 SNA increased in the control group (because they didn’t get the maxillary-taming treatment).
💡 Think of it like this: Without headgear, the maxilla keeps moving forward like a train with no brakes. 🚂💨 Add high-pull headgear? Boom—slowed down! 🛑
Mandibular Growth: Myth or Reality?
Mandibular Effects: The Great Debate! 🤨⚖️
Functional appliances like the Activator + High-Pull Headgear have been stirring debates for decades:
Camp 1: “Yes, Functional Therapy Grows the Mandible!” 📈
Camp 2: “Nope, It’s Just Natural Growth!” 📉
Demisch (1972) 🧑⚕️
Harvold & Vargervik (1971) 🧑⚕️
Owen (1981) 📚
Wieslander & Lagerström (1979) 📚
Luder (1982) 🔬
Jacobsson & Paulin (1990) 🔬
Toth & McNamara (1999) 🦷
Forsberg & Odenrick (1981) 🦷
🤯 So, who’s right? Our study says… both have a point!
What Happened in Our Study? 🧐📊
Mandibular Advancement Findings
Parameter
Treated Group (Activator + Headgear)
Control Group (No Treatment)
Significance
Mandibular advancement(mm)
~3 mm forward 🚀
Minimal change
✅
SNB increase (°)
+2.6° 📈
+0.4° 📉
✅ Significant
Mandibular length (Go–Me)
Increased significantly 🦷📏
Mild increase
✅ Significant
💡 What does this mean? ✔️ The mandible didn’t just sit back and relax—it advanced! ✔️ The SNB angle increased, meaning the lower jaw moved forward more than in untreated cases. ✔️ Mandibular length (Go-Me) increased significantly—suggesting real skeletal adaptation!
But WHY Did This Happen? 🔍
This isn’t just some mandibular magic trick—science explains it! 🧪✨
The condyle remodels and moves forward in the fossa.
This explains why the NSCo angle decreased & OLp-Co moved forward (Woodside et al., 1987; Ruf et al., 2001).
Basically, the TMJ adapts to the new jaw position! 🦷
💡 Think of it as shifting a chair forward—if the condyle moves, so does the whole mandible! 🪑➡️
Quick Mnemonic to Remember Mandibular Changes! 🧠
🦷 “SNB = See the New Bite!” (Because a Class II turns into a Class I as the jaw moves forward!)
🔹 Mandible advances (~3mm forward) 🔹 SNB increases (+2.6° 📈) 🔹 Go-Me increases (Mandibular growth 📏) 🔹 Condylar adaptation helps in Class II correction
Ortho Takeaway: What Should You Remember?
✅ Functional appliances help the mandible move forward, even if they don’t “grow” it like a plant. 🌱 ✅ SNB increases, Go-Me increases, and the glenoid fossa adapts. 🦷 ✅ The jaw doesn’t just grow—it adapts!It’s teamwork between remodeling & growth! 🛠️
🤔 What’s YOUR take? Do you think functional appliances really grow the mandible, or do they just help reposition it? Drop a comment below! 💬
What Happens to the Dentition?
Activator + headgear therapy isn’t just a bone game—it’s also a tooth tamer! 🦷🔧 Here’s the real MVP effect:
Parameter
Treated Group 📊
Control Group 💤
Maxillary Incisor Retroclination 🦷⬅️
🔽 5.3°
No sig. change
Overjet Reduction 😁
🔽 5.4 mm
No sig. change
Mandibular Incisor Proclination 🦷➡️
🔼 2.0°
No sig. change
Overbite Decrease 📉
🔽 2.2 mm
No sig. change
💡 Big takeaway? 👉 Overjet correction is a team effort—maxilla moves back, mandible moves forward, and incisors get into formation! 🎯
Upper Incisors: Pulling Back Like a Retreating Army 🚶♂️⬅️
📌 Activator + headgear retroclined the upper incisors by 5.3° 📌 Overjet reduced by 5.4 mm (thanks to a combo of skeletal & dental effects!) 📌 Even though the incisors were capped, lingual movement still happened! 🦷✨
🧐 Think of it like this: The upper incisors are stubborn party crashers who get forcibly escorted out by the headgear. 🚔👮♂️
Lower Incisors: The Sneaky Forward Movers 😏
📌 Mandibular incisors proclined by 2° despite being capped! 📌 Studies show this is unavoidable in functional therapy (Ahlgren & Laurin, 1976; Pancherz, 1984)
📌 Overbite reduced by 2.2 mm in the treated group! 📌 Why? More vertical face height = less deep bite! 📌 Studies agree! (Ahlgren & Laurin, 1976; Pancherz, 1984; Nelson et al., 1993)
🦷 Deep bite patients be like: “Wait, where did my overbite go?!” 😱
Ortho Takeaways 📝
✔️ Overjet correction = upper incisors move back + mandible moves forward ✔️ Upper incisors retrocline significantly (5.3°) ✔️ Lower incisors procline slightly (2°), despite capping ✔️ Overbite decreases by 2.2 mm = more open bite tendency
💬 What’s the most interesting dentoalveolar change you’ve noticed in your cases? Let’s discuss in the comment section! 🤓👇
Vertical Growth: The Mandibular Elevator Effect! 🚀⬆️
When we use an Activator + High-Pull Headgear, the mandible tends to grow vertically, thanks to a backward rotation effect. 📐 But why? Let’s see what the research says! 👀
Who Said What? 📚
Findings on Vertical Growth 📈
Williams & Melsen (1982) 🧑⚕️📖
Mandible grows more vertically due to backward rotation
Ruf et al. (2001) 🔬
Backward rotation leads to increased face height
Cozza et al. (2004a,b) 📊
Controlling vertical dimension is key for optimal forward jaw correction
What Did Our Study Find? 🔍📊
Parameter
Treated Group (Activator + Headgear)
Control Group (No Treatment)
Significance
Face height in molar region
Increased 📈
No change
✅ Significant
SN–PP Angle
Slight increase 🔄
No change
❌ Not significant
FH–OL Angle
Slight increase 🔄
No change
❌ Not significant
FMA Angle (Mandibular plane angle)
No major change 🤷♂️
No change
❌ Not significant
Overbite Correction
Significant ✂️
Stable (No correction)
✅ Significant
🤔 What does this mean? ✔️ Mandibular vertical growth happens, but rotation balance is key! ⚖️ ✔️ Face height increased, but overall vertical relationship remained stable. ✔️ Overbite correction was significant—thank you, double capping! 🙌
Why Does This Matter? 🤔
🔹 Overbite & Vertical Growth = Besties? 🦷💕
Overbite correction was significant because the incisors were passively prevented from erupting (thanks to double capping), allowing molars to erupt instead.
This controlled vertical development, preventing unwanted open bites.
🔹 Watch Out for Backward Rotation! ⏪
If the face height increases too much, the mandible rotates backward, worsening Class II instead of fixing it. 😵
Moral of the story: Control vertical growth, or you’ll have a long face. Literally. 😆
🔹 FMA = Flat Mandibular Angle = No significant change 🔹 Overbite correction was significant (Double capping = good prognosis!) 🔹 Vertical Growth needs control, or pogonion moves BACK! 😵
Ortho Takeaway: What Should You Remember?
✅ Mandible grows more vertically with activator therapy, but watch for backward rotation. ✅ Overbite correction was significant thanks to molar eruption. ✅ FMA remained stable, showing that vertical control was maintained. ✅ Class II correction isn’t just about moving forward—it’s about balancing vertical growth too!
Facial Profile: What Changed? 🧐
When we talk about Class II treatment, we often focus on bones and teeth—but what about the soft tissue? 🤔 Your patients don’t walk around showing off their cephs, right? It’s the face they care about! 😆
Here’s what happened when we used an Activator + Headgear Combo:
Increased (Chin moved forward, fold depth reduced)
Slight increase
✅ Significant
Sls–x-axis distance (Soft tissue sulcus) 📏
Increased (More balanced sulcus)
Slight increase
✅ Significant
Horizontal soft tissue menton (Me′–x-axis) 🧔
Increased (Chin grew forward!)
Slight decrease
✅ Significant
Labiomental fold depth (Mlf–E line distance) ✂️
Decreased (Less deep fold = smoother profile)
Slight increase (Got worse)
✅ Significant
What Does This Mean? 🤓
✔️ Chin & pogonion moved forward → Say goodbye to recessive chins! 👋 ✔️ Labiomental fold became shallower → No more deep, exaggerated folds! 🔄 ✔️ Upper lip projection slightly increased → But without making patients look “duck-lipped” 🦆😂 ✔️ Soft tissue sulcus balance improved → A more harmonious lower face
🟢 High-pull headgear = Restrains maxilla → So it doesn’t grow too far forward 🟢 Activator = Encourages mandibular forward growth → Bye-bye, retrognathic chin! 🟢 Labiomental fold = Naturally flattens as the chin moves forward
Think of it as sculpting a masterpiece 🖌️—you’re not just fixing teeth; you’re enhancing the whole face! 😎
Mnemonic to Remember: “CHIN UP!” ✨
💡 C = Convexity Angle Increases (Balanced profile) 💡 H = Horizontal Menton Growth (Chin moves forward) 💡 I = Improved Sulcus Balance 💡 N = No More Deep Labiomental Fold 💡 U = Upper Lip Projection Slightly Increased 💡 P = Pogonion Moves Forward
So next time you see a Class II patient, tell them: “Don’t worry—after treatment, you’ll have a ‘CHIN UP’ moment!” 😆
Final Ortho Takeaway 📌
✅ Functional appliances + headgear improve soft tissue harmony 🏆 ✅ Patients get better chin projection & smoother profiles 💁♀️ ✅ The labiomental fold decreases, so no more harsh chin lines 🚫⏳ ✅ This treatment doesn’t just fix bones—it enhances faces! 🤩
💬 What’s your favorite soft tissue change in ortho treatment? Drop a comment below! 🗣️👇
Class II malocclusion—our beloved troublemaker—comes from either a mandibular deficiency (most common culprit 😬), maxillary excess, or both. And let’s be honest, more often than not, it’s that shy little mandible sitting too far back (McNamara, 1981; McNamara & Ellis, 1988).
So, what do we do? We call in our orthopedic reinforcements! 🎺
Functional jaw orthopedic appliances promise to encourage adaptive skeletal growth by keeping the mandible in a more forward position (a little push in the right direction, you know? 😉). One of the OGs in this game is the Activator(thanks, Andresen!), a widely used functional appliance.
But what if the patient is all ‘vertical overkill’ with excessive lower face height? 🤯
Enter the Activator + High-Pull Headgear Combo!
This tag-team effort helps to: ✔️ Control vertical growth (because we don’t need any more of that! 🚫📏) ✔️ Provide more cumulative skeletal changes than just the activator alone (Teuscher, 1978; Pfeiffer & Grobéty, 1982)
But Does It Actually Work? Or Are We Just Fooling Ourselves? 🤔
That’s where the real debate kicks in. While we know the dentoalveolar effects are solid (Jakobsson, 1967; Pancherz, 1984; Basciftci et al., 2003), the true orthopedic impact remains controversial (Calvert, 1982; Tulloch et al., 1990).
Many studies have compared: 📌 Activator vs. Activator + Headgear (Gögen & Parlar, 1989; Cura et al., 1996) 📌 Both vs. Untreated Class II Kids (very few studies actually do this! 😵)
So, What’s the Plan?
This study sets out to answer the million-dollar questions: 1️⃣ Does the activator (with or without headgear) actually promote mandibular growth? 2️⃣ Is one appliance better than the other? 3️⃣ Are the observed changes due to treatment… or just good ol’ natural growth?
📌 Materials & Methods (A.K.A. How We Did the Magic!)
Category
Details
Subjects 🧑⚕️
49 Skeletal Class II Division 1 patients
Time Period ⏳
Treated between 2001-2003 at Süleyman Demirel University
Inclusion Criteria ✅
No prior ortho treatment, cooperative, treated with either activator or activator-headgear combo, no fixed appliances
Exclusion Criteria ❌
One patient was excluded due to “uncooperative behavior” (aka, rebel without a retainer! 😅)
Study Groups 👥
– Activator Group: 33 patients (13 females, 20 males) treated with Andresen Activator – Activator + Headgear Group: 16 patients (7 females, 9 males) treated with both appliances – Control Group: 20 patients (9 females, 11 males) who rejected treatment (yes, we tracked them down! 🕵️♂️)
Cephalometric Analysis 📏
Standardized lateral cephalograms taken before (T0) & after (T1) treatment
Ceph Analysis Software 💻
Vistadent™ AT (GAC International, New York, USA)
Measurement Reliability 🔬
All measurements repeated 2 weeks later; error rate ≤ 0.994 for all parameters (that’s some solid consistency! 💯)
Statistics 📊
– Paired t-test: Checked treatment effects within groups – ANOVA & Tukey Test: Compared changes between groups – SPSS 11.0.0 was our stats weapon of choice! 🔢
🛠️ Appliance Breakdown: What Were These Kids Wearing?
– Mandible positioned edge-to-edge in bite registration – 5-7 mm interocclusal space increase – Used in two-step activation for large overjets
Activator + High-Pull Headgear 🦸♂️
– Same activator as above but with headgear tubes in premolar area – High-pull force (~300-400 g per side) 🎯
– Controlled vertical growth (because we don’t want them growing UP instead of FORWARD! 😆) – Worn 16+ hours per day for best results
🤨 But What About the Control Group?
These were 20 patients who refused treatment (seriously, why? 😵). They were observed over the same period as the treated groups to see how much of Class II correction was due to natural growth vs. actual treatment effects.
The Class II Showdown: Activator vs. Activator + Headgear – Who Wins? 🦷🥊
Alright, ortho warriors! We’ve set the stage, picked our players, and now it’s time to see the results. Which appliance reigned supreme in the battle of mandibular advancement, incisor control, and overjet reduction? 🤔
Let’s break it down—but with zero headache and maximum clarity (plus a few laughs)! 😆
📌 Results in a Nutshell: Who Changed the Most?
Key takeaways before we dive into numbers: 🔹 Both appliances worked well in correcting Class II malocclusion. 🔹 The control group? Well… they mostly just grew naturally. 🥱 🔹 Mandibular growth happened in both treatment groups, but HOW it happened differed!
👀 Intragroup Changes (Within Each Group!)
Parameter
Activator Group 🏆
Activator + Headgear 💪🎯
Control Group 🤷♂️
SNA (Maxilla position) 📐
No significant change
Decreased significantly 😏
No significant change
SNB (Mandible position)📏
Increased 🎉
Increased 🎉
Slight increase (not significant)
ANB (Class II severity)❌
Reduced → meaning less Class II!
Reduced → same result!
Minimal reduction (not significant)
Mandibular Length (Co-Gn) 📏
Increased significantly
Increased significantly
Increased (but less than the treated groups)
Ramus Height (Co-Go)📈
Increased significantly
Increased even more! 🚀
Slight increase
Upper Incisor Retraction🦷⬅️
Yes
More than activator group!
Minimal
Lower Incisor Advancement 🦷➡️
Greater than headgear group!
Yes (but less than activator group)
Minimal
Overjet Reduction 🔄
Significant decrease ✅
Significant decrease ✅
Not much change…
Mandibular Rotation 🔄
Some opening rotation
More opening rotation of occlusal plane
Anterior rotation of dentition
Occlusal Plane Angle 📐
Increased
Increased even more!
Decreased 🤯
AFH (Anterior Face Height) 📏
Increased
Increased
Increased (but significantly less)
Mandibular Plane Angle📐
Increased
Increased
Minimal change
Lower Lip Position 👄
Advanced
More advanced than activator alone!
Minimal change
🧐 Intergroup Comparisons (Between Groups!)
What’s the Difference?
Activator 🏆
Activator + Headgear 💪🎯
Control Group 🤷♂️
Mandibular Growth
✅ Significant
✅ Significant
⏳ Natural growth (but less)
Overjet Reduction
✅ More than controls
✅ More than controls
😐 Minimal
Incisor Changes
More lower incisor advancement
More upper incisor retraction
😴 Minimal
Occlusal Plane Angle
🔼 Increased
🔼 Increased even more!
🔽 Decreased!
Face Height (AFH)
🔼 Increased
🔼 Increased
💤 Less change
Ramus Height Increase
🤷♂️ Not significant
✅ Significant increase
💤 Minimal change
Lower Lip Advancement
✅ Significant
✅ Even more significant!
🥱 Meh…
EFFECTS ON MAXILLA
The activator and activator headgear are both warriors in the battle against Class II malocclusion. But do they really push the maxilla back, or are we just dreaming? Studies say… it’s complicated. Some claim that neither does much (😢), while others insist that the activator headgear combo works like a headgear-in-disguise. 🦸
What Does Science Say? 🧐
Feature 🏷️
Activator 🤹♂️
Activator + Headgear 🎭
Does it push the maxilla back?
Maybe, but not dramatically. 🤷♂️ Some studies (Chang, Courtney, Cura, Ruf, Basciftci) say there’s little to no orthopedic effect.
Yes, but don’t expect miracles! 🌟 The headgear-like effect is real (Jakobsson, Pancherz, Vargervik & Harvold), but not game-changing.
How much force does it generate?
About 100 g (softer push). 🎈
Orthopedic-level force (stronger push). 💪
Sagittal restriction of maxillary displacement?
Limited effect. 🚦
More restriction than activator alone, but the difference is not statistically significant. 📉
Effect on SNA angle?
Slight reduction. 📏
Greater reduction than activator alone, but the difference is clinically insignificant. 🤏
Long-term potential?
Needs more research! 🧐
Could be more effective with a longer treatment duration. ⏳
So, Who’s the Winner? 🏆
It’s a draw. 😬 While the activator alone doesn’t do much to hold back the maxilla, adding headgear helps a little—but don’t expect a total transformation. If your goal is maxillary restriction, traditional headgear might be a better bet.Final Takeaway: If activator treatment had a slogan, it would be:“I try my best, but don’t expect magic!” 🎩✨For now, if you’re treating a growing Class II patient, use the activator headgear combo if you want a slight maxillary restriction. Just don’t forget compliance—because headgear works only when patients actually wear it! 😅
EFFECTS ON MANDIBLE
The activator has been hailed as a growth stimulator, but the science is… well, mixed. Some studies claim it increases mandibular length in the short term 🏃♂️, but long-term results are still debated. Others argue that no clinically significant growth occurs. 😬
What Does Science Say? 🔬
Feature 🏷️
Activator 🤹♂️
Activator + Headgear 🎭
Short-term mandibular length increase?
Yes! 📏 Studies show 2–4 mm per year growth (Harvold, Webster, Ruf, Basciftci).
Yes, same effect as activator alone. 🚀
Long-term mandibular growth?
🧐 Still not confirmed. Tulloch et al. (1998) say long-term benefits are questionable. 🤷♂️
Same as activator alone—no extra long-term boost. 🤔
Does it work better than natural growth?
Growth was statistically significant compared to control groups. ✅
Also statistically significant, but no extra magic compared to activator alone. 📊
Activator does increase mandibular length in the short term. 📈
Activator with headgear does the same thing—but not better than activator alone.
The long-term effects remain debatable, and natural growth might be doing a lot of the work! 🤯
Final Takeaway: “Yes, the activator helps—at least for a while. But don’t expect it to turn a retrognathic mandible into a jawline fit for Hollywood.” 🎬😂
Cura et al. (1996) found that activator alone was less effective than activator + headgear. 😯
Some studies suggest slightly better ANB reduction than activator alone, but…
Is headgear superior?
NO! 🛑 Gögen & Öztürk (1994) found no significant difference in ANB reduction between both. 🤷♂️
No clear superiority—headgear doesn’t make a huge difference. 😅
Compared to untreated Class II cases?
Definitely improves the sagittal relationship! 📏
Also improves it, but not significantly more than activator alone.
Both treatments reduce ANB and improve maxillo-mandibular relationships. ✅
Activator + headgear may offer a slight advantage in some cases (Cura et al., 1996). 🤏
BUT! No clear evidence proves headgear is significantly better than activator alone. 🤷♂️
Effects on the dentoalveolar structures
What Happens to the Upper Incisors? 🦷🔄
Effect 🏷️
Activator 🤹♂️
Activator + Headgear 🎭
Upper Incisors (U1) Retroclination?
Yes! Retracted significantly 📉
Retracted even more due to headgear force ⏪
Why?
Just the activator working its magic 🎩✨
Extra posterior force from headgear = more retraction 🚀
🔹 Conclusion? 👉 Headgear makes the upper incisors even more retroclined than activator alone! 😯
What Happens to the Lower Incisors? 🦷🔼
Effect 🏷️
Activator 🤹♂️
Activator + Headgear 🎭
Lower Incisors (L1) Proclination?
More protruded 😬📈
Better controlled! Less protrusion ✅
Why?
Activator causes forward movement of mandibular teeth. 🚀
Headgear keeps things in check, reducing unwanted proclination. 🛑
🔹 Conclusion? 👉 If the patient already has protrusive lower incisors, headgear is the better bet! 🎯
What Happens to Tooth Eruption? 🌱🦷
Teeth 🦷
Effect
Mandibular posterior + Maxillary anterior
Encouraged to erupt! 🌱📈
Maxillary posterior + Mandibular anterior
Eruption is inhibited! ❌📉
🔹 Why does this matter? 👉 This eruption pattern causes occlusal plane rotation, which helps correct Class II relationships! 🎯
Occlusal Plane Rotation: Activator vs. Headgear 🔄📏
Effect 🏷️
Activator 🤹♂️
Activator + Headgear 🎭
Occlusal Plane Rotation?
Clockwise rotation 🔄
Even more clockwise rotation! 🔄🔄
Why?
Mandibular posteriors erupt more than maxillary posteriors 📊
Extra posterior intrusive forces from headgear ⏬ make it rotate more!
🔹 Conclusion? 👉 Both activator and activator + headgear cause clockwise occlusal plane rotation (a good thing for Class II correction!). But headgear increases the effect slightly.
What’s the Best Choice? 🤔
If you need more U1 retraction, go for activator + headgear.
If the lower incisors are already too proclined, activator alone might push them even more! Consider headgear.
Both appliances help Class II correction by altering eruption patterns & occlusal plane rotation.
👉 Moral of the story?Headgear might not be the most fashionable choice, but it gets the job done! 😂
Effects on the vertical dimension
Who Gets a Taller Face? 🤔🦷
Effect 🏷️
Activator 🤹♂️
Activator + Headgear 🎭
Increases Anterior Face Height (AFH)?
Yes! 📈
Yes! But slightly less than activator alone 📉
Increases Posterior Face Height (PFH)?
Yes! 📈
Yes! Similar effect to activator alone 📊
Why?
Encourages mandibular growth and posterior tooth eruption 🌱
🔹 Conclusion? 👉 Activator + headgear wins for soft tissue improvement! 🏆 👉 Want a stronger profile transformation? Headgear does the trick! 🎩
What Does This Mean Clinically? 🏥
If a patient has a very convex profile, activator headgear can help flatten it out by retruding the lower lip.
If a patient needs a milder correction, the activator alone might be enough.
🔹 Moral of the story? 👉 Activator headgear gives a more noticeable soft tissue change, while activator alone keeps things more subtle.🤓
Table of Orthodontic Glory 📊
Category🏆
Activator 🎭
Activator Headgear 🎯
Key Takeaway 🤓
Maxillary Effects 🏛️
Minimal orthopedic effect. Some studies say it works, others say “meh.” 🤷♂️
Slight headgear-like restriction, but not that different from activator alone. 🤏
Maxillary control is stronger with headgear, but the difference isn’t clinically game-changing.
Mandibular Growth 📈
Can increase mandibular length by ~3mm per treatment period. 📏
Same effect as activator. No magic wand here! 🎩✨
Both work, but long-term extra growth is still debatable.
ANB Angle Reduction🔄
Both improve maxillo-mandibular relation. 👏
Same ANB improvement as activator. 🧐
Both appliances improve Class II, but one isn’t superior.
Upper Incisor Position 😬
Retrudes maxillary incisors more than activator headgear. 🚀
Still retrudes, but slightly less than activator alone. ⚖️
Activator is a better upper incisor retractor!
Lower Incisor Position 😁
More proclination of lower incisors. 😲
Better control over lower incisor position. ✅
Headgear wins in controlling lower incisor flaring.
Occlusal Plane 🛤️
Causes clockwise rotation. ⏳
Even more clockwise rotation due to posterior intrusive forces. 🚀
Both rotate occlusal plane, headgear does it more.
Vertical Growth 📏
Increases anterior and posterior face height slightly more. 📈
Increases AFH & PFH but no big difference from activator. 🤏
Both equally increase face height.
Soft Tissue Profile 🧑🎨
Lower lip may protrude slightly. 👄
More lower lip protrusion than activator alone. 😘
Headgear impacts lower lip position more!
Memory Trick! 🧠💡
Think of Activator as your “Basic Gym Workout” 💪 and Activator Headgear as “Personal Trainer + Gym” 🏋️♀️💼. One is more controlled, but both make gains! 🎯🏆
Now, go forth and impress your profs, juniors, and clinic mentors with this knowledge! 🤓🔥 Happy studying! 🦷🎉
Picture this: You’ve got a patient with teeny-tiny lateral incisors that look like they skipped the memo on proportional growth. Or, on the flip side, some chonky premolars that are hogging all the real estate. What do we do? Simple—adjust the mesiodistal width!
✔ For Small Teeth – We create extra space to allow for bonding, veneers, or crowns to bring them up to size. Because no one likes an awkward gap-toothed smile (unless it’s intentional, looking at you, Madonna 😏).
✔ For Large Teeth – Approximal enamel reduction (IPR) helps make room. Think of it as giving teeth a little diet plan—just a millimeter here and there to slim them down.
🚀 Extractions: More Than Just Pulling Teeth!
Ah, extractions—the ortho version of the “big reset.” But don’t be fooled—yanking a tooth doesn’t mean we magically get all that space for crowding. Posterior teeth love to creep forward like uninvited guests at a party. 😩
So, how much space do we actually get? It depends on:
🦷 Which teeth are extracted – First premolars? Second premolars? Each has a different impact.
🦷 Which arch is involved – Because upper and lower play by different rules.
🦷 Whether second molars are banded – If they are, things get trickier!
🦷 Where the crowding is – Front? Back? Everywhere? 😵💫
🦷 Canine retraction – More crowding = more canine movement needed.
🦷 Angulation of extraction space – Are we working with nicely upright teeth or rebellious ones tilting all over the place?
📖 The Research Dilemma: Why Can’t We Just Google the Answer?
Frustratingly, literature isn’t super helpful here. Most space studies were done eons ago when clinical decisions were based on vibes rather than solid science. Plus, every case is different—5mm of crowding in one patient doesn’t always mean the same thing in another.
How Much Space Do We Get from Extractions?
📌 First premolar extractions: 40-65% of space helps relieve anterior crowding (without anchorage reinforcement). 📌 Second premolar extractions: Only 25-50% of space benefits the front. 📌 Upper arch ≠ Lower arch! Upper molars tend to move forward more, reducing net space.
Anchorage: Because Space Disappears Fast! 🏗️🚧
We use different anchorage devices to prevent teeth from shifting where we don’t want them to:
🚫 Lingual Arches – Good for holding space, but weak for active anchorage. ✅ Nance Buttons – Can help early on, but must be removed before full retraction. ❌ Jones Jigs & Pendulum Appliances – As much mesial premolar movement as distal molar movement. Not great. 🙃 👑 Headgear (Classic, but Gold Standard) – Best for reinforcing anchorage! 🎯 🚀 Mini-Implants & Onplants – The future of ortho anchorage! 💡🔩
Missing Teeth: To Open or Not to Open? ❌
When a tooth is missing, you’ve got two choices: ✅ Close the space by shifting teeth together. ✅ Keep the space open for a prosthetic replacement.
💡 Example: If a lateral incisor is missing, you need 6-7 mm of space for a prosthetic replacement (implant, bridge, or RPD). It’s the same logic as building up small teeth—we make space where needed for ideal esthetics and function.
⚠️ Watch out for Bolton Discrepancies! If you close space but end up with mismatched tooth sizes between upper and lower arches, occlusion might go crazy! 😵💫
Molar Movement: The Great Migration 🚛🦷
Molars don’t like to stay put. They move forward, backward, and sometimes just ruin your anchorage plans. 😤
So, what controls molar movement? Let’s break it down:
🛑 To move molars back (distalization): ➡️ Distalizing Headgear – Old school but effective. (If patients actually wear it! 😅) ➡️ Pendulum Appliance / TADs – More modern, less compliance-dependent. ➡️ Intermaxillary Elastics – Helps, but watch out for anchorage loss. ➡️ Orthognathic Surgery – Extreme cases only!
🚀 To move molars forward (mesialization): ➡️ Protraction Headgear – Pulls upper molars forward. ➡️ Intra-arch Traction – Springs, elastics, or coil springs to bring molars forward. ➡️ Functional Appliances – Great in growing patients with Class II patterns. ➡️ Natural Growth – Works best in growing kids, but unpredictable.
Why Does This Matter for Space Planning?
💡 Molar movement = Space gained or lost! If you don’t account for molar migration, your whole space plan can backfire.
📌 Example: If you extract first premolars to fix crowding but lose anchorage, molars might slide forward too much, leaving little space for retraction. Congrats, you just lost the space you worked so hard to get! 😬
Molar movement should always be planned with: ✅ Anchorage control (Headgear, TADs, Nance, etc.) ✅ Interarch considerations (Class II, Class III adjustments) ✅ Final occlusion goals (Are we aiming for Class I?)
Differential Maxillary/Mandibular Growth
Growth Patterns: Who’s Growing Faster? 📏
When planning space, you need to predict growth, especially in: 🔹 Class II cases (Mandible may “catch up”) 🔹 Class III cases (Mandible keeps moving forward 😨)
👉 Most patients in permanent dentition don’t have major A-P growth changes. But in boys with Class II or Class III patterns, things get interesting!
2️⃣ Class II Growth: The “Catch-Up” Effect 🔄
For some Class II cases, the mandible grows forward during the mid-to-late teens, reducing the overjet. Sounds great, right? Well, here’s the paradox in space planning:
🦷 Mandibular growth = Less space needed in the upper arch! ✅ If a patient has favorable mandibular growth, you can reduce upper arch space requirements by about +2 mm (1 mm per side).
💡 Space planning tip: Consider leaving slightly extra space in the upper arch in growing Class II cases since overjet may self-correct.
3️⃣ Class III Growth: The Space Nightmare 😱
Bad news: Class III cases usually get worse with growth. 😭 📉 Mandibular growth increases lower arch space requirements, leading to even more crowding in the lower arch!
🦷 How much extra space? 🔹 Plan for –2 mm to –4 mm of extra lower arch space to accommodate future incisor compensation.
💡 Space planning tip: If a Class III patient is still growing, be cautious—things might get worse, and surgery might be needed later. 🚑
4️⃣ The Final Space Equation: Must = 0! 🏁
After accounting for: ✅ Extractions 🦷❌ ✅ Tooth reduction/enlargement ✂️ ✅ Molar movement 🔄 ✅ Growth effects 📏
Your final space must return to ZERO! 🎯 If you have extra space left or still need more, it means: ❌ The treatment plan might need adjustments. ❌ Your mechanics aren’t aligned with your goals. ❌ Growth predictions were incorrect. (Oops! 😬)
Case Report: Space Planning in Class II Div 2♟️🦷
Ever felt like orthodontic space planning is a game of chess? Well, in this Royal London Space Planning case, every move counted! Let’s break it down step by step.
📌 Patient Details
👦 Age: 11 years 🔹 Malocclusion: Class II Division 2 🔹 Crowding: 5 mm (lower), 6 mm (upper) 🔹 AP Relationship: Between Class I and half-unit Class II
🔍 Main Treatment Goals: ✔️ Correct Class II malocclusion ✔️ Align both arches without extractions ✔️ Maintain anchorage (because Class II cases are sneaky!) ✔️ Create space for intrusion and torque of upper incisors
🛠️ Space Planning Breakdown (Step-by-Step)
1️⃣ How Much Space Was Needed? 📏
📌 Crowding: 🔹 Lower arch: 5 mm 🔹 Upper arch: 6 mm
📌 Leveling of Curve of Spee: 🔹 Lower: 1 mm 🔹 Upper: 2 mm
📌 Buccal Segment Correction: 🔹 Needed 2 mm of arch width expansion → This generated 1 mm of space in the upper arch
📌 Advancing the Incisors: 🔹 Lower incisors advanced by 3 mm = 6 mm of space gained 🔹 Upper incisors advanced by 3 mm = 6 mm of space gained
📌 Palatal Root Torque of Upper Incisors: 🔹 Required –3 mm space
📌 Mandibular Growth Catch-Up (Bonus Space!) 🔹 +2 mm per side = +4 mm of “free” upper arch space 🎉
👉 Final Space Calculation: ✅ Lower arch net space = 0 (meaning no extractions were needed) ❌ Upper arch had a 4 mm space deficit
2️⃣ The Key Problem: Anchorage! ⚓
Would Class II elastics or a functional appliance work? 🚫 Nope! ❌ They would cause lower molars to drift mesially, leading to a -4 mm deficit in the lower arch. ✅ Instead, headgear was chosen to retract upper molars and maintain anchorage.
3️⃣ The Treatment Plan
✔️ Phase 1: Upper removable appliance with an anterior bite plane 🔹 Purpose? → To level the lower occlusal curvewithout losing anchorage.
✔️ Phase 2: Headgear worn for 18 months (to hold upper molars back)
✔️ Phase 3: 🔹 Lower Preadjusted Edgewise appliance after 4 months 🔹 Upper Preadjusted Edgewise appliance after 9 months
🕰️ Total Treatment Time: 22 months
4️⃣ Results (Checkmate! ♟️😃)
📌 What was achieved? ✅ Class II Div 2 corrected ✅ Proper torque of upper incisors ✅ Lower incisors moved forward into space of over-erupted upper incisors ✅ Anchorage preserved—no lower space loss!
📸 Final Smile: Picture-perfect 😁
5️⃣ Lessons for Ortho Students 🎓
💡 Lesson #1: Space planning isn’t just about crowding—it’s about anchorage control too! ⚓ 💡 Lesson #2:Class II elastics or functionals aren’t always the answer. They could cause unwanted lower molar movement. 🚫 💡 Lesson #3: Growth can be your ally or your enemy. Use it wisely! 📈 💡 Lesson #4:Think ahead! The final space should always be ZERO—otherwise, your mechanics need a rethink.