Molar incisor hypomineralization (MIH): The “Why, What and How” of decision making for orthodontists

Picture this: You’re an orthodontist, standing in your clinic, ready to battle malocclusions like a dental superhero. Your trusty sidekicks? Brackets, bands, and auxiliaries. But then, lurking in the shadows of enamel comes a formidable foe—Molar-Incisor Hypomineralization (MIH). Cue dramatic music.
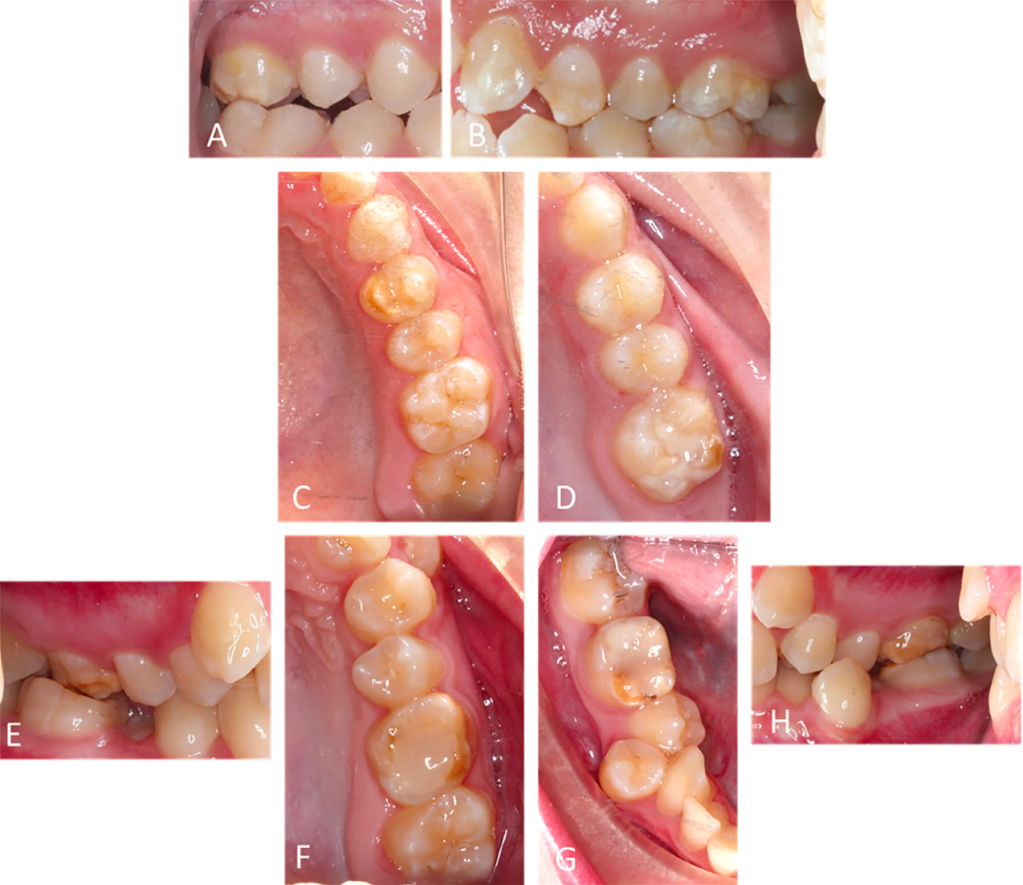
Now, you might be thinking, “Really? Another dental complication? Didn’t we already have enough to deal with—like convincing teenagers to wear their rubber bands?” But fear not! We can break down this orthodontic enigma using Simon Sinek’s Golden Circle method. Yes, the same framework that inspires businesses and leaders can also help us decode MIH. Let’s dive in.

The “Why” – Our Core Purpose: Why Should We Care About MIH?

If you’re an orthodontist, MIH isn’t just another acronym to add to your vocabulary—it’s a genuine clinical headache. This condition, which disrupts enamel development, makes teeth more porous, fragile, and annoyingly prone to decay. Imagine trying to bond brackets to enamel that crumbles like a poorly baked cookie. Not fun.

Beyond the technical struggles, there’s the human factor. Kids with MIH often experience dental anxiety, sensitivity, and a higher risk of caries, making their orthodontic journey more challenging. As professionals dedicated to crafting beautiful, functional smiles, we need to take MIH seriously. Because at the end of the day, what’s the point of straightening teeth if they don’t last?

The “What” – Understanding the Beast: What Is MIH Exactly?

MIH affects the first permanent molars and incisors, leading to weak enamel that flakes, fractures, and generally behaves like it skipped calcium class. Researchers blame a mix of genetic and environmental factors, including childhood illnesses, antibiotics, and—because why not?—potentially some mysterious, yet-to-be-determined causes.

Orthodontists face a tough battle here. Hypomineralized enamel doesn’t bond well, meaning brackets are more likely to pop off mid-treatment, like an overenthusiastic popcorn kernel. Sealants and fillings? They don’t always stay put. In severe cases, extractions may even be necessary, often under general anesthesia. Add in the stress of anxious kids, frustrated parents, and mounting healthcare costs, and MIH turns into more than just an enamel issue—it’s a full-blown orthodontic challenge.

The “How” – Fighting Back: How Can We Manage MIH in Orthodontics?

Here’s where we get creative. Since MIH-affected teeth can be hypersensitive and structurally compromised, orthodontists need to tweak their usual strategies. Some battle-tested tips include:

  • Stronger Bonding Protocols: Think of it like using super glue instead of tape. Resin-modified glass ionomers or self-etching primers may offer better adhesion.
  • Adjunctive Support: Don’t just slap on a bracket and hope for the best. Consider bands, indirect bonding, or even temporary anchorage devices to minimize stress on hypomineralized teeth.
  • Strategic Treatment Planning: Sometimes, it’s better to extract a compromised first permanent molar early to allow for favorable space closure—sort of like cutting your losses before they spiral out of control.
  • Desensitization Strategies: MIH teeth can be dramatically hypersensitive, making simple treatments feel like medieval torture. Pre-treatment fluoride varnishes, casein phosphopeptide-amorphous calcium phosphate (CPP-ACP), or desensitizing agents may be game changers.
  • Multidisciplinary Collaboration: Since MIH is a complex condition, working closely with pediatric dentists and restorative specialists ensures comprehensive care. Translation: Teamwork makes the dream work.

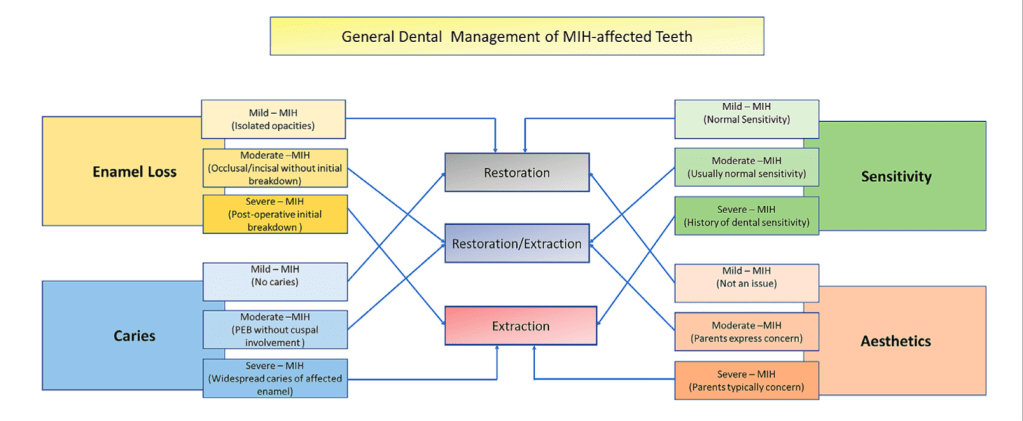
How Do We Measure MIH Severity?

Great question! Over the years, researchers have tried to classify MIH using complex scoring systems. Some use criteria like:

  1. Demarcated opacities – The ‘Instagram filters’ of enamel defects.
  2. Posteruptive enamel breakdown (PEB) – The ‘oops, it’s crumbling’ stage.
  3. Atypical restorations – The ‘let’s fix this mess’ approach.
  4. Tooth extractions due to MIH – The ‘eviction notice’ for first permanent molars.
  5. Failure of eruption – Because sometimes, teeth just don’t feel like showing up.

One commonly used scoring system is the MIH Treatment Need Index, which, let’s be real, sounds like something straight out of a bureaucratic nightmare. But it’s actually useful—it helps us determine how bad the MIH situation is and what to do next.

Does MIH Affect Quality of Life? Oh, Absolutely.

If you think MIH is just about funny-looking enamel, think again. Studies show that MIH can significantly impact a child’s oral health-related quality of life (OHRQoL). Here’s how:

  • Oral Symptoms & Functionality: MIH-affected molars are often hypersensitive, making eating ice cream a horror movie experience.
  • Social & Emotional Impact: MIH-affected incisors can make kids feel self-conscious about their smiles, leading to social anxiety. And let’s not forget about potential teasing—because kids can be brutally honest.
  • Increased Dental Fear & Anxiety (DFA): Some studies say MIH-affected kids are more likely to dread dental visits. Others say, “Nah, they’re fine.” Either way, behavior management is key.

So, What’s the Game Plan?

MIH doesn’t come with a ‘one-size-fits-all’ treatment. Instead, it requires a mix of strategies:

  • Minimally invasive techniques (like microabrasion or infiltration) to improve aesthetics.
  • Restorations to protect those weak spots—composite resins, glass ionomer cements, and the occasional crown for stubborn cases.
  • Fluoride varnishes and desensitizing agents to ease the ouch factor.
  • Extraction of molars (if necessary) with careful ortho planning—because no one wants unexpected space issues later.
  • Patient and caregiver education (because sometimes, a little reassurance goes a long way!).

Step 1: To Extract or Not to Extract?

Before anything else, orthodontists must decide whether the MIH-affected teeth should stay or go. If the teeth are beyond repair—hypersensitive, structurally weak, or just outright stubborn—it may be best to bid them farewell. If they are salvageable, then buckle up because they require extra TLC during treatment.

Bonding and Banding: Special Considerations for MIH-affected Teeth

MIH-affected enamel is like a fragile antique—handle with care. Unlike their healthier neighbors, these teeth don’t always cooperate with traditional bonding and banding techniques. But don’t worry, science has our backs! Here’s how we can secure brackets and bands without a meltdown (from either the patient or the orthodontist).

Orthodontic Bonding Tips:

🦷 Prophylaxis First: Clean the tooth surface with a rubber cup and fluoride paste (up to 13,500 PPM fluoride). Think of it as a spa day for the tooth before the real work begins.

🦷 Pretreatment Magic: A little 5% sodium hypochlorite works wonders before using a self-etching primer bonding system. It’s like priming a wall before painting—essential for a strong hold.

Cementing and Bonding Options:

🔹 GIC (Glass Ionomer Cement): A reliable option with fluoride release—because extra protection is always a plus.

🔹 RMGIC (Resin-Modified GIC): Think of this as GIC with superpowers—it has better adhesion and longevity.

🔹 Compomer (Polyacid-modified GIC): A hybrid option that offers flexibility and durability.

🔹 Resin Composite: The go-to for a strong, lasting bond, but only if the enamel allows it. MIH teeth can be temperamental!

Banding Done Right:

📌 Metal Printed Bands: Custom-fitted for a snug, secure grip. Think of it as a tailored suit—because one size never fits all.

Utilization of extraction spaces for orthodontic corrections

Ah, the noble First Permanent Molar (FPM)—a tooth that stands its ground, anchors the jaw, and chews through life’s challenges. But what happens when it’s compromised beyond repair? Orthodontists face a real conundrum: extract it and risk space management issues, or keep it and endure the long-term consequences? Let’s break it down (pun intended) with a deep dive into extraction spaces for orthodontic corrections, all while keeping our humor intact—because nothing soothes dental woes like a good laugh!

Orthodontists typically avoid extracting FPMs because of their strong anchorage potential. Think of them as the wise elders of the dental arch, holding everything together. But when they fall victim to hypomineralization, decay, or pain, tough choices must be made.

Timing is everything! Extract too early, and adjacent teeth tip into the space like an overly enthusiastic Jenga tower. Extract too late, and you risk poor occlusal contact, overeruption of opposing teeth, and the orthodontist giving you “that look.”

The Referral Chain Reaction

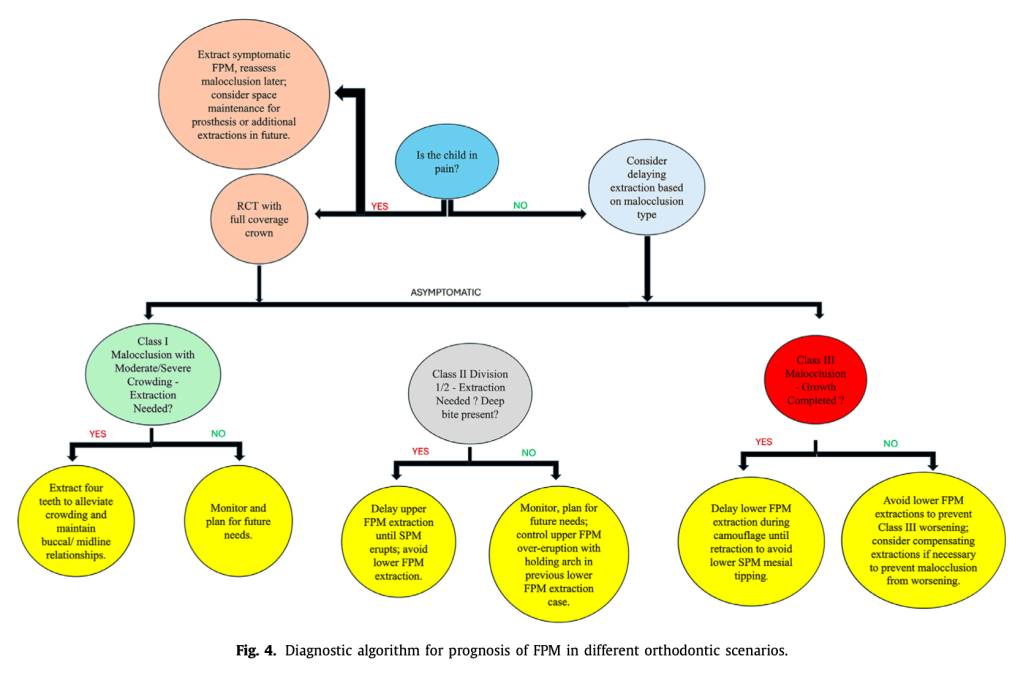
Most patients first visit their general dentist, who then passes the case to a pediatric dentist. If the situation is dire, the orthodontist enters the scene, often finding themselves in a borderline decision-making scenario. At around 8-9 years old, kids undergo assessment, as this is the sweet spot where Second Permanent Molars (SPMs) are still in development. Severe pain? Extraction is likely, no matter the malocclusion type.

Timing Matters: Extracting the Lower FPM

Extracting a compromised lower FPM while the SPM is still developing (between ages 8-10) minimizes occlusion disruption. But miss this window, and you may be dealing with tipping, rotation, and spacing nightmares. Think of it like catching a bus—you don’t want to be too early or too late unless you enjoy waiting at the stop forever.

However, once extracted, the domino effect begins. Patients may face mesial tipping of upper and lower SPMs, distal migration of premolars, and bite deepening. Orthodontists must then break the news: “Congrats! You might need future extractions and prosthetic work.” Sounds fun, right?

The Third Molar Wild Card

If there’s a third molar in the same quadrant, hooray! Space closure improves. If not, no biggie—patients can still function with a shorter dental arch. It just makes mesial movement of the lower SPM a tad more complicated.

The Art of Extraction Strategy: Class I, II, and III Cases

  • Class I Malocclusion (Moderate to Severe Crowding): Extracting FPMs can create much-needed space, but it’s often best to wait until the SPMs erupt. If extractions aren’t needed, stainless steel crowns may be the unsung heroes of long-term FPM protection.
  • Class II Division 1: Delayed extractions of upper FPMs help avoid mesial drift, which could mess up overjet correction. In cases of a retrusive mandible, keeping lower FPMs intact is preferred—because excessive retraction can lead to airway complications. Nobody wants that.
  • Class II Division 2 (Deep Overbite Patients): Lower FPM extractions? Bad idea—especially for brachyfacial cases. Instead, retention strategies and immediate appliance placement post-SPM eruption can help maintain vertical dimension.
  • Class III Malocclusions: Super unpredictable growth patterns mean extractions should be postponed until growth ceases. Removing lower FPMs can worsen the situation, making upper third molars redundant and worsening reverse overjet. In short, let the teeth settle before making any rash decisions!

The Dilemma of Restoring vs. Extracting FPMs

Endodontic treatment sounds like a noble plan, but reality hits hard. The success rate of restoring hypomineralized teeth is dicey at best. Bond failures, post-eruptive breakdown, and the need for perfect sealing make restorations a gamble. Plus, getting an 8-year-old to sit still for a lengthy procedure? Good luck! If the initial restoration fails, a second round of general anesthesia might be needed for extraction—something everyone would rather avoid.

Space Closure & The Battle Against Overeruption

If the lower FPM is extracted before functional therapy, maintaining occlusal coverage is crucial. Overeruption can be a real nuisance, and a holding appliance might be necessary until the space is restored prosthetically or closed via orthodontic treatment. But compensating extractions? Only in extreme cases where the FPMs are beyond salvation!

Managing space closure is no walk in the park, especially in deep curve of Spee cases or patients with reduced lower anterior facial height. Add strong occlusal forces into the mix, and even stainless steel crowns struggle to stay put.

Class III cases demand the most caution, as premature extractions can throw everything out of whack. The best approach? Delay major decisions until growth stabilizes and all options (including orthodontic camouflage vs. surgery) are on the table.

Orthodontists are basically playing 4D chess when deciding whether to extract an FPM. It’s all about precision, timing, and making sure one move doesn’t throw the whole game into chaos.

So next time your orthodontist suggests extracting an FPM, know that they’ve calculated the risks, assessed the potential consequences, and likely lost sleep over it. Because in the world of orthodontics, every extraction is a strategic decision—one that could determine the future of a patient’s perfect smile!

(And if all else fails, there’s always the stainless steel crown—a knight in shining armor for struggling FPMs everywhere!)

Anterior Maxillary Distraction by Tooth-Borne Palatal Distractor

Let’s talk about anterior maxillary osteotomy—a fancy way of saying “pushing your upper jaw back into place because your teeth decided to go rogue.” Now, before we dive into the nitty-gritty, let’s acknowledge the real heroes here: the orthodontists and surgeons who spend their days nudging bones like a very sophisticated game of Jenga.

Maxillary osteotomies have been around longer than your grandma’s secret recipe for laddoos. But unlike her kitchen skills, these techniques come with scalpels, screws, and a significant chance of making your nose twitch for weeks.

We have three classic moves in the Maxillary Osteotomy Dance:

1. Wassmund osteotomy – Named after a guy who probably spent too much time thinking about cutting bones.


2. Wunderer osteotomy – Wunderer…because wondering if your face will move correctly afterward is part of the thrill.


3. Anterior maxillary downfracture osteotomy – For those who like their surgery with a side of gravity.

While all three techniques get the job done, they differ in their “access route”, like Google Maps giving you three ways to get to the same dental conference—one scenic, one straightforward, and one with a questionable dirt road.

The Problem With Pushing Forward

Now, if you thought moving the anterior maxilla forward was easy, think again. The palatal mucosa is like an overprotective mother—it does not stretch easily. If you try too hard, you might end up with an oronasal or oroantral fistula. (For those unfamiliar, that’s a fancy way of saying, “Congratulations, you now have an accidental bonus airway!”)

In fact, the only reported case of maxillary advancement via osteotomy happened in 1968—shoutout to William Bell, the original maxillary daredevil. He moved the maxilla forward, bone-grafted the leftover gap, and then—because 1968 was a wild time—popped in a removable denture like a dental Band-Aid.

Enter Distraction Osteogenesis – The Slow and Steady Approach

The dental world eventually realized that gradual movement is the way to go (kind of like convincing your cat to take a bath). So, we borrowed a trick from orthopedics: distraction osteogenesis. Originally developed for cleft lip and palate cases, this technique slowly moves bones using:

External distractors – Big, bulky, and very “Mad Max.”

Orthodontic face masks – Like Invisalign’s overachieving cousin.

Internal distractors – The discreet VIP section of distraction devices.


But here’s the twist: these are mostly used to move the whole maxilla forward (Le Fort I style), rather than just the anterior segment. That’s like moving an entire apartment building when all you really needed was to shift the balcony.

The Unexpected Hero: The Palatal Distractor

Palatal distractors have traditionally been used for expansion, helping kids (and the occasional brave adult) widen their maxilla to correct collapsed buccal occlusion. But someone (probably while holding a coffee and staring at a dog study) thought, “Hey, what if we used this thing to move the maxilla forward?”

The results?

Tooth-borne distractors were tested on dogs (lucky them), and they did successfully move the anterior maxilla forward—along with a lot of dental movement.

Bone-borne distractors came in to save the day, ensuring that actual bone (not just teeth) was being moved.

And guess what? There’s exactly ONE reported case of a palatal distractor being used to advance a retruded maxilla in a non-cleft patient. Just one. That’s rarer than an orthodontist who doesn’t own at least three pairs of loupes.

Who Needs This? (Besides People Who Want to Look Like Their Own X-Ray)

This technique is perfect for patients with maxillary hypoplasia in both the anteroposterior and transverse planes—especially if they have cleft lip and palate. Think of it like a strategic battlefield move:

Crossbite limited to anterior and premolars? Check.

Molars behaving themselves in normal buccal occlusion? Check.

Dental crowding making your orthodontist sigh dramatically? Check.


The beauty of this approach? As your maxilla gradually advances, new bone forms in its wake—meaning your displaced teeth can be politely guided into their new positions with post-surgical orthodontics.

The Surgical Game Plan: Step-by-Step (or Slice-by-Slice)

Step 1: Build Your Secret Weapon – The Hyrax Appliance

Before the surgery even starts, we need our mechanical hero: the Hyrax orthodontic appliance (which sounds like a prehistoric creature but is actually a German-made expansion screw). Unlike its usual role in expanding palates sideways, we tweak it to push forward instead of out.

4 arms of the appliance:

2 anterior arms → Soldered to canines or first premolars

2 posterior arms → Soldered to first or second molars

This is the equivalent of securing a medieval battering ram before storming the castle walls.

Step 2: Knock Knock, It’s Surgery Time!

Under general anesthesia (because no one wants to be awake for this), we begin:

1. Vestibular incision – From first molar to first molar (basically, a wide front door for the maxilla).

2. Mucoperiosteal flap reflection – Peeling back the gums like opening a well-wrapped gift… but with scalpels.

3. Buccal linear osteotomy – A clean cut above the maxillary teeth from pyriform rim to distraction site.

4. Lateral nasal wall cut – Because your nose needs to be in on the action too.

5. Septal osteotomy – The nasal septum gets a trim at its base (like a very aggressive haircut).

At this point, your maxilla is thinking, “What did I do to deserve this?”

Step 3: The Grand Downfracture (Because Upfracturing Isn’t a Thing)

Vertical interdental osteotomy → First, a light cut through the buccal cortex, then deepened carefully (like slicing a layered cake).

Palatal osteotomy → Extending the cut medially to separate the segment without puncturing the palatal mucosa (because who needs a hole in their mouth?).

Downfracturing the anterior maxilla → A gentle wiggle and push to mobilize it forward (think of convincing a cat to move off your laptop).

Important Rule: Do not mess with the palatal mucosal pedicle—it’s keeping everything alive!

Step 4: Installing the Hyrax & Hitting the Snooze Button

1. Cement the appliance onto the selected teeth. (Your maxilla is now officially in a mechanical relationship.)

2. Close the surgical wound. (Because we don’t want to leave things open-ended.)

3. Let the bone chill for five days. (Surgery is tiring. Even for your face.)

Step 5: The Big Move – Slow & Steady Wins the Maxilla Race

On post-op day five, we start activating the Hyrax:

1mm per day (Because bones like to take their time).

2 to 4 activation rhythms per day (Like an orthodontic drumbeat).

The anterior maxilla keeps moving forward until a normal overjet is achieved.

Once it’s in place? Lock it in for 6 weeks—because good things take time (and so does new bone formation).

The Good, The Bad & The Orthodontist Who Has to Deal With It

✅ The Benefits:

⭐ No need for bone grafts – Your body does all the hard work.
⭐ Improved soft tissue support – Upper lip & paranasal area get a free upgrade.
⭐ Better space for orthodontic alignment – Less need for tooth extractions.
⭐ Stability – Unlike nonvascularized bone grafts, this bone won’t shrink over time.

⚠️ The Potential Drama:

🚨 Anchorage issues – If the patient lacks premolars/molars, the posterior teeth might move instead of the maxilla.
🚨 Tooth proclination – If the palatal osteotomy isn’t done properly, the front teeth might tip forward instead.
🚨 Appliance limitations – Tooth-borne distractors provide great control, but bone-borne devices might be more stable.

Long-term Follow-up After Maxillary Distraction Osteogenesis in Growing Children With Cleft Lip and Palate

If bones could talk, they’d probably say, “Hey, stop pulling me!” But in the world of distraction osteogenesis (DO), that’s exactly what we do—intentionally stretch bone tissue to create new growth. Think of it as the orthodontic equivalent of a yoga instructor telling your jaw to lengthen and breathe.

While orthognathic surgery has been the gold standard for skeletal corrections, DO has stepped in as the cool new kid, especially for cases that were once deemed untreatable. But is it really the superior method, or just a fancier way to move bones? Let’s break it down.

Since its first craniofacial application by McCarthy et al. in 1992, DO has come a long way from being an experimental idea to a widely used technique for maxillary and mandibular expansion. But, like any orthodontic superhero, it comes with its strengths, weaknesses, and a history of trial-and-error that reads like a medical thriller.

The Origins: From Soviet Leg Braces to Jawline Makeovers

DO owes its roots (pun intended) to Ilizarov’s principles—a Russian orthopedic surgeon who figured out that bone can be stretched and tricked into regenerating. What started as a method for limb lengthening soon found its way into orthodontics when McCarthy et al. used it to lengthen hypoplastic mandibles in children.

Once researchers saw potential in midface and maxillary distraction, it became a game-changer for patients with clefts and severe maxillary hypoplasia—especially when traditional orthognathic surgery wasn’t an ideal option.

With miniature distraction devicesrigid external distraction (RED) systems, and intraoral appliances, the orthodontic world saw an explosion (well, controlled expansion) of techniques:

🔹 Cohen et al. (1997) – Introduced maxillary distraction in young children.
🔹 Polley & Figueroa (1997) – Used the RED device to treat severe maxillary hypoplasia.
🔹 Molina et al. (1998) – Tried a mix of facial masks and intraoral appliances for mixed dentition cases.

So, Does It Work? The Numbers Speak!

Swennen et al. (2001) reviewed 16 studies spanning 33 years (1966-1999) and found that maxillary advancements ranged from 1 mm to 17 mm. Not bad for a non-surgical approach, right?

Well, not so fast—relapse was reported in 50.4% of cases. That’s like getting a six-pack after months of workouts only for it to disappear when you eat one slice of pizza.

Rachmiel et al. (2005) reported stable results in 12 cleft patients after two years, showing that maxillary length (Condylion to A point) held its ground. But Krimmel et al. (2005) later threw a wrench into that optimism, noting a decrease in SNA and ANB angles just one year after distraction.

Cheung & Chua (2006) conducted a meta-analysis of 26 studies (1966-2003) on 276 cleft patients, revealing:

📌 Most maxillary advancements were between 5-9 mm.
📌 External distractors (68.8%) were more common than internal distractors (2.17%) and facial masks (25.72%).
📌 Maxillary relapse? 5.56% within two years—but only one study provided actual numbers.

One thing is clear: distraction osteogenesis works, but long-term stability is still a mixed bag.

The Study: Six Patients, One Mission—Expand That Maxilla!

Meet our VIPs: six Chinese patients (3 boys, 3 girls, average age 10.5 years), all of whom had:
✔ Cleft lip and palate (two unilateral, four bilateral)
✔ Primary lip and palate repair in infancy
✔ Anteroposterior maxillary hypoplasia (aka, their upper jaw was slacking)
✔ Class III malocclusion with a negative overjet (translation: their lower teeth were winning a battle they shouldn’t even be fighting)

These kids weren’t just getting braces—they were about to experience controlled bone expansion, courtesy of the Rigid External Distraction (RED) device.

1️⃣ Pre-Orthodontic Preparation – Because even bone stretching needs a good warm-up.
2️⃣ Complete High Le Fort I Osteotomy – A fancy way of saying, “Let’s surgically cut the upper jaw so we can move it.” where the maxilla was delicately detached with septal and pterygomaxillary disjunction. (Translation: we made it mobile but still attached—think of it as unlocking a door, not knocking it down.)
3️⃣ RED Device Installation – Think of this as the orthodontic version of a headgear, but instead of just pushing teeth, it’s stretching the entire upper jaw.
4️⃣ Latency Period (5 Days) – Let the jaw marinate before we start stretching it.
5️⃣ Active Distraction (1 mm/day) – The screws on the RED device were adjusted daily to pull the maxilla forward. (It’s like a gym for your bones—except you don’t have to do the work; your jaw does.)
6️⃣ Overcorrection Achieved! 🎉 – Because we know relapse is real, we stretched the maxilla a little extra to compensate for future setbacks.
7️⃣ Consolidation (6-8 Weeks) – The RED device stayed put to let the new bone solidify.
8️⃣ Device Removal & Orthodontics – After the expansion was done, the real party started: braces to fine-tune everything.

The study wasn’t just about making kids look less Class III—it was about proving that DO actually works (and hopefully, stays that way). Here’s how they did it:

📸 Lateral Cephalographs  were taken at four key points:
🔹 T0 (Before Distraction) – “This is your jaw on cleft-induced hypoplasia.”
🔹 T1 (Immediately After Distraction) – “Congratulations, your maxilla has entered the chat.”
🔹 T2 (6 Months Later) – “Let’s see if your jaw likes its new position.”
🔹 T3 (1+ Year Later) – “Did it stay put, or did it sneak back?”

Instead of using simple before-and-after pictures (this isn’t a weight loss commercial), the researchers mapped out skeletal and dental landmark positions using a cranial base reference system.

How, you ask?

🔹 First, skeletal landmarks were pinpointed on the T0 cephalogram.
🔹 Then, these landmarks were transferred onto T1, T2, and T3 cephalograms using a best-fit method—aligning surrounding bone structures and trabecular patterns (Huang & Ross, 1982).
🔹 To keep things precise, an x-y coordinate system was created:

Y-axis: A perpendicular line intersecting the X-axis at sella
🔹 This coordinate system was then transferred onto each cephalogram for standardized measurements.

X-axis: Drawn 7° below the sella-nasion plane

Key Takeaways

✅ Overjet increased (yay, no more Class III woes!).
✅ Overbite decreased—except for our rebellious Case 5.
✅ Maxilla went forward (woo-hoo!) but then took a casual retreat backward over a year (boo!).
✅ Some vertical movement—first up, then down (the maxilla, not our enthusiasm).
✅ Teeth tagged along for the ride, moving anteriorly and inferiorly.
✅ Relapse? Oh yeah—about 9.6% at 6 months, increasing to 24.5% by a year.

Effects of lip bumper therapy on the mandibular arch dimensions of children and adolescents

Move over, braces—there’s a new sheriff in town, and it’s called the Lip Bumper (LB)! Okay, not exactly new, but definitely underrated. If you thought orthodontic appliances were just about pulling teeth in different directions, LB is here to expand your perspective—literally!

Let’s break down the magic of LB, one millimeter at a time.

Orthodontic treatment often involves making critical decisions about space management in the mandibular dental arch. One conservative approach that has gained attention is lip bumper (LB) therapy, which may serve as an effective alternative to future space deficiency resolution, reducing the necessity for tooth extractions.

LB Therapy: The Good, The Bad, and The Bulky

The Good: More Space, Less Crowding

Studies suggest that LB therapy can help gain mandibular arch circumference by:
✔️ Distally angulating the first molars (M1)
✔️ Proclining the incisors (hello, newfound space!)
✔️ Buccally tipping the deciduous molars/premolars
✔️ Preventing mesial migration of molars (keeping that precious E space intact!)

This results in increased arch width, length, and perimeter, making it a solid alternative for managing mild to moderate crowding.

The Bad: Unpredictability & Side Effects

Before you rush to prescribe LBs to every borderline crowding case, let’s talk about the flip side: ❌ High uncertainty about the exact amount of movement per tooth
❌ Risk of M2 impaction or ectopic eruption (ouch!)
❌ Potential excessive buccal tipping of incisors, leading to periodontal concerns
❌ Social struggles—lips looking permanently puffed out (not ideal for the self-conscious teen)

The Bulky: Activation Matters

Not all LBs are created equal—activation protocols vary across studies. The amount of activation differs depending on the region:

Tooth RegionActivation Range (mm)
Molars (M1)2 – 5 mm
Premolars/Primary Molars3 – 8 mm
Canines3 – 5 mm
Incisors1 – 3 mm

More activation ≠ better results. Too much force can lead to M2 eruption disturbances, especially if the LB is worn for over two years.

LBs: A Space Maker or a Space Stealer?

While LB therapy is great for anterior crowding relief, posterior space management often gets overlooked. If not planned carefully, gaining space in the front can mean losing it in the back—resulting in impacted second molars (M2).

🚨 Negative Predictors for M2 Impaction:

  • Pre-treatment M2 inclination >30°
  • LB treatment duration >2 years

So before jumping on the LB train, check that M2 position! Otherwise, you’ll be trading one problem (crowding) for another (impacted molars and potential future surgeries).

Final Thoughts: The Patient Factor

If LB therapy had a motto, it would be: “Cooperation is key.” A patient who refuses to wear their LB (or removes it every chance they get) is on the fast track to treatment failure. In some cases, orthodontists have resorted to tying the LB in place—because desperate times call for desperate measures.

🔹 Max LB duration in studies: 28 months 🔹 Ideal duration: As short as possible while achieving stable results

Bottom Line:

✔️ LB therapy can increase arch length and reduce crowding.
❌ But it comes with unpredictability, risk of M2 impaction, and social discomfort.
💡 Plan wisely, evaluate molar positions, and keep treatment durations reasonable!

Choosing the Right Needle

Endodontic success is contingent upon meticulous debridement, shaping, and disinfection of the root canal system. Among the numerous factors influencing treatment outcomes, irrigation needle selection is an often-overlooked yet critical determinant of efficacy. The choice of needle gauge directly impacts the delivery of irrigants, ensuring optimal penetration, minimal apical extrusion, and maximal bacterial eradication. This article explores the scientific rationale behind needle gauge selection and its implications for clinical practice.

The Role of Needle Gauge in Endodontic Irrigation

Root canal irrigation serves multiple objectives: mechanical flushing of debris, dissolution of organic matter, microbial disinfection, and smear layer removal. The gauge of the irrigation needle determines the flow dynamics, pressure distribution, and depth of penetration within the canal. The ideal needle must navigate the complex anatomy of the root canal while facilitating efficient irrigant exchange without causing undue apical pressure.

Comparative Analysis of Commonly Used Needle Gauges

Gauge (G)External Diameter (mm)Clinical Considerations
21G0.81Rarely used due to excessive size and risk of irrigant extrusion
23G0.64Suitable for wide canals but limits depth of penetration
25G0.51Balances flow rate with controlled delivery
27G0.39Optimal for most cases; allows deeper penetration while minimizing extrusion
28G0.36Enhances precision for minimally invasive approaches
30G0.30Preferred for deep, narrow canals requiring delicate irrigation

Fluid Dynamics and Needle Design

The efficiency of irrigation is not solely dictated by gauge but also by the design of the needle tip. Side-vented needles, for example, reduce the risk of apical extrusion by directing flow laterally rather than apically. Additionally, advances in computational fluid dynamics have demonstrated that smaller gauge needles create more turbulent flow patterns, enhancing irrigant activation and biofilm disruption.

Advanced Irrigation Modalities: Beyond Traditional Needle Irrigation

While conventional needle irrigation remains the gold standard, emerging technologies aim to augment disinfection through enhanced fluid dynamics and activation mechanisms:

  • Ultrasonic and Sonic Activation: Agitates the irrigant to improve penetration into lateral canals and dentinal tubules.
  • Photoactivated Disinfection: Employs photosensitizers and light energy to generate reactive oxygen species for microbial eradication.
  • Electrochemically Activated Solutions (e.g., Sterilox): Generates hypochlorous acid and free chlorine radicals, enhancing antimicrobial efficacy while maintaining biocompatibility.
  • IntraLight UV Disinfection: Uses a 254 nm UV intracanal illuminator to eliminate residual microbial biofilms.

Clinical Implications and Future Directions

The evolution of endodontic irrigation strategies underscores the growing emphasis on precision-driven, minimally invasive techniques. While the 27-gauge needle remains the most widely adopted due to its balance of penetration and safety, ongoing research into fluid dynamics, antimicrobial solutions, and activation methods promises to redefine the standard of care.

As endodontic irrigation techniques continue to advance, the selection of an appropriate needle gauge must be guided by both anatomical considerations and the latest evidence-based protocols. A nuanced understanding of irrigation dynamics will not only improve disinfection efficacy but also contribute to superior long-term treatment outcomes.

Conclusion

Endodontics is no longer just about mechanical instrumentation; it is an interdisciplinary science integrating fluid mechanics, microbiology, and material science. The seemingly simple decision of needle gauge selection is, in reality, a critical component of treatment success. By refining our approach to irrigation, we can elevate endodontic outcomes, ensuring that root canal therapy is not only effective but also biologically sound.

Evaluation of the Jones jig appliance for distal molar movement

What is the Jones Jig Appliance?

Orthodontic treatment often requires space creation to align teeth properly. One effective way to achieve this is through molar distalization—moving the upper first molars backward to make room for crowding or to correct bite discrepancies. Traditionally, orthodontists have relied on headgear, Class II elastics, and removable appliances, all of which require patient compliance (and we all know how reliable that is! 🙄).

But what if there was a more predictable, fixed alternative?

Enter the Jones Jig Appliance—a fixed, non-compliance-based distalizing appliance designed to move molars efficiently without relying on patient effort.

How Does the Jones Jig Work?

✔ Palatal Button – A 0.5-inch diameter acrylic button, anchored to the maxillary second premolars using a 0.036-inch stainless steel wire for stability.
✔ Jones Jig Arms – One arm fits into the 0.045-inch headgear tube, while the other fits into the slot of the first molar band.
✔ Nickel-Titanium Spring – A 0.040-inch coil spring delivers a controlled force of 70-75 g to push the molars backward.

Once the Jones Jig is cemented, it is activated by tying the activation loop with a 0.010-inch ligature off the bracket of the anchoring tooth. This ensures continuous force application.

The coils are then reactivated every 4 to 5 weeks until the desired molar movement is achieved.

Once activated, the appliance applies a gentle but continuous distal force on the upper first molars, moving them backward over time. The best part? Since it’s fixed, patients don’t have to remember to wear it, making treatment more reliable.

Advantages of the Jones Jig

✅ No Patient Compliance Needed – Unlike headgear, patients don’t have to wear or adjust it.
✅ Continuous Force Application – The coil spring ensures a steady force for predictable movement.
✅ Faster Treatment Time – Studies show that molars can be distalized in 4-6 months.

While the Jones Jig is highly effective, it does come with some considerations:
🔹 Molar Tipping – Instead of bodily movement, molars may tip distally, requiring additional mechanics for uprighting.
🔹 Anchorage Loss – The anterior teeth may shift forward slightly, which may need to be controlled with TADs (temporary anchorage devices) or a transpalatal arch (TPA).

Does the Eruption of Second Molars Affect Treatment?

When using the Jones Jig Appliance for molar distalization, orthodontists must consider various factors that can influence treatment outcomes. One key question is: Does the eruption of second molars impact molar movement and anchorage loss?

A study evaluating 72 patients explored this question by comparing cases with erupted vs. unerupted maxillary second molars to determine how they affected the type and amount of molar movement and anchorage loss.

Study Findings: Second Molar Eruption and Its Effects

Researchers divided the patients into two groups:

GroupCondition of Second MolarsKey Observations
Group 1 (28 patients)Unerupted second molars (below the cementoenamel junction of the first molar)Less anchorage loss in premolars and incisors, potentially more controlled molar movement.
Group 2 (44 patients)Erupted second molars (not banded or bonded)More anchorage loss observed, possibly due to resistance from the second molars.

The presence or absence of second molars plays a significant role in the effectiveness of molar distalization. Patients with unerupted second molars may experience better molar movement with less anchorage loss, while those with erupted second molars may require additional anchorage support. In cases with erupted second molars, additional anchorage reinforcement (e.g., TADs or a transpalatal arch) may be necessary to prevent undesired movement.

Study Findings: How Far Did Those Molars Go?

retrospective study of 72 patients using the Jones Jig showed:

Tooth MovementMean ChangeTipping AngleComparison to Other Appliances
Maxillary First Molar2.51 mm distal movement7.53° distal tipping
(meaning they didn’t just move—they leaned back like someone dodging responsibility. 😅)
Similar to Herbst, Wilson Mechanics, and Pendulum Appliance 📏
Maxillary Second Molar1.79 mm distal movement
(Not as much as the first molar, but still making progress! 🔄)
8.03° distal tipping
(tipped even more than first molars)
0.71 mm extrusion observed 📉
(suggests that second molars are like that one friend who always stands out in group photos. 📸)
OverjetIncreased 0.45 mm

If necessary, J-hook headgear or Class II elastics can help maintain anchorage.
2.21° incisor proclination

(much less than the 6° seen in other studies. So, while there’s some flaring, it’s not enough to make your patient look like Bugs Bunny. 🐰)
Less flaring than with Pendulum & Repelling Magnets 😎

Less than the 1.30 mm increase seen with the Pendulum appliance and the 1.60 mm increase with repelling magnets.
OverbiteDecreased 1.28 mmImproved vertical control compared to other appliances 📊

Anchorage Control: Because We Don’t Want Molar Tipping Running the Show

Distalizing molars is great, but uncontrolled tipping? Not so much. Here’s where anchorage control steps in like a responsible chaperone at a high school dance.

✅ Use a Nance holding arch, utility archwire, or stopped archwire to keep those molars in check.
✅ Short Class II elastics can help move the premolars and incisors back once the molars are in position.
✅ J-hook headgear can reinforce anchorage (for the brave souls who still prescribe it).

Molar Extrusion: Is It a Big Deal?

One concern with distalization is molar extrusion—but does the Jones Jig make teeth “float away”? Not really.

🔹 Jones Jig Patients:

  • Males: 3.17 ± 1.79 mm of extrusion
  • Females: 1.33 ± 1.38 mm of extrusion

🔹 Untreated Class I Patients (for comparison):

  • Males: 4.1 ± 3.1 mm
  • Females: 1.9 ± 2.2 mm

📌 Takeaway?
The extrusion in Jones Jig patients is within normal growth changes. So, unless your patient is trying to float their molars into the stratosphere, this isn’t a major concern. 🚀

Jones Jig vs. Headgear: Any Real Difference?

The study found no statistically significant differences between the Jones Jig group and a matched Headgear groupwhen evaluating:

✅ Maxillary first molar position
✅ Maxillary central incisor angulation
✅ Linear position of incisors
✅ Overjet & Overbite changes

So, if you’re an orthodontist who loves avoiding unnecessary patient lectures about compliance, the Jones Jig might be your new best friend. 🎉

Treatment Comparison: Who Wins?

Treatment ModalityPatient Compliance Needed?Molar Distalization (mm)Overjet Change (mm)Overbite Change (mm)
Jones Jig Appliance❌ No compliance needed2.51 mm+0.45 mm-1.28 mm
Cervical Headgear✅ Requires compliance 😬2.50 mm+0.40 mm-1.30 mm
Class II Elastics✅ Requires compliance 🙄Varies (depends on use)Greater risk of overjet increaseLess predictable molar control

📌 Takeaway?
The Jones Jig does everything headgear does—without the compliance drama. It’s like getting straight A’s without ever studying (if only life worked that way 😆).

Final Verdict: Is the Jones Jig Worth It?

✔ YES! If you want a fixed, predictable, non-compliance-dependent way to correct Class II malocclusions, the Jones Jig is a great choice.

✔ Same results as headgear—without the teenage rebellion.

✔ Minimal anchorage loss compared to other distalization appliances (no crazy overjet increase).

✔ Less annoying for patients = less annoying for you. 😆

Unilateral face-bows: A theoretical and laboratory analysis

Orthodontics has long relied on mechanical devices to refine tooth movement and optimize jaw alignment. Among these, the face-bow remains an essential tool for controlled force application. Recent experimental and theoretical studies have focused on enhancing face-bow designs to achieve unilateral distal forces more efficiently. This post synthesizes key findings regarding the efficacy of various face-bow configurations, addressing their theoretical underpinnings and practical implications for advanced orthodontic care.

Comparative Analysis of Face-Bow Designs

Face-Bow TypeKey FeaturesForce DistributionResulting Forces
Swivel-Offset Face-Bow– Outer bow attached eccentrically via a swivel joint.- Allows lateral movement of the outer-bow tips.– Unequal force distribution.- Delivers unilateral distal forces.- Generates lateral forces.– Delivers unilateral force with predictable lateral forces.- Effective for asymmetric treatment.
Symmetrical Face-Bow– Outer bow symmetrically aligned.- Balanced force application.– Even force distribution on both sides.- No lateral force generated.- Ineffective for unilateral force delivery.– No unilateral or lateral forces delivered.
Soldered-Offset Face-Bow– Rigid attachment of outer bow on one side.- Appears asymmetrical but does not deliver unilateral forces.– Symmetrical force distribution.- No lateral force generated.– No unilateral force delivered.
Spring-Attachment Face-Bow– Spring on one terminal of the inner bow.- Symmetrical outer-bow tips.– Equal force on both sides.- No lateral force generated.– No unilateral force delivered.

Which Face-Bow Designs Effectively Deliver Unilateral Distal Forces?

Not all face-bow designs are capable of delivering sufficient unilateral distal forces, an essential factor for treating conditions such as unilateral posterior crossbites or asymmetrical dental arch development. The following analysis highlights the effectiveness of different face-bow configurations:

  • Ineffective Designs:
    • Bilaterally Symmetrical Face-Bows: These designs maintain equal force distribution on both sides, making them unsuitable for unilateral force application.
    • Spring-Attachment Face-Bows: Despite their versatility, these face-bows fail to concentrate force on a single side, limiting their application in unilateral treatments.
    • Soldered-Offset Face-Bows: While superficially asymmetrical, the rigid attachment of the outer bow does not result in the necessary unilateral force distribution.
    These designs consistently failed to generate a mean unilateral distal force exceeding 60%, thereby limiting their clinical utility for unilateral orthodontic applications.
  • Effective Designs:
    • Power-Arm Face-Bows: These designs effectively direct unilateral forces, achieving greater than 60% of the force distribution to one side, which aligns with clinical requirements for unilateral force application.
    • Swivel-Offset Face-Bows: By incorporating a swivel mechanism, these face-bows create asymmetry, allowing for targeted distal force delivery to one side.

Both of these designs surpass the 60% threshold for unilateral force distribution, thus meeting the criteria for effective treatment.

Theoretical Framework for Unilateral Force Delivery

The key to effective unilateral force application lies in the asymmetry of the face-bow’s design. When the outer-bow tips are positioned asymmetrically relative to the midsagittal plane of the inner bow, it allows for the focused application of force on one side:

  • Asymmetrical Designs: These designs facilitate targeted force delivery by creating a mechanical advantage that directs the force to one side. This results in the efficient application of unilateral distal forces, which is essential for treating asymmetric dental and skeletal issues.
  • Symmetrical Designs: These configurations fail to produce unilateral forces because the force is evenly distributed, thus making them ineffective for unilateral applications.

The swivel-offset face-bow achieves this asymmetry through a lateral swing of the outer-bow terminals, while power-arm face-bows, when constructed with comparable geometric patterns, similarly exhibit the necessary force distribution for unilateral applications.

Characterization of Lateral Forces in Unilateral Face-Bows

Unilateral face-bows not only generate distal forces but also produce lateral forces that contribute to the overall mechanical effect. These lateral forces are characterized by the following:

  • Directionality: The lateral force is directed from the side receiving the greater distal force toward the opposite side, ensuring balanced correction of dental and skeletal asymmetries.
  • Magnitude: The magnitude of the lateral force increases with the unilateral effectiveness of the face-bow, making it a predictable variable in effective designs.
  • Predictability: Experimental studies demonstrate that lateral forces are highly predictable in effective designs, such as the power-arm and swivel-offset face-bows, whereas they are erratic and difficult to control in symmetrical, ineffective designs.

Practical Considerations for Clinicians: Which Face-Bow Design is Optimal?

While both the power-arm and swivel-offset face-bows are effective in delivering unilateral distal forces, the power-arm design stands out in terms of practicality and clinical efficiency:

  • Ease of Fabrication: The power-arm face-bow can be easily modified chairside from a conventional face-bow, offering flexibility and reduced chair time for both clinicians and patients.
  • Predictable Performance: Experimental data show that the power-arm design provides a force distribution that closely matches that of the swivel-offset face-bow, with less than a 5% difference in performance.
  • Patient Comfort: The power-arm design ensures more consistent force application, contributing to better patient comfort and compliance during treatment.

Effects of different vectors of forces applied by combined headgear

Class II malocclusions are a common orthodontic challenge, often requiring precise management of maxillary dentition to achieve ideal outcomes. Extraoral forces, such as those applied via headgear, have long been used to either distalize upper molars or restrict their forward migration. Understanding the physics behind these forces and their application is key to maximizing treatment efficacy and minimizing undesirable side effects.

Orthodontic forces can be represented as vectors, which help visualize the direction and magnitude of applied forces. When multiple forces converge on a tooth, a resultant vector can be calculated. This resultant vector can then be resolved into components parallel and perpendicular to the tooth axis, allowing for precise analysis of force magnitudes in these directions. This fundamental principle of physics underpins the design and application of combined headgear, which uses cervical and high-pull vectors to achieve targeted outcomes.

One of the critical considerations in orthodontic treatment is the direction of applied forces. Studies show that molars tipped back during distalization tend to relapse quickly unless occlusal forces act to upright them. For bodily movement of upper molars, force must be applied through the center of resistance. Cervical headgear, which applies forces below the center of resistance, can cause extrusion of upper molars and an undesirable opening of the mandible. Conversely, occipital traction—preferred for patients with open bite tendencies—is less effective in altering maxillary structures anteroposteriorly.

Addressing Challenges with Combined Headgear

The limitations of traditional cervical and high-pull headgear in treating Class II malocclusions with high mandibular plane angles necessitate alternative approaches. Combined headgear, which integrates forces from both cervical and high-pull vectors, offers a promising solution. By optimizing the resultant force vector, combined headgear can:

  • Minimize molar extrusion.
  • Reduce the likelihood of mandibular plane angle alterations.
  • Improve anteroposterior control of maxillary structures.

Evidence Supporting Combined Headgear

Research highlights the potential of combined headgear to address the shortcomings of single-vector approaches. For instance, bending the outer arms of cervical headgear downward by 15° has been shown to reduce extrusion. Moreover, studies by Baumrind and colleagues suggest that mandibular plane angle remains stable when combined headgear is used, likely due to the balanced application of forces.

This study examined three treatment groups, each using a different force ratio: 1:1, 2:1, and 1:2.

Treatment GroupForce Adjustment (High-Pull : Cervical)Inner Bow ExpansionWear TimeTreatment Duration
1:1150 gm per side : 150 gm per sideNot expanded20 hours/day2 to 9 months
2:1200 gm per side : 100 gm per sideNot expanded20 hours/day3 to 7 months
1:2100 gm per side : 200 gm per sideNot expanded20 hours/day2 to 7 months

The goal? To understand how these variations impact the displacement of the maxilla and mandible, molar positioning, and even occlusal plane inclination. Here’s what they found.

Changes Through the Treatment

Parameter1:1 Treatment Group2:1 Treatment Group1:2 Treatment Group
ANB AngleSignificant decreaseSignificant decreaseSignificant decrease
SNB AngleSignificant increaseSignificant increaseNo significant change
SN/GoGnNo significant changeSignificant decreaseNo significant change
SN/OPNo significant changeSignificant increaseSignificant decrease
Upper Molar/ANS-PNS (Angle)No significant changeNo significant changeSignificant decrease
Upper Molar/ANS-PNS (mm)Significant decreaseSignificant decreaseSignificant increase
Lower Molar MP (mm)Significant increaseNo significant changeNo significant change

Maxillary and Mandibular Displacement

In the third treatment group, with a 1:2 force ratio, the maxilla was displaced backward. Interestingly, this aligns with findings from previous studies by O’Reilly and Boecler, who observed similar effects with cervical headgear. However, the mandible’s forward growth remained consistent across all groups, resulting in no significant differences in the ANB angle. This reinforces the idea that headgear’s primary role is in influencing the maxilla rather than the mandible.

Upper Molar Movement

Now, let’s talk molars. Superimposition analyses showed that the upper first molar was distalized by 3.6 to 4.0 millimeters across all groups. This distalization played a significant role in correcting molar relationships. However, the type of headgear affected how these molars moved. For example, high-pull headgear resulted in greater horizontal displacement, as noted by Baumrind et al., while cervical headgear tended to cause more vertical changes.

Occlusal Plane Inclination

One fascinating finding was the tipping of the upper molars. In the third group, there was a significant decrease in angulation and a mesial displacement of the molar apex. This aligns with Baumrind’s observations and highlights how force direction can influence tooth movement. Meanwhile, Badell’s study on combined headgear treatments showed a notable distal tipping, which was less pronounced in other groups.

Vertical changes were also noteworthy. In the 1:2 group, the downward force component caused molar extrusion, a pattern commonly seen with cervical headgear. Conversely, the 1:1 and 2:1 groups showed molar intrusion, consistent with high-pull headgear studies. This difference in vertical displacement also impacted the occlusal plane. The second group, with a 2:1 force ratio, showed a significant increase in occlusal plane inclination, mirroring findings from Badell and Watson.

Mandibular Plane Angle (MP)

Beyond the teeth, headgear also influences skeletal structures. The mandibular plane angle—a key indicator of vertical facial growth—remained largely unchanged in the 1:2 group, likely due to a modest increase in ramus height. However, the second group showed a significant decrease in the SN/Go-Gn angle, suggesting a more pronounced impact on vertical growth patterns.hames et al. and Badell, highlighting the interplay between force systems and vertical growth patterns.

Intercanine Width

And finally, let’s touch on intercanine width. Mitani and Brodie’s research showed an increase in this variable with cervical headgear, and this study confirmed those findings. The third group, with the greatest distalization, exhibited the most significant increase in intercanine width, highlighting the interplay between molar movement and arch expansion.

So, what’s the takeaway? Headgear therapy is a versatile and effective tool, but its outcomes depend heavily on the force system used. From molar distalization to occlusal plane changes, every detail matters. This study not only builds on decades of research but also underscores the importance of tailoring treatment to individual patient needs.

Extraoral Force in Orthodontics: A Closer Look at Class II, Division 1 Malocclusions

Orthodontic philosophies, much like those in medicine, tend to swing with the pendulum of trends and innovations. In the medical field, we’ve seen treatments rise and fall in popularity—antihistamines were once heralded as a cure-all, and antibiotics became the go-to for nearly every ailment. Similarly, in orthodontics, we’ve witnessed an evolving landscape of treatments and tools: non-extraction versus extraction approaches, debates over which teeth to extract, and a constant shift between fixed and removable appliances. Each innovation, from square tubes to round tubes and from labial to lingual appliances, has had its moment in the spotlight.

In this article we will explore: What is the role of the extra-oral appliance? Where does it find use? What are its limitations? How valid are the multiplicity of claims made for it?

Investigating the Facts: A Study of 150 Cases

In a detailed study of 150 Class II, Division 1 malocclusions, headplates and plaster casts were analyzed to assess the role of extraoral force. Among these cases, 107 exhibited normal mandibular arch form, tooth size, and basal bone relationships. These findings suggest that in many cases, the mandibular arch is not the primary culprit in malocclusion; rather, the anteroposterior discrepancy lies in the maxilla. This raises an important question: Should orthodontic therapy target the maxilla while leaving the mandibular arch undisturbed?

The clinical reality supports this approach. Prolonged Class II therapy directed at the mandibular arch often results in unwanted tipping or forward sliding of the lower teeth. By focusing forces on the maxilla, we may achieve better results, including improved tooth interdigitation, reduced overbite and overjet, and restored muscle function and facial aesthetics.

The Debate Around Extraoral Force

The literature on extraoral force is filled with conflicting claims. Some argue that it restricts maxillary growth, while others suggest it only affects alveolar growth. There are debates about whether it moves teeth bodily or merely tips them, and whether it allows the mandible to grow forward or simply frees occlusal interferences. Even the choice of appliance—headgear versus cervical bands—sparks disagreement.

To bring order to the conflicting claims about extraoral appliances, we must approach the topic with objectivity. What truly happens in a controlled group of cases? Which cases benefit most from extraoral force, and where does it fall short? By critically evaluating both successes and failures, we can better understand the indications, contraindications, and unanswered questions surrounding this treatment modality.

The appliance used consisted of molar bands, an .045 stainless steel labial arch wire with vertical spring loops at the molars, and continuous loops at the lateral canine embrasures to receive the cervical gear. The cervical gear featured a metal tube with a continuous internal spring to provide distal motivating force. In select cases, incisors were banded at certain stages of therapy.

Patients were categorized into three age groups to analyze outcomes based on developmental stages:

  • Deciduous dentition: 3 to 6 years
  • Mixed dentition: 7 to 10 years
  • Permanent dentition: 11 to 19 years

This stratification allowed for a nuanced understanding of how age and dentition stage influenced treatment outcomes.

The study revealed several key insights, supplemented by observations from routine practice where extraoral anchorage was employed in diverse scenarios. These included:

  • Bolstering anchorage during full edgewise therapy
  • Closing spaces created by distal movement of anterior teeth
  • Uprighting individual teeth
  • Serving as an active retainer

The study confirmed that Class II, Division 1 cases vary significantly, even when focusing on three core characteristics:

  1. Maxillomandibular basal relationship
  2. Overjet
  3. Overbite

The severity of discrepancies across these factors, combined with patient-specific variables such as morphogenetic patterns, motivation, cooperation, and growth during therapy, made the prognosis unpredictable. Success or failure was influenced by the degree of deviation from the norm in each factor and the interplay between them.

Can extraoral force alone, directed against the maxilla, correct Class II, Division 1 malocclusions?

The goal of establishing normal tooth interdigitation, eliminating excessive overbite and overjet, and restoring muscle function and appearance is ambitious. Achieving these outcomes universally is contingent on numerous factors:

  • Hereditary patterns
  • Age and sex of the patient
  • Presence or absence of third molars
  • Growth increments during treatment
  • Patient cooperation

Deciduous Dentition Group (3 to 6 years)

  • Sample Size: 14 cases, all selected for their severity, characterized by significant basal dysplasias.
  • Outcomes:
    • Successful correction: Achieved in 3 cases.
    • Partial improvement: 3 cases showed near-successful results.
    • Residual Class II relationship: Persisted in over half the cases, though to a lesser degree.
    • Basal adjustment: Anteroposterior basal adjustment was observed in 11 out of 14 cases.
    • Muscle function: Most patients exhibited improved muscle tone and function, along with a reduction in abnormal muscle habits.
    • Overjet correction: Often led to excessive lingual tipping of maxillary incisors, especially in cases without pre-existing spacing.
    • Overbite correction: The least satisfactory aspect of treatment.

Mixed Dentition Group (7 to 10 years)

  • Sample Size: 50 cases (34 girls, 16 boys).
  • Outcomes:
    • Normal molar relationship: Achieved in 29 cases, though not always accompanied by normal canine relationships.
    • Overjet correction: Similar to the deciduous group, excessive lingual inclination of maxillary incisors was noted in some cases.
    • Vertical correction: More pronounced and successful compared to the deciduous group.
    • Severe discrepancies: Cases with the greatest deviation from normal in basal relationship, overbite, and overjet showed the least favorable results.

Case Examples

  1. Patient A.L.
    • Presented with severe basal malrelationship, marked overjet, and normal overbite.
    • Outcome: Immediate and gratifying response due to anterior spacing and lack of excessive overbite.
  2. Patient J.K.
    • Presented with a similar profile but without anterior spacing.
    • Outcome: Removal of maxillary second molars facilitated mesiodistal adjustment, resulting in successful correction across all parameters.

Permanent Dentition Cases

  • Sample Size: 36 cases (19 boys, 17 girls)
  • Growth Correlation: A clear link was observed between the pubertal growth spurt and positive response to mechanotherapy.
  • Outcomes:
    • 25 patients responded well enough to eliminate Class II characteristics, achieving normal interdigitation and improved aesthetics.
    • Success was highly dependent on a combination of favorable growth, patient cooperation, and other individual factors.

Can Extraoral Force Achieve Bodily Distal Movement of Maxillary Teeth?

The ability of extraoral force to influence maxillary growth, move teeth bodily distal, or merely tip them distally has been a subject of debate.

Maxillary Growth

  • Observation: There is no evidence that maxillary growth, as governed by sutures, is significantly affected by extraoral force. Claims of growth inhibition require substantiation, which is currently lacking.
  • Alveolar Growth: However, maxillary alveolar growth can be influenced. Changes in the anteroposterior apical base relationship are among the most significant findings, as demonstrated by cases like Patient A.M.

Distal Movement of Maxillary First Molars

  • Controversy: The possibility of bodily distal movement of maxillary first molars remains contentious. While some authorities categorically deny this, evidence from the study suggests otherwise:
    • Cases Supporting Movement:
      • Bodily distal movement has been observed in some cases, though it is not the norm.
      • Occasionally, this movement occurs unpredictably or can be facilitated by the removal of maxillary second molars during active treatment (Figs. 8 and 9).
    • Normal Path Restriction: In most cases, extraoral force restrains the maxillary first molar from moving forward along its natural path or tips it distally.

Challenges with Tipping

  • Excessive Distal Tipping: One drawback of extraoral appliances is the tendency for excessive distal tipping of maxillary first molars.
  • Mitigation Strategies:
    • Allowing maxillary second molars to erupt before treatment.
    • Removing maxillary second molars during treatment.
    • Using bands or Rocky Mountain-type crowns on second deciduous molars instead of first permanent molars in the mixed dentition stage.
    • Employing a headcap instead of cervical gear, as the headcap is associated with reduced tipping tendencies.

Does Extraoral Force Tip Maxillary Incisors Lingually, Moving Apices Labially?

Yes, extraoral force can cause lingual tipping of the maxillary incisors, with their apices potentially moving labially. This effect is a notable concern in orthodontic treatment, particularly in cases with significant basal discrepancies.

Lingual Tipping of Maxillary Incisors:

  • Lingual tipping is a frequent outcome when extraoral force is applied, especially in attempts to correct overjet in cases with marked maxillomandibular basal dysplasia.
  • This tipping often results from the inability to fully eliminate the basal malrelationship.

Overjet Correction Challenges:

  • Correcting overjet in the presence of basal discrepancies often necessitates:
    • Excessive lingual inclination of maxillary incisors.
    • Excessive labial inclination of mandibular incisors.
    • A combination of both adjustments.
  • These compromises are sometimes unavoidable to achieve acceptable occlusal and esthetic outcomes.
  • Between the two options, lingual tipping of maxillary incisors is considered the lesser compromise compared to labial tipping of mandibular incisors.

Does Extraoral Force, Directed Against the Maxillary First Molar, Impact Maxillary Second or Third Molars?

The impact of extraoral force on the maxillary second and third molars cannot be definitively answered with a simple “yes” or “no.” However, clinical observations and studies provide insights into potential effects:

Temporary Impact on Second Molars:

  • Excessive distal tipping of the maxillary first molars due to extraoral force can temporarily affect the eruption path of the maxillary second molars.
  • Once the distal force is removed, the first molars typically upright themselves, allowing the second molars to erupt.

Crossbite and Eruption Issues:

  • In some cases, maxillary second molars have been observed to erupt buccally, resulting in crossbite.
  • While it is not definitively proven that this is caused by extraoral force, there is a strong likelihood of a connection.

Non-Eruption Cases:

  • Four documented cases showed non-eruption of maxillary second molars following extraoral mechanotherapy.
  • This suggests that extraoral force may sometimes inhibit the eruption of the second molars, likely due to changes in the eruption path or space limitations.

Impact on Third Molars:

  • The diversion of the second molar’s eruption path could also influence the eruption of the maxillary third molars, though this requires further investigation.

Space Limitation in the Alveolar Trough:

  • Observations indicate that the alveolar trough may have limited capacity. If space is consumed by distal movement or tipping of the first molars, it may affect the eruption and alignment of second and third molars.

Growth and Timing in Class II Correction

  1. Importance of Growth:
    • Growth is a critical factor in addressing Class II discrepancies. Successful treatment often relies on leveraging the pubertal growth spurt to maximize skeletal and dental changes.
    • The maxillary alveolodental complex can be restrained during growth, allowing for a more favorable adjustment of the anteroposterior relationship with minimal reliance on tooth movement.
  2. Optimal Age for Treatment:
    • Girls: Best results observed between 10 to 13 years.
    • Boys: Optimal outcomes seen between 12 to 17 years.
    • Exceptional cases, such as a 19-year-old boy with significant mandibular growth during a late growth spurt, demonstrate the variability of growth potential.
  3. Uncertainty of Growth:
    • While growth is pivotal, its predictability remains a challenge. The degree of mandibular growth and its impact on correcting Class II malocclusions vary significantly between individuals.

Unilateral Response to Extraoral Force

  1. Observation of Unilateral Effects:
    • In some cases, unilateral response to extraoral force was noted, particularly in the canine region. This posed challenges in achieving bilateral symmetry.
  2. Contributing Factors:
    • Sleeping Position: Patients reported consistently sleeping on one side, which appeared to correlate with reduced movement on that side.
    • Chewing Habits: Favoring one side during eating may also contribute to unilateral response, though this remains inconclusive.
  3. Management Strategies:
    • In some cases, a lower lingual appliance was used to provide additional elastic traction, helping address asymmetry. However, unilateral response persisted in certain cases.

Challenges in Achieving Complete Correction

  1. Residual Discrepancies:
    • Even with significant improvement in overjet and molar relationships, Class II characteristics in some segments, particularly the buccal region, may remain unresolved
  2. Future Considerations:
    • The causes of unilateral response and incomplete correction remain areas for further research and clinical focus. Factors such as patient compliance, growth variability, and appliance design must be studied in greater detail.

Does Extraoral Force Free Occlusal Interferences, Stimulate Forward Mandibular Positioning, or Promote Mandibular Growth?

The effects of extraoral force on occlusal interferences, mandibular positioning, and growth remain a topic of debate. The current evidence provides insights but lacks conclusive proof for some claims.

Freeing Occlusal Interferences:

  • Extraoral force can alter inclined plane relationships between maxillary and mandibular teeth.
  • In cases of mandibular overclosure caused by occlusal interference, combined extraoral force and bite plate therapy can effectively eliminate functional retrusion.
  • However, functional retrusions are less frequent and less severe than previously believed.

Stimulating Forward Mandibular Positioning:

  • Claims that extraoral force promotes forward mandibular positioning via a neurogenic reflex posture mechanism lack robust evidence.
  • While such repositioning cannot be categorically dismissed, it has not been consistently demonstrated under controlled, biometric conditions.

Stimulating Mandibular Growth:

  • There is no conclusive evidence that extraoral force or any orthodontic appliance can stimulate mandibular growth beyond the individual’s inherent morphogenetic pattern.
  • Apparent acceleration or increased growth rates reported in some studies (e.g., guide planes) have not been reliably duplicated in controlled experiments, such as those conducted at Northwestern University.

Class II to Class I Transformation:

  • Eliminating distal displacement through extraoral force does not result in the transformation of a Class II malocclusion into a Class I malocclusion.
  • The role of growth and morphogenetic patterns remains the primary determinant of mandibular development.

Challenges and Limitations

  • Need for Controlled Studies:
    • Many claims regarding mandibular growth stimulation and repositioning remain anecdotal or based on uncontrolled studies. Rigorous biometric analyses are necessary to substantiate such claims.
  • Physiological Variability:
    • Individual growth patterns, genetic predispositions, and environmental factors contribute to the variability in response to orthodontic treatment.
  • Role of Functional Appliances:
    • While functional appliances may influence mandibular posture temporarily, their long-term impact on growth remains uncertain.

Effects of cervical headgear appliance: A Guide for Orthodontic Students

Treating Class II malocclusion can be a challenging endeavor due to the diverse range of appliances available and the complexity of dental and skeletal relationships between the maxilla and mandible. To simplify the analysis and ensure consistent outcomes, studies focusing exclusively on cervical headgear have provided valuable insights.

Why Cervical Headgear?

Cervical headgear is like the Swiss Army knife of Class II malocclusion treatment. Its efficacy, however, depends significantly on when you start using it. Research suggests that the late mixed dentition or the onset of permanent dentition is the orthodontic equivalent of “prime time.” With a force of 450 to 500 grams on each side—basically the weight of a small apple—the appliance works best when worn for 12 to 14 hours daily. Yes, that’s half a day, so patients need to be as committed as a coffee addict to their morning brew.

Effects of Cervical Headgear on Molar Position and Bite

One notable effect observed in studies is the extrusion of maxillary first molars, a phenomenon first described in the 1970s. Think of it as the molars getting a little too excited and rising up—like bread dough, but less tasty. This leads to bite opening and an increase in vertical parameters, which can be a problem for dolichofacial patients with long faces. Adding height to an already tall face is like putting a top hat on a giraffe—probably not the best idea. However, with careful management, even vertical growers can benefit from this appliance.

Mandibular Rotation and Vertical Changes

Molar extrusion also causes mandibular clockwise rotation, leading to an increase in the mandibular plane angle. This backward rotation is well-documented, and while it’s not ideal, it’s not the end of the world either. After all, even the best orthodontic plans can sometimes feel like trying to herd cats—challenging but ultimately rewarding.

Arch Expansion and Alignment

Cervical headgear also moonlights as a gentle expander of the upper arch, introducing an 8 to 10 mm expansion in the inner bow. This expansion helps align maxillary teeth and the mandibular arch to follow suit. It’s like getting a BOGO deal on alignment—who doesn’t love that? These changes create excellent conditions for the mandible to grow to its full potential, making Class II correction a reality.

Maxillary Repositioning and Overjet Correction

Another party trick of cervical headgear is improving the maxillomandibular relationship. By restricting forward and downward maxillary displacement, it lets the mandible grow normally, compensating for the initial overjet. It’s like giving the mandible a chance to shine on the orthodontic stage—finally, the underdog gets its moment.

Key Takeaways for Orthodontic Students

  • Timing Matters: Initiate treatment during late mixed dentition or early permanent dentition for optimal results.
  • Patient Selection: Avoid using cervical headgear in dolichofacial patients with extreme vertical growth patterns.
  • Appliance Effects: Understand the implications of molar extrusion, mandibular rotation, and vertical parameter changes.
  • Comprehensive Benefits: Leverage the appliance’s ability to expand arches, improve alignment, and enhance the maxillomandibular relationship.

Cervical headgear remains a cornerstone in the treatment of Class II malocclusion. By mastering its application and understanding its effects, orthodontic students can achieve predictable and effective outcomes in their clinical practice.

Ortho Pan India Whatsapp Group 🙂