Hey future ortho experts! Let’s dive into a study that’s all about why timing matters in treating skeletal discrepancies. Spoiler: Early intervention can be a game-changer!
🚨 Why Bother with Early Treatment?
Traditional orthodontic correction (think braces alone) often fails to improve facial aesthetics in patients with major skeletal discrepancies (like severe Class II). Worse, it might even worsen the profile! 😱 The solution? Target the skeleton early—during mixed dentition—to harness growth and guide jaw development.
📚 Study Snapshot
Patients
28 Italian kids (12 boys, 16 girls) in early mixed dentition (DS2 stage).
Common issues: Increased overjet, distal molar relationship, varying vertical bites (open to deep), and lip incompetence.
Appliance Design
Custom maxillary splint with full tooth coverage (except incisors for aesthetics).
Kloehn facebow attached to molar tubes for high-pull headgear (45° upward/backward force, 400–500g/side).
Bite plate adjusted for occlusal contact or bite opening.
Extras: Tongue grid for open bites, “circum-arch” elastics for incisor retroclination.
Wear Time
Nightly + daytime use (10–18 hrs/day for 6–18 months). Compliance was key! Non-responders (no change in 6 weeks) were excluded.
Using cephalometric analysis (Björk’s superimposition method), the study revealed:
Headgear & RME: A Dynamic Duo or Just Extra Work? 🤔
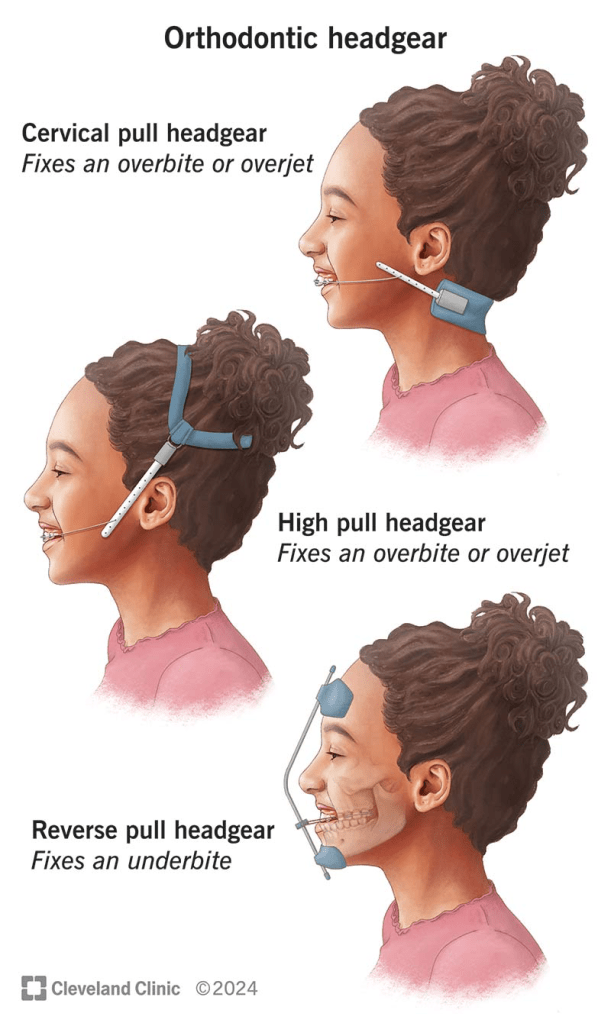
Class II malocclusion—aka the “overbite situation”—is like a dental tug-of-war between the maxilla (upper jaw) and mandible (lower jaw). Sometimes, the upper jaw is a little too enthusiastic and needs to be held back while the lower jaw plays catch-up. Enter headgear, the OG of growth modification since the 1950s! 🎩🦷
Why Headgear?
Think of it as a seatbelt for your upper jaw—it stops excessive forward movement while letting the lower jaw grow at its own pace. 🚗💨 Studies show headgear can reduce facial convexity (goodbye, profile selfies with extra chin tucks!) and improve the sagittal relationship between the upper and lower dental arches. 📏✨
But What About a Narrow Upper Jaw?
Class II cases often come with maxillary constriction, meaning the upper arch is too narrow—like trying to fit a king-size blanket on a twin bed. 🛏️ Solution? Rapid Maxillary Expansion (RME)! 💥 By widening the upper arch, RME makes more space for the teeth and helps balance the bite.
The Real Question: RME + Headgear = Worth It?
Some say expanding the maxilla first helps headgear work even better. Others wonder, “Why add more hardware when headgear alone does the job?” 🤷♂️ That’s exactly what this study aims to find out—comparing maxillary skeletal and dental effects when using combined headgear alone vs. headgear + RME.
👨⚕️ The Study Setup: Who, What, Where?
🔬 Study Type: Experimental (aka, “let’s test this on real people!”) 📍 Location: Pontifícia Universidade Católica do Rio Grande do Sul, Brazil 🇧🇷 👦👧 Participants: 41 kids with Class II, Div 1 malocclusion + 20 Class I controls 🦷 Treatment: Combined Headgear (CH) alone vs. RME + CH 📏 Assessment Tool: Lateral cephalograms 📸
📊 How Were They Grouped?
Group
Who’s In?
What’s Happening?
Group 1 (CH)
20 Class II kids (8 boys, 12 girls)
Wore combined headgear 12-14 hrs/day for 6 months 🕒
Group 2 (RME+CH)
21 Class II kids (10 boys, 11 girls)
First did RME for 14 days, then combined headgear for 6 months🔧🦷
Group 3 (Control)
20 Class I kids (8 boys, 12 girls)
Just space supervision, no fancy gadgets 🚫
📏 Baseline Skeletal Stats (T1): Were They Even Comparable?
Measurement
Group 1 (CH)
Group 2 (RME+CH)
Group 3 (Control)
Mandibular Plane Angle (SN.GoGn)
36.9° ± 3.9°
36.4° ± 6.3°
36.9° ± 4.1°
ANB Angle (Class II if > 4°)
5° ± 1.9°
5.9° ± 1.8°
3.7° ± 2.2°
✔️ All groups had similar skeletal patterns (slightly hyperdivergent). ✔️ Class II groups (CH & RME+CH) had significantly higher ANB than controls (duh!).
⚙️ Treatment Protocols: How Did They Torture—Err, Treat—The Kids?
🦷 Group 1 (CH Only):
✅ Headgear worn 12-14 hours/day for 6 months ✅ Inner bow expanded 2mm before insertion into molar tubes ✅ Force applied: 300g/f per side in cervical + parietal directions ✅ Resultant force vector: 424g/f
🦷 Group 2 (RME + CH):
🔧 Step 1: RME Phase (14 days)
Modified Haas Expander (banded from 1st molars → premolars/deciduous molars)
Activated 4x on day 1, then 2x/day until transverse overcorrection achieved 💥
🦷 Step 2: CH Therapy (6 months)
Same headgear protocol as Group 1 (CH), just started 7 days into expansion
📸 Follow-Up (T2): What Happened Next?
📅 Timeline:
Experimental groups (CH & RME+CH): Cephs taken once Class I molar relationship achieved (~6 months)
Control group: Cephs taken 6 months later (nothing changed, just grew normally)
👀 Cephalometric Analysis:
Blinded operator digitized landmarks using Dentofacial Planner Plus (DFP 2.0)
Statistical Analysis:
Student’s t-test for before-after comparisons
ANOVA & Tukey’s tests for inter-group differences
Headgear vs. RME + Headgear: Who Wins the Class II Battle? 🦷⚔️
So, what really happened after 6 months of headgear and expansion drama? Did we just push teeth back, or did we actually fix something?
🔬 The Molar Drama: Distalization, Tipping & More!
When you strap a headgear on a patient, you expect those maxillary molars to back off a little, right? Well, they did! But let’s get into the juicy details.
Molar Effects 🦷
Group 1 (CH Only)
Group 2 (RME + CH)
Significance 📌
Maxillary molars moved distally
✅ Yes
✅ Yes
Both groups had distal movement!
Maxillary molars tipped distally
✅ Yes (6.4°)
❌ No tipping (1.4°)
Tipping only in CH group!
Difference in tipping between groups?
❌ No significant difference
❌ No significant difference
Tipping happened, but RME didn’t change the game!
Maxillary molar extrusion?
❌ Nope
❌ Nope
No molars were harmed in the making of this study! 😂
🎯 Key Takeaway:
Headgear alone (CH) made maxillary molars tip backward.
Adding RME (CH + RME) prevented tipping, but the amount of distal movement was the same in both groups.
Neither group showed molar extrusion. So, no unwanted gummy smiles! 😃
🏠 What Happened to the Maxilla?
Did we actually hold that maxilla back, or did we just give the patient extra metal to wear?
Maxillary Effects 🏠
Group 1 (CH Only)
Group 2 (RME + CH)
Significance 📌
Clockwise maxillary rotation?
✅ Yes
❌ No
Only CH group showed rotation!
Forward maxillary growth restriction?
❌ No
✅ Yes
RME + CH held maxilla back better!
Difference in maxillary changes between groups?
❌ No significant difference
❌ No significant difference
Effects were subtle between groups.
📌 Clockwise rotation of the maxilla was seen in Group 1 (Cervical Headgear Alone) but was not significantly different from Group 2 (Cervical Headgear + RME).
🧐 Why does this matter?
Molars act as anchors for headgear forces. If the force is applied at a lower level, the maxilla tilts clockwise⏩🔄.
This tilts the occlusal plane and can make deep bite & excessive gingival exposure worse! 😱
Ortho Wisdom of the Day:
❌ Class II + Deep Bite + Excess Gingival Display = BAD combo for cervical headgear alone! ✅ Use high-pull headgear instead—its force vector passes through or above the maxilla’s center of resistance, preventing excessive rotation. 💡
🎯 Key Takeaway:
Headgear alone (CH) rotated the maxilla clockwise a bit.
RME + CH restricted forward growth of the maxilla.
No major differences between groups—so, was RME really necessary? 🤔
⏳ How Long Did It Take to Achieve Class I?
Let’s face it, patients hate long treatments. So, which group got to a Class I molar relationship faster?
Group
Time to Class I Molar Relationship
CH Only (Group 1)
⏳ 6.5 ± 1 months
RME + CH (Group 2)
⏳ 5.5 ± 1.1 months
🎉 Winner: RME + CH shaved off 1 month! But was it worth the extra hassle? 🤷♂️
🦷 Why Headgear? And Which One?!
If you’ve ever had a patient ask, “Why do I have to wear this medieval torture device?”—here’s your answer:
Type of Headgear 🎭
Best For… 👩⚕️
Why? 🤓
Cervical Headgear (CH)
Hypodivergent or mesodivergent faces
Allows some molar extrusion, doesn’t mess with facial esthetics. ✅
High-Pull Headgear
Hyperdivergent faces, open bites
Keeps molars in check, prevents jaw from tipping backward. 🚫
Combined Headgear (CH + High-Pull Forces)
Mesodivergent & hyperdivergent faces
Controls molar movement while keeping things balanced. ⚖️
🎯 Key Takeaway:
Cervical headgear? Great for low-angle cases, but it can increase vertical growth. 😬
High-pull headgear? Best for high-angle cases to prevent open bite.
Combined headgear (CH)? The middle ground—good for most Class II, especially hyperdivergent cases!
So, if your Class II patient is growing like a giraffe 🦒, go for combined or high-pull headgear. Otherwise, cervical may do the trick!
🦷 The Science Behind Headgear Design
The way a headgear is designed determines its effects. Let’s take a look at what happens when we tweak the outer bow:
Headgear Bow Design 🎭
Effect on Molars 🦷
Impact on Mandible 👀
Longer & Downward Angled
More vertical force, avoids extrusion, but increases distal tipping 📉
Can help in hyperdivergent cases! ✅
Shorter Outer Bow (Cervical Headgear)
More horizontal force, prevents excessive molar tipping
Keeps mandible stable 📏
Upward Angled Bow 🚀
Eliminates tipping, but causes extrusion! 😱
Leads to clockwise mandibular rotation(bad for Class II) 🚨
🎯 The Takeaway:
If you don’t want molars tipping too much, keep the bow shorter!
If you’re worried about extrusion messing up the occlusion, avoid upward-angled bows!
🦷 What About Transverse Maxillary Deficiency?
Class II Division 1 isn’t just about protruded upper teeth—there’s often a hidden transverse problem! 😲
Issue 🤯
How It Affects Class II? 📉
Solution? ✅
Narrow maxillary arch
Makes the mandible sit back
RME to unlock forward mandibular growth! 🏗️
Constricted canine region
Pushes the lower jaw backward
Widen it to allow natural AP growth! 📈
🎯 Key Takeaway:
If the maxilla is too narrow, mandibular growth gets blocked—making Class II even worse!
RME before headgear?Yes! Expanding first means the mandible can move forward naturally.
So, if your Class II patient has a narrow upper arch, don’t just throw headgear at them—widen it first! 🚀
🤓 Headgear vs. Headgear + RME – Which is Better
Feature 🔬
CH Alone
CH + RME
Distal molar movement 🚀
✅ Good
✅ Good
Distal tipping 🤷♂️
6.4° (More) 📉
1.4° (Less) ✅
Molar extrusion 📏
❌ None
❌ None
Clockwise maxillary rotation 🔄
✅ Happened
❌ Prevented
Restriction of forward maxillary growth ⏳
❌ No significant restriction
✅ More restriction 📉
🦷 The Final Takeaway: What Should YOU Do?
🔹 If your Class II patient has a narrow maxilla, use RME before headgear—it’s a game-changer! 🎮 🔹 High-pull headgear might be a better choice if you want to avoid maxillary rotation. 🏗️ 🔹 No single approach is perfect—your treatment should be customized based on facial pattern & occlusion.
📜 Conclusion: The Ortho Cheat Sheet 📜
✅ Distal movement of maxillary molars happens with both CH & CH+RME. ❌ Distal tipping occurs ONLY with CH alone. ❌ Clockwise rotation of the maxilla happens more with CH alone. ⚡ RME before headgear speeds up treatment & minimizes unwanted side effects!
Let’s talk about anterior maxillary osteotomy—a fancy way of saying “pushing your upper jaw back into place because your teeth decided to go rogue.” Now, before we dive into the nitty-gritty, let’s acknowledge the real heroes here: the orthodontists and surgeons who spend their days nudging bones like a very sophisticated game of Jenga.
Maxillary osteotomies have been around longer than your grandma’s secret recipe for laddoos. But unlike her kitchen skills, these techniques come with scalpels, screws, and a significant chance of making your nose twitch for weeks.
We have three classic moves in the Maxillary Osteotomy Dance:
1. Wassmund osteotomy – Named after a guy who probably spent too much time thinking about cutting bones.
2. Wunderer osteotomy – Wunderer…because wondering if your face will move correctly afterward is part of the thrill.
3. Anterior maxillary downfracture osteotomy – For those who like their surgery with a side of gravity.
While all three techniques get the job done, they differ in their “access route”, like Google Maps giving you three ways to get to the same dental conference—one scenic, one straightforward, and one with a questionable dirt road.
The Problem With Pushing Forward
Now, if you thought moving the anterior maxilla forward was easy, think again. The palatal mucosa is like an overprotective mother—it does not stretch easily. If you try too hard, you might end up with an oronasal or oroantral fistula. (For those unfamiliar, that’s a fancy way of saying, “Congratulations, you now have an accidental bonus airway!”)
In fact, the only reported case of maxillary advancement via osteotomy happened in 1968—shoutout to William Bell, the original maxillary daredevil. He moved the maxilla forward, bone-grafted the leftover gap, and then—because 1968 was a wild time—popped in a removable denture like a dental Band-Aid.
Enter Distraction Osteogenesis – The Slow and Steady Approach
The dental world eventually realized that gradual movement is the way to go (kind of like convincing your cat to take a bath). So, we borrowed a trick from orthopedics: distraction osteogenesis. Originally developed for cleft lip and palate cases, this technique slowly moves bones using:
External distractors – Big, bulky, and very “Mad Max.”
Orthodontic face masks – Like Invisalign’s overachieving cousin.
Internal distractors – The discreet VIP section of distraction devices.
But here’s the twist: these are mostly used to move the whole maxilla forward (Le Fort I style), rather than just the anterior segment. That’s like moving an entire apartment building when all you really needed was to shift the balcony.
The Unexpected Hero: The Palatal Distractor
Palatal distractors have traditionally been used for expansion, helping kids (and the occasional brave adult) widen their maxilla to correct collapsed buccal occlusion. But someone (probably while holding a coffee and staring at a dog study) thought, “Hey, what if we used this thing to move the maxilla forward?”
The results?
Tooth-borne distractors were tested on dogs (lucky them), and they did successfully move the anterior maxilla forward—along with a lot of dental movement.
Bone-borne distractors came in to save the day, ensuring that actual bone (not just teeth) was being moved.
And guess what? There’s exactly ONE reported case of a palatal distractor being used to advance a retruded maxilla in a non-cleft patient. Just one. That’s rarer than an orthodontist who doesn’t own at least three pairs of loupes.
Who Needs This? (Besides People Who Want to Look Like Their Own X-Ray)
This technique is perfect for patients with maxillary hypoplasia in both the anteroposterior and transverse planes—especially if they have cleft lip and palate. Think of it like a strategic battlefield move:
Crossbite limited to anterior and premolars? Check.
Molars behaving themselves in normal buccal occlusion? Check.
Dental crowding making your orthodontist sigh dramatically? Check.
The beauty of this approach? As your maxilla gradually advances, new bone forms in its wake—meaning your displaced teeth can be politely guided into their new positions with post-surgical orthodontics.
The Surgical Game Plan: Step-by-Step (or Slice-by-Slice)
Step 1: Build Your Secret Weapon – The Hyrax Appliance
Before the surgery even starts, we need our mechanical hero: the Hyrax orthodontic appliance (which sounds like a prehistoric creature but is actually a German-made expansion screw). Unlike its usual role in expanding palates sideways, we tweak it to push forward instead of out.
4 arms of the appliance:
2 anterior arms → Soldered to canines or first premolars
2 posterior arms → Soldered to first or second molars
This is the equivalent of securing a medieval battering ram before storming the castle walls.
Step 2: Knock Knock, It’s Surgery Time!
Under general anesthesia (because no one wants to be awake for this), we begin:
1. Vestibular incision – From first molar to first molar (basically, a wide front door for the maxilla).
2. Mucoperiosteal flap reflection – Peeling back the gums like opening a well-wrapped gift… but with scalpels.
3. Buccal linear osteotomy – A clean cut above the maxillary teeth from pyriform rim to distraction site.
4. Lateral nasal wall cut – Because your nose needs to be in on the action too.
5. Septal osteotomy – The nasal septum gets a trim at its base (like a very aggressive haircut).
At this point, your maxilla is thinking, “What did I do to deserve this?”
Step 3: The Grand Downfracture (Because Upfracturing Isn’t a Thing)
Vertical interdental osteotomy → First, a light cut through the buccal cortex, then deepened carefully (like slicing a layered cake).
Palatal osteotomy → Extending the cut medially to separate the segment without puncturing the palatal mucosa (because who needs a hole in their mouth?).
Downfracturing the anterior maxilla → A gentle wiggle and push to mobilize it forward (think of convincing a cat to move off your laptop).
Important Rule: Do not mess with the palatal mucosal pedicle—it’s keeping everything alive!
Step 4: Installing the Hyrax & Hitting the Snooze Button
1. Cement the appliance onto the selected teeth. (Your maxilla is now officially in a mechanical relationship.)
2. Close the surgical wound. (Because we don’t want to leave things open-ended.)
3. Let the bone chill for five days. (Surgery is tiring. Even for your face.)
Step 5: The Big Move – Slow & Steady Wins the Maxilla Race
On post-op day five, we start activating the Hyrax:
1mm per day (Because bones like to take their time).
2 to 4 activation rhythms per day (Like an orthodontic drumbeat).
The anterior maxilla keeps moving forward until a normal overjet is achieved.
Once it’s in place? Lock it in for 6 weeks—because good things take time (and so does new bone formation).
The Good, The Bad & The Orthodontist Who Has to Deal With It
✅ The Benefits:
⭐ No need for bone grafts – Your body does all the hard work. ⭐ Improved soft tissue support – Upper lip & paranasal area get a free upgrade. ⭐ Better space for orthodontic alignment – Less need for tooth extractions. ⭐ Stability – Unlike nonvascularized bone grafts, this bone won’t shrink over time.
⚠️ The Potential Drama:
🚨 Anchorage issues – If the patient lacks premolars/molars, the posterior teeth might move instead of the maxilla. 🚨 Tooth proclination – If the palatal osteotomy isn’t done properly, the front teeth might tip forward instead. 🚨 Appliance limitations – Tooth-borne distractors provide great control, but bone-borne devices might be more stable.
Move over, braces—there’s a new sheriff in town, and it’s called the Lip Bumper (LB)! Okay, not exactly new, but definitely underrated. If you thought orthodontic appliances were just about pulling teeth in different directions, LB is here to expand your perspective—literally!
Let’s break down the magic of LB, one millimeter at a time.
Orthodontic treatment often involves making critical decisions about space management in the mandibular dental arch. One conservative approach that has gained attention is lip bumper (LB) therapy, which may serve as an effective alternative to future space deficiency resolution, reducing the necessity for tooth extractions.
LB Therapy: The Good, The Bad, and The Bulky
The Good: More Space, Less Crowding
Studies suggest that LB therapy can help gain mandibular arch circumference by: ✔️ Distally angulating the first molars (M1) ✔️ Proclining the incisors (hello, newfound space!) ✔️ Buccally tipping the deciduous molars/premolars ✔️ Preventing mesial migration of molars (keeping that precious E space intact!)
This results in increased arch width, length, and perimeter, making it a solid alternative for managing mild to moderate crowding.
The Bad: Unpredictability & Side Effects
Before you rush to prescribe LBs to every borderline crowding case, let’s talk about the flip side: ❌ High uncertainty about the exact amount of movement per tooth ❌ Risk of M2 impaction or ectopic eruption (ouch!) ❌ Potential excessive buccal tipping of incisors, leading to periodontal concerns ❌ Social struggles—lips looking permanently puffed out (not ideal for the self-conscious teen)
The Bulky: Activation Matters
Not all LBs are created equal—activation protocols vary across studies. The amount of activation differs depending on the region:
Tooth Region
Activation Range (mm)
Molars (M1)
2 – 5 mm
Premolars/Primary Molars
3 – 8 mm
Canines
3 – 5 mm
Incisors
1 – 3 mm
More activation ≠ better results. Too much force can lead to M2 eruption disturbances, especially if the LB is worn for over two years.
LBs: A Space Maker or a Space Stealer?
While LB therapy is great for anterior crowding relief, posterior space management often gets overlooked. If not planned carefully, gaining space in the front can mean losing it in the back—resulting in impacted second molars (M2).
🚨 Negative Predictors for M2 Impaction:
Pre-treatment M2 inclination >30°
LB treatment duration >2 years
So before jumping on the LB train, check that M2 position! Otherwise, you’ll be trading one problem (crowding) for another (impacted molars and potential future surgeries).
Final Thoughts: The Patient Factor
If LB therapy had a motto, it would be: “Cooperation is key.” A patient who refuses to wear their LB (or removes it every chance they get) is on the fast track to treatment failure. In some cases, orthodontists have resorted to tying the LB in place—because desperate times call for desperate measures.
🔹 Max LB duration in studies: 28 months 🔹 Ideal duration: As short as possible while achieving stable results
Bottom Line:
✔️ LB therapy can increase arch length and reduce crowding. ❌ But it comes with unpredictability, risk of M2 impaction, and social discomfort. 💡 Plan wisely, evaluate molar positions, and keep treatment durations reasonable!
Class II malocclusions are a common orthodontic challenge, often requiring precise management of maxillary dentition to achieve ideal outcomes. Extraoral forces, such as those applied via headgear, have long been used to either distalize upper molars or restrict their forward migration. Understanding the physics behind these forces and their application is key to maximizing treatment efficacy and minimizing undesirable side effects.
Orthodontic forces can be represented as vectors, which help visualize the direction and magnitude of applied forces. When multiple forces converge on a tooth, a resultant vector can be calculated. This resultant vector can then be resolved into components parallel and perpendicular to the tooth axis, allowing for precise analysis of force magnitudes in these directions. This fundamental principle of physics underpins the design and application of combined headgear, which uses cervical and high-pull vectors to achieve targeted outcomes.
One of the critical considerations in orthodontic treatment is the direction of applied forces. Studies show that molars tipped back during distalization tend to relapse quickly unless occlusal forces act to upright them. For bodily movement of upper molars, force must be applied through the center of resistance. Cervical headgear, which applies forces below the center of resistance, can cause extrusion of upper molars and an undesirable opening of the mandible. Conversely, occipital traction—preferred for patients with open bite tendencies—is less effective in altering maxillary structures anteroposteriorly.
Addressing Challenges with Combined Headgear
The limitations of traditional cervical and high-pull headgear in treating Class II malocclusions with high mandibular plane angles necessitate alternative approaches. Combined headgear, which integrates forces from both cervical and high-pull vectors, offers a promising solution. By optimizing the resultant force vector, combined headgear can:
Minimize molar extrusion.
Reduce the likelihood of mandibular plane angle alterations.
Improve anteroposterior control of maxillary structures.
Evidence Supporting Combined Headgear
Research highlights the potential of combined headgear to address the shortcomings of single-vector approaches. For instance, bending the outer arms of cervical headgear downward by 15° has been shown to reduce extrusion. Moreover, studies by Baumrind and colleagues suggest that mandibular plane angle remains stable when combined headgear is used, likely due to the balanced application of forces.
This study examined three treatment groups, each using a different force ratio: 1:1, 2:1, and 1:2.
Treatment Group
Force Adjustment (High-Pull : Cervical)
Inner Bow Expansion
Wear Time
Treatment Duration
1:1
150 gm per side : 150 gm per side
Not expanded
20 hours/day
2 to 9 months
2:1
200 gm per side : 100 gm per side
Not expanded
20 hours/day
3 to 7 months
1:2
100 gm per side : 200 gm per side
Not expanded
20 hours/day
2 to 7 months
The goal? To understand how these variations impact the displacement of the maxilla and mandible, molar positioning, and even occlusal plane inclination. Here’s what they found.
Changes Through the Treatment
Parameter
1:1 Treatment Group
2:1 Treatment Group
1:2 Treatment Group
ANB Angle
Significant decrease
Significant decrease
Significant decrease
SNB Angle
Significant increase
Significant increase
No significant change
SN/GoGn
No significant change
Significant decrease
No significant change
SN/OP
No significant change
Significant increase
Significant decrease
Upper Molar/ANS-PNS (Angle)
No significant change
No significant change
Significant decrease
Upper Molar/ANS-PNS (mm)
Significant decrease
Significant decrease
Significant increase
Lower Molar MP (mm)
Significant increase
No significant change
No significant change
Maxillary and Mandibular Displacement
In the third treatment group, with a 1:2 force ratio, the maxilla was displaced backward. Interestingly, this aligns with findings from previous studies by O’Reilly and Boecler, who observed similar effects with cervical headgear. However, the mandible’s forward growth remained consistent across all groups, resulting in no significant differences in the ANB angle. This reinforces the idea that headgear’s primary role is in influencing the maxilla rather than the mandible.
Upper Molar Movement
Now, let’s talk molars. Superimposition analyses showed that the upper first molar was distalized by 3.6 to 4.0 millimeters across all groups. This distalization played a significant role in correcting molar relationships. However, the type of headgear affected how these molars moved. For example, high-pull headgear resulted in greater horizontal displacement, as noted by Baumrind et al., while cervical headgear tended to cause more vertical changes.
Occlusal Plane Inclination
One fascinating finding was the tipping of the upper molars. In the third group, there was a significant decrease in angulation and a mesial displacement of the molar apex. This aligns with Baumrind’s observations and highlights how force direction can influence tooth movement. Meanwhile, Badell’s study on combined headgear treatments showed a notable distal tipping, which was less pronounced in other groups.
Vertical changes were also noteworthy. In the 1:2 group, the downward force component caused molar extrusion, a pattern commonly seen with cervical headgear. Conversely, the 1:1 and 2:1 groups showed molar intrusion, consistent with high-pull headgear studies. This difference in vertical displacement also impacted the occlusal plane. The second group, with a 2:1 force ratio, showed a significant increase in occlusal plane inclination, mirroring findings from Badell and Watson.
Mandibular Plane Angle (MP)
Beyond the teeth, headgear also influences skeletal structures. The mandibular plane angle—a key indicator of vertical facial growth—remained largely unchanged in the 1:2 group, likely due to a modest increase in ramus height. However, the second group showed a significant decrease in the SN/Go-Gn angle, suggesting a more pronounced impact on vertical growth patterns.hames et al. and Badell, highlighting the interplay between force systems and vertical growth patterns.
Intercanine Width
And finally, let’s touch on intercanine width. Mitani and Brodie’s research showed an increase in this variable with cervical headgear, and this study confirmed those findings. The third group, with the greatest distalization, exhibited the most significant increase in intercanine width, highlighting the interplay between molar movement and arch expansion.
So, what’s the takeaway? Headgear therapy is a versatile and effective tool, but its outcomes depend heavily on the force system used. From molar distalization to occlusal plane changes, every detail matters. This study not only builds on decades of research but also underscores the importance of tailoring treatment to individual patient needs.
Orthodontic philosophies, much like those in medicine, tend to swing with the pendulum of trends and innovations. In the medical field, we’ve seen treatments rise and fall in popularity—antihistamines were once heralded as a cure-all, and antibiotics became the go-to for nearly every ailment. Similarly, in orthodontics, we’ve witnessed an evolving landscape of treatments and tools: non-extraction versus extraction approaches, debates over which teeth to extract, and a constant shift between fixed and removable appliances. Each innovation, from square tubes to round tubes and from labial to lingual appliances, has had its moment in the spotlight.
In this article we will explore: What is the role of the extra-oral appliance? Where does it find use? What are its limitations? How valid are the multiplicity of claims made for it?
The use of extraoral appliances isn’t new. As early as 1887, Dr. Edward Angle, a pioneer in orthodontics said “The value of the occipital bandage is, I believe, becoming more and more appreciated, and is especially applicable in this class of cases [meaning maxillary protrusions]. I am using the appliance . . . in my 16th case, and I consider it much more satisfactory than any of the few devices described in our literature on the subject.”
Investigating the Facts: A Study of 150 Cases
In a detailed study of 150 Class II, Division 1 malocclusions, headplates and plaster casts were analyzed to assess the role of extraoral force. Among these cases, 107 exhibited normal mandibular arch form, tooth size, and basal bone relationships. These findings suggest that in many cases, the mandibular arch is not the primary culprit in malocclusion; rather, the anteroposterior discrepancy lies in the maxilla. This raises an important question: Should orthodontic therapy target the maxilla while leaving the mandibular arch undisturbed?
The clinical reality supports this approach. Prolonged Class II therapy directed at the mandibular arch often results in unwanted tipping or forward sliding of the lower teeth. By focusing forces on the maxilla, we may achieve better results, including improved tooth interdigitation, reduced overbite and overjet, and restored muscle function and facial aesthetics.
The Debate Around Extraoral Force
The literature on extraoral force is filled with conflicting claims. Some argue that it restricts maxillary growth, while others suggest it only affects alveolar growth. There are debates about whether it moves teeth bodily or merely tips them, and whether it allows the mandible to grow forward or simply frees occlusal interferences. Even the choice of appliance—headgear versus cervical bands—sparks disagreement.
To bring order to the conflicting claims about extraoral appliances, we must approach the topic with objectivity. What truly happens in a controlled group of cases? Which cases benefit most from extraoral force, and where does it fall short? By critically evaluating both successes and failures, we can better understand the indications, contraindications, and unanswered questions surrounding this treatment modality.
The appliance used consisted of molar bands, an .045 stainless steel labial arch wire with vertical spring loops at the molars, and continuous loops at the lateral canine embrasures to receive the cervical gear. The cervical gear featured a metal tube with a continuous internal spring to provide distal motivating force. In select cases, incisors were banded at certain stages of therapy.
Patients were categorized into three age groups to analyze outcomes based on developmental stages:
Deciduous dentition: 3 to 6 years
Mixed dentition: 7 to 10 years
Permanent dentition: 11 to 19 years
This stratification allowed for a nuanced understanding of how age and dentition stage influenced treatment outcomes.
The study revealed several key insights, supplemented by observations from routine practice where extraoral anchorage was employed in diverse scenarios. These included:
Bolstering anchorage during full edgewise therapy
Closing spaces created by distal movement of anterior teeth
Uprighting individual teeth
Serving as an active retainer
The study confirmed that Class II, Division 1 cases vary significantly, even when focusing on three core characteristics:
Maxillomandibular basal relationship
Overjet
Overbite
The severity of discrepancies across these factors, combined with patient-specific variables such as morphogenetic patterns, motivation, cooperation, and growth during therapy, made the prognosis unpredictable. Success or failure was influenced by the degree of deviation from the norm in each factor and the interplay between them.
Can extraoral force alone, directed against the maxilla, correct Class II, Division 1 malocclusions?
The goal of establishing normal tooth interdigitation, eliminating excessive overbite and overjet, and restoring muscle function and appearance is ambitious. Achieving these outcomes universally is contingent on numerous factors:
Hereditary patterns
Age and sex of the patient
Presence or absence of third molars
Growth increments during treatment
Patient cooperation
Deciduous Dentition Group (3 to 6 years)
Sample Size: 14 cases, all selected for their severity, characterized by significant basal dysplasias.
Residual Class II relationship: Persisted in over half the cases, though to a lesser degree.
Basal adjustment: Anteroposterior basal adjustment was observed in 11 out of 14 cases.
Muscle function: Most patients exhibited improved muscle tone and function, along with a reduction in abnormal muscle habits.
Overjet correction: Often led to excessive lingual tipping of maxillary incisors, especially in cases without pre-existing spacing.
Overbite correction: The least satisfactory aspect of treatment.
Mixed Dentition Group (7 to 10 years)
Sample Size: 50 cases (34 girls, 16 boys).
Outcomes:
Normal molar relationship: Achieved in 29 cases, though not always accompanied by normal canine relationships.
Overjet correction: Similar to the deciduous group, excessive lingual inclination of maxillary incisors was noted in some cases.
Vertical correction: More pronounced and successful compared to the deciduous group.
Severe discrepancies: Cases with the greatest deviation from normal in basal relationship, overbite, and overjet showed the least favorable results.
Case Examples
Patient A.L.
Presented with severe basal malrelationship, marked overjet, and normal overbite.
Outcome: Immediate and gratifying response due to anterior spacing and lack of excessive overbite.
Patient J.K.
Presented with a similar profile but without anterior spacing.
Outcome: Removal of maxillary second molars facilitated mesiodistal adjustment, resulting in successful correction across all parameters.
Permanent Dentition Cases
Sample Size: 36 cases (19 boys, 17 girls)
Growth Correlation: A clear link was observed between the pubertal growth spurt and positive response to mechanotherapy.
Outcomes:
25 patients responded well enough to eliminate Class II characteristics, achieving normal interdigitation and improved aesthetics.
Success was highly dependent on a combination of favorable growth, patient cooperation, and other individual factors.
Can Extraoral Force Achieve Bodily Distal Movement of Maxillary Teeth?
The ability of extraoral force to influence maxillary growth, move teeth bodily distal, or merely tip them distally has been a subject of debate.
Maxillary Growth
Observation: There is no evidence that maxillary growth, as governed by sutures, is significantly affected by extraoral force. Claims of growth inhibition require substantiation, which is currently lacking.
Alveolar Growth: However, maxillary alveolar growth can be influenced. Changes in the anteroposterior apical base relationship are among the most significant findings, as demonstrated by cases like Patient A.M.
Distal Movement of Maxillary First Molars
Controversy: The possibility of bodily distal movement of maxillary first molars remains contentious. While some authorities categorically deny this, evidence from the study suggests otherwise:
Cases Supporting Movement:
Bodily distal movement has been observed in some cases, though it is not the norm.
Occasionally, this movement occurs unpredictably or can be facilitated by the removal of maxillary second molars during active treatment (Figs. 8 and 9).
Normal Path Restriction: In most cases, extraoral force restrains the maxillary first molar from moving forward along its natural path or tips it distally.
Challenges with Tipping
Excessive Distal Tipping: One drawback of extraoral appliances is the tendency for excessive distal tipping of maxillary first molars.
Mitigation Strategies:
Allowing maxillary second molars to erupt before treatment.
Removing maxillary second molars during treatment.
Using bands or Rocky Mountain-type crowns on second deciduous molars instead of first permanent molars in the mixed dentition stage.
Employing a headcap instead of cervical gear, as the headcap is associated with reduced tipping tendencies.
Does Extraoral Force Tip Maxillary Incisors Lingually, Moving Apices Labially?
Yes, extraoral force can cause lingual tipping of the maxillary incisors, with their apices potentially moving labially. This effect is a notable concern in orthodontic treatment, particularly in cases with significant basal discrepancies.
Lingual Tipping of Maxillary Incisors:
Lingual tipping is a frequent outcome when extraoral force is applied, especially in attempts to correct overjet in cases with marked maxillomandibular basal dysplasia.
This tipping often results from the inability to fully eliminate the basal malrelationship.
Overjet Correction Challenges:
Correcting overjet in the presence of basal discrepancies often necessitates:
Excessive lingual inclination of maxillary incisors.
Excessive labial inclination of mandibular incisors.
A combination of both adjustments.
These compromises are sometimes unavoidable to achieve acceptable occlusal and esthetic outcomes.
Between the two options, lingual tipping of maxillary incisors is considered the lesser compromise compared to labial tipping of mandibular incisors.
Does Extraoral Force, Directed Against the Maxillary First Molar, Impact Maxillary Second or Third Molars?
The impact of extraoral force on the maxillary second and third molars cannot be definitively answered with a simple “yes” or “no.” However, clinical observations and studies provide insights into potential effects:
Temporary Impact on Second Molars:
Excessive distal tipping of the maxillary first molars due to extraoral force can temporarily affect the eruption path of the maxillary second molars.
Once the distal force is removed, the first molars typically upright themselves, allowing the second molars to erupt.
Crossbite and Eruption Issues:
In some cases, maxillary second molars have been observed to erupt buccally, resulting in crossbite.
While it is not definitively proven that this is caused by extraoral force, there is a strong likelihood of a connection.
Non-Eruption Cases:
Four documented cases showed non-eruption of maxillary second molars following extraoral mechanotherapy.
This suggests that extraoral force may sometimes inhibit the eruption of the second molars, likely due to changes in the eruption path or space limitations.
Impact on Third Molars:
The diversion of the second molar’s eruption path could also influence the eruption of the maxillary third molars, though this requires further investigation.
Space Limitation in the Alveolar Trough:
Observations indicate that the alveolar trough may have limited capacity. If space is consumed by distal movement or tipping of the first molars, it may affect the eruption and alignment of second and third molars.
Growth and Timing in Class II Correction
Importance of Growth:
Growth is a critical factor in addressing Class II discrepancies. Successful treatment often relies on leveraging the pubertal growth spurt to maximize skeletal and dental changes.
The maxillary alveolodental complex can be restrained during growth, allowing for a more favorable adjustment of the anteroposterior relationship with minimal reliance on tooth movement.
Optimal Age for Treatment:
Girls: Best results observed between 10 to 13 years.
Boys: Optimal outcomes seen between 12 to 17 years.
Exceptional cases, such as a 19-year-old boy with significant mandibular growth during a late growth spurt, demonstrate the variability of growth potential.
Uncertainty of Growth:
While growth is pivotal, its predictability remains a challenge. The degree of mandibular growth and its impact on correcting Class II malocclusions vary significantly between individuals.
Unilateral Response to Extraoral Force
Observation of Unilateral Effects:
In some cases, unilateral response to extraoral force was noted, particularly in the canine region. This posed challenges in achieving bilateral symmetry.
Contributing Factors:
Sleeping Position: Patients reported consistently sleeping on one side, which appeared to correlate with reduced movement on that side.
Chewing Habits: Favoring one side during eating may also contribute to unilateral response, though this remains inconclusive.
Management Strategies:
In some cases, a lower lingual appliance was used to provide additional elastic traction, helping address asymmetry. However, unilateral response persisted in certain cases.
Challenges in Achieving Complete Correction
Residual Discrepancies:
Even with significant improvement in overjet and molar relationships, Class II characteristics in some segments, particularly the buccal region, may remain unresolved
Future Considerations:
The causes of unilateral response and incomplete correction remain areas for further research and clinical focus. Factors such as patient compliance, growth variability, and appliance design must be studied in greater detail.
Does Extraoral Force Free Occlusal Interferences, Stimulate Forward Mandibular Positioning, or Promote Mandibular Growth?
The effects of extraoral force on occlusal interferences, mandibular positioning, and growth remain a topic of debate. The current evidence provides insights but lacks conclusive proof for some claims.
Freeing Occlusal Interferences:
Extraoral force can alter inclined plane relationships between maxillary and mandibular teeth.
In cases of mandibular overclosure caused by occlusal interference, combined extraoral force and bite plate therapy can effectively eliminate functional retrusion.
However, functional retrusions are less frequent and less severe than previously believed.
Stimulating Forward Mandibular Positioning:
Claims that extraoral force promotes forward mandibular positioning via a neurogenic reflex posture mechanism lack robust evidence.
While such repositioning cannot be categorically dismissed, it has not been consistently demonstrated under controlled, biometric conditions.
Stimulating Mandibular Growth:
There is no conclusive evidence that extraoral force or any orthodontic appliance can stimulate mandibular growth beyond the individual’s inherent morphogenetic pattern.
Apparent acceleration or increased growth rates reported in some studies (e.g., guide planes) have not been reliably duplicated in controlled experiments, such as those conducted at Northwestern University.
Class II to Class I Transformation:
Eliminating distal displacement through extraoral force does not result in the transformation of a Class II malocclusion into a Class I malocclusion.
The role of growth and morphogenetic patterns remains the primary determinant of mandibular development.
Challenges and Limitations
Need for Controlled Studies:
Many claims regarding mandibular growth stimulation and repositioning remain anecdotal or based on uncontrolled studies. Rigorous biometric analyses are necessary to substantiate such claims.
Physiological Variability:
Individual growth patterns, genetic predispositions, and environmental factors contribute to the variability in response to orthodontic treatment.
Role of Functional Appliances:
While functional appliances may influence mandibular posture temporarily, their long-term impact on growth remains uncertain.
Understanding the growth patterns of the maxillary and mandibular lips is essential for effective orthodontic treatment planning. As orthodontic students, recognizing the interplay between facial soft tissues and the underlying hard tissues, particularly during the critical growth period from 8 to 18 years, can significantly influence treatment outcomes. This blog post delves into a lip growth and its implications for orthodontic therapy, providing data-driven insights and clinical guidelines.
Key Findings on Lip Growth
1. Maxillary Lip Length
Maxillary Lip Length Growth (mm)
Age 8
Age 18
Percentage Increase
Largest growth occurred between
Males
17.73
21.53
21.43%
Ages 10 and 16.
Females
17.73
19.88
12.11%
Ages 10 and 14.
2. Maxillary Lip Thickness
Maxillary Lip Thickness Growth (mm)
Age 8
Age 18
Percentage Increase
Males
10.77
15.76
46.33%
Growth was continuous, with the largest increase between ages 12 and 16.
Females
10.90
12.50
14.68%
Growth occurred primarily between ages 10 and 14.
3. Mandibular Lip Length
Mandibular Lip Length Growth (mm)
Age 8
Age 18
Percentage Increase
Males
19.14
26.53
38.56%
Largest increase occurred between ages 12 and 16.
Females
19.14
22.73
18.65%
Growth occurred primarily between ages 10 and 16.
4. Mandibular Lip Thickness
Males: Increased steadily from ages 8 to 16, with a plateau between ages 16 and 18.
Largest increases occurred between ages 14 and 16.
Females: Growth was less pronounced, with significant increases only between ages 10 and 14.
Clinical Implications for Orthodontic Treatment
1. Sexual Dimorphism in Lip Growth
Males experience greater increases in both lip length and thickness compared to females.
Females show more limited growth, particularly in lip thickness during puberty.
2. Extraction Therapy Considerations
Female Patients: Limited lip thickening during puberty makes the effects of extraction therapy more noticeable, especially in patients with straight or concave profiles. Treatment plans should be approached with caution to avoid adverse effects on facial esthetics.
Male Patients: Greater lip thickening provides more flexibility for extractions without significantly impacting facial profile fullness.
Maxillary Lip Thickness Growth Rates
Males:
0.5 mm/year (ages 8–12).
0.7 mm/year (ages 12–16).
Females:
0.5 mm/year (ages 10–12).
0.3 mm/year (ages 12–14).
Conclusion
Understanding the growth patterns of maxillary and mandibular lips is essential for predicting soft-tissue responses and planning effective orthodontic treatments. Sexual dimorphism plays a significant role, with males experiencing greater growth in both lip length and thickness compared to females. These differences must be factored into treatment decisions, particularly for extraction therapy, to ensure optimal esthetic and functional outcomes. As orthodontic students, incorporating these insights into clinical practice will enhance your ability to deliver patient-centered care.
Introduction Malocclusion, characterized by changes in teeth positioning and skeletal growth, represents a global public health concern.
Historical Context: Correction attempts date back to at least 1000 BC.
Prevalence: Class II malocclusion affects one-third of the population and is categorized as skeletal or dental in origin.
Etiology:
Only 20% of Class II Division 1 cases are due to maxillary protrusion.
The majority stem from mandibular retrusion.
This prevalence has led to the development of functional appliances aimed at stimulating mandibular growth. These devices are divided into removable and fixed functional appliances.
Fixed Functional Appliances
Types:
Rigid: Herbst appliance, MARA (Mandibular Advancement Repositioning Appliance).
Flexible: Jasper Jumper, Scandee tubular jumpers.
Hybrid: Forsus Fatigue Resistant Device (FFRD).
Forsus Fatigue Resistant Device (FFRD):
A telescoping spring mechanism for Class II correction.
Provides moderate patient tolerance with initial discomfort that subsides over time.
PowerScope Appliance:
Latest addition, introduced by Dr. Andy Hayes in 2016 in collaboration with American Orthodontics.
Features a telescopic mechanism with a nickel-titanium (NiTi) spring delivering 260 g constant force.
Designed as a preassembled, one-size-fits-all appliance for easy chairside application.
Study Rationale While Forsus FRD is extensively studied, limited literature evaluates and compares the skeletal, dental, and soft tissue effects of PowerScope. This study bridges that gap by conducting a cephalometric evaluation and comparison of these two fixed functional appliances.
Both appliances are effective in correcting Class II discrepancies caused by retrognathic mandibles. However:
Forsus FRD is superior in achieving skeletal changes, particularly maxillary retrusion and mandibular advancement.
PowerScope shows more pronounced effects on dentoalveolar and soft tissue parameters, especially upper incisor inclination correction and facial convexity improvement.