Anterior Maxillary Distraction by Tooth-Borne Palatal Distractor

Let’s talk about anterior maxillary osteotomy—a fancy way of saying “pushing your upper jaw back into place because your teeth decided to go rogue.” Now, before we dive into the nitty-gritty, let’s acknowledge the real heroes here: the orthodontists and surgeons who spend their days nudging bones like a very sophisticated game of Jenga.

Maxillary osteotomies have been around longer than your grandma’s secret recipe for laddoos. But unlike her kitchen skills, these techniques come with scalpels, screws, and a significant chance of making your nose twitch for weeks.

We have three classic moves in the Maxillary Osteotomy Dance:

1. Wassmund osteotomy – Named after a guy who probably spent too much time thinking about cutting bones.


2. Wunderer osteotomy – Wunderer…because wondering if your face will move correctly afterward is part of the thrill.


3. Anterior maxillary downfracture osteotomy – For those who like their surgery with a side of gravity.

While all three techniques get the job done, they differ in their “access route”, like Google Maps giving you three ways to get to the same dental conference—one scenic, one straightforward, and one with a questionable dirt road.

The Problem With Pushing Forward

Now, if you thought moving the anterior maxilla forward was easy, think again. The palatal mucosa is like an overprotective mother—it does not stretch easily. If you try too hard, you might end up with an oronasal or oroantral fistula. (For those unfamiliar, that’s a fancy way of saying, “Congratulations, you now have an accidental bonus airway!”)

In fact, the only reported case of maxillary advancement via osteotomy happened in 1968—shoutout to William Bell, the original maxillary daredevil. He moved the maxilla forward, bone-grafted the leftover gap, and then—because 1968 was a wild time—popped in a removable denture like a dental Band-Aid.

Enter Distraction Osteogenesis – The Slow and Steady Approach

The dental world eventually realized that gradual movement is the way to go (kind of like convincing your cat to take a bath). So, we borrowed a trick from orthopedics: distraction osteogenesis. Originally developed for cleft lip and palate cases, this technique slowly moves bones using:

External distractors – Big, bulky, and very “Mad Max.”

Orthodontic face masks – Like Invisalign’s overachieving cousin.

Internal distractors – The discreet VIP section of distraction devices.


But here’s the twist: these are mostly used to move the whole maxilla forward (Le Fort I style), rather than just the anterior segment. That’s like moving an entire apartment building when all you really needed was to shift the balcony.

The Unexpected Hero: The Palatal Distractor

Palatal distractors have traditionally been used for expansion, helping kids (and the occasional brave adult) widen their maxilla to correct collapsed buccal occlusion. But someone (probably while holding a coffee and staring at a dog study) thought, “Hey, what if we used this thing to move the maxilla forward?”

The results?

Tooth-borne distractors were tested on dogs (lucky them), and they did successfully move the anterior maxilla forward—along with a lot of dental movement.

Bone-borne distractors came in to save the day, ensuring that actual bone (not just teeth) was being moved.

And guess what? There’s exactly ONE reported case of a palatal distractor being used to advance a retruded maxilla in a non-cleft patient. Just one. That’s rarer than an orthodontist who doesn’t own at least three pairs of loupes.

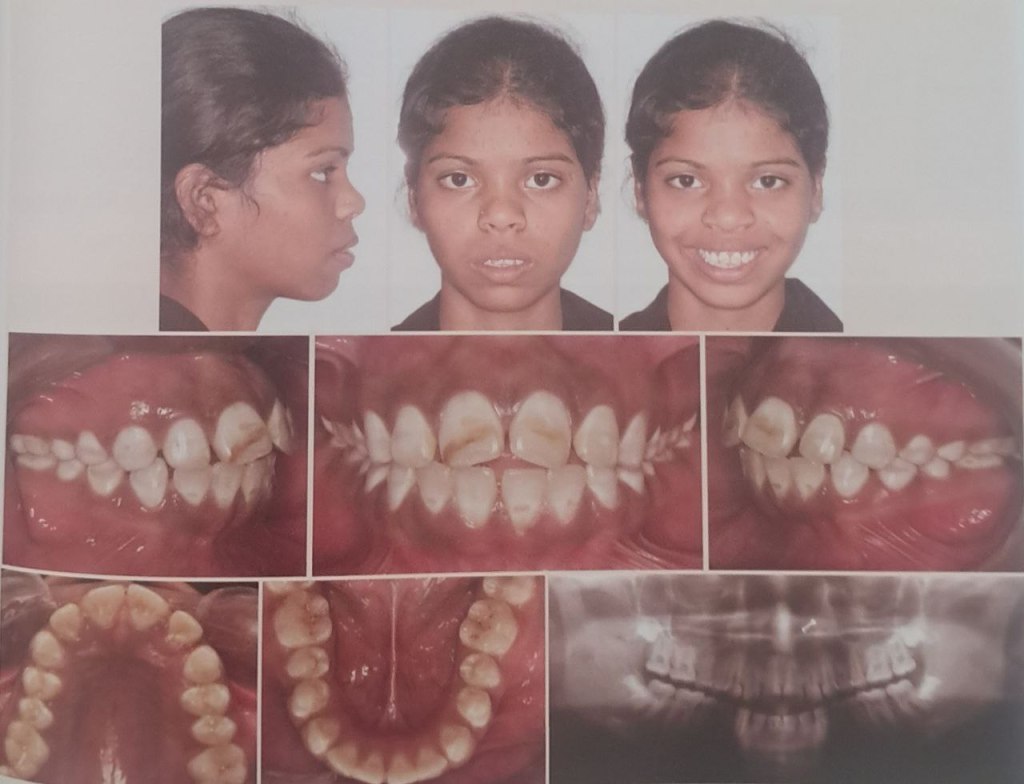
Who Needs This? (Besides People Who Want to Look Like Their Own X-Ray)

This technique is perfect for patients with maxillary hypoplasia in both the anteroposterior and transverse planes—especially if they have cleft lip and palate. Think of it like a strategic battlefield move:

Crossbite limited to anterior and premolars? Check.

Molars behaving themselves in normal buccal occlusion? Check.

Dental crowding making your orthodontist sigh dramatically? Check.


The beauty of this approach? As your maxilla gradually advances, new bone forms in its wake—meaning your displaced teeth can be politely guided into their new positions with post-surgical orthodontics.

The Surgical Game Plan: Step-by-Step (or Slice-by-Slice)

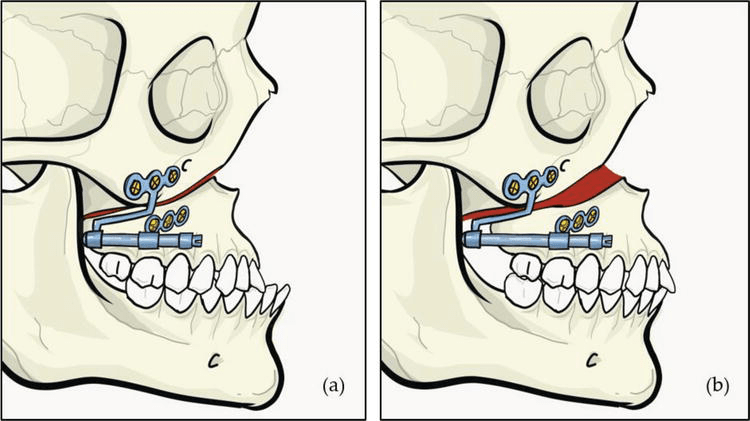
Step 1: Build Your Secret Weapon – The Hyrax Appliance

Before the surgery even starts, we need our mechanical hero: the Hyrax orthodontic appliance (which sounds like a prehistoric creature but is actually a German-made expansion screw). Unlike its usual role in expanding palates sideways, we tweak it to push forward instead of out.

4 arms of the appliance:

2 anterior arms → Soldered to canines or first premolars

2 posterior arms → Soldered to first or second molars

This is the equivalent of securing a medieval battering ram before storming the castle walls.

Step 2: Knock Knock, It’s Surgery Time!

Under general anesthesia (because no one wants to be awake for this), we begin:

1. Vestibular incision – From first molar to first molar (basically, a wide front door for the maxilla).

2. Mucoperiosteal flap reflection – Peeling back the gums like opening a well-wrapped gift… but with scalpels.

3. Buccal linear osteotomy – A clean cut above the maxillary teeth from pyriform rim to distraction site.

4. Lateral nasal wall cut – Because your nose needs to be in on the action too.

5. Septal osteotomy – The nasal septum gets a trim at its base (like a very aggressive haircut).

At this point, your maxilla is thinking, “What did I do to deserve this?”

Step 3: The Grand Downfracture (Because Upfracturing Isn’t a Thing)

Vertical interdental osteotomy → First, a light cut through the buccal cortex, then deepened carefully (like slicing a layered cake).

Palatal osteotomy → Extending the cut medially to separate the segment without puncturing the palatal mucosa (because who needs a hole in their mouth?).

Downfracturing the anterior maxilla → A gentle wiggle and push to mobilize it forward (think of convincing a cat to move off your laptop).

Important Rule: Do not mess with the palatal mucosal pedicle—it’s keeping everything alive!

Step 4: Installing the Hyrax & Hitting the Snooze Button

1. Cement the appliance onto the selected teeth. (Your maxilla is now officially in a mechanical relationship.)

2. Close the surgical wound. (Because we don’t want to leave things open-ended.)

3. Let the bone chill for five days. (Surgery is tiring. Even for your face.)

Step 5: The Big Move – Slow & Steady Wins the Maxilla Race

On post-op day five, we start activating the Hyrax:

1mm per day (Because bones like to take their time).

2 to 4 activation rhythms per day (Like an orthodontic drumbeat).

The anterior maxilla keeps moving forward until a normal overjet is achieved.

Once it’s in place? Lock it in for 6 weeks—because good things take time (and so does new bone formation).

The Good, The Bad & The Orthodontist Who Has to Deal With It

✅ The Benefits:

⭐ No need for bone grafts – Your body does all the hard work.
⭐ Improved soft tissue support – Upper lip & paranasal area get a free upgrade.
⭐ Better space for orthodontic alignment – Less need for tooth extractions.
⭐ Stability – Unlike nonvascularized bone grafts, this bone won’t shrink over time.

⚠️ The Potential Drama:

🚨 Anchorage issues – If the patient lacks premolars/molars, the posterior teeth might move instead of the maxilla.
🚨 Tooth proclination – If the palatal osteotomy isn’t done properly, the front teeth might tip forward instead.
🚨 Appliance limitations – Tooth-borne distractors provide great control, but bone-borne devices might be more stable.

Long-term Follow-up After Maxillary Distraction Osteogenesis in Growing Children With Cleft Lip and Palate

If bones could talk, they’d probably say, “Hey, stop pulling me!” But in the world of distraction osteogenesis (DO), that’s exactly what we do—intentionally stretch bone tissue to create new growth. Think of it as the orthodontic equivalent of a yoga instructor telling your jaw to lengthen and breathe.

While orthognathic surgery has been the gold standard for skeletal corrections, DO has stepped in as the cool new kid, especially for cases that were once deemed untreatable. But is it really the superior method, or just a fancier way to move bones? Let’s break it down.

Since its first craniofacial application by McCarthy et al. in 1992, DO has come a long way from being an experimental idea to a widely used technique for maxillary and mandibular expansion. But, like any orthodontic superhero, it comes with its strengths, weaknesses, and a history of trial-and-error that reads like a medical thriller.

The Origins: From Soviet Leg Braces to Jawline Makeovers

DO owes its roots (pun intended) to Ilizarov’s principles—a Russian orthopedic surgeon who figured out that bone can be stretched and tricked into regenerating. What started as a method for limb lengthening soon found its way into orthodontics when McCarthy et al. used it to lengthen hypoplastic mandibles in children.

Once researchers saw potential in midface and maxillary distraction, it became a game-changer for patients with clefts and severe maxillary hypoplasia—especially when traditional orthognathic surgery wasn’t an ideal option.

With miniature distraction devicesrigid external distraction (RED) systems, and intraoral appliances, the orthodontic world saw an explosion (well, controlled expansion) of techniques:

🔹 Cohen et al. (1997) – Introduced maxillary distraction in young children.
🔹 Polley & Figueroa (1997) – Used the RED device to treat severe maxillary hypoplasia.
🔹 Molina et al. (1998) – Tried a mix of facial masks and intraoral appliances for mixed dentition cases.

So, Does It Work? The Numbers Speak!

Swennen et al. (2001) reviewed 16 studies spanning 33 years (1966-1999) and found that maxillary advancements ranged from 1 mm to 17 mm. Not bad for a non-surgical approach, right?

Well, not so fast—relapse was reported in 50.4% of cases. That’s like getting a six-pack after months of workouts only for it to disappear when you eat one slice of pizza.

Rachmiel et al. (2005) reported stable results in 12 cleft patients after two years, showing that maxillary length (Condylion to A point) held its ground. But Krimmel et al. (2005) later threw a wrench into that optimism, noting a decrease in SNA and ANB angles just one year after distraction.

Cheung & Chua (2006) conducted a meta-analysis of 26 studies (1966-2003) on 276 cleft patients, revealing:

📌 Most maxillary advancements were between 5-9 mm.
📌 External distractors (68.8%) were more common than internal distractors (2.17%) and facial masks (25.72%).
📌 Maxillary relapse? 5.56% within two years—but only one study provided actual numbers.

One thing is clear: distraction osteogenesis works, but long-term stability is still a mixed bag.

The Study: Six Patients, One Mission—Expand That Maxilla!

Meet our VIPs: six Chinese patients (3 boys, 3 girls, average age 10.5 years), all of whom had:
✔ Cleft lip and palate (two unilateral, four bilateral)
✔ Primary lip and palate repair in infancy
✔ Anteroposterior maxillary hypoplasia (aka, their upper jaw was slacking)
✔ Class III malocclusion with a negative overjet (translation: their lower teeth were winning a battle they shouldn’t even be fighting)

These kids weren’t just getting braces—they were about to experience controlled bone expansion, courtesy of the Rigid External Distraction (RED) device.

1️⃣ Pre-Orthodontic Preparation – Because even bone stretching needs a good warm-up.
2️⃣ Complete High Le Fort I Osteotomy – A fancy way of saying, “Let’s surgically cut the upper jaw so we can move it.” where the maxilla was delicately detached with septal and pterygomaxillary disjunction. (Translation: we made it mobile but still attached—think of it as unlocking a door, not knocking it down.)
3️⃣ RED Device Installation – Think of this as the orthodontic version of a headgear, but instead of just pushing teeth, it’s stretching the entire upper jaw.
4️⃣ Latency Period (5 Days) – Let the jaw marinate before we start stretching it.
5️⃣ Active Distraction (1 mm/day) – The screws on the RED device were adjusted daily to pull the maxilla forward. (It’s like a gym for your bones—except you don’t have to do the work; your jaw does.)
6️⃣ Overcorrection Achieved! 🎉 – Because we know relapse is real, we stretched the maxilla a little extra to compensate for future setbacks.
7️⃣ Consolidation (6-8 Weeks) – The RED device stayed put to let the new bone solidify.
8️⃣ Device Removal & Orthodontics – After the expansion was done, the real party started: braces to fine-tune everything.

The study wasn’t just about making kids look less Class III—it was about proving that DO actually works (and hopefully, stays that way). Here’s how they did it:

📸 Lateral Cephalographs  were taken at four key points:
🔹 T0 (Before Distraction) – “This is your jaw on cleft-induced hypoplasia.”
🔹 T1 (Immediately After Distraction) – “Congratulations, your maxilla has entered the chat.”
🔹 T2 (6 Months Later) – “Let’s see if your jaw likes its new position.”
🔹 T3 (1+ Year Later) – “Did it stay put, or did it sneak back?”

Instead of using simple before-and-after pictures (this isn’t a weight loss commercial), the researchers mapped out skeletal and dental landmark positions using a cranial base reference system.

How, you ask?

🔹 First, skeletal landmarks were pinpointed on the T0 cephalogram.
🔹 Then, these landmarks were transferred onto T1, T2, and T3 cephalograms using a best-fit method—aligning surrounding bone structures and trabecular patterns (Huang & Ross, 1982).
🔹 To keep things precise, an x-y coordinate system was created:

Y-axis: A perpendicular line intersecting the X-axis at sella
🔹 This coordinate system was then transferred onto each cephalogram for standardized measurements.

X-axis: Drawn 7° below the sella-nasion plane

Key Takeaways

✅ Overjet increased (yay, no more Class III woes!).
✅ Overbite decreased—except for our rebellious Case 5.
✅ Maxilla went forward (woo-hoo!) but then took a casual retreat backward over a year (boo!).
✅ Some vertical movement—first up, then down (the maxilla, not our enthusiasm).
✅ Teeth tagged along for the ride, moving anteriorly and inferiorly.
✅ Relapse? Oh yeah—about 9.6% at 6 months, increasing to 24.5% by a year.

Evaluation of the Jones jig appliance for distal molar movement

What is the Jones Jig Appliance?

Orthodontic treatment often requires space creation to align teeth properly. One effective way to achieve this is through molar distalization—moving the upper first molars backward to make room for crowding or to correct bite discrepancies. Traditionally, orthodontists have relied on headgear, Class II elastics, and removable appliances, all of which require patient compliance (and we all know how reliable that is! 🙄).

But what if there was a more predictable, fixed alternative?

Enter the Jones Jig Appliance—a fixed, non-compliance-based distalizing appliance designed to move molars efficiently without relying on patient effort.

How Does the Jones Jig Work?

✔ Palatal Button – A 0.5-inch diameter acrylic button, anchored to the maxillary second premolars using a 0.036-inch stainless steel wire for stability.
✔ Jones Jig Arms – One arm fits into the 0.045-inch headgear tube, while the other fits into the slot of the first molar band.
✔ Nickel-Titanium Spring – A 0.040-inch coil spring delivers a controlled force of 70-75 g to push the molars backward.

Once the Jones Jig is cemented, it is activated by tying the activation loop with a 0.010-inch ligature off the bracket of the anchoring tooth. This ensures continuous force application.

The coils are then reactivated every 4 to 5 weeks until the desired molar movement is achieved.

Once activated, the appliance applies a gentle but continuous distal force on the upper first molars, moving them backward over time. The best part? Since it’s fixed, patients don’t have to remember to wear it, making treatment more reliable.

Advantages of the Jones Jig

✅ No Patient Compliance Needed – Unlike headgear, patients don’t have to wear or adjust it.
✅ Continuous Force Application – The coil spring ensures a steady force for predictable movement.
✅ Faster Treatment Time – Studies show that molars can be distalized in 4-6 months.

While the Jones Jig is highly effective, it does come with some considerations:
🔹 Molar Tipping – Instead of bodily movement, molars may tip distally, requiring additional mechanics for uprighting.
🔹 Anchorage Loss – The anterior teeth may shift forward slightly, which may need to be controlled with TADs (temporary anchorage devices) or a transpalatal arch (TPA).

Does the Eruption of Second Molars Affect Treatment?

When using the Jones Jig Appliance for molar distalization, orthodontists must consider various factors that can influence treatment outcomes. One key question is: Does the eruption of second molars impact molar movement and anchorage loss?

A study evaluating 72 patients explored this question by comparing cases with erupted vs. unerupted maxillary second molars to determine how they affected the type and amount of molar movement and anchorage loss.

Study Findings: Second Molar Eruption and Its Effects

Researchers divided the patients into two groups:

GroupCondition of Second MolarsKey Observations
Group 1 (28 patients)Unerupted second molars (below the cementoenamel junction of the first molar)Less anchorage loss in premolars and incisors, potentially more controlled molar movement.
Group 2 (44 patients)Erupted second molars (not banded or bonded)More anchorage loss observed, possibly due to resistance from the second molars.

The presence or absence of second molars plays a significant role in the effectiveness of molar distalization. Patients with unerupted second molars may experience better molar movement with less anchorage loss, while those with erupted second molars may require additional anchorage support. In cases with erupted second molars, additional anchorage reinforcement (e.g., TADs or a transpalatal arch) may be necessary to prevent undesired movement.

Study Findings: How Far Did Those Molars Go?

retrospective study of 72 patients using the Jones Jig showed:

Tooth MovementMean ChangeTipping AngleComparison to Other Appliances
Maxillary First Molar2.51 mm distal movement7.53° distal tipping
(meaning they didn’t just move—they leaned back like someone dodging responsibility. 😅)
Similar to Herbst, Wilson Mechanics, and Pendulum Appliance 📏
Maxillary Second Molar1.79 mm distal movement
(Not as much as the first molar, but still making progress! 🔄)
8.03° distal tipping
(tipped even more than first molars)
0.71 mm extrusion observed 📉
(suggests that second molars are like that one friend who always stands out in group photos. 📸)
OverjetIncreased 0.45 mm

If necessary, J-hook headgear or Class II elastics can help maintain anchorage.
2.21° incisor proclination

(much less than the 6° seen in other studies. So, while there’s some flaring, it’s not enough to make your patient look like Bugs Bunny. 🐰)
Less flaring than with Pendulum & Repelling Magnets 😎

Less than the 1.30 mm increase seen with the Pendulum appliance and the 1.60 mm increase with repelling magnets.
OverbiteDecreased 1.28 mmImproved vertical control compared to other appliances 📊

Anchorage Control: Because We Don’t Want Molar Tipping Running the Show

Distalizing molars is great, but uncontrolled tipping? Not so much. Here’s where anchorage control steps in like a responsible chaperone at a high school dance.

✅ Use a Nance holding arch, utility archwire, or stopped archwire to keep those molars in check.
✅ Short Class II elastics can help move the premolars and incisors back once the molars are in position.
✅ J-hook headgear can reinforce anchorage (for the brave souls who still prescribe it).

Molar Extrusion: Is It a Big Deal?

One concern with distalization is molar extrusion—but does the Jones Jig make teeth “float away”? Not really.

🔹 Jones Jig Patients:

  • Males: 3.17 ± 1.79 mm of extrusion
  • Females: 1.33 ± 1.38 mm of extrusion

🔹 Untreated Class I Patients (for comparison):

  • Males: 4.1 ± 3.1 mm
  • Females: 1.9 ± 2.2 mm

📌 Takeaway?
The extrusion in Jones Jig patients is within normal growth changes. So, unless your patient is trying to float their molars into the stratosphere, this isn’t a major concern. 🚀

Jones Jig vs. Headgear: Any Real Difference?

The study found no statistically significant differences between the Jones Jig group and a matched Headgear groupwhen evaluating:

✅ Maxillary first molar position
✅ Maxillary central incisor angulation
✅ Linear position of incisors
✅ Overjet & Overbite changes

So, if you’re an orthodontist who loves avoiding unnecessary patient lectures about compliance, the Jones Jig might be your new best friend. 🎉

Treatment Comparison: Who Wins?

Treatment ModalityPatient Compliance Needed?Molar Distalization (mm)Overjet Change (mm)Overbite Change (mm)
Jones Jig Appliance❌ No compliance needed2.51 mm+0.45 mm-1.28 mm
Cervical Headgear✅ Requires compliance 😬2.50 mm+0.40 mm-1.30 mm
Class II Elastics✅ Requires compliance 🙄Varies (depends on use)Greater risk of overjet increaseLess predictable molar control

📌 Takeaway?
The Jones Jig does everything headgear does—without the compliance drama. It’s like getting straight A’s without ever studying (if only life worked that way 😆).

Final Verdict: Is the Jones Jig Worth It?

✔ YES! If you want a fixed, predictable, non-compliance-dependent way to correct Class II malocclusions, the Jones Jig is a great choice.

✔ Same results as headgear—without the teenage rebellion.

✔ Minimal anchorage loss compared to other distalization appliances (no crazy overjet increase).

✔ Less annoying for patients = less annoying for you. 😆

Unilateral face-bows: A theoretical and laboratory analysis

Orthodontics has long relied on mechanical devices to refine tooth movement and optimize jaw alignment. Among these, the face-bow remains an essential tool for controlled force application. Recent experimental and theoretical studies have focused on enhancing face-bow designs to achieve unilateral distal forces more efficiently. This post synthesizes key findings regarding the efficacy of various face-bow configurations, addressing their theoretical underpinnings and practical implications for advanced orthodontic care.

Comparative Analysis of Face-Bow Designs

Face-Bow TypeKey FeaturesForce DistributionResulting Forces
Swivel-Offset Face-Bow– Outer bow attached eccentrically via a swivel joint.- Allows lateral movement of the outer-bow tips.– Unequal force distribution.- Delivers unilateral distal forces.- Generates lateral forces.– Delivers unilateral force with predictable lateral forces.- Effective for asymmetric treatment.
Symmetrical Face-Bow– Outer bow symmetrically aligned.- Balanced force application.– Even force distribution on both sides.- No lateral force generated.- Ineffective for unilateral force delivery.– No unilateral or lateral forces delivered.
Soldered-Offset Face-Bow– Rigid attachment of outer bow on one side.- Appears asymmetrical but does not deliver unilateral forces.– Symmetrical force distribution.- No lateral force generated.– No unilateral force delivered.
Spring-Attachment Face-Bow– Spring on one terminal of the inner bow.- Symmetrical outer-bow tips.– Equal force on both sides.- No lateral force generated.– No unilateral force delivered.

Which Face-Bow Designs Effectively Deliver Unilateral Distal Forces?

Not all face-bow designs are capable of delivering sufficient unilateral distal forces, an essential factor for treating conditions such as unilateral posterior crossbites or asymmetrical dental arch development. The following analysis highlights the effectiveness of different face-bow configurations:

  • Ineffective Designs:
    • Bilaterally Symmetrical Face-Bows: These designs maintain equal force distribution on both sides, making them unsuitable for unilateral force application.
    • Spring-Attachment Face-Bows: Despite their versatility, these face-bows fail to concentrate force on a single side, limiting their application in unilateral treatments.
    • Soldered-Offset Face-Bows: While superficially asymmetrical, the rigid attachment of the outer bow does not result in the necessary unilateral force distribution.
    These designs consistently failed to generate a mean unilateral distal force exceeding 60%, thereby limiting their clinical utility for unilateral orthodontic applications.
  • Effective Designs:
    • Power-Arm Face-Bows: These designs effectively direct unilateral forces, achieving greater than 60% of the force distribution to one side, which aligns with clinical requirements for unilateral force application.
    • Swivel-Offset Face-Bows: By incorporating a swivel mechanism, these face-bows create asymmetry, allowing for targeted distal force delivery to one side.

Both of these designs surpass the 60% threshold for unilateral force distribution, thus meeting the criteria for effective treatment.

Theoretical Framework for Unilateral Force Delivery

The key to effective unilateral force application lies in the asymmetry of the face-bow’s design. When the outer-bow tips are positioned asymmetrically relative to the midsagittal plane of the inner bow, it allows for the focused application of force on one side:

  • Asymmetrical Designs: These designs facilitate targeted force delivery by creating a mechanical advantage that directs the force to one side. This results in the efficient application of unilateral distal forces, which is essential for treating asymmetric dental and skeletal issues.
  • Symmetrical Designs: These configurations fail to produce unilateral forces because the force is evenly distributed, thus making them ineffective for unilateral applications.

The swivel-offset face-bow achieves this asymmetry through a lateral swing of the outer-bow terminals, while power-arm face-bows, when constructed with comparable geometric patterns, similarly exhibit the necessary force distribution for unilateral applications.

Characterization of Lateral Forces in Unilateral Face-Bows

Unilateral face-bows not only generate distal forces but also produce lateral forces that contribute to the overall mechanical effect. These lateral forces are characterized by the following:

  • Directionality: The lateral force is directed from the side receiving the greater distal force toward the opposite side, ensuring balanced correction of dental and skeletal asymmetries.
  • Magnitude: The magnitude of the lateral force increases with the unilateral effectiveness of the face-bow, making it a predictable variable in effective designs.
  • Predictability: Experimental studies demonstrate that lateral forces are highly predictable in effective designs, such as the power-arm and swivel-offset face-bows, whereas they are erratic and difficult to control in symmetrical, ineffective designs.

Practical Considerations for Clinicians: Which Face-Bow Design is Optimal?

While both the power-arm and swivel-offset face-bows are effective in delivering unilateral distal forces, the power-arm design stands out in terms of practicality and clinical efficiency:

  • Ease of Fabrication: The power-arm face-bow can be easily modified chairside from a conventional face-bow, offering flexibility and reduced chair time for both clinicians and patients.
  • Predictable Performance: Experimental data show that the power-arm design provides a force distribution that closely matches that of the swivel-offset face-bow, with less than a 5% difference in performance.
  • Patient Comfort: The power-arm design ensures more consistent force application, contributing to better patient comfort and compliance during treatment.

Effects of cervical headgear appliance: A Guide for Orthodontic Students

Treating Class II malocclusion can be a challenging endeavor due to the diverse range of appliances available and the complexity of dental and skeletal relationships between the maxilla and mandible. To simplify the analysis and ensure consistent outcomes, studies focusing exclusively on cervical headgear have provided valuable insights.

Why Cervical Headgear?

Cervical headgear is like the Swiss Army knife of Class II malocclusion treatment. Its efficacy, however, depends significantly on when you start using it. Research suggests that the late mixed dentition or the onset of permanent dentition is the orthodontic equivalent of “prime time.” With a force of 450 to 500 grams on each side—basically the weight of a small apple—the appliance works best when worn for 12 to 14 hours daily. Yes, that’s half a day, so patients need to be as committed as a coffee addict to their morning brew.

Effects of Cervical Headgear on Molar Position and Bite

One notable effect observed in studies is the extrusion of maxillary first molars, a phenomenon first described in the 1970s. Think of it as the molars getting a little too excited and rising up—like bread dough, but less tasty. This leads to bite opening and an increase in vertical parameters, which can be a problem for dolichofacial patients with long faces. Adding height to an already tall face is like putting a top hat on a giraffe—probably not the best idea. However, with careful management, even vertical growers can benefit from this appliance.

Mandibular Rotation and Vertical Changes

Molar extrusion also causes mandibular clockwise rotation, leading to an increase in the mandibular plane angle. This backward rotation is well-documented, and while it’s not ideal, it’s not the end of the world either. After all, even the best orthodontic plans can sometimes feel like trying to herd cats—challenging but ultimately rewarding.

Arch Expansion and Alignment

Cervical headgear also moonlights as a gentle expander of the upper arch, introducing an 8 to 10 mm expansion in the inner bow. This expansion helps align maxillary teeth and the mandibular arch to follow suit. It’s like getting a BOGO deal on alignment—who doesn’t love that? These changes create excellent conditions for the mandible to grow to its full potential, making Class II correction a reality.

Maxillary Repositioning and Overjet Correction

Another party trick of cervical headgear is improving the maxillomandibular relationship. By restricting forward and downward maxillary displacement, it lets the mandible grow normally, compensating for the initial overjet. It’s like giving the mandible a chance to shine on the orthodontic stage—finally, the underdog gets its moment.

Key Takeaways for Orthodontic Students

  • Timing Matters: Initiate treatment during late mixed dentition or early permanent dentition for optimal results.
  • Patient Selection: Avoid using cervical headgear in dolichofacial patients with extreme vertical growth patterns.
  • Appliance Effects: Understand the implications of molar extrusion, mandibular rotation, and vertical parameter changes.
  • Comprehensive Benefits: Leverage the appliance’s ability to expand arches, improve alignment, and enhance the maxillomandibular relationship.

Cervical headgear remains a cornerstone in the treatment of Class II malocclusion. By mastering its application and understanding its effects, orthodontic students can achieve predictable and effective outcomes in their clinical practice.

Ortho Pan India Whatsapp Group 🙂

Speech and Malocclusion #Paper1

Introduction

Orthodontic care primarily focuses on dental esthetics and masticatory function, but its impact on sound production is often overlooked. Sound production involves a dynamic interaction with the oral cavity, requiring orthodontists to recognize how dental anomalies and treatments influence speech. Enhanced patient care can be achieved through better treatment planning and referrals to speech pathologists for patients whose malocclusions affect speech production. This is particularly relevant for adults requiring proper speech for professional purposes.

Definition of Sound and Speech Mechanism

Sound is mechanical vibration energy requiring the coordination of neural, muscular, mechanical, aerodynamic, acoustic, and visual elements. Speech production involves four processes:

  1. Language processing in the brain.
  2. Motor command generation to vocal organs.
  3. Articulatory movements of the oral cavity.
  4. Air emission from the lungs.

Speech sounds are classified into:

  • Vowels: Produced without obstruction to airflow.
  • Consonants: Produced with varying obstructions in oral or nasal cavities.

Classification

  • Ingram’s Classification:
    1. Dysphonia: Disorders of vocalization.
    2. Dysrhythmia: Respiratory coordination issues.
    3. Dysarthria:
      • Due to neurological abnormalities (e.g., motor neuron lesions).
      • Due to local abnormalities (e.g., jaws, teeth, palate).
    4. Non-Structural Disorders: Mental, hearing, or environmental factors.
    5. Developmental Disorders: Abnormal or delayed speech development.
    6. Mixed Disorders: Combination of the above.
  • Types of Consonants:
    • Bilabial consonants: “b”, “p”, “m”
    • Labiodental consonants: “f ”, “v”
    • Dental consonants: “d”, “t”, “n”, “s”, “z”
    • Dentoalveolar consonants: “c”, “c”, “j”, “ş”
    • Frontopalatal consonants: “g”, “k”, “l”, “r”, “y” 
    • Backpalatal consonants: “g”, “ğ”
    • Pharyngeal consonant: “h”
    • Nasal consonants: “m”, “n”

Orthodontic Implications

  • Malocclusion and Speech:
    • Class II Malocclusion:
      • Difficulty with bilabial sounds (“p,” “b,” “m”).
      • Compensatory mechanisms involve lower lip contacting maxillary incisors.
    • Class III Malocclusion:
      • Difficulty with labiodental sounds (“f,” “v”).
      • Common errors include bilabial production or reversed labiodental posture.
      • Dentalization leads to lisping for sounds like “t,” “d,” “s,” and “z.”
    • Open Bite:
      • Anterior lisping and distortion of anterior sounds.
      • Severe cases show more misarticulations when combined with other anomalies.
    • Diastema:
      • Impacts sounds like “l,” “n,” and “d.”
  • Velopharyngeal Dysfunction: Associated with cleft palate, causing hypernasal resonance and airflow issues.
  • Adaptation Mechanisms: Tongue and lips often adapt to dental irregularities, masking speech defects.

Studies

  • Fymbo’s Study:
    • Analyzed 410 students, noting a higher incidence of speech difficulties in those with malocclusion.
    • Severity of speech defects correlated with the severity of dental anomalies.
  • Laine et al.:
    • Narrower palates linked to sibilant speech disorders.
    • Increased open bite and overjet have greater impacts than spacing.
  • Dalston and Vig:
    • Minimal long-term speech changes post-orthognathic surgery.
  • Garber et al.:
    • Temporary speech errors observed post-surgery resolved within 1-3 months.

Shortcomings

  • Limited Longitudinal Data: Lack of extended studies tracking speech changes post-treatment.
  • Standardization Issues: No universal methods to measure malocclusion-related speech defects.
  • Complex Etiology:
    • Speech defects often result from multiple factors, not just malocclusion.
    • Adaptation varies based on intelligence, emotional state, and muscle control.

Understanding the Quad-Helix Appliance for Maxillary Expansion

Palatal expansion has been a cornerstone of orthodontic treatment for over a century. Despite its proven efficacy, this technique has sparked debates within the orthodontic community. Is rapid expansion the best approach, or do slower methods offer greater stability? Let’s dive into the history, mechanics, and clinical applications of maxillary expansion, with a special focus on the quad-helix appliance.

The primary goal of palatal expansion is to coordinate the maxillary and mandibular denture bases, addressing narrow or collapsed arches. This can be achieved through:

  1. Orthodontic Movement (tooth-focused)
  2. Orthopedic Movement (bone-focused)
  3. Combination Therapy

A variety of appliances—fixed, semi-fixed, and removable—are employed to achieve these goals.

MethodAdvantagesChallenges
Rapid Palatal ExpansionQuick skeletal changesPotential for relapse and sutural strain
Slow ExpansionGreater histologic integrity of suturesRequires longer treatment time

HISTORY

Coffin Loop Appliance:

  • Incorporated in a vulcanite plate for upper arch expansion.
  • Produces continuous force due to the configuration of the palatal compound loop.

Martin Schwarz Appliance:

  • Popular in Europe.
  • Utilizes tissue-borne anchorage with wire components for tooth movement.
  • Expansion force is intermittent due to the jackscrew mechanism.

Haas and Wertz Fixed Appliance:

  • Designed for rapid expansion of the midpalatal suture in narrow maxillary arches.
  • Cemented to maxillary first premolars and first permanent molars.
  • Includes a palatal jackscrew and acrylic extensions.
  • Produces lateral orthopedic movement of the maxilla due to high force magnitude.

Load-Activation Characteristics:

  • Chaconas and Caputo found differences in stress transmission through craniofacial bones with various fixed expansion appliances.
  • Impact on craniofacial sutures varies depending on the appliance.

Rickett’s “W” Expansion Appliance:

  • Initially used for cleft palate conditions with collapsed dental arches.
  • Acts continuously over time until activation force dissipates.

What Makes the Quad-Helix Appliance Unique?

Helical Loops for Increased Flexibility:

  • Initially added to the posterior segment of the palatal arch
  • Further modification introduced four loops (two anterior and two posterior), creating the quad-helix appliance.

Construction Details:

  • Made of 0.038-inch (0.975 mm) wire.
  • Soldered to bands cemented to maxillary first permanent molars or deciduous second molars, depending on the patient’s age.

Initial Activation and Effects:

  • Appliance is activated before cementation.
  • Results in expansion of buccal segments and rotation of banded teeth 

Force Magnitude:

  • Chaconas and Caputo reported that 8 mm of expansion before cementation generates approximately 14 ounces of force 

Effectiveness in Different Age Groups:

Effective in orthopedically widening the maxilla in children, helping to establish a normal maxillomandibular relationship.

Force is sufficient for tooth movement but insufficient for orthopedic effects in adults with closed midpalatal sutures.

In children, particularly in the deciduous or early mixed dentition stages, the resistance of the patent suture is lower than the dentoalveolar area.

Clinical Case: A Pediatric Success Story

  • Patient History: Prolonged thumb-sucking led to a narrow maxilla due to lowered tongue position and buccinator muscle forces.
  • Treatment: Quad-helix appliance activated ~8 mm, sufficient for maxillary expansion.
  • Outcome: Successful expansion and resolution of thumb-sucking habit. The appliance’s palatal position ensured comfort and minimal impact on speech.
AdvantagesImpact
Acts as a habit-breaking deviceAddresses prolonged thumb-sucking habits
Comfortable for the patientMinimal impact on speech
Effective in pediatric casesAchieves orthopedic widening of the maxilla

Insights from Cephalometric and Cast Analysis

Orthodontic Changes (T₁ to Tₚ)

  1. Maxillary Molar Width: Increased by an average of 5.88 mm, reflecting significant dental expansion.
  2. Average Frontal Molar Relation: Improved by 2.95 mm, indicating better occlusal alignment.
  3. Maxillary Intercanine Width: Expanded by 2.74 mm, enhancing anterior dental arch form.

Orthopedic Changes (T₁ to Tₚ)

  1. Maxillary Width: Increased by 0.92 mm, with five cases showing expansions exceeding 2.7 mm.
  2. Maxillomandibular Width: Increased by 0.89 mm, with notable cases surpassing 1.4 mm.
  3. Palatal Changes: The anterior palate moved downward, increasing maxillary height.

Relapse and Stability (Tₚ to T₂)

  1. Minimal Relapse: Dental expansions remained stable over 42 months.
  2. Orthopedic Effects: Demonstrated high stability, contrasting with the relapse often seen in rapid palatal expansion.
  3. Palatal Plane and Maxillary Height: Slight decreases observed, indicating no net parallel downward movement.

Slow vs. Rapid Expansion

  • Slow expansion using the quad-helix appliance demonstrated superior stability and less relapse compared to rapid palatal expansion. The gradual physiologic movement allowed the facial skeleton to adapt, ensuring long-term stability.

Bite Opening

  1. Active Expansion (T₁ to Tₚ): Slight bite opening occurred due to occlusal interferences.
  2. Post-Expansion (Tₚ to T₂): Additional bite opening was attributed to orthodontic treatment rather than the expansion appliance.

Facial Skeletal Considerations

  • Stability was influenced by initial nasal and maxillary widths:
    • Narrow Maxilla + Normal/Wide Nasal Width: High stability.
    • Narrow Nasal Width + Normal Maxilla: Lower stability.

Facial Type

  • The sample skewed toward brachyfacial types, limiting conclusions about expansion outcomes across facial types.

Effective Early Correction of Posterior Cross-Bites by Quad-Helix or Removable Appliances

Early Correction of Posterior Cross-Bites

  • Advocated to:
    • Direct erupting teeth into normal positions.
    • Eliminate premature occlusal contacts.
    • Promote beneficial dentoskeletal changes during growth periods (Bell, 1982).
  • Posterior cross-bites develop early and are not self-correcting (Moyers & Jay, 1959; Thilander et al., 1984).

Orthodontic Response to Expansion

  • Initial response completed within a week (Storey, 1973; Cotton, 1978; Hicks, 1978).
  • Subsequent movements occur as compressed buccal alveolar plate resorbs at the root-periodontal interface due to continued force (Storey, 1973).

Orthopaedic Effects of Expansion

  • Sufficient transverse forces can overcome bioelastic strength of sutural elements, causing:
    • Orthopaedic separation of maxillary segments (Storey, 1973; Chaconas & de Alba y Levy, 1977; Cotton, 1978; Hicks, 1978).
    • Palatal segment repositioning continues until force is reduced below sutural tensile strength.
  • Stabilization involves reorganization and remodeling of sutural connective and osseous tissues (Storey, 1973; Ekstrom et al., 1977).

Increased Maxillary Arch Width

  • Linked to orthodontic and/or orthopaedic effects of expansion (Ficarelli, 1978; Moyers, 1984).
  • Initial changes involve lateral tipping of posterior maxillary teeth due to compression and stretching of periodontal and palatal soft tissues.

Midpalatal Sutural Opening and Maxillary Displacement

  • Expansion leads to:
    • Downward and forward displacement of the maxilla with bite opening (Haas, 1961).
    • Downward and backward rotation of the mandible, increasing the vertical dimension of the lower face (Haas, 1970).
  • Subsequent recovery of mandibular posture noted in most cases (Wertz, 1970).

Rate of Expansion and Dental Arch Width Increase

  • Rapid Maxillary Expansion (Krebs, 1959, 1964):
    • Subjects aged 8–19 years showed an average dental arch increase of 6.0 mm (range: 0.5–10.3 mm).
    • Skeletal changes accounted for:
      • ~50% of the arch width increase in 8–12-year-olds.
      • ~33% of the increase in 13–19-year-olds.
  • Slow Maxillary Expansion (Hicks, 1978):
    • Subjects aged 10–15 years showed a dental arch width increase of 3.8–8.7 mm.
    • Skeletal response ranged from 16–30%, with lower skeletal response in older patients.
    • Buccal tipping of molars and skeletal segments contributed to arch width increase.
    • Asymmetrical angular changes between left and right molars and maxillary segments were observed.

Removable Plates and Sutural Growth (Skieller, 1964):

  • In subjects aged 6–14 years:
    • 20% of dental arch widening was attributed to sutural growth.
    • Sutural growth rate during expansion was significantly greater than during follow-up, indicating stimulated growth during expansion.

Removable Plates and Sutural Growth (Skieller, 1964):

  • Study on 20 subjects aged 6–14 years:
    • 20% of dental arch widening was attributed to sutural growth.
    • Growth rate at the mid-palatal suture was significantly higher during expansion compared to the follow-up period.
    • Suggests that sutural growth is stimulated during the expansion period.

Histologic Findings in Slow Expansion Procedures:

  • Sutural separation occurs at a controlled rate, maintaining tissue integrity during maxillary repositioning and remodeling (Storey, 1973; Ekstrom et al., 1977; Cotton, 1978).

Relapse Tendency During Post-Retention Period:

  • Relapse potential is reduced in slow expansion procedures due to:
    • Maintenance of sutural integrity.
    • Reduced stress loads within tissues (Storey, 1973; Cotton, 1978; Mossaz-Joelson & Mossaz, 1989).

Relapse Rates with Slow Maxillary Expansion (Hicks, 1978):

  • Relapse amount varies based on retention type:
    • Fixed retention: 10–23%.
    • Removable retention: 22–25%.
    • No retention: 45%.

Managing Relapse Potential:

  • Over-expansion during active treatment.
  • Prolonging the retention period to stabilize results.
Measurement/FactorQuad-Helix GroupRemovable Appliance GroupExplanation/Findings
Intercanine Width IncreaseSmaller increaseSmaller increaseQuad-helix arm did not touch canines until molar region expanded
Width Between First Permanent MolarsGreater increaseGreater increaseQuad-helix group showed more expansion in molar regions
Deciduous Molar Width IncreaseGreater increaseSmaller increaseQuad-helix expansion involved torque movements, removable appliance involved tipping
Mandibular Interarch DimensionsSmall changesSmall changesNo predictable pattern of change, maxillary expansion altered occlusion forces
Maxillary Arch Length (Expansion Period)IncreaseIncreaseBoth groups showed increase in arch length during expansion
Maxillary Arch Length (Retention/Post-Retention Period)Gradual decreaseGradual decreaseSmall net increase after retention and post-retention periods
Frontal Cephalometric Ratios (Active Treatment)Significant increaseSignificant increase, but less than quad-helixMaxillary intermolar width increased more in quad-helix group
Molar Tipping (Active Treatment)Minimal tippingHigh degree of buccal tippingRemovable appliance showed more molar tipping
Active Treatment Time101 days (average)115 days (average)Quad-helix had shorter active treatment time, but patients were observed less frequently
Retention Time3 months3 monthsSame retention time for both groups
Skeletal Expansion (Basal Expansion)Small basal expansionSmall basal expansionMinimal basal expansion observed in both groups
Orthopedic Movement of ExpansionMinimal sutural growthMinimal sutural growthSmall amount of basal expansion, similar to previous studies (Skieller, 1964; Hicks, 1978)

Biomechanics of Space Closure (Group B Anchorage)

Types of Anchorage Based on Maximum Anchorage Demand

Anchorage is classified into three types based on the maximum anchorage required:

Type A: Maximum Anchorage

  • Definition: Anchorage demand is very high.
  • Space Utilization: Not more than 1/4th of the extraction space should be closed by forward movement of anchor teeth.
  • Mechanism: The extraction space is primarily closed by maximum incisor retraction.

Type B: Moderate Anchorage

  • Definition: Anchorage demand is moderate.
  • Space Utilization: Anchor teeth are allowed to move forward by up to half the extraction space.
  • Mechanism: The extraction space is closed by a combination of incisor retraction and posterior tooth protraction.

Type C: Minimum Anchorage

  • Definition: Anchorage demand is very low.
  • Space Utilization: More than half of the extraction space is closed by mesial movement of the anchor teeth.
  • Mechanism: The extraction space is primarily closed by protraction of posterior teeth with minimal incisor retraction.

Group B Anchorage: Biomechanics of Space Closure

Key Features

  • Archwire: A working archwire with a minimal curve of Spee (e.g., 0.019 × 0.025-inch SS wire) is engaged into the bracket slots and molar tubes.
  • Couples and Forces:
    • The wire generates a couple at the level of the bracket/molar tube at both ends, leading to the generation of a moment of couple (M_c).
    • Tiebacks create a force for space closure (F), generating a moment of force (M_F).
  • Force and Moment Interaction:
    • At either end of the system, the moments of couple and force are created in opposite directions, canceling each other.
    • This leaves only the translatory force (F) to exist, enabling space closure.

Translational Movement

  • When moments are balanced correctly:
  • No vertical component of force is produced.
  • No rotational tendency occurs in the system.
  • Occlusal plane and overbite remain unchanged.

  • Diagram: Depicts the working archwire (faded blue line) and the resulting forces and moments.
  • Outcome: Translation of anterior and posterior segments without altering the occlusal plane or overbite.

Planned Imbalance of Moments

  • In some scenarios, moments are deliberately imbalanced to achieve specific vertical movements:
  • Posterior Teeth: Extrusion (yellow arrows).
  • Anterior Teeth: Intrusion (yellow arrows).
  • Effect: Opens the deep overbite by modifying the vertical dimension.
  • Diagram: Illustrates the planned imbalance (thick red curved arrow) leading to controlled vertical movements.
  • Outcome: Deep overbite correction through extrusion of posterior teeth and intrusion of anterior teeth.

Summary

Group B anchorage allows for controlled space closure through balanced forces and moments. By adjusting the moments, orthodontists can achieve either translational movement or vertical adjustments, making it a versatile approach in clinical orthodontics.

Bimaxillary Dentoalveolar Protrusion: Traits and Orthodontic Correction

Bimaxillary protrusion is a condition characterized by protrusive and proclined upper and lower incisors with increased lip procumbency. It is commonly seen in African-American and Asian populations but can occur across all ethnic groups. Due to the negative perception of protrusive dentition and lips in many cultures, patients with bimaxillary protrusion often seek orthodontic treatment to improve their facial profiles. This guide summarizes key aspects of bimaxillary protrusion, including its etiology, pretreatment characteristics, treatment goals, and outcomes.

Etiology of Bimaxillary Protrusion

The etiology of bimaxillary protrusion is multifactorial, including:

  • Genetic Factors: Hereditary traits influencing facial and dental structures.
  • Environmental Factors:
    • Mouth breathing.
    • Tongue and lip habits.
    • Increased tongue volume.

Morphological Features

Keating’s study on Caucasian patients identified the following cephalometric traits:

FeatureObservation
Posterior cranial baseShorter
MaxillaLonger and more prognathic
Skeletal patternMild Class II
Upper and posterior face heightSmaller
Facial planesDivergent
Soft tissue profileProcumbent with a low lip line

Pretreatment Characteristics

Cephalometric Traits

Patients with bimaxillary protrusion exhibit the following pretreatment characteristics:

TraitObservation
Upper and lower incisor proclinationIncreased (2-3 SD above mixed racial norms)
Vertical growth patternsIncreased lower anterior face height
Mandibular plane angleElevated
Alveolar heightsIncreased

Soft Tissue Features

  • Lip Position:
    • Upper and lower lips are ahead of the E-plane.
    • Lower lip: 6.0 mm ahead (Keating’s Caucasian sample).
    • Upper lip: 1.0 mm ahead (less than Keating’s 3.4 mm).
  • Nasolabial Angle:
    • Found to be 94° (1 SD more acute than mixed racial norms).
    • Tan’s study on Chinese patients reported an even more acute angle (86.6°).
  • Lip Thickness:
    • Increased, likely due to a higher proportion of African-American patients in the study.

Alveolar Morphology

  • Alveolar Width: Reduced compared to Handelman’s norms.
  • Alveolar Height: Increased, consistent with vertical facial growth patterns.
  • Thin and elongated alveolus may limit retraction mechanics and necessitate surgical osteotomies in severe cases.

Orthodontic Treatment Goals

The primary objectives of treating bimaxillary protrusion include:

  • Dental Goals:
    • Retraction and retroclination of maxillary and mandibular incisors.
    • Reduction in incisor proclination and protrusion.
  • Soft Tissue Goals:
    • Decrease in lip procumbency and convexity.
    • Improvement in the nasolabial angle.
  • Mechanics Used:
    • Extraction of four first premolars.
    • Retraction using maximum anchorage mechanics.

Flowchart: Treatment Goals and Process

1. Initial Diagnosis → 2. Extraction of Four Premolars → 3. Retraction of Incisors → 4. Profile Improvement

Treatment Outcomes

Dental and Skeletal Changes

ParameterObservation
Interincisal angleIncreased significantly
Incisor inclinationDecreased significantly
Anteroposterior incisor positionReduced significantly (P < .001)

Soft Tissue Changes

  • Upper Lip Retraction:
    • Ratio of upper incisor retraction to upper lip retraction: 2.2:1 (similar to Chiasson and Hershey).
    • Nasolabial angle: Increased significantly (P < .02).
  • Variability:
    • Lip response depends on factors like interlabial gap, lip redundancy, and musculature quality.

Vertical Dimension

  • No significant changes in lower anterior face height or mandibular plane angle, indicating that treatment mechanics do not affect the vertical dimension.