Alright, future tooth wizards, let’s talk moments—no, not “romantic sunset” moments, but the kind that makes teeth twirl like ballet dancers! 🩰
1. Moment Basics: The “Push & Spin” Effect
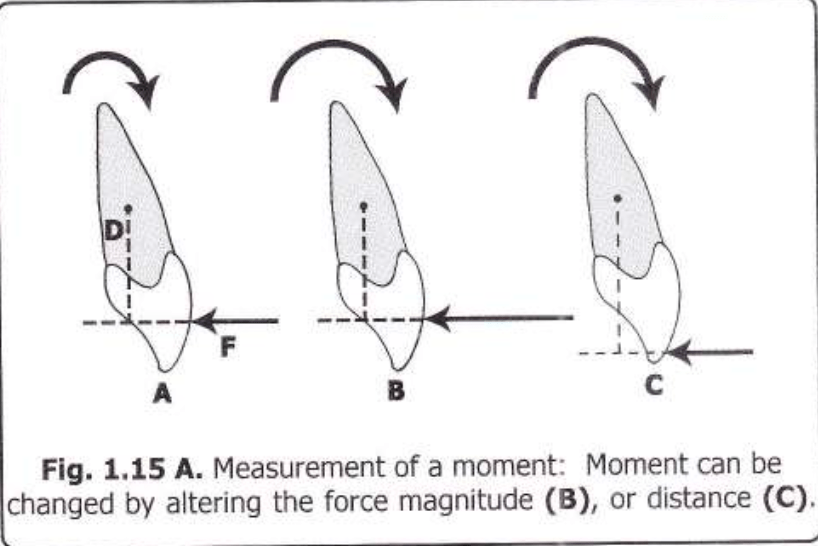
Imagine your patient’s tooth is a stubborn door. If you push close to the hinges (aka the Center of Resistance, C Res), the door barely spins but slides sideways (translational effect). Push far from the hinges? The door swings open dramatically (rotational effect).
Moment Formula: Moment (M) = Force (F) × Perpendicular Distance (d) Units: gm-mm (like saying, “I bench-press 1000 gm-mm of torque!” 💪).
Diagram Alert! Check out Fig 1.15—it’s the OG of “force vs. distance” drama.
2. Clockwise or Anti-Clockwise? Let’s Settle This!
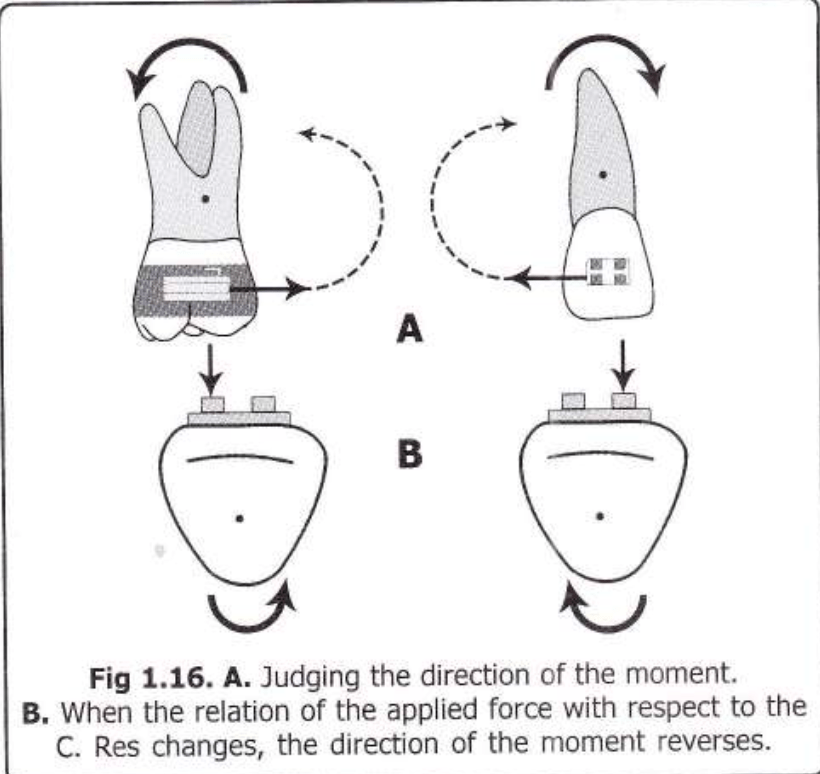
To predict the direction:
Follow the line of action of the force.
If it “wraps around” the C Res like a hug, you’ll see if it’s clockwise (👆) or anti-clockwise (👇).
Pro Tip: Flip the force’s direction or shift it to the other side of C Res, and the moment flips too! (Fig 1.16 demonstrates this ✨spicy✨ reversal).
3. Force Couples: The Pure Rotation Party!
Ever seen two kids spinning a merry-go-round? That’s a force couple—two equal, opposite forces not on the same line.
Example: Your ortho pliers applying a twist to a wire.
Math Magic: Total Moment = Force × Distance *between* the forces (No matter where you apply the couple—it’s a free vector, like that one friend who’s always down to party anywhere 🎉).
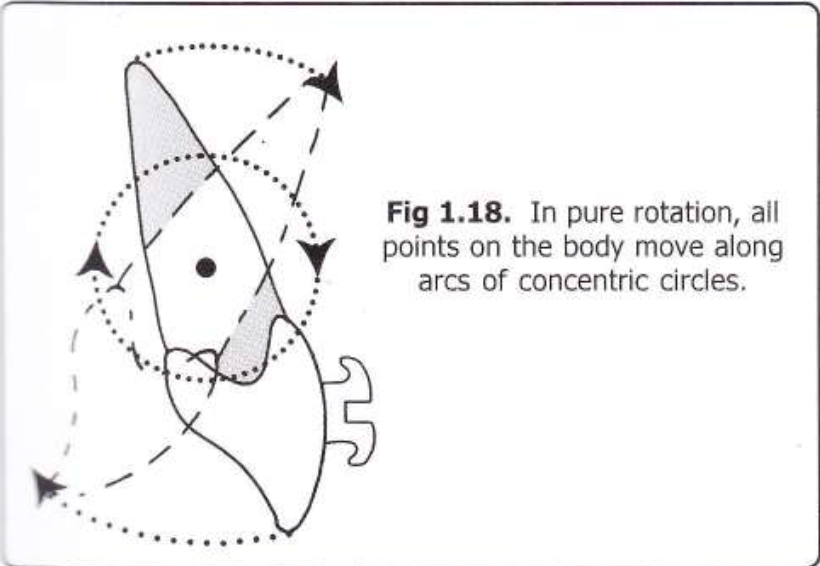
Diagram Time!Fig 1.17 shows a couple causing pure rotation (teeth spinning like a TikTok
trend).
Fig 1.18? Pure concentric circles—no translation, just vibes.
4. Real-Life Ortho Examples
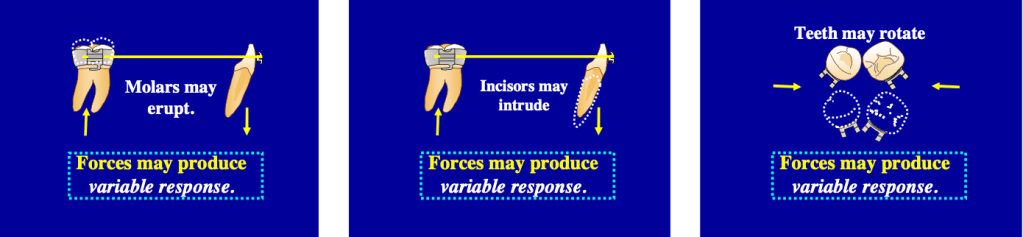
Single Force (Mf): If you push a bracket off-center, the tooth both tilts and moves (like trying to nudge a cat off the couch—it’ll squirm and hiss).
Couple (Mc): Use a closing loop in your archwire. The loop creates two forces, rotating the tooth without sliding it sideways—pure spin! Example: 100gm forces 10mm apart = 1000 gm-mm moment (💃 Cue the tooth tango!).
5. Why This Matters
Bracket Positioning: Closer to C Res = more translation (good for intruding/extruding).
Loops & Springs: Couples = pure rotation (perfect for derotating that snaggletooth).
Fun Fact: Couples are “free vectors”—apply them anywhere on the tooth, and the moment stays the same. It’s like gossip in dental school—it spreads everywhere but the effect is identical. 😜
Non-Parallel Forces: Frenemies fighting 😤. Example: One spring pushing up, another pulling down = tooth confusion 🤯.
Golden Rule: If forces don’t cancel out, anchorage saves the day (aka, anchor teeth = the gym buddy spotting you 🏋️♀️). No anchorage? Congrats, you just moved ALL the teeth… and maybe the patient’s face. 😱
Why Grams > Newtons 📏🍔
“Orthos don’t do rocket science… unless it’s molar rockets.”
Science: Force = mass × acceleration (F=ma). But teeth move slowly, so acceleration ≈ Netflix binge speed 🐌.
Ortho Hack: Ignore physics class. Use grams (mass) instead. 1 Newton ≈ 100g (or “the weight of a hamster” 🐹).
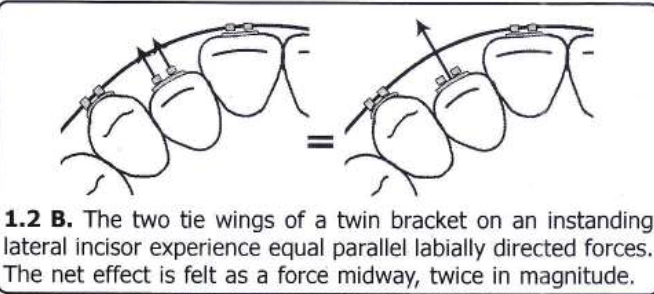
Parallel Forces: The “Double Trouble” Technique
“Two pushes > one push. Basic math.”
Scenario: Twin edgewise brackets on a tooth (like a twin-engine plane ✈️).
Science: Two equal, parallel forces in the same direction = combined force acting at the midpoint.
Example: Pushing a tooth labially from both tie wings = net force at the center (💥).
Why Care? Twin brackets = double the power without drama.
Force Couples: The Tooth Rotator 9000 🔄
“Push one side, pull the other. Chaos ensues.”
Force Couple: Two equal, parallel, but opposite forces (non-colinear).
Example: Rotating a tooth → one tie wing gets pushed, the other pulled (like twisting a jar lid 🍯).
Pro Tip: If forces are colinear (same line), they cancel out. Boring. Non-colinear = tooth spins like a Beyblade.
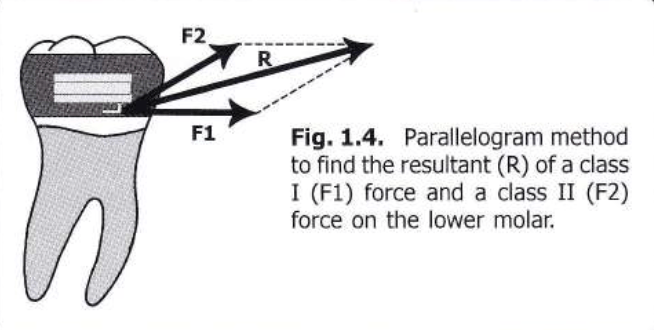
Non-Parallel Forces: The Parallelogram Party 📐🎉
“Forces going wild? Draw a parallelogram!”
Resultant Force: The diagonal of the parallelogram tells you where the tooth will move.
Example: Class I + Class II forces on a molar → diagonal = tooth’s escape route 🏃♂️.
Law of Transmissibility: Slide forces along their line of action to make them meet (like sliding DMs to your crush 💌).
Breaking Down Forces: The “What’s the Damage?” Move 🔍
“One force, two effects. Ortho magic!”
Resolving Forces: Split a single force into horizontal (retraction) and vertical (extrusion) components.
Example: Class II elastic → 70% retraction 😬, 30% extrusion 🦷.
Pro Hack: Use right angles for easy math (thanks, rectangles! 📏).
Multiple Forces: The Ortho Jenga Game 🧩
“Combine forces like a DJ mixes beats.”
Combine two forces → find the resultant.
Combine that resultant with the third force.
Repeat until you’ve tamed all forces.
Real Life: Headgear + distalizing spring = controlled chaos 🤯.
What’s the Big Deal with C.Res?
“It’s the GPS for moving teeth. Miss it, and you’re lost.”
C.Res = Tooth’s Boss: Imagine it’s the puppet master 🧙♂️ pulling strings. Where you apply force relative to C.Res decides if the tooth tips, intrudes, or does a cha-cha slide 💃.
Not the Center of Mass!
Center of Mass: For free bodies (like a tooth flying through space 🚀).
C.Res: For teeth stuck in bone (thanks, PDL! 🦴). Think of it as the tooth’s “democratic leader” swayed by bone, gums, and angry collagen fibers.
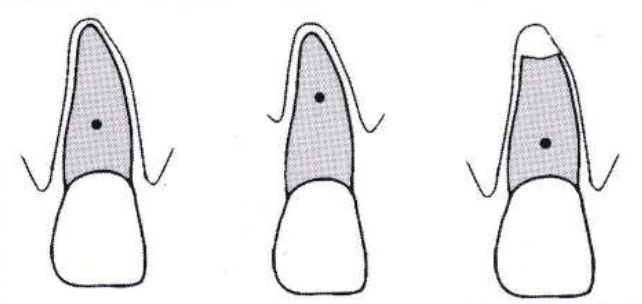
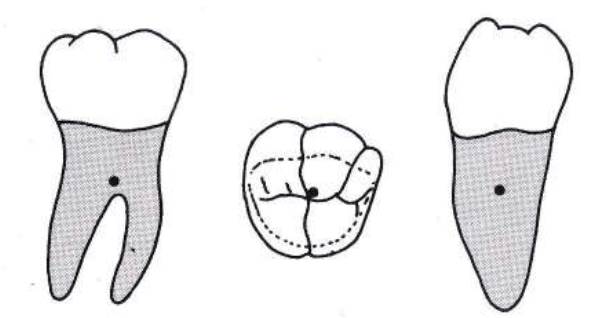
Where is C.Res Hiding? 🕵️♂️
Depends on the tooth’s roots and drama level:
Single-rooted teeth (incisors/canines):
Location: Between alveolar crest & root apex.
Debate Alert: Some say 50% root length 🎯, others 25-33%
Hey future tooth whisperers! 👋 Let’s talk about Class II malocclusions—the “overjet squad” that keeps orthodontists up at night. 😴💤 You know, those cases where the upper jaw’s like, “I’m the star of the show!” and the mandible’s just… crickets. 🦗 The big debate: Do we treat these kids early with growth mods, or wait and let fate (or braces + surgery) decide? Let’s dive into this UNC study that’s spilling the tea. ☕
The Drama Unfolds � Class II malocclusions aren’t just a “teeth problem”—most have skeletal beef (maxilla vs. mandible). The study asked: Can we actually tweak jaw growth with early treatment, or are we just moving teeth around? 🤔 And does it even matter if we start when they’re 8 vs. 16? 🧒➡️👩🔬
Spoiler: Past studies were kinda sus. 🚨 Small samples, no control groups, and retrospective data (aka “let’s cherry-pick success stories”). This study? They went full NASA—prospective design, control group, and actual stats. 📈✨
The Contenders 🥊 They tested TWO EARLY TREATMENT APPROACHES:
Headgear: The OG “let’s hold back that maxilla” move. (Bonus: Makes kids look like they’re prepping for a Back to the Future sequel. 🚗⚡)
Functional Appliances: The “fake it till you make it” approach (Herbst, Twin Block—anything to nudge the mandible forward). 🦾
VS. Control Group: The “wait-and-see” squad. (Basically, the kids who got to binge Netflix while others had headgear selfies. 📸😅)
The Big Questions ❓ Skeletal Change or Just Tooth Yoga? 🧘♀️ Are we actually changing jaw growth, or just tipping teeth?
Which Appliance Wins? 🏆 Headgear vs. Functional—who’s the MVP?
Is Early Treatment Worth It? Or should we just chill until all the adult teeth arrive? 🦷🎉
The Big Picture 📊 ANOVA says: “Most of these numbers matter… except when they don’t.”
Statistically Significant: ANB angle, mandibular length, overjet—all lit up like a Christmas tree 🎄 (p < 0.01).
Not So Much: Maxillary length, Pog-NP, incisor angulation… crickets 🦗. Translation: You can’t fix everything, folks.
Gender? Nope. 🚫👦👧 Boys and girls reacted the same. No “boys grow more” myths here—equality wins! 🙌
Treatment Groups: The Good, The Bad, The Ugly 😎
1. Headgear Crew 🎯 Mission: “Restrain the maxilla!”
But… 20% of these kids grew less than the control group. 🥴 Why you gotta be like that, mandible?
3. Control Group 🍿
Mission: “Exist and vibe.”
Results: ANB angle improved naturally in most kids (🪄 growth magic!). Overjet? 50% got worse, 50% got better. It’s a coin flip! 💰
Spicy Take 🌶️
Early treatment works… kinda. It’s like using a GPS to reroute growth—sometimes it takes the detour, sometimes it ignores you and hits traffic. 🚦🗺️
Should you do it?
Pros: Might dodge extractions/surgery later.
Cons: Growth’s a fickle beast. No guarantees.
Verdict: Treat early if you’ve got a super cooperative patient (and parent). Otherwise… pray? 🙏
Let’s unpack this spicy discussion section—where UNC researchers throw shade at past studies, question everything we thought we knew, and basically say: “Growth modification? Hold our coffee.” ☕
The US vs. Europe Smackdown 🌍 USA: Headgear Nation 🇺🇸 – “Let’s hold back that maxilla!”
Europe: Functional Appliance Fanatics 🇪🇺 – “Mandible, grow forward or else!” But does either actually work long-term? UNC says: “Kinda… but also… maybe not?” 🤷♂️
Why RCTs Are the GOAT 🐐 (And Why Ortho Hates Them) Randomized Clinical Trials (RCTs) = the gold standard for proving if treatments work. But ortho trials are like:
Ethical Drama: “Is it cool to randomize kids to headgear vs. no treatment?” 😬
Time Sucks: Tracking patients from age 8 to 18? Orthodontists age faster than their patients. ⌛👵
Growth’s Plot Twist: Even if early treatment works, will puberty undo it? 🌱➡️🌳
Key Quote: “Enthusiastic treatment reports have no controls. Well-controlled reports have no enthusiasm.”
Variability was WILD: Some kids’ jaws fixed themselves (control group flexing 💪). Others said, “Nope, I’m here to sabotage your data.” 😈
Small Effects: Mean changes were tiny vs. natural growth chaos. Statistically significant ≠ clinically life-changing. 📉
Phase 2 Mystery: Will these early changes last? Or will puberty hit like a dumpster fire? 🔥 UNC’s like: “Stay tuned for Season 2!” 🍿
Shade Alert: Why Past Studies Are Sus 🕶️ Retrospective Bias: Old studies only included “success stories” (headgear kids who didn’t yeet their appliances out the window). 🪟🚫
Publication Bias: Journals only publish “positive” results. Negative data? Straight to the shredder. 🗑️
Same Data, Multiple Papers: Researchers recycling their one good sample like it’s a TikTok trend. ♻️
Bottom Line: We’ve been overhyping growth modification because bad science told us to. 😒
The Big Questions Still Unanswered ❓ Does Early Treatment Even Matter? If you treat at 8 vs. 12, does it change the endgame? Or are we just giving kids extra years of headgear memes? 🤡
Cost vs. Benefit: Is 2+ years of early treatment worth avoiding maybe one extraction later? 💸
Growth’s Plot Armor: Can we ever beat natural growth variability? Or are we just along for the ride? 🎢
Ortho Student Takeaway 🎓 RCTs = Painful But Necessary. They’re the only way to avoid “bro science” in ortho. 🧪
Growth Modification ≠ Guaranteed. It’s a gentle nudge, not a cure. Manage expectations (yours and the parents’). 🙏
Control Groups Are Heroes. Without them, we’re all just guessing. Shoutout to the kids who raw-dogged their Class II. 🙌
Final Thought: Treating Class II is like herding cats. 🐱🐾 You can try, but sometimes the cats win. Stay humble, future orthodontists. 😂
👋 Hey there, fellow ortho warriors! Today, we’re diving into the mysterious world of Class II malocclusion—where the maxilla likes to boss around the mandible, and our job is to restore the balance of power! 🦷⚖️
Why Does Class II Happen? 🤔
Class II malocclusion isn’t just about an overgrown maxilla or a shy mandible. It’s a whole party of skeletal structure, growth patterns, and dentoalveolar development (McNamara, 1981). Think of it as a complex relationship—sometimes it’s the maxilla’s fault, sometimes the mandible’s, and sometimes they just don’t get along. 😅
Treatment to the Rescue! 🦸♂️
To tame this rebellious jaw situation, orthodontists use: 📌 Extraoral force (a.k.a. the famous headgear) to put the maxilla in its place. 📌 Functional appliances (activators, Frankels, etc.) to give the mandible a growth boost. 📌 A combo of both when we want to play it safe—like pairing Batman & Robin for maximum crime-fighting (Meach, 1966; Bass, 1982).
What Happens When We Use High-Pull Headgear + Activator?
This legendary duo doesn’t just sit there looking pretty. It: ✅ Restricts maxillary growth (no more forward expansion party! 🎉) ✅ Stops maxillary teeth from going mesial & vertical (so they stay where they belong) ✅ Encourages better posterior tooth and condylar remodeling (remodeling isn’t just for houses! 🏠) ✅ Improves muscle patterns (stronger jaws = better function 💪)
💡 Remember: High-pull headgear is like a strict teacher holding the maxilla back, while the activator is the personal trainer pushing the mandible forward. 💪🦷
The Soft Tissue Side of the Story! 😍
We focus a lot on bones, but let’s be real—patients care about their face in the mirror! 🤳 Soft tissue changes in Class II treatment can be unpredictable, but here’s the gist: ✔ Lip retrusion happens (Forsberg & Odenrick, 1981) ✔ Soft tissue pogonion moves forward (McDonagh et al., 2001) ✔ The profile can flatten out (Hansson et al., 1997, 2000)
When we use high-pull headgear + activators, the maxilla doesn’t just sit there—it gets pulled back like a stubborn kid being dragged away from a candy store. 🍬🚫
✅ Point A shifts backward 📍 −1.4 mm (N Perpendicular) 📍 −2.3 mm (OLp)
This means we’re seeing true orthopedic retraction—aka maxillary restraint in action! 🚀 Why does this matter? Because a Class II case with maxillary excess needs more than just dental changes—we need to slow down forward maxillary growth! 🏃♂️💨
Is This a Proven Effect? 📜
Oh, you bet! Studies have been backing this up for decades (Pfeiffer & Grobéty, 1982; Pancherz, 1984; Van Beek, 1984, and many more!).
🧐 Key evidence? 📌 SNA decreased in the treatment group (yay, retraction! 🎉) 📌 SNA increased in the control group (because they didn’t get the maxillary-taming treatment).
💡 Think of it like this: Without headgear, the maxilla keeps moving forward like a train with no brakes. 🚂💨 Add high-pull headgear? Boom—slowed down! 🛑
Mandibular Growth: Myth or Reality?
Mandibular Effects: The Great Debate! 🤨⚖️
Functional appliances like the Activator + High-Pull Headgear have been stirring debates for decades:
Camp 1: “Yes, Functional Therapy Grows the Mandible!” 📈
Camp 2: “Nope, It’s Just Natural Growth!” 📉
Demisch (1972) 🧑⚕️
Harvold & Vargervik (1971) 🧑⚕️
Owen (1981) 📚
Wieslander & Lagerström (1979) 📚
Luder (1982) 🔬
Jacobsson & Paulin (1990) 🔬
Toth & McNamara (1999) 🦷
Forsberg & Odenrick (1981) 🦷
🤯 So, who’s right? Our study says… both have a point!
What Happened in Our Study? 🧐📊
Mandibular Advancement Findings
Parameter
Treated Group (Activator + Headgear)
Control Group (No Treatment)
Significance
Mandibular advancement(mm)
~3 mm forward 🚀
Minimal change
✅
SNB increase (°)
+2.6° 📈
+0.4° 📉
✅ Significant
Mandibular length (Go–Me)
Increased significantly 🦷📏
Mild increase
✅ Significant
💡 What does this mean? ✔️ The mandible didn’t just sit back and relax—it advanced! ✔️ The SNB angle increased, meaning the lower jaw moved forward more than in untreated cases. ✔️ Mandibular length (Go-Me) increased significantly—suggesting real skeletal adaptation!
But WHY Did This Happen? 🔍
This isn’t just some mandibular magic trick—science explains it! 🧪✨
The condyle remodels and moves forward in the fossa.
This explains why the NSCo angle decreased & OLp-Co moved forward (Woodside et al., 1987; Ruf et al., 2001).
Basically, the TMJ adapts to the new jaw position! 🦷
💡 Think of it as shifting a chair forward—if the condyle moves, so does the whole mandible! 🪑➡️
Quick Mnemonic to Remember Mandibular Changes! 🧠
🦷 “SNB = See the New Bite!” (Because a Class II turns into a Class I as the jaw moves forward!)
🔹 Mandible advances (~3mm forward) 🔹 SNB increases (+2.6° 📈) 🔹 Go-Me increases (Mandibular growth 📏) 🔹 Condylar adaptation helps in Class II correction
Ortho Takeaway: What Should You Remember?
✅ Functional appliances help the mandible move forward, even if they don’t “grow” it like a plant. 🌱 ✅ SNB increases, Go-Me increases, and the glenoid fossa adapts. 🦷 ✅ The jaw doesn’t just grow—it adapts!It’s teamwork between remodeling & growth! 🛠️
🤔 What’s YOUR take? Do you think functional appliances really grow the mandible, or do they just help reposition it? Drop a comment below! 💬
What Happens to the Dentition?
Activator + headgear therapy isn’t just a bone game—it’s also a tooth tamer! 🦷🔧 Here’s the real MVP effect:
Parameter
Treated Group 📊
Control Group 💤
Maxillary Incisor Retroclination 🦷⬅️
🔽 5.3°
No sig. change
Overjet Reduction 😁
🔽 5.4 mm
No sig. change
Mandibular Incisor Proclination 🦷➡️
🔼 2.0°
No sig. change
Overbite Decrease 📉
🔽 2.2 mm
No sig. change
💡 Big takeaway? 👉 Overjet correction is a team effort—maxilla moves back, mandible moves forward, and incisors get into formation! 🎯
Upper Incisors: Pulling Back Like a Retreating Army 🚶♂️⬅️
📌 Activator + headgear retroclined the upper incisors by 5.3° 📌 Overjet reduced by 5.4 mm (thanks to a combo of skeletal & dental effects!) 📌 Even though the incisors were capped, lingual movement still happened! 🦷✨
🧐 Think of it like this: The upper incisors are stubborn party crashers who get forcibly escorted out by the headgear. 🚔👮♂️
Lower Incisors: The Sneaky Forward Movers 😏
📌 Mandibular incisors proclined by 2° despite being capped! 📌 Studies show this is unavoidable in functional therapy (Ahlgren & Laurin, 1976; Pancherz, 1984)
📌 Overbite reduced by 2.2 mm in the treated group! 📌 Why? More vertical face height = less deep bite! 📌 Studies agree! (Ahlgren & Laurin, 1976; Pancherz, 1984; Nelson et al., 1993)
🦷 Deep bite patients be like: “Wait, where did my overbite go?!” 😱
Ortho Takeaways 📝
✔️ Overjet correction = upper incisors move back + mandible moves forward ✔️ Upper incisors retrocline significantly (5.3°) ✔️ Lower incisors procline slightly (2°), despite capping ✔️ Overbite decreases by 2.2 mm = more open bite tendency
💬 What’s the most interesting dentoalveolar change you’ve noticed in your cases? Let’s discuss in the comment section! 🤓👇
Vertical Growth: The Mandibular Elevator Effect! 🚀⬆️
When we use an Activator + High-Pull Headgear, the mandible tends to grow vertically, thanks to a backward rotation effect. 📐 But why? Let’s see what the research says! 👀
Who Said What? 📚
Findings on Vertical Growth 📈
Williams & Melsen (1982) 🧑⚕️📖
Mandible grows more vertically due to backward rotation
Ruf et al. (2001) 🔬
Backward rotation leads to increased face height
Cozza et al. (2004a,b) 📊
Controlling vertical dimension is key for optimal forward jaw correction
What Did Our Study Find? 🔍📊
Parameter
Treated Group (Activator + Headgear)
Control Group (No Treatment)
Significance
Face height in molar region
Increased 📈
No change
✅ Significant
SN–PP Angle
Slight increase 🔄
No change
❌ Not significant
FH–OL Angle
Slight increase 🔄
No change
❌ Not significant
FMA Angle (Mandibular plane angle)
No major change 🤷♂️
No change
❌ Not significant
Overbite Correction
Significant ✂️
Stable (No correction)
✅ Significant
🤔 What does this mean? ✔️ Mandibular vertical growth happens, but rotation balance is key! ⚖️ ✔️ Face height increased, but overall vertical relationship remained stable. ✔️ Overbite correction was significant—thank you, double capping! 🙌
Why Does This Matter? 🤔
🔹 Overbite & Vertical Growth = Besties? 🦷💕
Overbite correction was significant because the incisors were passively prevented from erupting (thanks to double capping), allowing molars to erupt instead.
This controlled vertical development, preventing unwanted open bites.
🔹 Watch Out for Backward Rotation! ⏪
If the face height increases too much, the mandible rotates backward, worsening Class II instead of fixing it. 😵
Moral of the story: Control vertical growth, or you’ll have a long face. Literally. 😆
🔹 FMA = Flat Mandibular Angle = No significant change 🔹 Overbite correction was significant (Double capping = good prognosis!) 🔹 Vertical Growth needs control, or pogonion moves BACK! 😵
Ortho Takeaway: What Should You Remember?
✅ Mandible grows more vertically with activator therapy, but watch for backward rotation. ✅ Overbite correction was significant thanks to molar eruption. ✅ FMA remained stable, showing that vertical control was maintained. ✅ Class II correction isn’t just about moving forward—it’s about balancing vertical growth too!
Facial Profile: What Changed? 🧐
When we talk about Class II treatment, we often focus on bones and teeth—but what about the soft tissue? 🤔 Your patients don’t walk around showing off their cephs, right? It’s the face they care about! 😆
Here’s what happened when we used an Activator + Headgear Combo:
Increased (Chin moved forward, fold depth reduced)
Slight increase
✅ Significant
Sls–x-axis distance (Soft tissue sulcus) 📏
Increased (More balanced sulcus)
Slight increase
✅ Significant
Horizontal soft tissue menton (Me′–x-axis) 🧔
Increased (Chin grew forward!)
Slight decrease
✅ Significant
Labiomental fold depth (Mlf–E line distance) ✂️
Decreased (Less deep fold = smoother profile)
Slight increase (Got worse)
✅ Significant
What Does This Mean? 🤓
✔️ Chin & pogonion moved forward → Say goodbye to recessive chins! 👋 ✔️ Labiomental fold became shallower → No more deep, exaggerated folds! 🔄 ✔️ Upper lip projection slightly increased → But without making patients look “duck-lipped” 🦆😂 ✔️ Soft tissue sulcus balance improved → A more harmonious lower face
🟢 High-pull headgear = Restrains maxilla → So it doesn’t grow too far forward 🟢 Activator = Encourages mandibular forward growth → Bye-bye, retrognathic chin! 🟢 Labiomental fold = Naturally flattens as the chin moves forward
Think of it as sculpting a masterpiece 🖌️—you’re not just fixing teeth; you’re enhancing the whole face! 😎
Mnemonic to Remember: “CHIN UP!” ✨
💡 C = Convexity Angle Increases (Balanced profile) 💡 H = Horizontal Menton Growth (Chin moves forward) 💡 I = Improved Sulcus Balance 💡 N = No More Deep Labiomental Fold 💡 U = Upper Lip Projection Slightly Increased 💡 P = Pogonion Moves Forward
So next time you see a Class II patient, tell them: “Don’t worry—after treatment, you’ll have a ‘CHIN UP’ moment!” 😆
Final Ortho Takeaway 📌
✅ Functional appliances + headgear improve soft tissue harmony 🏆 ✅ Patients get better chin projection & smoother profiles 💁♀️ ✅ The labiomental fold decreases, so no more harsh chin lines 🚫⏳ ✅ This treatment doesn’t just fix bones—it enhances faces! 🤩
💬 What’s your favorite soft tissue change in ortho treatment? Drop a comment below! 🗣️👇
Class II malocclusion—our beloved troublemaker—comes from either a mandibular deficiency (most common culprit 😬), maxillary excess, or both. And let’s be honest, more often than not, it’s that shy little mandible sitting too far back (McNamara, 1981; McNamara & Ellis, 1988).
So, what do we do? We call in our orthopedic reinforcements! 🎺
Functional jaw orthopedic appliances promise to encourage adaptive skeletal growth by keeping the mandible in a more forward position (a little push in the right direction, you know? 😉). One of the OGs in this game is the Activator(thanks, Andresen!), a widely used functional appliance.
But what if the patient is all ‘vertical overkill’ with excessive lower face height? 🤯
Enter the Activator + High-Pull Headgear Combo!
This tag-team effort helps to: ✔️ Control vertical growth (because we don’t need any more of that! 🚫📏) ✔️ Provide more cumulative skeletal changes than just the activator alone (Teuscher, 1978; Pfeiffer & Grobéty, 1982)
But Does It Actually Work? Or Are We Just Fooling Ourselves? 🤔
That’s where the real debate kicks in. While we know the dentoalveolar effects are solid (Jakobsson, 1967; Pancherz, 1984; Basciftci et al., 2003), the true orthopedic impact remains controversial (Calvert, 1982; Tulloch et al., 1990).
Many studies have compared: 📌 Activator vs. Activator + Headgear (Gögen & Parlar, 1989; Cura et al., 1996) 📌 Both vs. Untreated Class II Kids (very few studies actually do this! 😵)
So, What’s the Plan?
This study sets out to answer the million-dollar questions: 1️⃣ Does the activator (with or without headgear) actually promote mandibular growth? 2️⃣ Is one appliance better than the other? 3️⃣ Are the observed changes due to treatment… or just good ol’ natural growth?
📌 Materials & Methods (A.K.A. How We Did the Magic!)
Category
Details
Subjects 🧑⚕️
49 Skeletal Class II Division 1 patients
Time Period ⏳
Treated between 2001-2003 at Süleyman Demirel University
Inclusion Criteria ✅
No prior ortho treatment, cooperative, treated with either activator or activator-headgear combo, no fixed appliances
Exclusion Criteria ❌
One patient was excluded due to “uncooperative behavior” (aka, rebel without a retainer! 😅)
Study Groups 👥
– Activator Group: 33 patients (13 females, 20 males) treated with Andresen Activator – Activator + Headgear Group: 16 patients (7 females, 9 males) treated with both appliances – Control Group: 20 patients (9 females, 11 males) who rejected treatment (yes, we tracked them down! 🕵️♂️)
Cephalometric Analysis 📏
Standardized lateral cephalograms taken before (T0) & after (T1) treatment
Ceph Analysis Software 💻
Vistadent™ AT (GAC International, New York, USA)
Measurement Reliability 🔬
All measurements repeated 2 weeks later; error rate ≤ 0.994 for all parameters (that’s some solid consistency! 💯)
Statistics 📊
– Paired t-test: Checked treatment effects within groups – ANOVA & Tukey Test: Compared changes between groups – SPSS 11.0.0 was our stats weapon of choice! 🔢
🛠️ Appliance Breakdown: What Were These Kids Wearing?
– Mandible positioned edge-to-edge in bite registration – 5-7 mm interocclusal space increase – Used in two-step activation for large overjets
Activator + High-Pull Headgear 🦸♂️
– Same activator as above but with headgear tubes in premolar area – High-pull force (~300-400 g per side) 🎯
– Controlled vertical growth (because we don’t want them growing UP instead of FORWARD! 😆) – Worn 16+ hours per day for best results
🤨 But What About the Control Group?
These were 20 patients who refused treatment (seriously, why? 😵). They were observed over the same period as the treated groups to see how much of Class II correction was due to natural growth vs. actual treatment effects.
The Class II Showdown: Activator vs. Activator + Headgear – Who Wins? 🦷🥊
Alright, ortho warriors! We’ve set the stage, picked our players, and now it’s time to see the results. Which appliance reigned supreme in the battle of mandibular advancement, incisor control, and overjet reduction? 🤔
Let’s break it down—but with zero headache and maximum clarity (plus a few laughs)! 😆
📌 Results in a Nutshell: Who Changed the Most?
Key takeaways before we dive into numbers: 🔹 Both appliances worked well in correcting Class II malocclusion. 🔹 The control group? Well… they mostly just grew naturally. 🥱 🔹 Mandibular growth happened in both treatment groups, but HOW it happened differed!
👀 Intragroup Changes (Within Each Group!)
Parameter
Activator Group 🏆
Activator + Headgear 💪🎯
Control Group 🤷♂️
SNA (Maxilla position) 📐
No significant change
Decreased significantly 😏
No significant change
SNB (Mandible position)📏
Increased 🎉
Increased 🎉
Slight increase (not significant)
ANB (Class II severity)❌
Reduced → meaning less Class II!
Reduced → same result!
Minimal reduction (not significant)
Mandibular Length (Co-Gn) 📏
Increased significantly
Increased significantly
Increased (but less than the treated groups)
Ramus Height (Co-Go)📈
Increased significantly
Increased even more! 🚀
Slight increase
Upper Incisor Retraction🦷⬅️
Yes
More than activator group!
Minimal
Lower Incisor Advancement 🦷➡️
Greater than headgear group!
Yes (but less than activator group)
Minimal
Overjet Reduction 🔄
Significant decrease ✅
Significant decrease ✅
Not much change…
Mandibular Rotation 🔄
Some opening rotation
More opening rotation of occlusal plane
Anterior rotation of dentition
Occlusal Plane Angle 📐
Increased
Increased even more!
Decreased 🤯
AFH (Anterior Face Height) 📏
Increased
Increased
Increased (but significantly less)
Mandibular Plane Angle📐
Increased
Increased
Minimal change
Lower Lip Position 👄
Advanced
More advanced than activator alone!
Minimal change
🧐 Intergroup Comparisons (Between Groups!)
What’s the Difference?
Activator 🏆
Activator + Headgear 💪🎯
Control Group 🤷♂️
Mandibular Growth
✅ Significant
✅ Significant
⏳ Natural growth (but less)
Overjet Reduction
✅ More than controls
✅ More than controls
😐 Minimal
Incisor Changes
More lower incisor advancement
More upper incisor retraction
😴 Minimal
Occlusal Plane Angle
🔼 Increased
🔼 Increased even more!
🔽 Decreased!
Face Height (AFH)
🔼 Increased
🔼 Increased
💤 Less change
Ramus Height Increase
🤷♂️ Not significant
✅ Significant increase
💤 Minimal change
Lower Lip Advancement
✅ Significant
✅ Even more significant!
🥱 Meh…
EFFECTS ON MAXILLA
The activator and activator headgear are both warriors in the battle against Class II malocclusion. But do they really push the maxilla back, or are we just dreaming? Studies say… it’s complicated. Some claim that neither does much (😢), while others insist that the activator headgear combo works like a headgear-in-disguise. 🦸
What Does Science Say? 🧐
Feature 🏷️
Activator 🤹♂️
Activator + Headgear 🎭
Does it push the maxilla back?
Maybe, but not dramatically. 🤷♂️ Some studies (Chang, Courtney, Cura, Ruf, Basciftci) say there’s little to no orthopedic effect.
Yes, but don’t expect miracles! 🌟 The headgear-like effect is real (Jakobsson, Pancherz, Vargervik & Harvold), but not game-changing.
How much force does it generate?
About 100 g (softer push). 🎈
Orthopedic-level force (stronger push). 💪
Sagittal restriction of maxillary displacement?
Limited effect. 🚦
More restriction than activator alone, but the difference is not statistically significant. 📉
Effect on SNA angle?
Slight reduction. 📏
Greater reduction than activator alone, but the difference is clinically insignificant. 🤏
Long-term potential?
Needs more research! 🧐
Could be more effective with a longer treatment duration. ⏳
So, Who’s the Winner? 🏆
It’s a draw. 😬 While the activator alone doesn’t do much to hold back the maxilla, adding headgear helps a little—but don’t expect a total transformation. If your goal is maxillary restriction, traditional headgear might be a better bet.Final Takeaway: If activator treatment had a slogan, it would be:“I try my best, but don’t expect magic!” 🎩✨For now, if you’re treating a growing Class II patient, use the activator headgear combo if you want a slight maxillary restriction. Just don’t forget compliance—because headgear works only when patients actually wear it! 😅
EFFECTS ON MANDIBLE
The activator has been hailed as a growth stimulator, but the science is… well, mixed. Some studies claim it increases mandibular length in the short term 🏃♂️, but long-term results are still debated. Others argue that no clinically significant growth occurs. 😬
What Does Science Say? 🔬
Feature 🏷️
Activator 🤹♂️
Activator + Headgear 🎭
Short-term mandibular length increase?
Yes! 📏 Studies show 2–4 mm per year growth (Harvold, Webster, Ruf, Basciftci).
Yes, same effect as activator alone. 🚀
Long-term mandibular growth?
🧐 Still not confirmed. Tulloch et al. (1998) say long-term benefits are questionable. 🤷♂️
Same as activator alone—no extra long-term boost. 🤔
Does it work better than natural growth?
Growth was statistically significant compared to control groups. ✅
Also statistically significant, but no extra magic compared to activator alone. 📊
Activator does increase mandibular length in the short term. 📈
Activator with headgear does the same thing—but not better than activator alone.
The long-term effects remain debatable, and natural growth might be doing a lot of the work! 🤯
Final Takeaway: “Yes, the activator helps—at least for a while. But don’t expect it to turn a retrognathic mandible into a jawline fit for Hollywood.” 🎬😂
Cura et al. (1996) found that activator alone was less effective than activator + headgear. 😯
Some studies suggest slightly better ANB reduction than activator alone, but…
Is headgear superior?
NO! 🛑 Gögen & Öztürk (1994) found no significant difference in ANB reduction between both. 🤷♂️
No clear superiority—headgear doesn’t make a huge difference. 😅
Compared to untreated Class II cases?
Definitely improves the sagittal relationship! 📏
Also improves it, but not significantly more than activator alone.
Both treatments reduce ANB and improve maxillo-mandibular relationships. ✅
Activator + headgear may offer a slight advantage in some cases (Cura et al., 1996). 🤏
BUT! No clear evidence proves headgear is significantly better than activator alone. 🤷♂️
Effects on the dentoalveolar structures
What Happens to the Upper Incisors? 🦷🔄
Effect 🏷️
Activator 🤹♂️
Activator + Headgear 🎭
Upper Incisors (U1) Retroclination?
Yes! Retracted significantly 📉
Retracted even more due to headgear force ⏪
Why?
Just the activator working its magic 🎩✨
Extra posterior force from headgear = more retraction 🚀
🔹 Conclusion? 👉 Headgear makes the upper incisors even more retroclined than activator alone! 😯
What Happens to the Lower Incisors? 🦷🔼
Effect 🏷️
Activator 🤹♂️
Activator + Headgear 🎭
Lower Incisors (L1) Proclination?
More protruded 😬📈
Better controlled! Less protrusion ✅
Why?
Activator causes forward movement of mandibular teeth. 🚀
Headgear keeps things in check, reducing unwanted proclination. 🛑
🔹 Conclusion? 👉 If the patient already has protrusive lower incisors, headgear is the better bet! 🎯
What Happens to Tooth Eruption? 🌱🦷
Teeth 🦷
Effect
Mandibular posterior + Maxillary anterior
Encouraged to erupt! 🌱📈
Maxillary posterior + Mandibular anterior
Eruption is inhibited! ❌📉
🔹 Why does this matter? 👉 This eruption pattern causes occlusal plane rotation, which helps correct Class II relationships! 🎯
Occlusal Plane Rotation: Activator vs. Headgear 🔄📏
Effect 🏷️
Activator 🤹♂️
Activator + Headgear 🎭
Occlusal Plane Rotation?
Clockwise rotation 🔄
Even more clockwise rotation! 🔄🔄
Why?
Mandibular posteriors erupt more than maxillary posteriors 📊
Extra posterior intrusive forces from headgear ⏬ make it rotate more!
🔹 Conclusion? 👉 Both activator and activator + headgear cause clockwise occlusal plane rotation (a good thing for Class II correction!). But headgear increases the effect slightly.
What’s the Best Choice? 🤔
If you need more U1 retraction, go for activator + headgear.
If the lower incisors are already too proclined, activator alone might push them even more! Consider headgear.
Both appliances help Class II correction by altering eruption patterns & occlusal plane rotation.
👉 Moral of the story?Headgear might not be the most fashionable choice, but it gets the job done! 😂
Effects on the vertical dimension
Who Gets a Taller Face? 🤔🦷
Effect 🏷️
Activator 🤹♂️
Activator + Headgear 🎭
Increases Anterior Face Height (AFH)?
Yes! 📈
Yes! But slightly less than activator alone 📉
Increases Posterior Face Height (PFH)?
Yes! 📈
Yes! Similar effect to activator alone 📊
Why?
Encourages mandibular growth and posterior tooth eruption 🌱
🔹 Conclusion? 👉 Activator + headgear wins for soft tissue improvement! 🏆 👉 Want a stronger profile transformation? Headgear does the trick! 🎩
What Does This Mean Clinically? 🏥
If a patient has a very convex profile, activator headgear can help flatten it out by retruding the lower lip.
If a patient needs a milder correction, the activator alone might be enough.
🔹 Moral of the story? 👉 Activator headgear gives a more noticeable soft tissue change, while activator alone keeps things more subtle.🤓
Table of Orthodontic Glory 📊
Category🏆
Activator 🎭
Activator Headgear 🎯
Key Takeaway 🤓
Maxillary Effects 🏛️
Minimal orthopedic effect. Some studies say it works, others say “meh.” 🤷♂️
Slight headgear-like restriction, but not that different from activator alone. 🤏
Maxillary control is stronger with headgear, but the difference isn’t clinically game-changing.
Mandibular Growth 📈
Can increase mandibular length by ~3mm per treatment period. 📏
Same effect as activator. No magic wand here! 🎩✨
Both work, but long-term extra growth is still debatable.
ANB Angle Reduction🔄
Both improve maxillo-mandibular relation. 👏
Same ANB improvement as activator. 🧐
Both appliances improve Class II, but one isn’t superior.
Upper Incisor Position 😬
Retrudes maxillary incisors more than activator headgear. 🚀
Still retrudes, but slightly less than activator alone. ⚖️
Activator is a better upper incisor retractor!
Lower Incisor Position 😁
More proclination of lower incisors. 😲
Better control over lower incisor position. ✅
Headgear wins in controlling lower incisor flaring.
Occlusal Plane 🛤️
Causes clockwise rotation. ⏳
Even more clockwise rotation due to posterior intrusive forces. 🚀
Both rotate occlusal plane, headgear does it more.
Vertical Growth 📏
Increases anterior and posterior face height slightly more. 📈
Increases AFH & PFH but no big difference from activator. 🤏
Both equally increase face height.
Soft Tissue Profile 🧑🎨
Lower lip may protrude slightly. 👄
More lower lip protrusion than activator alone. 😘
Headgear impacts lower lip position more!
Memory Trick! 🧠💡
Think of Activator as your “Basic Gym Workout” 💪 and Activator Headgear as “Personal Trainer + Gym” 🏋️♀️💼. One is more controlled, but both make gains! 🎯🏆
Now, go forth and impress your profs, juniors, and clinic mentors with this knowledge! 🤓🔥 Happy studying! 🦷🎉
Picture this: You’ve got a patient with teeny-tiny lateral incisors that look like they skipped the memo on proportional growth. Or, on the flip side, some chonky premolars that are hogging all the real estate. What do we do? Simple—adjust the mesiodistal width!
✔ For Small Teeth – We create extra space to allow for bonding, veneers, or crowns to bring them up to size. Because no one likes an awkward gap-toothed smile (unless it’s intentional, looking at you, Madonna 😏).
✔ For Large Teeth – Approximal enamel reduction (IPR) helps make room. Think of it as giving teeth a little diet plan—just a millimeter here and there to slim them down.
🚀 Extractions: More Than Just Pulling Teeth!
Ah, extractions—the ortho version of the “big reset.” But don’t be fooled—yanking a tooth doesn’t mean we magically get all that space for crowding. Posterior teeth love to creep forward like uninvited guests at a party. 😩
So, how much space do we actually get? It depends on:
🦷 Which teeth are extracted – First premolars? Second premolars? Each has a different impact.
🦷 Which arch is involved – Because upper and lower play by different rules.
🦷 Whether second molars are banded – If they are, things get trickier!
🦷 Where the crowding is – Front? Back? Everywhere? 😵💫
🦷 Canine retraction – More crowding = more canine movement needed.
🦷 Angulation of extraction space – Are we working with nicely upright teeth or rebellious ones tilting all over the place?
📖 The Research Dilemma: Why Can’t We Just Google the Answer?
Frustratingly, literature isn’t super helpful here. Most space studies were done eons ago when clinical decisions were based on vibes rather than solid science. Plus, every case is different—5mm of crowding in one patient doesn’t always mean the same thing in another.
How Much Space Do We Get from Extractions?
📌 First premolar extractions: 40-65% of space helps relieve anterior crowding (without anchorage reinforcement). 📌 Second premolar extractions: Only 25-50% of space benefits the front. 📌 Upper arch ≠ Lower arch! Upper molars tend to move forward more, reducing net space.
Anchorage: Because Space Disappears Fast! 🏗️🚧
We use different anchorage devices to prevent teeth from shifting where we don’t want them to:
🚫 Lingual Arches – Good for holding space, but weak for active anchorage. ✅ Nance Buttons – Can help early on, but must be removed before full retraction. ❌ Jones Jigs & Pendulum Appliances – As much mesial premolar movement as distal molar movement. Not great. 🙃 👑 Headgear (Classic, but Gold Standard) – Best for reinforcing anchorage! 🎯 🚀 Mini-Implants & Onplants – The future of ortho anchorage! 💡🔩
Missing Teeth: To Open or Not to Open? ❌
When a tooth is missing, you’ve got two choices: ✅ Close the space by shifting teeth together. ✅ Keep the space open for a prosthetic replacement.
💡 Example: If a lateral incisor is missing, you need 6-7 mm of space for a prosthetic replacement (implant, bridge, or RPD). It’s the same logic as building up small teeth—we make space where needed for ideal esthetics and function.
⚠️ Watch out for Bolton Discrepancies! If you close space but end up with mismatched tooth sizes between upper and lower arches, occlusion might go crazy! 😵💫
Molar Movement: The Great Migration 🚛🦷
Molars don’t like to stay put. They move forward, backward, and sometimes just ruin your anchorage plans. 😤
So, what controls molar movement? Let’s break it down:
🛑 To move molars back (distalization): ➡️ Distalizing Headgear – Old school but effective. (If patients actually wear it! 😅) ➡️ Pendulum Appliance / TADs – More modern, less compliance-dependent. ➡️ Intermaxillary Elastics – Helps, but watch out for anchorage loss. ➡️ Orthognathic Surgery – Extreme cases only!
🚀 To move molars forward (mesialization): ➡️ Protraction Headgear – Pulls upper molars forward. ➡️ Intra-arch Traction – Springs, elastics, or coil springs to bring molars forward. ➡️ Functional Appliances – Great in growing patients with Class II patterns. ➡️ Natural Growth – Works best in growing kids, but unpredictable.
Why Does This Matter for Space Planning?
💡 Molar movement = Space gained or lost! If you don’t account for molar migration, your whole space plan can backfire.
📌 Example: If you extract first premolars to fix crowding but lose anchorage, molars might slide forward too much, leaving little space for retraction. Congrats, you just lost the space you worked so hard to get! 😬
Molar movement should always be planned with: ✅ Anchorage control (Headgear, TADs, Nance, etc.) ✅ Interarch considerations (Class II, Class III adjustments) ✅ Final occlusion goals (Are we aiming for Class I?)
Differential Maxillary/Mandibular Growth
Growth Patterns: Who’s Growing Faster? 📏
When planning space, you need to predict growth, especially in: 🔹 Class II cases (Mandible may “catch up”) 🔹 Class III cases (Mandible keeps moving forward 😨)
👉 Most patients in permanent dentition don’t have major A-P growth changes. But in boys with Class II or Class III patterns, things get interesting!
2️⃣ Class II Growth: The “Catch-Up” Effect 🔄
For some Class II cases, the mandible grows forward during the mid-to-late teens, reducing the overjet. Sounds great, right? Well, here’s the paradox in space planning:
🦷 Mandibular growth = Less space needed in the upper arch! ✅ If a patient has favorable mandibular growth, you can reduce upper arch space requirements by about +2 mm (1 mm per side).
💡 Space planning tip: Consider leaving slightly extra space in the upper arch in growing Class II cases since overjet may self-correct.
3️⃣ Class III Growth: The Space Nightmare 😱
Bad news: Class III cases usually get worse with growth. 😭 📉 Mandibular growth increases lower arch space requirements, leading to even more crowding in the lower arch!
🦷 How much extra space? 🔹 Plan for –2 mm to –4 mm of extra lower arch space to accommodate future incisor compensation.
💡 Space planning tip: If a Class III patient is still growing, be cautious—things might get worse, and surgery might be needed later. 🚑
4️⃣ The Final Space Equation: Must = 0! 🏁
After accounting for: ✅ Extractions 🦷❌ ✅ Tooth reduction/enlargement ✂️ ✅ Molar movement 🔄 ✅ Growth effects 📏
Your final space must return to ZERO! 🎯 If you have extra space left or still need more, it means: ❌ The treatment plan might need adjustments. ❌ Your mechanics aren’t aligned with your goals. ❌ Growth predictions were incorrect. (Oops! 😬)
Case Report: Space Planning in Class II Div 2♟️🦷
Ever felt like orthodontic space planning is a game of chess? Well, in this Royal London Space Planning case, every move counted! Let’s break it down step by step.
📌 Patient Details
👦 Age: 11 years 🔹 Malocclusion: Class II Division 2 🔹 Crowding: 5 mm (lower), 6 mm (upper) 🔹 AP Relationship: Between Class I and half-unit Class II
🔍 Main Treatment Goals: ✔️ Correct Class II malocclusion ✔️ Align both arches without extractions ✔️ Maintain anchorage (because Class II cases are sneaky!) ✔️ Create space for intrusion and torque of upper incisors
🛠️ Space Planning Breakdown (Step-by-Step)
1️⃣ How Much Space Was Needed? 📏
📌 Crowding: 🔹 Lower arch: 5 mm 🔹 Upper arch: 6 mm
📌 Leveling of Curve of Spee: 🔹 Lower: 1 mm 🔹 Upper: 2 mm
📌 Buccal Segment Correction: 🔹 Needed 2 mm of arch width expansion → This generated 1 mm of space in the upper arch
📌 Advancing the Incisors: 🔹 Lower incisors advanced by 3 mm = 6 mm of space gained 🔹 Upper incisors advanced by 3 mm = 6 mm of space gained
📌 Palatal Root Torque of Upper Incisors: 🔹 Required –3 mm space
📌 Mandibular Growth Catch-Up (Bonus Space!) 🔹 +2 mm per side = +4 mm of “free” upper arch space 🎉
👉 Final Space Calculation: ✅ Lower arch net space = 0 (meaning no extractions were needed) ❌ Upper arch had a 4 mm space deficit
2️⃣ The Key Problem: Anchorage! ⚓
Would Class II elastics or a functional appliance work? 🚫 Nope! ❌ They would cause lower molars to drift mesially, leading to a -4 mm deficit in the lower arch. ✅ Instead, headgear was chosen to retract upper molars and maintain anchorage.
3️⃣ The Treatment Plan
✔️ Phase 1: Upper removable appliance with an anterior bite plane 🔹 Purpose? → To level the lower occlusal curvewithout losing anchorage.
✔️ Phase 2: Headgear worn for 18 months (to hold upper molars back)
✔️ Phase 3: 🔹 Lower Preadjusted Edgewise appliance after 4 months 🔹 Upper Preadjusted Edgewise appliance after 9 months
🕰️ Total Treatment Time: 22 months
4️⃣ Results (Checkmate! ♟️😃)
📌 What was achieved? ✅ Class II Div 2 corrected ✅ Proper torque of upper incisors ✅ Lower incisors moved forward into space of over-erupted upper incisors ✅ Anchorage preserved—no lower space loss!
📸 Final Smile: Picture-perfect 😁
5️⃣ Lessons for Ortho Students 🎓
💡 Lesson #1: Space planning isn’t just about crowding—it’s about anchorage control too! ⚓ 💡 Lesson #2:Class II elastics or functionals aren’t always the answer. They could cause unwanted lower molar movement. 🚫 💡 Lesson #3: Growth can be your ally or your enemy. Use it wisely! 📈 💡 Lesson #4:Think ahead! The final space should always be ZERO—otherwise, your mechanics need a rethink.
Welcome, ortho warriors! 🎭 Today, we’re diving into the world of space analysis—a topic as old as orthodontics itself but still as relevant as ever. If you’ve ever struggled to fit all 32 teeth into a jaw that seems to have space for only 28, you’ll understand why this is such a big deal!
Space analysis is nothing new. For years, orthodontists have tried to predict and manage space within the arch. Some key contributions include:
1️⃣ Predicting the size of unerupted canines and premolars (a.k.a. fortune-telling for teeth 🔮) 2️⃣ Assessing space required to flatten an occlusal curve (because we love smooth arches, not rollercoasters 🎢)
And then came some of the big names in space analysis:
Merrifield’s Total Dentition Space Analysis 🎯
Divides the dental arch into anterior, midarch, and posterior areas
Uses Tweed’s diagnostic triangle to assess space deficits or surpluses
Even suggests extraction patterns based on findings! (Because sometimes, it’s off with their heads! 🦷⚔️)
Merrifield et al’s Cranial Facial Dental Analysis 🏗️
Built upon the Total Dentition Space Analysis
Incorporated Cranial Facial Analysis
Assigned a difficulty score for Class II cases (because ortho isn’t already stressful enough 🤯)
Royal London Space Planning (1985) 🇬🇧👑
Developed at Royal London Hospital
Based on Andrews’ Six Keys to Normal Occlusion 🔑🔑🔑🔑🔑🔑
Helps quantify space needs for treatment in permanent/mixed dentition
Unlike Merrifield’s method, it doesn’t tell you where the teeth should be or how to move them—it’s more flexible, like an ortho version of “choose your own adventure”! 📖😆
Why Space Planning is a Game-Changer? 🎯
A well-thought-out space plan isn’t just for neat-freak orthodontists (though we love our perfectly aligned brackets ✨). It serves multiple purposes:
✅ Disciplined treatment planning – No more “let’s wing it” approaches! 🚫🦷 ✅ Realistic treatment goals – Can we actually achieve that Hollywood smile? 🎬 ✅ Anchorage control – Avoid unwanted tooth movement (because molars love to wander!) 😵💫 ✅ Extraction decisions – To pull or not to pull? That is the question! ⚖️ ✅ Arch relationship correction – Ensuring upper and lower arches play nice together! 🤝 ✅ Better patient communication – No more confused patients nodding along in fear 😅 ✅ Informed consent – Patients need to know what’s coming before we go full ortho mode! 📜
How Do We Plan Space Like a Pro? 🏗️
The space planning process happens in 2 stages:
1️⃣ Assessing Space Requirements 📏
How much space is needed for proper alignment?
Is there excess space or a deficit?
What about crowding or spacing issues?
2️⃣ Creating or Utilizing Space 🏗️
Predicting how much molar movement is required 🦷➡️🦷
Deciding if we need extractions, distalization, expansion, or IPR
📋 Fun Fact: This isn’t just a one-time calculation! Space planning is an ongoing process recorded for every patient before starting treatment.
ASSESSMENT OF SPACE REQUIREMENT
Why Assess Space? 🤔
Before you even think about which appliance to use (no, don’t grab that bracket just yet! ❌🦷), you need to define treatment goals: ✅ How wide should the arch be? ✅ Where should the incisors be positioned? ✅ Is there extra space, or are we playing dental Tetris?
How to Measure Crowding & Spacing? 📏
1️⃣ Place a clear ruler over the occlusal/labial surface of study models. 2️⃣ Measure mesiodistal widths of misaligned teeth. 3️⃣ Compare with available arch space in the archform selected. 4️⃣ Record values in mm:
Positive (+) = Space present or created (e.g., incisor advancement)
Negative (-) = Crowding or space required (e.g., incisor retraction)
🚨 Warning: Do NOT measure 3 or more teeth together using a straight-line method! Why?
A straight-line (chord) underestimates space compared to the actual curved archform (arc).
This can make you think there’s more space than there actually is = bad treatment planning! 🚨
Why Does the Curve of Spee Eat Up Space? 🍽️
When you level an occlusal curve, you’re not just straightening teeth like a 2D line. It’s a full-blown 3D puzzle! 🧩
📌 Key Fact:
The Curve of Spee forms because of vertical “slippage” at contact points between teeth.
When you level it, these contact points shift back into alignment—and that eats up space in the arch.
🛑 Common Mistake:
People assume space required = difference between arc (curved line) and chord (straight line). ❌
But this underestimates the space needed because teeth aren’t perfect cylinders—they’re bulbous! (Thanks, anatomy. 🤦♂️)
How Much Space Do We Need? 📏
Orthodontists used to think: 📢 “1 mm of space for every 1 mm of curve depth.”
🚨 Turns out, that’s an overestimate! 🚨
What’s the Real Deal?
Studies5-7 have shown space required increases nonlinearly as the curve deepens.
The first millimeter of leveling takes less space than later increments.
Space depends on tooth shape—bulbous teeth = more space needed!
Royal London vs. Other Methods 🏆
1️⃣ Traditional Methods 🏛️
📏 Use a reference plane from the second molars → Curve appears deeper → More space estimated.
2️⃣ Royal London Space Planning 👑
📏 Uses a reference plane from first molars → Looks like a shallower curve → More realistic space estimate.
💡 Why?
Second molars tend to level by moving backward (distally)—which doesn’t affect anterior/midarch space.
Royal London focuses on anterior & midarch space needs—which is what we care about for space planning!
🔢 Fun Fact:
Rarely does the Curve of Spee exceed 4 mm (excluding second molars).
That’s why Royal London’s approach makes more sense for treatment planning.
What to Watch Out For! 🚦
🔹 1️⃣ Don’t Double Count! ❌
If premolars are already crowded, don’t also count them in space required for leveling!
That’s like counting your Netflix subscription twice in your budget. 🫠
🔹 2️⃣ Not Every Case Needs a Flat Curve! 😲
Clinical judgment is key! Do you really need to flatten it completely? 🤔
Some deep curves are functional—flattening them could cause occlusal instability! ⚠️
The Great Space Expectation vs. Reality Check 🏗️
What We Assume:
“Broaden the arch, and BOOM—more room for all the teeth!” 🏠➡️🏡
What Actually Happens:
🔬 Studies (Adkins et al.12, Akkaya et al.13) found that even with Rapid Palatal Expansion (RPE):
Each 1 mm expansion → Only ~0.7 mm increase in arch perimeter! 😲
Why? Because not all teeth expand equally!
First premolars? Expanded 6.1 mm
Canines? Only 2.9 mm
Anterior arch form isn’t fully expressed during expansion alone!
How Does Expansion Really Affect Space?
👨🔬 O’Higgins’ ex vivo experiment (bracketed teeth on an acrylic model) taught us: 📏 Every 1 mm increase in intermolar width → 0.28 mm reduction in anteroposterior arch depth.
💡 Translation:
Arch gets wider, but also shorter!
The result? Arch perimeter increases by just ~0.56 mm per mm of molar expansion!
Key takeaway: Expansion gives space, but NOT a 1:1 ratio.
How Should We Use This in Space Planning? 🤓
👑 The Royal London Space Planning Approach: ✅ For every 1 mm of molar expansion, assume ~0.5 mm space creation. ✅ If palatal suture is split, expect slightly more space gain. ✅ Don’t count individual tooth movements as “expansion”—that’s just crowding adjustment!
Wait… What About Contraction? 😨
If expansion reduces arch depth, contraction (like using a TPA for anchorage or reducing arch width) can make things even tighter! 🚧
Moral of the story? 🚫 Don’t overpromise your patient “Oh, we’ll just expand your arch for space!”—because it’s NOT that simple!
Incisor Position: The Space Creator & Consumer 📉📈
Think of incisors like chess pieces—a single move forward or backward shapes the entire game (or arch)!
Why Would We Change Incisor A/P Position?
✅ Reduce excessive overjet (Class II cases) ✅ Proclination in cases of crowding ✅ Maintain proper interincisal angle ✅ Achieve ideal incisor inclination (cephalometric harmony)
How Much Space Does Incisor Movement Really Create? 🧐
👨🔬 O’Higgins & Lee (ex vivo model):
They removed first premolars (7.2 mm per side) & closed spaces
Incisors retracted ~7.7–8.0 mm! 😱
Why more than 7.2 mm? Because the archform changed too! (Intercanine width expanded slightly)
What does this mean for us in practice?
🔹 For every 1 mm of incisor retraction → 2 mm of space gained! 🔹 For every 1 mm of incisor advancement → 2 mm of space used!
📌 Moral of the story? Small incisor changes eat up or free up space twice as fast as you might think!
Practical Space Planning 🔢
1️⃣ Assess the lower incisor position first!
If they need retraction, you’ll GAIN space.
If they need advancement, you’ll LOSE space.
2️⃣ Adjust the upper incisors accordingly (to maintain a 2-3 mm overjet).
3️⃣ Beware of unwanted side effects!
Incisor retraction may lead to molar mesialization (which reduces space)
Excessive advancement can lead to lip strain & instability
The Space Implications of Tooth Angulation 🔄
Think of teeth like bookends on a shelf—upright ones take up less space, while tilted ones can hog more.
How Does This Work?
📏 Upright incisors take up less space in the arch. 📐 Properly angulated incisors need more space (but look and function better). 🛠️ Over-angulated incisors may actually free up some space (though this is rare).
The Evidence: Tuverson’s Wax Setup Experiment 🕵️
🦷 2 mm of excess space can be absorbed by properly angulating overly upright upper incisors! 🦷 But… not every angulation issue = space problem!
A 5° distal tilt doesn’t necessarily take up more space than a 5° mesial tilt.
🧐 Royal London Hospital (Unpublished Study): 🔹 Confirmed Tuverson’s findings but estimated a maximum of 0.5 mm per incisor. 🔹 For canines: Small angulation changes don’t impact space much (due to their curved mesial & distal surfaces).
So, What Does This Mean for Us? 🤔
💡 Angulation correction isn’t a game-changer for space—MAX 2 mm total from all four upper incisors! 💡 The bigger clinical concern? Anchorage loss from mesiodistal apical movements (especially with canines).
How Torque Affects Space 🔄
📏 Palatal root torque → Incisal edges shift forward → Arch perimeter increases 📐 Proclined incisors (tipped forward) → Need less space to retract 🛠️ Retroclined incisors (tipped back) → Need more space to torque upright
The Science Behind It
Tuverson’s Demonstration Set-Up
🔹 Applying palatal root torque can absorb 1 mm of excess space in the maxillary arch.
O’Higgins et al’s Ex Vivo Model
🔹 Bracketed acrylic teeth with fixed posterior segments showed:
Palatal torque → Increased arch perimeter
Overjet increases if buccal segments aren’t distalized
🔹 Incisor morphology matters!
Large/Parallel-sided incisors → Need more space
Triangular incisors (contact points near incisal edge) → Need less space
Barrel-shaped incisors → Need an intermediate amount
🔹 Archform also plays a role—3D space dynamics are complex, making simple calculations tricky!
How Much Space Do You Need? 🤔
1️⃣ Bodily retraction of upper incisors by 5 mm → Needs 10 mm of space (5 mm per buccal segment). 2️⃣ Proclined incisors (simple tipping) → 5 mm incisal edge movement, 4 mm contact point movement → Needs 8 mm of space. 3️⃣ For every 5° of incisor torque in average-shaped teeth → Expect 1 mm of space requirement. 4️⃣ Retroclined incisors (Class II Div 2) → Need space to apply apical torque, even if incisal edges stay in place. 5️⃣ Lower incisors? Minimal space effect because their contact points are closer to the incisal edges.
Key Space-Influencing Factors 🚀
1️⃣ Crowding & Spacing → Most significant 2️⃣ Arch Width Changes → Expansion creates ~0.5 mm per mm of intermolar width increase 3️⃣ Incisor Anteroposterior (A/P) Changes → 1 mm of A/P movement = 2 mm of space change
👉 These three have the biggest impact on total space needs!
Minor Space Contributors 🔍
4️⃣ Occlusal Curve Leveling → Nonlinear relationship with space (~1 mm per 1 mm curve depth is an overestimate) 5️⃣ Tooth Angulation (Tip Changes) → Max 0.5 mm per incisor 6️⃣ Incisor Inclination (Torque Changes) → 1 mm per 5° of torque for upper incisors
👉 These three have minimal impact on total space.
Upper vs. Lower Arch: Why the Difference?
🚩 The missing factor? Molar A/P relationship! ✔️ In Class I, space requirements should be equal for both arches (unless tooth-size discrepancies exist). ✔️ In Class II, upper arch needs more space due to molar distalization needs:
Full-unit Class II molars → Upper arch needs 14 mm more space than lower
Half-unit Class II molars → 7 mm discrepancy ✔️ Any mismatch between upper and lower space needs could signal an analysis error or Bolton discrepancy (tooth size discrepancy).
Clinical Takeaways 📌
✅ Focus on major space factors first (crowding, arch width, incisor A/P change). ✅ Use molar relationship as a final check—Class II cases often need more upper arch space. ✅ Small adjustments (angulation, torque, curve leveling) play a role but don’t majorly impact total space calculations.
💡 Final Thought: A well-planned space analysis isn’t just about numbers—it ensures a stable, functional, and esthetic occlusion!
🔑 Takeaway: Space planning is not just about measuring gaps—it’s about strategizing movement to ensure stable, functional, and aesthetic outcomes. Whether it’s through expansion, extractions, IPR, or torque control, every decision impacts the final smile. 😁✨
💬 Final Thought: Next time you analyze space, think beyond numbers—factor in growth, anchorage, and occlusion to craft a truly individualized treatment plan!
👉 So, fellow ortho warriors, how do you approach space planning in your cases? Let’s discuss! 🚀💬
Headgear—an iconic yet often dreaded orthodontic appliance—has been around for decades, serving as a non-surgical method to control maxillary growth and molar positioning. Despite its reputation among patients, orthodontists continue to rely on it for effective anchorage and skeletal modifications
🔹 Cervical Pull Headgear – The “Easygoing” One 😌
Simple to make, patients tolerate it better.
But… it can be a drama queen! 😵
Moves molars backward but also tips them, roots going mesially (oops!).
Can extrude molars, making the face longer—hello, gummy smile? 🙃
Stability? Meh. Too much tipping, not enough translation.
🔹 High-Pull Headgear – The “Disciplined” One 🎯
Distal movement? ✅
Intrusion instead of extrusion? ✅
More control over force direction? ✅
Basically, it’s like telling molars, “We’re going back AND staying put.” 🚀
Science Says… But How Much Force? 🤔
Studies show high-pull headgear can move molars distally and tweak vertical growth, possibly even making skeletal changes. 🦴 But here’s the catch—how much force is just right? Some say a lot, some say less is more. Even animal studies couldn’t agree. 🐭🐶🐷
So, the mission (if you choose to accept it) is to figure out the ideal force system—gentle but effective—because we’re in the business of moving teeth, not wrecking them. 🦷💀
Let’s dissect the MATERIALS & METHODS section of this study—because numbers, wires, and ceph tracings are what we live for! 🧐💀
🧑⚕️ Patient Selection: Who Got to Wear This Fashion Statement?
✅ 24 adolescent patients (all Caucasian, because diversity in ortho studies is still a work in progress 🤦♂️) ✅ Molar occlusion: Between 3.0 to 7.0 mm Class II at the start of treatment ✅ Skeletal age:9.5 to 12.5 years (determined from hand-wrist films 📸) ✅ Interlabial gap ≥ 2.0 mm + Increased lower facial height (classic hyperdivergent cases!) ✅ Treatment duration:6 months ✅ Groups: 🔹 12 patients = High-Pull Headgear Group 🦷🔧 🔹 12 patients = Control Group (No headgear, lucky them? 🤔)
⚙️ Appliance Design: The Ortho Engineering Behind It
🎯 Interlandi Type High-Pull Headgear (fancy name, simple purpose) 🔹 Force Application:
Connected to the head straps using ¼-inch latex elastics
Elastic attachment points were adjustable to control force direction 🎛️
Force directed through the buccal trifurcation of maxillary first molars (approx. center of resistance 📍)
🔹 Key Specs:
Inner bow:Parallel to occlusal plane
Outer bow: Shortened so it didn’t extend past the maxillary first molars
Force applied:500g per side (measured with a force gauge ⚖️)
Effects aimed for:Distalization + Intrusion (not just tipping like cervical pull!)
💡 Bonus Feature:0.032 x 0.032 Stainless Steel Transpalatal Arch
Purpose? 🧐 ✅ Maintained arch symmetry ✅ Prevented molar rotation (because we don’t want them spinning like a Beyblade! 🌀)
🧐 Elastic Force Decay?
Measured over 15 hours – result? Minimal loss, so clinically insignificant (phew! 😅)
Reminder: Patients had to change elastics daily (because worn-out elastics = wasted treatment time ⏳)
📝 Patient Cooperation: Did They Even Wear the Headgear?
Let’s be honest—compliance is our biggest enemy in headgear treatment. 😤 Here’s how they kept track:
1️⃣ Daily diary 📖 – Parents checked if their kids were actually wearing it. 2️⃣ Molar mobility check 🦷 – If the teeth were moving, the headgear was doing its job! 3️⃣ Ease of insertion 🔄 – If the bow slipped in too easily, it probably wasn’t worn enough. 4️⃣ Physical wear signs 🧐 – Scratches, bent wires = proof of usage! 5️⃣ Ceph changes 📊 – Measured interdental spacing, overjet reduction, and buccal occlusion improvement.
🎬 Molar Action: The Great Escape! 🦷💨
Molar Movement 🦷
Treatment Group (Headgear Warriors)
Control Group (Lazy Lords 😴)
Distal movement
2.56 mm 🔙 (SIGNIFICANT)
0.23 mm 🔜 (Minimal)
Vertical movement (Intrusion/Eruption)
0.54 mm Intrusion ⬇️
0.23 mm Eruption ⬆️
Overall Motion
DISTAL + INTRUSION 📉
MESIAL + ERUPTION 📈
📢 Translation: The molars in the treatment group took a step back (distalized) and went slightly underground (intruded). Meanwhile, the control group molars were partying and moving forward & upwards! 🥳
🏛️ Maxilla: Growth on a Diet! 🍽️
The maxilla in the treatment group experienced a growth restriction thanks to the headgear’s orthopedic effect! 🚫🏗️
Maxillary Growth (Anteroposterior & Vertical)
Treatment Group (Headgear Effect)
Control Group (Free Growth)
A-point movement (Horizontal)
0.33 mm backward ⏪
0.5 mm forward ⏩
ANS & PNS movement (Vertical Growth)
↓ by ~0.5 mm 📉
Normal downward growth 📈
📢 Translation:
Headgear applied the brakes on maxillary forward growth.
Maxillary vertical growth was reduced by half.
🔬 Skeletal & Soft Tissue: The “No Drama” Zone!
Unlike the molars, some skeletal parameters remained unchanged. 📏
Measurement
Change in Treatment Group?
Nasal floor
No difference 😴
Mandibular plane
No difference 😴
Skeletal convexity
No difference 😴
Soft tissue convexity
No difference 😴
📢 Translation: The headgear worked on the maxilla and molars but didn’t mess with soft tissues or overall facial profile. No major aesthetic changes. (Ortho-approved!) 😌
⌛ 24-Hour Headgear vs. Intermittent Wear: The Big Debate! 🤔
Some orthodontic gurus like Armstrong & Badel believe that wearing headgear 24/7 is the ultimate “Satyam Shivam Sundaram” of orthodontics! 🎭 But guess what? This study proves that intermittent wear (12 hours/day) still packs a punch! 🥊
✅ Correction of Class II molar relation? ✅ ✅ Distal molar movement? ✅ ✅ Maxillary growth restriction? ✅ 🎉 And all that in just 6 months!
💡 Takeaway: Patients don’t have to be headgear hermits 24/7—a balanced, realistic 12-hour wear can still yield significant results!
💪 The Power of Force: 500 gm & The Maxillary Game Changer! ⚡
🔬 The Recipe for Maxillary Control:
Armstrong, Watson, Badel, & Graber recommended going all out with 400–1000 gm of force if rapid orthopedics was the goal! 🚀
This study? A sweet spot of 500 gm did the trick! Less drama, great results! 🎯
💡 Key Finding:
A-point movement was restricted—a major win! The maxilla stayed in check instead of running wild like a Bollywood hero in a chase scene! 🏃💨
Forward growth of ANS was significantly reduced, meaning the headgear truly controlled skeletal development! 🏗️
💡 Comparison with Other Studies
Researcher 👨🏫
Molar Distalization (mm) 📉
Treatment Duration ⏳
Force Level 🎯
This Study 🎯
2.56 mm
6 months
Lighter Forces 💨
Badel (118)
2.3 mm
4 months
Full-time wear
Weislander (S)
~3.0 mm
2–3 years
Similar Force
Watson (12)
3.0 mm
5–16 months
Higher Force 🔥
📢 Translation for Real Life:
Short-term wear (6 months) achieved similar results as years of treatment in older studies!
Less force, same or better results! 🤯
Weislander (300–400 gm) = A-point & ANS moved 2 mm distally over 3 years!
Watson (600–1000 gm) = A-point & ANS shifted 4 mm distally in under a year!
Baumrind = Mandibular growth slowed down in treatment groups compared to controls.
📢 This study adds to the evidence that: ✔️ Even with moderate force, skeletal changes occur. ✔️ Maxillary growth restriction is real—it’s not just an ortho myth! ✔️ Mandibular growth showed a mild reduction, but not enough to worry
🎯 Angle of Attack: 20° & The Power of Sin(θ)!
Ever wondered how headgear force actually works? It’s not just “wear it and hope for the best!” 😆 There’s physics involved!
💡 Key Point:
In our study, the force of the appliance was directed at ~20° to the occlusal plane.
This means the intrusive force on maxillary molars = 500 gm × sin(20°).
📢 Translation for the non-math lovers: 🔹 Headgear isn’t just pulling back molars—it’s also subtly pushing them upwards (intrusion). 🔹 This changes the maxilla’s growth dynamics, and we’ve got numbers to prove it! 📊
🔬 ANS & PNS: No More “Bollywood Slow-Motion Growth” 🎭
📚 What Happens Normally?
The ANS (Anterior Nasal Spine) moves down during natural growth.
The PNS (Posterior Nasal Spine) follows suit, leading to an increase in the palatal plane angle.
📚 What Happened in Our Study? ✅ Headgear stopped ANS & PNS downward movement 📉 ✅ No significant changes in nasal floor angulation ✅ Palatal plane angle remained stable
💡 Takeaway:
Headgear isn’t just about molars moving back—it’s controlling vertical growth too!
Watson (1.04°/year) & Baumrind (1.1°/year) reported slight changes in palatal plane angle, but our headgear kept it locked in place! 🎯
🦷 Maxillary Molar Intrusion: The Power of High-Pull Headgear!
Group 🎭
Maxillary Molar Movement 📉
Headgear Group 🏹
0.54 mm Intrusion ⬇️
Control Group 😴
0.42 mm Eruption ⬆️
📢 Translation:
Headgear warriors saw molars being pushed slightly up (~0.54 mm).
Control group molars went rogue and erupted (~0.42 mm).
Why does this matter? Because it helps control vertical facial growth!
💡 But did it shorten the face? Nope! Lower facial height didn’t decrease significantly. Meaning, no unwanted “face shrinkage” occurred. 🚀
🤔 What About Lower Molars & Occlusion?
📚 Common Concern: If maxillary molars are intruded, will lower molars erupt to compensate and mess up occlusion?
✅ Good news! No significant compensatory eruption of the lower molars was found! 🎉 ✅ The functional occlusal plane remained stable throughout the 6-month period.
💡 Takeaway:
Headgear didn’t throw the bite into chaos. Everything stayed balanced! ⚖️
🔮 Future Predictions: “What If We Went Longer?” 🕰️
What if we kept headgear for another year? 📢 Watson (600–1000 gm force) showed 4.0 mm of molar intrusion over a longer period!
What does that mean for our study? ✔️ More skeletal changes would likely become statistically significant.
💡 Ortho Wisdom:
Short-term wear (6 months) already made a difference!
Longer wear = more pronounced skeletal effects!
📚 Common Ortho Fear: “What if only the crown moves, leaving the roots behind?” 😱
✅ Good news! Our study found translation—meaning: 🔹 Both crowns AND roots moved distally! ✅ 🔹 Roots actually moved 2.5° further than crowns! 🤯
💡 Why?
Normal mesial tipping of maxillary molars is always present.
The force was applied at the trifurcation area (right below the furcation).
This led to a small moment that helped move the roots backward too! 🔄
💡 Ortho Pro Tip: The center of resistance of molars is below the trifurcation area. Since we applied force slightly above it, we got a controlled distal shift! 🚀
🤔 What Helped Maintain Symmetry?
✅ The Palatal Arch! 🦷
Helped move right & left molars symmetrically 📏🔄
Prevented rotations or uneven shifts 🚫🔄
Allowed for stable occlusal changes! 🏆
Final Thoughts: Should You Still Consider Headgear?
Despite the rise of TADs (temporary anchorage devices) and other modern alternatives, cervical pull headgear remains a reliable, non-invasive option for controlling molar positioning and maxillary growth. While compliance remains a challenge, the study highlights its effectiveness in correcting skeletal Class II discrepancies without compromising vertical dimension.
🔹 Takeaway: Headgear is not just a relic of the past—it’s a scientifically backed tool that continues to hold value in contemporary orthodontics.
Would you still prescribe it, or do you prefer newer anchorage methods? Drop your thoughts below!
Picture this: A young patient strolls into your ortho clinic with a large overjet, a long face, and a smile that shows more gum than teeth! 🦷😬 They’ve got highly visible incisors at rest, and when they grin, it’s all pink and no chill. As an orthodontist, you know this isn’t just about reducing that overjet—it’s a full-on battle for balance, aesthetics, and function. Welcome to the world of high-angle Class II div 1 patients! 💥
So, What’s the Game Plan? 🧐
You need to: ✔️ Reduce the overjet 🏹 ✔️ Control the visibility (and vulnerability) of those maxillary incisors 🦷 ✔️ Avoid unwanted movements that could make things worse! 🚫😵
Enter the hero of our story: The Removable Maxillary Appliance with Vertical Pull Headgear! 🎭 This setup is like giving your patient’s upper jaw a much-needed GPS system—guiding growth while keeping everything under control. 🚀
Why Headgear? 🎩
For our Class II, high-angle patients with a reduced or average overbite, regular distal movement of molars isn’t enough. The problem? If we let the molars extrude, we risk backward rotation of the mandible (a.k.a. making that long face even longer 😱). So, what’s the fix?
👉 High pull headgear! This keeps the maxillary molars in check, prevents unwanted rotation, and—bonus!—helps reduce that excessive gummy smile. 🎯
The Appliance Rundown 🦷
Now, you might be thinking, Why not just band the first molars and call it a day? Well, if only ortho were that easy! 🤷♂️
Attaching the headgear to molars alone can lead to: ❌ Buccolingual tipping (aka unstable tooth positioning) ⚖️ ❌ Poor tissue tolerance (ouch!) 😖 ❌ Limited effectiveness in controlling the entire dental arch 🏛️
That’s why orthopaedic force should be distributed across as much of the maxillary dental arch as possible! This is where removable appliances become our best friends. 🤝
What Does the Literature Say? 📚
The greats of ortho have weighed in on this battle: 🦷 Thurow (1975) introduced a maxillary splint for better vertical control. 🦷 Graber (1969), Joffe & Jacobson (1975), Fotis et al. (1984) all experimented with variations. 🦷 Caldwell et al. (1984) gave us more case studies showing successful results! 🏆
In short, headgear-supported removable appliances work, and they’re backed by years of research and success stories. 🚀
🎯 The Clinical Hypothesis: What Are We Trying to Fix?
The goal? To reduce maxillary incisor visibility and vulnerability by: ✅ Intruding the maxillary anterior teeth (because less gum, more aesthetic!) ✅ Controlling excessive maxillary downward growth ✅ Encouraging a slight forward rotation of the mandible (which helps reduce that overjet!)
Think of it like adjusting a camera angle for the perfect smile—no one wants an overexposed shot! 📸
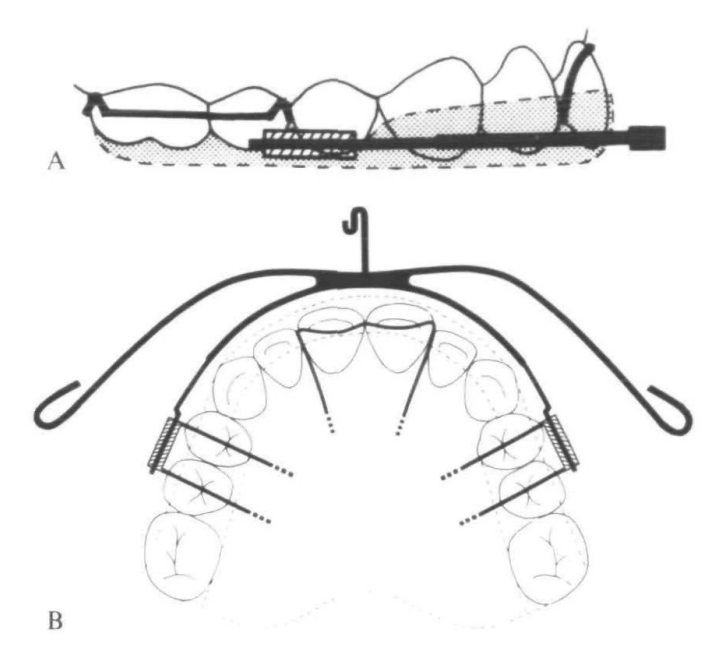
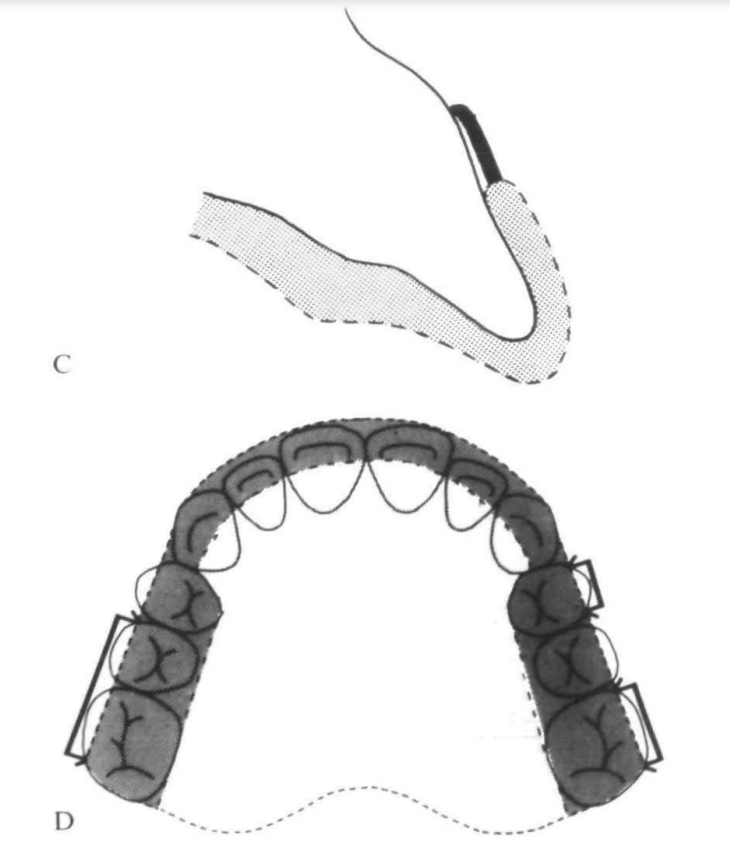
🛠️ The Appliance: M.I.S. Unpacked
So, what exactly is this M.I.S. (Maxillary Intrusion Splint)? 🤔
It’s a full-coverage, cribbed, heat-cured acrylic palatal plate (yes, that’s a mouthful—literally!). Here’s the breakdown:
🔹 Acrylic Capping: Covers the incisors and canines (only the incisal third) to provide stability. 🔹 Occlusal Coverage: Extends across the buccal segments but stops short of the buccal surfaces of premolars and molars (we don’t want to mess with transverse development). 🔹 Flying Extra-Oral Traction Tubes: Fancy name for where the headgear hooks in. These tubes are placed mesial to the first premolar cusp tip, allowing force application close to the maxillary dentition’s center of resistance (Poulton, 1959). 🔹 Anterior Clasp (Optional): A modified Southend clasp (basically a tiny goalpost 🏈 for your incisors) can be added to prevent palatal tipping.
Sounds cool, right? But wait—there’s more! 😆
🦸♂️ The Heroic Headgear: Modified Lee Laboratory High-Pull Headgear
Now, headgear has a bit of a reputation (ask any patient who’s worn one… or any ortho student who’s explained one 🥲). But trust me, this isn’t your average high-pull headgear!
Here’s what makes it next level: 👉 Modified Elastic Traction Point: Instead of being in front of the ear, it’s shifted back behind the eye for a near-vertical force application. 🔼 👉 Angle of Pull: Around 60° to the occlusal plane—steeper than standard high-pull but way more effective for vertical control. 👉 Stiff Kloehn Bow: The 1.3mm inner arm provides better rigidity. (Because flimsy bows are not our vibe! 🙅♂️) 👉 Customized Outer Arm: Adjusted to deliver force through the center of resistance—ensuring movement is efficient, not chaotic.
And how much force are we talking about? ⚡ 500g or more bilaterally, depending on how much the patient can tolerate. (No pain, no gain? Well… maybe just a little discomfort! 😅)
⏳ Wearing Protocol: Commitment is Key!
Let’s be real—this isn’t a pop-it-in-once-a-day kind of appliance. Patients need to be: 🕒 Wearing it for up to 14 hours a day (yes, it’s bedtime bestie) 📈 Gradually introduced to the full wear schedule 🧠 Highly motivated (because compliance is everything!)
Treatment typically starts in the late mixed dentition phase, after: ✔ Preliminary expansion & arch rounding (about 3 months with a removable appliance) ✔ Maintaining arch coordination with a retainer when M.I.S. isn’t in use
For severe cases, we can add a mandibular traction plate for: 🔗 Class II intermaxillary elastics 🎯 Additional headgear reinforcement
(And yes, this setup makes the patient look like a sci-fi character, but hey—science is cool! 🤓)
🎯 Study Design: How Did We Test This?
We took 26 successfully treated Caucasian Class II Div 1 patients (11 males, 15 females) and compared them with 26 untreated patients waiting for treatment at Kingston Hospital (also 11 males, 15 females).
💡 Why? To compare how M.I.S. affects skeletal and dental parameters versus natural growth.
📊 Subject Data Summary (Mean Age ± SD)
Group
Start of Active Treatment (X-ray 1)
End of Active Treatment (X-ray 2)
M.I.S. Group (n=26)
11.4 ± 1.21 years
12.5 ± 1.10 years
Control Group (n=26)
11.0 ± 1.01 years
12.7 ± 1.05 years
👀 The control group had a longer observation period, so their data were adjusted using a computed factor (because growth doesn’t wait for anyone! ⏳).
🦴 Skeletal Changes: Shifting the Foundations
📍 Anteroposterior Changes
Measurement
M.I.S. Group
Control Group
Significance (p-value)
SNA (°) (Maxillary prognathism reduction)
↓ 1.18°
No change
P < 0.001 ✅
N-A (mm) (Maxilla-to-nasion distance)
↓ 1.21 mm
No change
P < 0.001 ✅
S-ANS (mm) (Anterior nasal spine position change)
No increase
Increased by 1.29 mm
P < 0.001 ✅
💡 Translation: The M.I.S. helped keep the maxilla in check, while the control group’s maxilla kept growing forward like a rebellious teenager. 😎
📍 Vertical Skeletal Changes
Measurement
M.I.S. Group
Control Group
Significance (p-value)
Mx-Md Plane Angle (°)
↓ 1.04°
Smaller reduction
P < 0.01 ✅
Sella-Nasion to Maxillary Plane (°)
Increased 0.90°
Smaller change
P < 0.01 ✅
💡 Translation: The M.I.S. helped tip the maxilla slightly backward, improving vertical control. Meanwhile, in the control group, nature did its own thing (and not in a good way). 😅
🦷 Dental Changes: The Real MVPs!
📍 Incisor and Overjet Adjustments
Measurement
M.I.S. Group
Control Group
Significance (p-value)
Maxillary Incisor Proclination (°)
↓ 10.98°
No major change
P < 0.001 ✅
Overjet (mm)
↓ 6.65 mm
No major change
P < 0.001 ✅
Maxillary Incisor Intrusion (mm)
1.50 mm
Extruded 0.42 mm
P < 0.001 ✅
💡 Translation: The M.I.S. successfully pushed the maxillary incisors up and back—a win-win for gummy smiles! 🎉 Meanwhile, the control group’s incisors just kept coming down like a curtain at a bad show. 😬
📍 Molar Changes: Moving the Big Players
Measurement
M.I.S. Group
Control Group
Significance (p-value)
Maxillary Molar Distalization (mm)
3.31 mm
Moved mesially 2.22 mm
P < 0.001 ✅
Maxillary Molar Intrusion (mm)
0.72 mm
Extruded 1.47 mm
P < 0.001 ✅
Lower Molar Extrusion (mm)
0.56 mm
No major change
P < 0.05 ✅
💡 Translation: ✔ M.I.S. pushed the upper molars back (goodbye Class II! 👋). ✔ The upper molars didn’t over-erupt, helping prevent an unwanted clockwise mandibular rotation (hello better profile!). ✔ The lower molars extruded slightly, helping maintain occlusal balance.
📢 What Did This Study Reveal?
This research confirmed that M.I.S. does the following efficiently:
✅ Reduces overjet & incisor proclination (Buh-bye, bunny teeth! 🐰) ✅ Distalizes first molars WITHOUT extrusion (A rare win! 🎉) ✅ Intrudes maxillary incisors effectively (No more gummy smiles! 👏) ✅ Prevents unwanted incisor extrusion (Unlike conventional mechanics) ✅ Maintains control over posterior facial height (No excessive vertical growth 😎)
💡 But wait… there’s a twist!
M.I.S. had little effect on forward mandibular growth, which was kinda disappointing. 😕 Some patients even had pogonion rotating backward (Oof! 🤦).
🦷 How Does M.I.S. Work?
It’s all about precision control:
🔹 Incisors move back & up → Less proclination, less overjet 🔹 Molars move back WITHOUT vertical elongation → No downward drift = No increased lower facial height 🔹 Slight maxillary restraint (sagittal & vertical) → No excessive maxillary growth 🔹 Mandibular changes? Meh. 😅
📊 Key Cephalometric Changes
Measurement
M.I.S. Group
Control Group
Significance (p-value)
Overjet (mm)
↓ 6.65 mm
No major change
P < 0.001 ✅
Incisor Proclination (°)
↓ 10.98°
No major change
P < 0.001 ✅
Incisor Intrusion (mm)
1.50 mm
Extruded 0.42 mm
P < 0.001 ✅
Maxillary Molar Distalization (mm)
3.31 mm
Moved mesially 2.22 mm
P < 0.001 ✅
Maxillary Molar Intrusion (mm)
0.72 mm
Extruded 1.47 mm
P < 0.001 ✅
💡 What does this mean?
The incisors intruded and moved back, helping with overjet reduction.
Molars moved back but didn’t drop down, keeping vertical dimensions in check.
Mandible didn’t grow significantly forward, so this isn’t a cure for retrognathia.
🤔 So, Is M.I.S. a Miracle Appliance?
🎯 YES – For Mild to Moderate Class II Div 1 with a Gummy Smile! 🙅 NO – If You’re Expecting Major Mandibular Advancement!
👨⚕️ Key Takeaway for Ortho Students: If you have a severely retrognathic mandible, M.I.S. alone won’t cut it. Combine it with a functional appliance (like a Herbst or Twin Block) for better mandibular effects!
🔍 Clinical Pearl: The ‘Pogonion Problem’
🧐 Some patients had pogonion rotating backward instead of forward! 🤷 Why? Those with a high FHMnP angle (steep mandibular plane) had less control over chin projection.
💡 Solution? For these cases, consider: ✔ Intrusive activators to limit unwanted backward rotation ✔ Posterior bite blocks to control mandibular plane angle
📚 Previous Studies Agree! (We’re Not Making This Up! 😜)
🔹 Fotis et al. (1984) & Caldwell et al. (1984) → Molar intrusion leads to mandibular molar eruption as compensation. 🔹 Proffit (1986) → Better sagittal mandibular change when functional appliances + posterior bite blocks are used.
M.I.S. vs. Functional Appliances – Which One Wins? 🥊
🔹 M.I.S. (Maxillary Intrusion Splint) – The Gummy Smile Fixer ✔ Great for mild to moderate Class II Div 1 cases ✔ Reduces overjet, proclination, and gummy smile ✔ Intrudes incisors effectively without unwanted extrusion ✔ Works best when used in controlled cases
🚨 But… if the mandibular plane angle (FHMnP) is too steep, it won’t help much with mandibular growth! 😕
🔹 Functional Appliances (Bass, 1982 & Van Beek, 1982) – The Mandibular Booster ✔ Encourage forward mandibular growth ✔ Control vertical eruption of mandibular molars (posterior bite blocks FTW!) ✔ Work well for severely retrognathic patients
🚨 But… they don’t always intrude incisors as predictably as M.I.S.
🦷 Proffit’s Golden Rule (1986): Match the Appliance to the Case!
👨⚕️ Mild to Moderate Class II Div 1? → M.I.S. works great! 👨⚕️ Severe Retrognathia with High Mandibular Plane Angle? → Go for a functional appliance with posterior bite blocks!
📚 Clinical Pearl for Ortho Students!
🧐 Before choosing an appliance, always check: ✅ Mandibular plane angle (FHMnP) – Steep angles need bite block support! ✅ Severity of retrognathia – If severe, M.I.S. alone won’t do much! ✅ Vertical dimension changes – Don’t let mandibular molars erupt uncontrollably!
🚀 Moral of the Story:Ortho isn’t one-size-fits-all! Choose your tools wisely, and your patients will thank you. 🙌✨
🦷 Case History: Meet I.H. (The 9-Year-Old Who Got a Grown-Up Smile!)
📍 Initial Presentation
👦 9.4-year-old Caucasian male 😬 15 mm Overjet (Yikes!) 🦷 Spaced maxillary incisors with 3 mm midline diastema 😁 5 mm of incisor show at rest (a true gummy smile candidate! 👀)
Fun fact: He was NOT a digit sucker! (For once, we can’t blame thumbsucking! 😂)
📍 Treatment Plan
1️⃣ Phase 1:
Upper removable appliance to expand buccal segments (arch coordination)
Fixed appliance on 21|12 for closing anterior spacing
Hawley Retainer (modified for mild forward mandibular posture)
Worn nocturnally until late adolescence
📍 Final Result?
✅ Overjet gone! ✅ Gummy smile reduced! ✅ Class I occlusion achieved!
Moral of the case? The M.I.S. did its job perfectly! 🎯
🤓 Ortho Question Time! (Because Learning Should Be Fun! 🎉)
1️⃣ Would you use M.I.S. in your future patients? Why or why not? 🤔 2️⃣ What are your favorite patient excuses for not wearing their headgear? (Let’s laugh together! 😂) 3️⃣ If you had to invent a new orthodontic appliance, what would it do? (We love creative answers!) 🧠✨
Drop your answers in the comments below! 👇 Let’s geek out over ortho together! 🦷🎯
The correction usually follows one (or a mix) of these three approaches:
1️⃣ Extruding the posterior teeth – Raising the back teeth like tiny dental elevators. 2️⃣ Intruding the anterior teeth – Politely pushing the front teeth back where they belong. 3️⃣ Combining both techniques – Because balance is everything!
But choosing the right approach isn’t random—it depends on Intermaxillary Growth Space, Interocclusal Space, Facial Profile, Esthetics, and Occlusal Plane Steepness.
Intermaxillary Growth Space
Think of a growing child’s jaw as an expanding neighborhood. Teeth must either: ✅ Keep up with the expansion by erupting at the right pace. ❌ Lag behind, leading to overbites, open bites, and all sorts of trouble.
If you mentally freeze (ankylose) the teeth in place while the jaw continues growing, a space forms between the arches—this is the intermaxillary growth space.
The posterior teeth need to erupt significantly more than the front teeth just to maintain harmony.
Teeth grow in an arch-like fashion, with anterior teeth erupting almost straight up and forward.
👉 Backward Growth Rotation (The Skeletal Open Bite Struggle 😨):
The anterior teeth erupt way more than the posterior teeth.
If orthodontists erupt posterior teeth too much, it worsens the open bite. 🚨
Gear? Nope—Go Intrusive in Adults! 🛑
For nongrowing patients, forget extrusion—intrusion is the way to go! If there’s no jaw growth to accommodate changes, extruding posterior teeth can cause more harm than good by worsening the bite instead of fixing it.
Interocclusal Space: The Hidden Gamechanger 🕵️
Before deciding on the correction method, orthodontists analyze the interocclusal space (normally about 2 mm).
✅ Large Interocclusal Space (as in Class II, Div 2 cases) – Allows posterior teeth to erupt without tipping the mandible open. ❌ Minimal or No Interocclusal Space – Any eruption of back teeth forces the jaw open, which is a disaster in backward-rotating cases.
Facial Profile: Because Looks Matter! 😳
Orthodontics isn’t just about bite correction—it’s also about not making your patient look worse!
🔹 If a patient has a very convex facial profile, increasing the vertical dimension is a huge mistake 🚫. 🔹 Posterior rotation (hinging open) of the mandible worsens Class II relationships. 🔹 With a steep mandibular plane, just 2 mm of opening at the pogonion can cause a huge setback!
Esthetics: Smile Matters! 😁
Sometimes, deep bite correction isn’t just about function—it’s about making sure the patient looks good while talking and smiling!
✅ Toothy, gummy smile? Forget posterior extrusion—intrusion of anterior teeth is the way to go. ✅ Significant intrusion (>3-4 mm)? Get ready for surgical intervention (LeFort I osteotomy). ✅ High cervical headgear? Looks cool at orthodontic conferences but can steepen the occlusal plane too quickly—use with caution!
So, What’s the Takeaway? 🎓
1️⃣ Deep bite correction isn’t a one-size-fits-all treatment—it depends on growth patterns, occlusion, and facial esthetics. 2️⃣ Extruding posterior teeth works for growing patients, but adults need intrusive mechanics. 3️⃣ A bad treatment plan can make things worse—like turning a mild Class II into a full-blown mandibular retrusion disaster. 4️⃣ Sometimes, no amount of orthodontic magic can replace good old-fashioned surgery.
Correcting a deep bite isn’t just about straightening teeth—it’s about understanding jaw growth and making calculated moves. Think of it as playing chess… with teeth. ♟️🦷
So, next time someone asks why their deep overbite correction isn’t a simple “push-the-teeth-back” job, just show them this article and say: