Be cautious with patients with obtuse nasolabial angle—ASO may exaggerate nasal tip prominence.
🔵 MCQ 1: Predictive Analysis
A 24-year-old female patient with bimaxillary dentoalveolar protrusion is scheduled for bimaxillary anterior segmental osteotomy (ASO). If the maxillary incisor segment is planned for a 6 mm posterior movement, what is the most likely range of upper lip retraction based on systematic review evidence?
A. 1–2 mm B. 3–4 mm C. 4–6 mm D. 5–7 mm
✅ Answer: C. 4–6 mm Explanation: The upper lip typically retracts 33–67% of the hard tissue incisor movement. For a 6 mm setback, soft tissue movement would be approximately 2–4 mm (though some cases may show more).
🔵 MCQ 2: Clinical Decision-Making
A patient undergoing ASO shows an obtuse nasolabial angle preoperatively. What is the most appropriate surgical consideration to prevent worsening facial esthetics?
A. Proceed with ASO alone B. Perform rhinoplasty simultaneously C. Opt for mandibular setback only D. Combine ASO with subnasal augmentation
✅ Answer: B. Perform rhinoplasty simultaneously Explanation: ASO increases the nasolabial angle. In a patient with an already obtuse nasolabial angle, this can make the nose appear more prominent. Rhinoplasty may help balance facial esthetics.
🔵 MCQ 3: Application in Treatment Planning
Which of the following ST landmarks consistently showed minimal movement following ASO, making them less predictable targets for esthetic changes?
A. Labrale superius (Ls) B. Subnasale (Sn) C. Pronasale (Pn) D. Labrale inferius (Li)
✅ Answer: C. Pronasale (Pn) Explanation: Multiple studies showed minimal to no horizontal or vertical movement of the nasal tip (pronasale), suggesting limited nasal ST change from ASO alone.
🎯 You’re an orthodontic student wondering: “When should a genioplasty be done? What’s the deal with remodeling? Does age really matter?” Here’s your answer – all decoded from the Angle Orthodontist (2015) paper by Chamberland, Proffit, and Chamberland — in a crisp, clinical, and structured format. 💡📐
🦴 Wait… What’s This Fancy “Functional Genioplasty”?
Back in 1957, two legends—Trauner and Obwegeser—decided the chin needed a glow-up and introduced the inferior border osteotomy of the mandible. 💥 Boom! Chin augmentation was born—not just to make selfies better but to actually help patients functionally. That’s what we call a win-win. 🙌
🪛 More Than Just A Pretty Face: Why Move the Chin?
Let’s break it down:
Got a patient with a horizontal deficiency (aka retruded chin)?
Or maybe some vertical excess (think long lower face)?
With functional genioplasty, you can move that chin forward and upward—like giving it a motivational speech. 📈😎
And guess what? It’s not just cosmetic. Precious and Delaire (yes, they sound like a law firm, but they’re ortho legends) coined this combo the “functional genioplasty” because it:
💋 Improves lip function
😌 Helps achieve lip competence at rest
💪 Reduces lip pressure on lower incisors (bye-bye proclination problems!)
🔍 Study Recap:
54 patients underwent forward-upward genioplasty.
Divided into 3 age groups (<15, 15–19, >19 years).
Followed over 2 years to assess bone remodeling, symphysis changes, and post-surgical stability.
Compared to a control group that refused surgery.
📊 What This Study Wanted to Figure Out (And Why You Should Care)
This particular study wasn’t just chin-wagging for fun—it had serious ortho goals:
Understand how the chin bone remodels after genioplasty (Does it behave or act out? 🧐)
Track post-surgical stability in both growing and nongrowing patients (Spoiler: not all chins like to stay put! 👀)
🔬 Parameter
👶 <15 yrs (Group 1)
🧑 15–19 yrs (Group 2)
🧔 >19 yrs (Group 3)
🧍 Control Group
💡 Clinical Significance
Bone Remodeling
✅ Most remodeling
⚠️ Moderate
❌ Least
❌ None
Younger = better regenerative potential
Inferior Border Notch
↓ 1.2 mm(Sig.)
↓ 0.6 mm (Sig.)
↓ 0.3 mm (NS)
No change
Early surgery improves contour smoothing
Apposition at B Point
0.7–1.0 mm
Same
Same
-0.4 mm (Resorption)
Positive changes across all surgical groups
Symphysis Thickness
↑ Significantly
↑ Moderate
↑ Slight
↓ Thin over time
Chin strengthens structurally post-surgery
Facial Alveolar Bone Support
🆙 Enhanced
⚠️ Moderate
⚠️ Moderate
❌ Deteriorates
Improves incisor stability in younger patients
Lingual Bone Apposition
✅ Prominent
⚠️ Moderate
⚠️ Slight
❌ Absent
Long-term gain in chin bulk = aesthetic & functional support
Mandibular Growth
↔ Not affected
↔ Not affected
↔ Not affected
Natural progression
No hindrance to growth post-genioplasty
Relapse (Pg Position)
❌ Minimal
❌ Minimal
❌ Minimal
–
Genioplasty remains highly stable, even in growing patients
Surgical Limitations
✅ Canines erupted
✅ Canines erupted
✅ Canines erupted
NA
Don’t operate before mandibular canines erupt (~12–13 yrs)
🧑⚕️ Scenario 1: Meet Aarav, Age 13 — Class II with a Retruded Chin
You’re finishing Aarav’s orthodontic treatment. He has:
A retruded chin
Lip incompetence at rest
Mild lower incisor proclination (thanks to elastics and arch expansion)
Your options:
Retract lower incisors? Risk: bone dehiscence, relapse.
Advance the chin (Functional Genioplasty)? Potential benefits:
🦴 More bone formation (especially at the inferior border)
💪 Improved lip competence
🎯 Enhanced incisor stability
🔬 What the study shows:
Aarav’s age (<15) puts him in Group 1 — the best bone response!
Hey ortho enthusiasts! 👋 You’ve probably heard the legend: nickel-titanium (NiTi) archwires are the magic wands of orthodontics. Pop them in, tie up those wild teeth, and—voilà!—straight smiles for everyone. But is it really that simple? Let’s dig deeper.
The Superpowers of NiTi Archwires
Nickel-titanium wires are like the superheroes of the archwire world:
Super Flexible: They can be bent out of shape and still bounce back.
Shape Memory: They “remember” their original shape and gently coax teeth into alignment.
They also got two personalities:
Martensitic phase (soft, bendy 🤸♀️) — activated in cold 🍦
Austenitic phase (strong, springy 💪) — activated in heat ☕ So, every time your patient eats an ice cream and sips a hot coffee, the wire is having an identity crisis. 😅
This thermo-active property gives them the ability to keep applying light continuous forces over a range of tooth movements — and that’s a blessing for alignment! 🙌
So, what’s the catch? 🤔
Imagine you’re almost done with alignment, but there’s that one stubborn tooth (or maybe two) still out of place. The rest are lined up like a well-behaved marching band, but this one’s doing its own thing. 🕺
1. Losing Space You Worked Hard to Gain
Result? Space closes up again—like your hard work just vanished! 😱
You’ve created space for the rebel tooth using stiffer wires and maybe some springs.
If you switch back to a super-flexible NiTi wire to pull in that last tooth, the wire might not hold the space.
2. Vertical Problems: Intrusion and Spreading
Trying to engage a partially erupted tooth? The wire might push down (intrude) or spread the neighboring teeth.
If your patient has a normal or shallow overbite, this can mess up the bite and cause occlusal issues.
(Deep overbite? You might get away with it—but don’t push your luck! 😅)
3. Arch Form Distortion
Flexible wires are great, but if you force them to pick up a tooth way out of line, they can distort the whole arch.
Imagine pulling a bungee cord from the middle — the arch becomes a mess!
So, What’s the Solution? 🛠️
Don’t just rely on flexible NiTi wires for those last tough teeth! Instead, use a combination approach:
Start smart with round NiTi – Great for general alignment.
Progress to rectangular NiTi → rectangular SS – This gives control over torque and arch form.
Use auxiliaries smartly – Compressed coil springs, lacebacks, etc., to gain space for stubborn teeth.
DO NOT go back to floppy NiTi wires 😵 if you’ve already moved up to SS wires. That’s like going from a steel sword to a rubber noodle in battle ⚔️🍝.
Step/Component
Description
Why?
Base Archwire
0.018 high-tensile stainless steel wire formed to the desired arch form.
Provides rigidity to maintain arch form and prevent distortion in horizontal & vertical planes.
Space Creation (Optional)
Compressed NiTi push coil can be placed on the base wire to create space for misaligned teeth.
Allows controlled space gain without losing arch form stability.
Piggyback Archwire
0.014 NiTi wire cut to length, including two teeth on either side of the displaced tooth.
Flexible and elastic, used specifically to align the displaced tooth without affecting the whole arch.
Partial Ligation (Localising Modules)
Piggyback wire is ligated only on one wing of brackets adjacent to displaced tooth initially.
Keeps wire in place but allows sliding movement for gradual alignment.
Full Engagement
Once positioned, piggyback wire is fully ligated on all four wings of the displaced tooth’s bracket.
Ensures the tooth is fully engaged for effective alignment.
Base Archwire Placement
Base wire placed on top of piggyback wire; ligated on all teeth except those with localising modules.
Maintains arch form while piggyback wire does its job underneath.
Removing Localising Modules
Localising modules removed after base wire is slightly lifted; replaced with full ligation modules.
Frees piggyback wire to slide smoothly while keeping everything stable.
Final Alignment & Wire Removal
After alignment, piggyback wire is removed; displaced tooth fully ligated to base wire.
Simplifies final stages and allows progression to regular archwires.
Alternative Method
Use full-sized rectangular wire instead of base + space coil wire.
More rigidity and no need to bend wire; but requires displaced tooth to be very close for engagement.
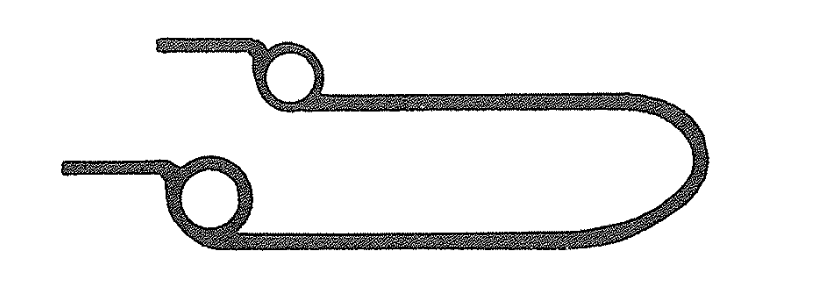
Deep bites are tricky—not just vertically, but also in the sagittal and transverse planes. But what if you could correct both anterior and posterior segments simultaneously with calibrated force? Enter the 0.016-inch distal extension, an appliance designed to erupt and rotate both halves of the arch in harmony.
🔩 Indications: When Should You Use This Appliance?
✅ Growth potential remains — you need an eruptive force.
✅ Second-order discrepancy: Incisors are higher than canines.
✅ Mild arch length deficiency: 2–3 mm per side.
✅ Deep curve of Spee requiring leveling.
✅ Extractions performed (usually 1st premolars).
🧰 Appliance Design: What’s It Made Of?
Component
Description
Base arch
0.018 × 0.025 SS with helices (or 0.017 × 0.025 TMA for flexibility)
Distal extension
0.016-inch wire with: 1) Vertical loop mesial to canine, 2) Helix distal to canine
Lingual arch
0.036-inch wire to stabilize molars and maintain transverse control
Where does the distal extension go?
It may lie over the tie-wings of the second premolar bracket
OR hook over the buccal segment wire for stability
🔬 Biomechanics: Alpha + Beta Moment Logic
The beauty of this system lies in its dual-moment design:
Alpha moment = From the distal extension → anterior eruption and rotation (roots distal)
Beta moment = From the base arch → posterior eruption and rotation (roots mesial)
💡 Equal alpha and beta moments (A = B) → Balanced leveling of anterior and posterior segments. 💡 More alpha > beta → More anterior eruption. 💡 More beta > alpha → More posterior eruption.
💡 Clinical Scenario: Classic Use Case
👩⚕️ Patient:
13-year-old female
Deep curve of Spee
Class I extraction case (1st premolars removed)
Incisors slightly higher than canines
Treatment Strategy:
Use 0.016-inch distal extension with base arch + lingual arch
Activate helix distal to canine (preactivation bends)
Open the vertical loop mesial to canine by 2 mm for controlled canine eruption
Tie back the base arch anteriorly and posteriorly through helices
Expected Response:
Canines and lateral incisors erupt and rotate (roots distal)
Central incisors may not erupt, due to depressive force at midline (from base arch)
Buccal segments rotate with mesial root movement (flattening curve of Spee)
Canines nudge distally, helping resolve minor crowding from extraction space
📈 Smart Force Calibration:
Use a Dontrix gauge
Activate base arch to deliver 100g per side (midline 200g)
Adjust vertical loop and helices for fine control of eruption depth and direction
Goal: Flatten steep posterior occlusal plane while maintaining incisor position.
👨⚕️ Case:
15-year-old male
Deep overbite due to extruded second molars and upright first molars
Incisors already well-aligned, no need for anterior extrusion
🎯 Action:
Strong preactivation of base arch helices (high beta moment)
Minimal or no activation in distal extension (low alpha moment)
Anterior tie-back ensures incisor control
Lingual arch reinforces anchorage
🧠 Biomechanical Result:
Posterior teeth (especially molars) erupt and rotate
Incisors stay stable or even intrude slightly
Curve of Spee flattens mostly from the posterior end
💡 Takeaway: Boost beta moment when you want to rotate posterior segments without disturbing the incisors.
🔁 Quick Recap:
Situation
Dominant Moment
Effect
Want both anterior + posterior leveling
Alpha = Beta
Balanced eruption
Canines/laterals are high
Alpha > Beta
More anterior eruption
Molars need eruption
Beta > Alpha
More posterior eruption
🧠 Final Student Takeaway: Logic-Based Questions Before Using the Distal Extension
Is there a vertical difference between incisors and canines?
Do you want both anterior and posterior segments to level together?
Are extractions done and minimal arch space required?
Is the lingual arch in place to counter uncontrolled molar movement?
Have you pre-activated helices/loops to deliver precise alpha and beta moments?
🧪 Bonus Concept: Incisor Behavior
🔍 Incisors won’t erupt unless alpha moment overcomes the midline depressive force from the base arch. That’s why laterals and canines erupt more than centrals!
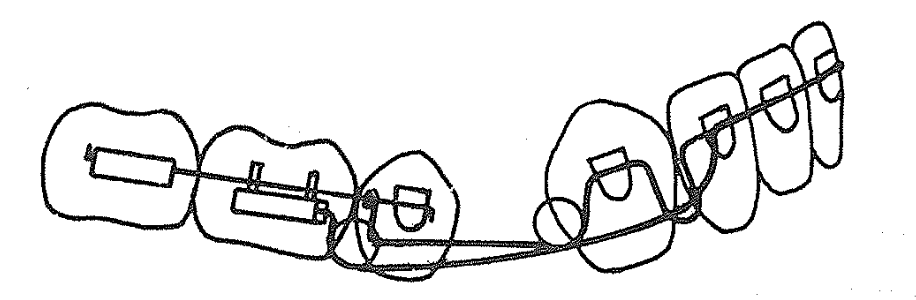
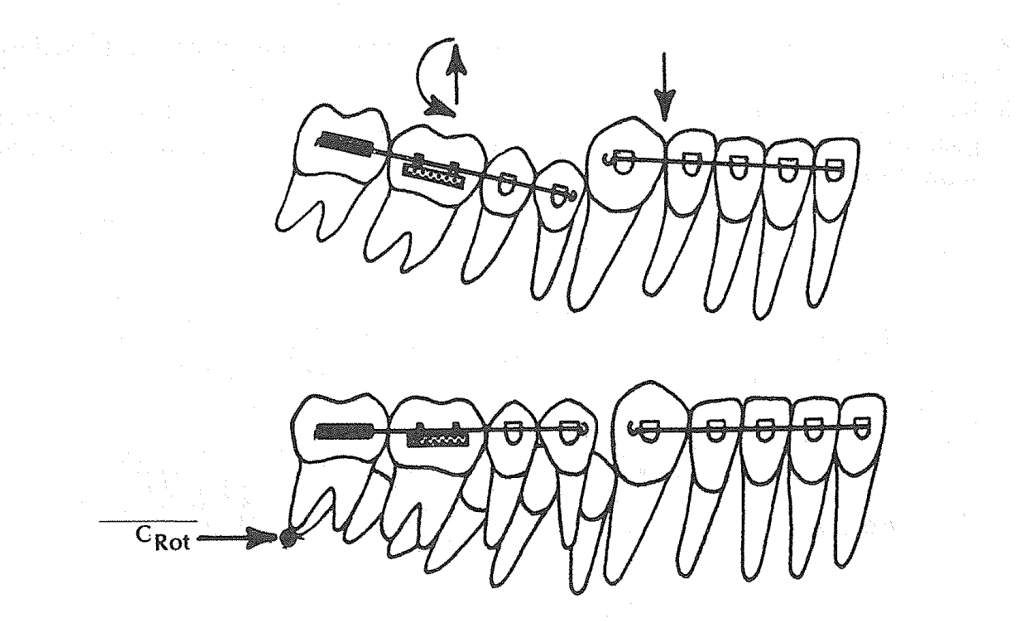
When managing a deep overbite, we often think about intrusion arches, curve of Spee leveling, or anterior bite turbos. But have you met the “base arch”?
This humble-looking yet biomechanically brilliant appliance does more than you expect — especially when molar control and occlusal plane leveling are your goals.
🔍 What Is the Base Arch?
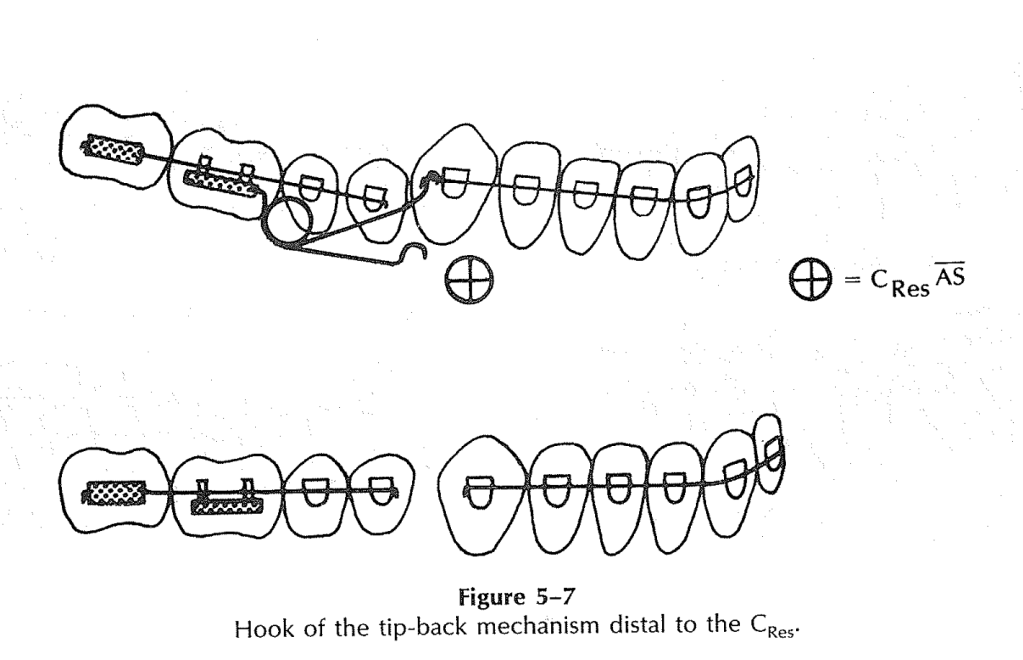
Also called the intrusive arch, the base arch shares design features with the tip-back mechanism:
Buccal segments: 0.018 × 0.025 inch stainless steel
Anterior segment (from canine to canine): 0.016 inch or larger
Lingual arch: mandatory to stabilize molars
The base arch wire (0.017 × 0.025 inch TMA or 0.018 × 0.025 inch SS) includes helices or stops/washers.
But here’s the twist:
The base arch is tied back.
This fixes the hook in place — no sliding anteroposteriorly as in tip-back.
The center of rotation (Crot) shifts mesially, closer to the mesial root of the first molar.
💡 Clinical Scenario 1: Deep Bite Without Flaring Incisors
👩⚕️ Patient:
14-year-old female
Deep curve of Spee, increased overbite
Incisors well-aligned, not flared
Goal: Level curve of Spee without proclination
Treatment Plan:
A base arch is used with a lingual arch in place. The base arch is:
Preactivated and tied back
Not sliding (fixed helices or stops used)
Calibrated with a Dontrix gauge to deliver ~200g (100g per side)
What Happens Biomechanically?
The tied-back base arch applies an eruptive force to posterior teeth.
The Crot shifts mesially → molars rotate and erupt, reducing the curve of Spee.
Incisors remain stable, no flaring, thanks to tie-back ligature through helices.
You get vertical leveling without anterior dentoalveolar protrusion.
💡 Clinical Scenario 2: Deep Bite with Slight Incisor Flaring👨⚕️ Patient:
👨⚕️ Patient:
15-year-old male
Class I molar, but deep overbite
Mild lower incisor flaring, crowding resolved
Posterior bite is underdeveloped
Treatment Plan:
Use a base arch without tying it back, and no lingual arch is placed (intentional).
What Happens?
Incisors become more upright, which is desired in this case. Without a tie-back, the anterior segment is free → some lingual crown torque may develop. The lack of a lingual arch allows posterior eruption and rotation to happen more freely. Curve of Spee flattens.
How to Decide When to Use Base Arch and How to Modify It
Clinical Goal
Use Base Arch?
Tie Back?
Lingual Arch?
Expected Result
Deep bite, no flaring
✅ Yes
✅ Yes
✅ Yes
Eruption of molars, anterior stability
Deep bite with incisor flaring
✅ Yes
❌ No
❌ No
Posterior eruption + anterior uprighting
Need arch length gain
❌ No (use tip-back instead)
❌
❌
Base arch doesn’t increase arch length
Avoid incisor flaring
✅ Yes
✅ Yes
✅ Yes
No anterior proclination
🧠 Ask Yourself Before Using a Base Arch:
Is anterior flaring acceptable or not?
Do I need posterior eruption and rotation to flatten the curve?
Will the lingual arch block or assist the desired moment?
Is there any need to increase arch length (then consider tip-back instead)?
And an anterior crowding with slightly flared lower incisors.
You’re not quite ready for extractions, and distalization isn’t needed in full force. You just need a smart trick to upright the molars and gain that precious 1–2 mm of space per side. What do you do?
Enter the Tip-Back Mechanism.
🎯 What Is the Tip-Back Mechanism?
Think of the tip-back spring like a little lever system. It uses a negative moment to rotate the buccal segments (molars and premolars) upright, making them more vertical instead of tipped mesially.
When you do that, the buccal segments “tip back”, and voilà – a small but meaningful amount of arch length is gained anteriorly.
Key term:Crot (center of rotation) – in this case, found distal to the second molar, allowing effective rotation and eruption of the buccal segment.
🛠️ Components of a Tip-Back Setup
Here’s what goes into this appliance:
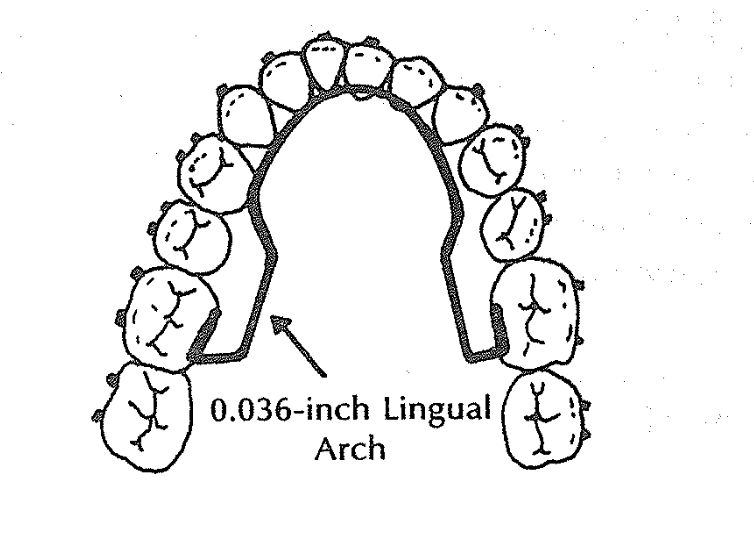
0.036” Lingual Arch – for anchorage.
0.018 × 0.025” Anterior Segment – typically from lateral to lateral or lateral to premolar.
Buccal Stabilizing Segments (BSS) – rectangular wires (0.018 × 0.025”) from molars to premolars.
The Tip-Back Hook/Spring – placed strategically to apply the eruptive & rotational force.
✅ Scenario 1: Hook Placed Between Canine and Lateral Incisor (Near CRes of Anterior Segment)
Patient: 13-year-old with mild lower incisor crowding, deep bite, and normal axial inclination of anteriors.
Clinical Findings:
Deep curve of Spee
Lower incisors are upright
Mandibular canines and lateral incisors are aligned but crowded
Slight arch length deficiency (~2 mm)
Hook Placement:
👉 Between lateral incisor and canine, i.e., near the center of resistance (CRes) of the anterior segment.
Biomechanical Reasoning:
When the hook is placed close to the CRes, the force system causes minimal rotational tendency on the anterior segment.
This results in controlled tip-back and uprighting of the molars without flaring or retraction of incisors.
Eruptive force is delivered to molars → distal crown tipping → space is gained mesial to first premolars.
✅ Scenario 2: Hook Placed Distal to the Canine (Distal to the CRes of Anterior Segment)
Patient: 14-year-old with pseudo-Class III tendency and flared lower incisors
Clinical Findings:
Lower incisors show labial flaring
Canines are slightly higher (gingivally placed) than central incisors
There is mild lower anterior crowding
Patient shows forward functional shift of the mandible
Hook Placement:
👉 Distal to the CRes—typically between canine and first premolar
Biomechanical Reasoning:
Force acts below and behind the CRes of the anterior segment.
This creates a clockwise moment, causing the roots of the incisors to come forward, helping to upright flared anteriors.
It counteracts the labial inclination, resulting in a flatter occlusal plane.
Today, we’re diving into the long-term success of comprehensive Class II correction. That’s right—grab your elastics and settle in, because this one’s going to be more enlightening than a mid-treatment ceph.
Now, when it comes to treating Class II malocclusion, there’s a question that keeps popping up like a stubborn second molar: What makes the results last? I mean, sure, we can correct the bite, make it look Instagram-worthy at debond, but what stops it from bouncing right back like your patient’s missed appointment excuses?
Let’s start with timing. You might think that earlier is better—like catching a flight or beating the lunch line at a conference—but evidence says otherwise. A randomized controlled study—yes, the gold standard of scientific drama—looked at early headgear treatment and found that timing? Not critical. That’s right, early intervention is not the orthodontic version of calling shotgun. Turns out, what really matters is growth—good, old-fashioned, pubertal, awkward selfie-stage growth.
Specifically, we’re talking about favorable downward and forward mandibular growth. It’s like Mother Nature throwing you a bone—literally. If that mandible keeps chugging forward during and after treatment, your Class II correction has a fighting chance of holding up. It’s like the orthodontic version of having backup power on your spaceship. Without it, you’re just drifting in relapse space.
Speaking of relapse—and we must, because it’s as inevitable as a bracket popping off before prom—studies show that one of the main culprits in post-treatment change is the mesial movement of the upper molars. Yep, those sneaky maxillary molars are edging forward like they’re trying to photobomb your perfect occlusion.
But fear not! In adolescents, forward mandibular displacement comes to the rescue. It compensates for the relapse, counteracting that molar mischief by pushing things back into alignment. It’s like a Jedi mind trick, but with jawbones.
Now, let’s talk adults. You know, the ones who call to ask if they can get Invisalign but also admit they “might not wear it much.” In adult patients, we don’t have the same growth advantages. The dental and skeletal structures are basically on a “no more updates” setting. So post-treatment changes? Limited. But here’s the kicker—they still show a similar degree of relapse in sagittal molar correction as adolescents. Which feels unfair, but biology never signed a contract.
So, to sum it up, if you want long-term success in Class II correction, don’t obsess over starting early—focus on managing and maximizing growth. Monitor molar movement like it’s your ex’s new Instagram activity, and brace yourself for the fact that some relapse is part of the game, no matter the age.
And remember—Class II correction is a marathon, not a sprint. Or more accurately, a guided, biomechanically orchestrated, compliance-dependent crawl toward ideal occlusion. But hey—resistance is futile… especially if you ignore anchorage.
Until next time, keep those wires tight, those retainers in, and never underestimate the power of mandibular growth.
What do you do when a lateral incisor is missing from birth (congenitally)?
You’ve got three main options:
Option
Description
Pros
Cons
🦷 Space Closure
Canine takes the lateral’s place
No prosthetic needed
Canine isn’t a perfect aesthetic match
🧱 Resin-Bonded Bridge
A minimally invasive bridge
Saves adjacent teeth
53% survival in 10.5 yrs, may fall off
🛠️ Implant
Place a single-tooth implant
Long-term, tooth-friendly
Timing is tricky, needs bone support
📚 STUDY GOAL:
To find out: When is the best time to start orthodontic space opening if the goal is to place a single-tooth implant later?
👥 THE PATIENT CREW:
14 Caucasian teenagers (9 girls 👧, 5 boys 👦)
26 missing lateral incisors
All treated at University Hospital Carl Gustav Carus, Dresden (That’s in Germany 🇩🇪, folks!)
🦴 THE BONE CHRONICLES: T1 ➡️ T2 ➡️ T3
Timeline Translation:
Time Point
Age (Mean ± SD)
What’s Happening
T1
13.02 ± 1.49 yrs
Start of ortho treatment 👩⚕️
T2
15.55 ± 1.38 yrs
End of ortho treatment 🎉
T3
18.67 ± 2.83 yrs
Implant placement time 🔩🦷
📉 Bone Loss Over Time (Yikes!):
Time
Bone Deficiency (mm²)
Significance vs T1
T1
0.26 ± 0.69
–
T2
1.92 ± 1.54
✅ P = .044
T3
3.77 ± 3.07
✅ P = .028
👀 Observation: The longer you wait, the more bone disappears. So don’t dilly-dally with space opening if you’re planning an implant!
🕰️ EARLY vs. LATE TREATMENT – Who Wins?
Group
T1 Deficiency
T2 Deficiency
T3 Deficiency
Early Starters ⏰
0.44 mm²
2.05 mm²
2.61 mm² ✅
Late Starters 😴
0.00 mm²
1.78 mm²
4.93 mm² ❌
🏆 Winner: Early treatment group – less bone loss at implant time!
📐 Incisor Inclination Drama
Ortho mechanics led to incisor proclination during space opening. Let’s break it down:
Time
Inclination Angle (°)
Change
Start (T1)
22.1° ± 6.9
–
End (T2)
31.5° ± 7.2
+9.4°
⚠️ Why it matters: The implant angle needs to match the natural inclination of the incisors. Planning is 🔑!
🧪 IMPLANT PLACEMENT: A MINI MANUAL
Ideal implant size: 3.75 mm shaft, 4 mm collar (But minis like 3.0 mm are also used!)
Safe distance: At least 1 mm between implant and neighboring roots.
Required bone support: 6 mm × 12 mm = 72 mm² implant surface.
Gingival trick: Lateral incisor gingival margin is 1 mm higher than central incisor—so the implant must be placed 1 mm below the central’s margin.
🧠 Pro Tip: Use cephs and stone casts to assess inclination and bone volume before diving in!
📉 Alveolar Ridge Loss: When Bone Gets Ghosted
Here’s the tea ☕:
Once a tooth is missing (especially in the front upper jaw), the bone and soft tissue in that area start shrinking—kind of like a deflated balloon 🎈.
Researchers noticed something wild 😳:
🕒 Time Point
% Ridge Deficiency
T1 (Start of ortho treatment)
0.4%
T2 (End of ortho)
2.7%
T3 (Time of implant)
5.2%
👉 14x increase from T1 to T3! Yikes!
But wait…
The late treatment group had less bone loss at T2. But then they lost more bone by T3 compared to the early group. 🤔
Translation: It’s not just about when you start ortho—it’s about how the bone behaves later, and spoiler alert: it’s moody.
🧬 Blame It on Your Genes
There’s a strong genetic component to how much ridge loss happens—some people lose more, some less.
🔬 Why the variability?
Growth factors (hello, biology!) 📈
Differences in how people’s bones respond after treatment
Timing of canine eruption and extraction of baby teeth
🐶 Canines to the Rescue
If you remove the primary lateral, the canine erupts into that space. But if you remove the primary canine too early → 🥴 buccolingual resorption (bye bye, bone).
👉 Pro Tip: Only extract the baby canine just before you move the permanent one distally. This way, the root stretches the PDL and… 💥 Builds Bone Like a Boss 💪
📏 Kokich vs. This Study: A Bone-Off!
Study
What they found
Kokich (20 pts)
Less than 1% bone loss up to 4 years later 😇
This study
Up to 5.2% loss at implant time 😱
Why the difference? This study measured surface area (6–12 mm region), not just distances. Also, they only looked at maxillary cases, not mandibular or premolars. Apples vs. oranges… or molars vs. incisors 🧐🍊
📣 Final Orthodontic Pro Tips 🎓
🎯 1. Late is great (sometimes)
Starting treatment later (around age 16.5) = less time for ridge to disappear before implant.
But don’t be too late or you’ll miss the growth train 🛤️
📐 2. Watch those incisor angles!
Mean incisor proclination at T2 = 31.5° 😮
Standard = 22.1° → so 9.4° extra
Over-proclination = thin bone = implant trouble (think 👻 bone and 😬 visible crown margins)
📏 3. Don’t ignore root spacing!
Just because crowns look good doesn’t mean roots are happy 😬
Use wire bending or bracket repositioning to create that root party room 🎉🦷🦷🦷
🧠 Growth Matters: Don’t Jump the Implant Gun!
Since implants don’t move (hello, ankylosis 😑), don’t place them before facial growth is done.
📸 Take a ceph → wait 6 months → take another If Nasion to Menton doesn’t change = 💡 Growth done!
🧠 TL;DR for Ortho Ninjas 🥷
Takeaway
Why It Matters
Ridge loss is real!
And it gets worse with time ⏳
Canine movement = bone creation
But only if timed right 🕒
Late treatment can be helpful
Less waiting time till implant 🚀
Incisor proclination can hurt you
Implant survival needs a strong cervical bone base 🧱
Roots matter too!
Not just crown position 😅
So remember ortho fam: You’re not just aligning teeth—you’re sculpting bone for the future 💀➡️🦷✨