When we think of Class III malocclusion, our minds instantly jump to “mandibular prognathism,” “maxillary deficiency,” or that unmistakable concave profile. But what if we told you that the story begins much deeper—in a region most clinicians rarely visualize: the cranial base.
A fascinating study by Chang et al. (2005) reveals how subtle changes in the cranial base shape can quietly set the stage for a Class III facial pattern long before the first molar even erupts.
🔍 Why the Cranial Base Matters
The cranial base serves as the architectural foundation for:
The position of the mandible
The forward placement of the maxilla
TMJ inclination
Facial profile development
Think of it as the “orthodontic motherboard.” If it develops differently, everything built upon it shifts.
1. The Big Finding: A Shorter Posterior Cranial Base
The study compared 100 Class III children with 100 normal controls. The most striking difference?
👉 The posterior cranial base was significantly shorter in Class III subjects.
This included reduced:
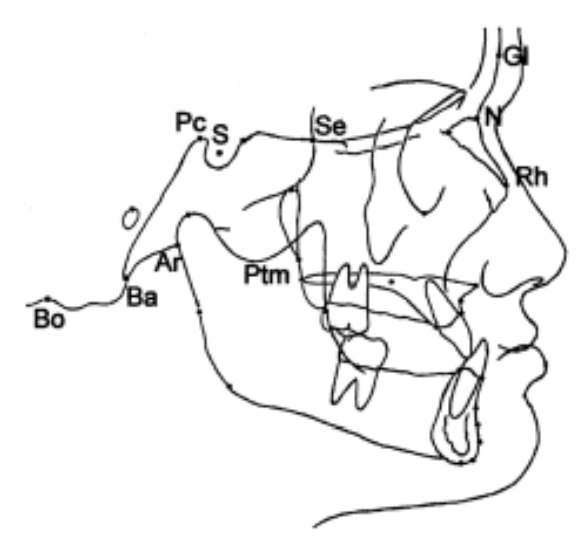
S–Ar
Pc–Ar
Pc–Ba
Pc–Bo
Ar–PM
Bo–PM
This matters because the posterior cranial base guides the position of the condyle. A short base = the TMJ sits more forward → the mandible follows → Class III appearance emerges.
Clinically: Ever seen a child with mild mandibular projection but no clear functional shift? Think posterior cranial base deficiency.
2. The Saddle Angle Story: More Acute Angulation
The study found:
N–S–Ar and N–Pc–Ar angles were more acute in Class III children.
This means the cranial base is more bent—a phenomenon sometimes called “cranial base kyphosis.”
Why it matters:
A more acute saddle angle shifts the glenoid fossa forward → the mandible comes along for the ride.
This is a skeletal pattern—not a habit, not a posture.
4. The Cranial Base Pattern Is Set Early—Very Early
Several classic studies say show that:
Cranial base shape develops prenatally
The saddle angle remains remarkably stable through childhood
Variations appear early and persist
This explains why:
Class III patterns often run in families
Interceptive treatment is most effective before growth accelerates
Prediction of Class III progression often depends on baseline cranial-base morphology
Final Thought
Class III malocclusion is not simply a “big mandible vs small maxilla” problem.
It’s a developmental story—one rooted in the very foundation of the skull.
Understanding cranial-base morphology gives orthodontists a sharper lens to diagnose, counsel, and treat Class III patients—particularly in their formative years.
Growth & Treatment Planning Hints
Shortened, flexed posterior cranial base → Expect stronger skeletal Class III tendency. → Earlier interceptive approaches (facemask + RME, chincup, functional orthopedics) may be more justified.
Cranial base near normal, but Class III present → Consider dominant roles of maxillary retrusion, mandibular overgrowth, or local factors.
Rapid visual check on lateral ceph
Look at posterior base: S‑Ar, Pc‑Ar, Pc‑Ba, Ar‑PM, Ba‑PM, Bo‑PM.
Rapid Maxillary Expansion (RME) is one of the most powerful orthopedic tools available during growth. While most of us associate RME with “widening the palate” and correcting crossbites, its influence extends far beyond the transverse plane.
A landmark study by Farronato et al. evaluated 183 growing patients—Class I, II, and III—and revealed that RME also drives important sagittal and vertical changes. These effects vary significantly depending on the skeletal class, which is critical when planning early treatment.
This blog breaks down these findings into practical clinical insights you can apply from your very next patient.
🔍 Why RME Matters Beyond Transverse Correction
When the Hyrax appliance opens the midpalatal suture, it triggers a chain reaction:
Circummaxillary sutures loosen
Maxilla may reposition
Mandible adapts to new occlusal contacts
Vertical dimensions can shift
These effects can help or hinder skeletal correction—if you understand how they behave in each malocclusion.
🔹 CLASS I
Sagittal
ANB ↓ slightly (–0.34°) → Mild improvement toward Class I
Maxilla & Mandible
No significant sagittal movement
Slight downward–backward rotation of palatal plane
Vertical
No significant N–Me change
Mandibular plane: unchanged
👉 Clinical Impact
Improves transverse deficiency without disturbing sagittal or vertical balance.
Class I kids are like the straight-A students who also volunteer and play violin. You expand them and—poof!—they get wider. That’s it.
Downward–backward rotation of mandible & palatal plane
👉 Clinical Impact
RME improves early skeletal Class III by: ✓ Forward translation of maxilla ✓ Clockwise rotation of mandible
Now, Class III… These kids don’t just enter the clinic. They storm in with a plotline.
RME hits them and BAM— the maxilla moves forward (+0.81°), the mandible rotates down and back like it’s trying to avoid an awkward conversation, and ANB shoots up like a Broadway finale (+2.16°).
Meanwhile, vertical height increases too. Because of course it does. Why do one thing when you can do five?
Class III kids after RME look like they’ve had a character arc. Like they went to Paris and “found themselves.”
Summary of Cephalometric Changes After RME
Parameter
Class I
Class II
Class III
Maxillary Position (SNA)
No significant change
No significant change
↑ SNA (maxilla moves forward)
Mandibular Position (SNB)
No significant change
↑ SNB (mandible moves forward)
↓ SNB (mandible rotates down–back)
ANB Angle
↓ slightly (minor Class I improvement)
↓↓ significantly (Class II improves)
↑↑ significantly (Class III improves)
Palatal Plane (SN–SNP.SNA)
↑ (down–back rotation)
↑ (down–back rotation)
↑ more (significant rotation)
Anterior Facial Height (N–Me)
No significant change
No significant change
↑ increased vertical height
Mandibular Plane (SN–GoGn)
No significant change
No significant change
Mild ↑ (not always significant)
Posterior Facial Height (S–Go)
No significant change
No significant change
No significant change
Clinical Interpretation of RME Effects
Clinical Aspect
Class I
Class II
Class III
Sagittal Effect
Minimal
Mandible moves forward → improves Class II
Maxilla advances + mandible rotates back → improves Class III
Vertical Effect
Stable
Stable
Vertical dimension increases (N–Me ↑)
Overall Skeletal Correction
Mild
Moderate
Strong
Most Active Phase
Active + Retention
Mainly retention
Active phase
Risk Areas
Few
Few
Vertical increase in hyperdivergent cases
Mechanism Behind RME Changes
Effect
How It Happens
Mandibular forward shift (Class II)
Removal of transverse “lock” → lower arch can posture forward (McNamara effect)
When you begin the leveling and aligning stage in fixed orthodontic treatment, one challenge always lurks around the corner—upper anterior teeth love to tip forward. This is especially true with preadjusted edgewise appliances because of the built-in tip in the brackets.
To solve this, McLaughlin and Bennett introduced something brilliantly simple: the laceback ligature. The idea was elegant—use a figure-eight stainless-steel ligature from the molar to the canine to prevent incisor flaring and apply light distalizing forces on the canine.
But the clinical question is: 👉 Are laceback ligatures actually effective? 👉 And how do they compare to something stronger, like NiTi closed coil springs?
A controlled clinical study by Melih Sueri and Tamer Turk (Angle Orthodontist, 2006) provides the answers—and some surprises.
1. PURPOSE OF LACEBACK LIGATURES
Prevent forward tipping of upper anterior teeth during leveling.
Apply a light, interrupted distalizing force on canines.
Provide controlled movement with minimal anchorage loss.
2. FORCE APPLICATION
Laceback Ligature
Material: 0.010″ stainless steel ligature wire
From first molar → canine
Re-tighten at every visit
Force type: interrupted / light
NiTi Closed Coil Spring
Material: Superelastic NiTi
Force: 150 g
From first molar → canine
Reactivate monthly
Force type: continuous
3. CLINICAL EFFECTS
Canine Movement
Parameter
Laceback
NiTi Coil Spring
Distal movement
~1.67 mm
~4.07 mm
Distal tipping
4.5°
11.6°
Rotation
2.7° distobuccal
7.8° distopalatal
Movement rate
0.66 mm/month
1.61 mm/month
🔎 Interpretation:
Lacebacks = Slower but more controlled movement
NiTi coil springs = Faster, less controlled, more tipping & rotation
4. MOLAR MOVEMENT (Anchorage Loss)
Parameter
Laceback
NiTi Coil Spring
Mesial movement
0.70 mm
1.93 mm
Mesial tipping
3.9°
3.1°
🔎 Interpretation:
Lacebacks cause significantly less anchorage loss.
5. INCISOR EFFECTS
Upper incisors show retroclination and posterior movement with both methods due to overall anterior segment retraction forces.
WHEN TO USE WHAT?
✔ Use Laceback Ligatures When:
You want maximum anchorage control
You’re in the leveling & aligning stage
Controlling canine tipping/rotation is critical
Light, intermittent forces are preferred
✔ Use NiTi Closed Coil Springs When:
You need faster canine retraction
Anchorage can be reinforced or is less critical
Canine tipping is acceptable or planned
Final Thoughts
This study beautifully highlights a truth every orthodontist must embrace: Success isn’t just about moving teeth—it’s about controlling how they move.
Lacebacks may look old-school, but they offer unmatched finesse during the initial phase of treatment. NiTi coils, on the other hand, are powerful tools when used at the right time.
Mastering when to use each one is a hallmark of an excellent clinician.
Class III cases can be tricky—because what you see clinically may not always be what’s truly happening skeletally. A major reason for this confusion is the mandibular closure path.
In simple terms, you must ask:
👉 Does the mandible really sit forward? or 👉 Is it just sliding forward because the incisors collide during closure?
This distinction is essential for correct diagnosis and avoiding overtreatment.
True vs Pseudo Class III — The Core Difference
Feature
True Class III 😬
Pseudo Class III 🙂
Cause
Skeletal discrepancy
Premature incisor contact
Forward mandibular shift
❌ Minimal / None
✅ Present (functional slide)
Ceph ANB
Negative due to skeletal
Improves when edge-to-edge
Profile
Concave
Straight / near normal
Treatment
Growth modification / Surgery
Remove interference + limited ortho
Why Functional Shifts Matter So Much
A patient may appear severely Class III when teeth are in habitual occlusion. But once you guide them into edge-to-edge, the face and ceph often tell a different story.
This happens because many Class III patients have a:
This functional shift can exaggerate the skeletal discrepancy and lead to misdiagnosis.
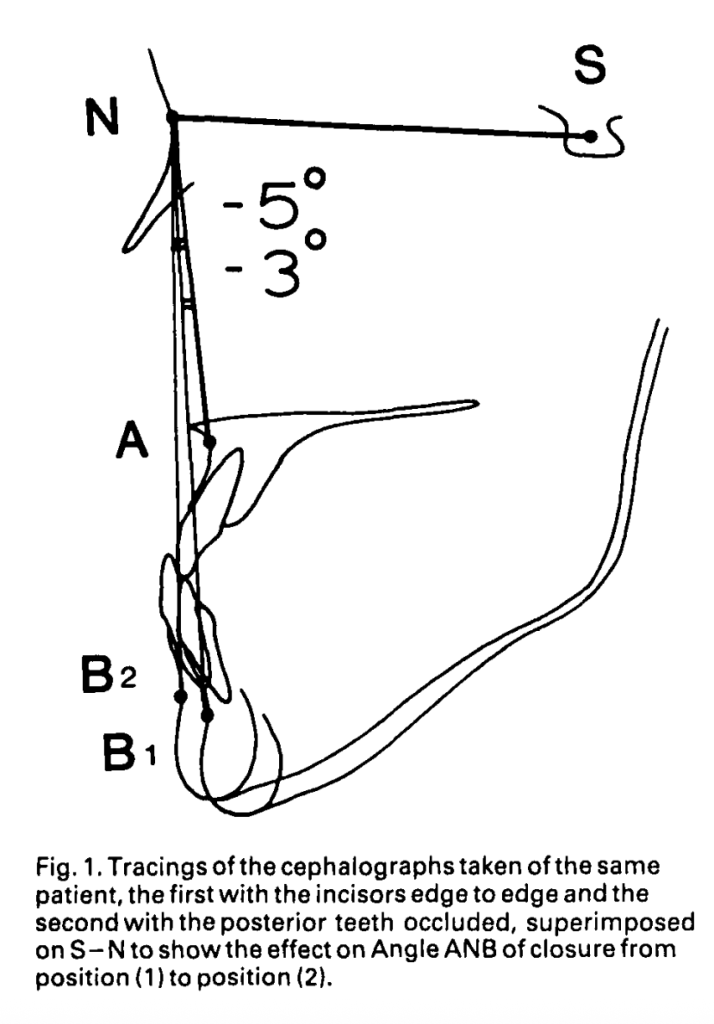
The closure path also involves a vertical component. As the mandible moves forward, it may also rotate downward, further altering the apparent skeletal relationship
What Actually Happens During Closure (Based on the Study)
1. Closure begins → incisors touch edge-to-edge
→ This causes an initial forward shift of the mandible.
2. As closure continues → condyles move backward
→ This cancels most of the forward movement.
3. Final result
✅ Most Class III patients show little to no real mandibular displacement when the posterior teeth are in occlusion.
This means the apparent Class III worsening is mostly positional, not skeletal.
Role of Overbite in the Functional Shift
Overbite depth determines how much shift can happen:
Deep overbite
➡️ Less functional forward displacement ➡️ Hinge closure pushes condyles backward effectively
Shallow overbite
➡️ More chance of a genuine functional slide ➡️ Slight displacement may persist even in full occlusion
What Two Cephs Really Tell You
Taking both:
Edge-to-edge ceph, and
Habitual occlusion ceph, usually does not dramatically change your skeletal assessment.
Typical Changes Seen
Parameter
Edge-to-edge
Habitual Occlusion
Interpretation
SNB
↓ by ~3°
↑
Hinge closure effect, not forward displacement
ANB
↑ by ~3°
↓
Mostly due to vertical change from overbite
Key insight:
The ANB difference is largely due to vertical position changes—not true mandibular forward movement.
When Does Residual Functional Shift Still Matter?
For most patients → minimal to none.
But in patients with shallow overbite (<4 mm) a small functional shift may be measurable:
SNB decreases slightly (≈ –0.4°)
ANB increases slightly (≈ +0.28°)
These differences are statistically significant, but rarely large enough to alter your diagnosis.
Practical Chairside Screening
A. Suspect Pseudo-Class III if:
A noticeable forward jump during closure
Edge-to-edge looks less Class III
Shallow overbite
Strong anterior interferences
B. Suspect True Skeletal Class III if:
No forward shift on closure
Edge-to-edge still looks Class III
Deep overbite (hinge movement dominates)
Minimal ceph difference between both positions
Should You Take Two Cephs?
According to the study:
❗ Routine second ceph is not necessary in most cases.
Habitual occlusion ceph is usually sufficient because:
The functional slide is often neutralized during full closure.
The difficulty? Growth often exacerbates the problem—especially mandibular growth. So the treatment plan you choose at 12 years of age can dramatically influence whether that patient avoids or needs orthognathic surgery at 18.
1. Non-Extraction Approach
👉 When to choose:
Mild–moderate Class III
Little or no mandibular crowding
Early permanent dentition
Forward functional shift present
Patient accepts extraoral appliances
2. Extraction Approach
👉 When to choose:
Marked lower arch crowding
Dental compensation is needed to correct overjet
Patient is in the late mixed/early permanent dentition
Non-compliance expected for extraoral appliances
Parameter
Non-Extraction + Headgear
Extraction + Fixed Appliances
Upper Incisors
Proclined
Usually stable / mild retroclination
Lower Incisors
Spontaneous retroclination
Controlled orthodontic retroclination
Mandible
Downward–backward rotation
Tends to grow forward
ANB Change
Improves
Minimal improvement
Profile
More convex, softer appearance
Mostly dental correction
Best For
Mild skeletal Class III
Crowding cases
Treatment Time
Shorter
Longer
Long-term Stability
Depends on growth control
Depends on dental compensation
👩⚕️👨⚕️ What Exam Answers Must Include
If an examiner asks: “How would you decide between extraction and non-extraction in Class III?”
Your ideal answer should include:
Crowding analysis (most important)
Growth pattern & age
Severity of skeletal discrepancy
Incisor inclination (U1-SN, L1-MP)
Soft tissue profile
Compliance for extraoral appliances
Future orthognathic surgery considerations
🧩 Clinical Case Tip for PG Examination
A skeletal Class III child with minimal lower crowding, reverse overjet, and acceptable profile → Non-extraction + headgear
A Class III adolescent with >5 mm crowding, upright upper incisors, and camouflaging need → Extraction-based camouflage
Remember
Class III = growth-driven problem. Your treatment choice must consider future mandibular growth and potential need for surgery.
Class III malocclusion is one of those topics that every orthodontic student eventually dreads—complex etiology, unpredictable growth, and tough treatment calls, especially in adults.
But what if we told you that there is a systematic way to simplify treatment planning?
A classic study by Stellzig-Eisenhauer et al. gives us a powerful, evidence-based roadmap. This blog breaks it down into easy, clinic-ready points.
🔍 Why Class III in Adults Is So Challenging
Growth is almost complete → no skeletal correction with ortho alone.
Many patients show combined skeletal + dentoalveolar features.
Borderline cases make it hard to decide between:
✔️ camouflage orthodontics (non-surgical)
✔️ orthognathic surgery with orthodontics
The BIG Q: How do we objectively decide?
HIGH-YIELD CEPH PARAMETERS
A. Primary Predictor
Wits Appraisal (MOST RELIABLE)
−1 to −5 mm → Often orthodontic (camouflage)
< −7 mm → Borderline
≤ −10 mm → Usually surgical
B. Other Key Predictors (Discriminant Model)
Variable
Trend
Interpretation
S–N Length
↓ shorter
Increased likelihood of surgery
M/M Ratio (Maxilla/Mandible)
↓ low
Mandibular excess or maxillary deficiency → surgery
Lower Gonial Angle
↑ large
Vertical growth pattern → challenging to camouflage
3️⃣ NON-SURGICAL (ORTHODONTIC) CANDIDATES
Likely treatable with camouflage if: ✔ Wits > −6 mm ✔ Acceptable facial esthetics ✔ Mild–moderate skeletal discrepancy ✔ Good incisor inclinations possible (no excessive decomp needed) ✔ No significant vertical maxillary deficiency ✔ Patient prefers non-surgical path
Common Strategies:
Class III elastics
Lower incisor retraction (limits apply)
Upper expansion/advancement via dentoalveolar mechanics
Mini-screws for camouflage anchorage
4️⃣ SURGICAL CANDIDATES
Recommend ortho + orthognathic surgery when: ✔ Wits ≤ −8 to −10 mm ✔ Severe skeletal discrepancy (maxillary deficiency / mandibular prognathism) ✔ Large M/M discrepancy ✔ High lower gonial angle (vertical growers) ✔ Soft-tissue profile compromised ✔ Decompensation needed beyond safe limits ✔ Patient wants ideal esthetics & occlusion
Typical Surgical Options:
Le Fort I Maxillary Advancement
BSSO Mandibular Setback
Bimaxillary Surgery (common)
5️⃣ BORDERLINE CASE CHECKLIST
Use these for “grey-zone” decisions:
☐ Dual bite? (Check CR vs CO)
☐ Incisor decompensation possible without harming periodontium?
☐ How much soft tissue improvement expected?
☐ Stability concerns? (high angle, open bite tendency)
ORTHO ONLY = Mild skeletal discrepancy + Acceptable esthetics + Wits > −6 mm SURGERY = Severe skeletal Class III + Esthetic disharmony + Wits < −10 mm BORDERLINE = Depends on soft tissue, decomp needs, patient expectations
Every orthodontic student eventually faces one of the toughest decisions in treatment planning — what to do with borderline Class III malocclusion cases. These are patients whose skeletal discrepancy is neither mild enough for camouflage nor severe enough to demand immediate orthognathic surgery. So, how do we decide?
A landmark study by A-Bakr Rabie and colleagues (2008) explored exactly this question, comparing treatment outcomes of orthodontic camouflage (extraction-based) and orthognathic surgery in borderline Class III patients.
The Study at a Glance
Sample: 25 Southern Chinese adults
13 treated orthodontically (extraction protocol)
12 treated surgically (bimaxillary or mandibular setback)
Selection criteria: Pretreatment ANB > −5°, with clear Class III skeletal tendency.
Aim: Identify cephalometric differences and outcomes between the two treatment paths.
Parameter
Camouflage (Orthodontic)
Surgery
ANB angle
> –5°
≤ –5°
Holdaway angle
> 12° ✅
< 12° 🚩
Wits appraisal
> –7.5 mm
< –7.5 mm
Go-Me / S–N ratio
~111
↑ 119
U1–L1 angle
↓ (≈120°)
↑ (≈129°)
Previous research (https://dentowesome.org/2025/11/12/class-iii-malocclusion-surgery-or-orthodontics/) tried to give us some hard rules. Kerr suggested that if the ANB angle is less than -4°, go surgical. Stellzig-Eisenhauer threw a whole formula at us using four variables. But honestly? These didn’t really help us distinguish between the borderline cases. It turns out, this research paper discovered something much more practical.
Key Finding — The Magic Number: Holdaway Angle
Among the many cephalometric parameters analyzed, the Holdaway angle stood out as the best predictor for treatment modality.
🔹 Holdaway angle ≥ 12° → Orthodontic camouflage likely to succeed 🔹 Holdaway angle < 12° → Orthognathic surgery indicated
This single angle correctly classified 72% of the cases — making it a practical clinical guide for borderline cases.
How the Two Treatments Differed
Aspect
Camouflage (Extraction)
Orthognathic Surgery
Mechanism
Retraction of lower incisors + downward/backward mandibular rotation
Surgical setback of the mandibular dentoalveolus
Cephalometric effects
↓ L1–ML angle (retroclined incisors)
↑ L1–ML angle (uprighting)
Facial changes
Increased lower facial height; improved profile via dental compensation
Setback of chin and lower lip, harmonious soft-tissue correction
Soft tissue
No significant difference post-treatment between groups
Comparable esthetic improvements
Both treatments target the lower dentoalveolus, emphasizing incisor position and mandibular rotation.
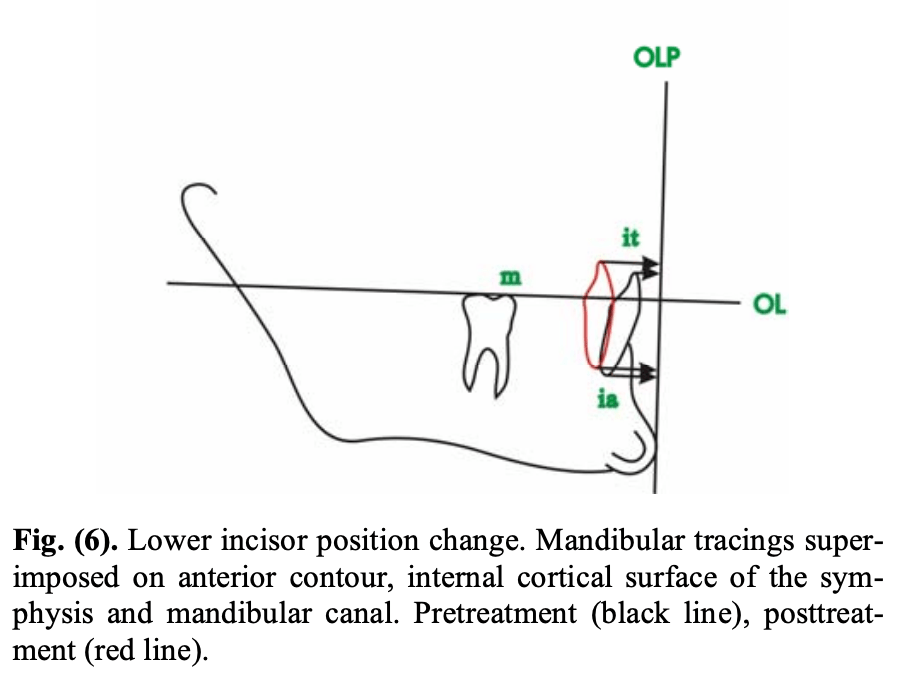
The orthodontic group in this study retracted the lower incisors by an average of 4.9 mm at the incisal tip and 1.9 mm at the incisor apex. That’s not a typo—the roots barely moved. Why? Because you’re using lingual root torque to prevent the incisors from tipping back excessively. You want to maintain incisor inclination while achieving anterior-posterior movement.
In Short
Holdaway angle ≈ 12° may be your cephalometric compass when planning for borderline Class III cases — but the final direction still depends on your patient’s goals and your clinical judgment.
Rabie A.-B.M., Wong R.W.K., Min G.U. (2008). Treatment in Borderline Class III Malocclusion: Orthodontic Camouflage (Extraction) Versus Orthognathic Surgery. The Open Dentistry Journal, 2:38–48. DOI: 10.2174/1874210600802010038.
Author: Kerr W.J.S., Miller S., Dawber J.E. Journal:British Journal of Orthodontics (1992)
🎯 Why This Topic Matters
Every orthodontic student eventually faces this critical question:
When does a Class III malocclusion cross the line from orthodontic correction to surgical intervention?
Understanding this boundary is essential—not only for diagnosis and treatment planning but also for effective communication with patients and surgical colleagues. The study by Kerr and colleagues provides timeless, cephalometrically based guidance that remains clinically relevant even today.
🦷 The Study in a Snapshot
The researchers compared two groups of 20 patients with severe Class III malocclusion:
Group 1: Treated with orthodontics alone
Group 2: Recommended for orthognathic surgery
All patients had negative overjets, ensuring comparable skeletal severity.
📈 Key Cephalometric Findings
Parameter
Surgery Group (Mean)
Ortho Group (Mean)
Significance
ANB Angle
-6.9°
-2.6°
p < 0.001
M/M Ratio (Maxilla/Mandible Length)
0.78
0.89
p < 0.001
Lower Incisor Inclination
78.5°
85.4°
p < 0.01
Holdaway Angle
0.9°
6.1°
p < 0.01
These four parameters clearly differentiated surgical from orthodontic cases.
What About Vertical Dimensions and Overbite?
Surprisingly, vertical measurements like facial proportions, gonial angle, or Y-axis didn’t strongly differentiate surgical cases from orthodontic ones in this study. Nor was an open bite tendency common. So while vertical control is important in treatment, it might not be the clincher in Class III treatment decisions.
🧩 What These Numbers Mean Clinically
Kerr et al. proposed “threshold values”—practical cut-offs to guide treatment choice:
Cephalometric Parameter
Threshold Value Suggesting Surgery
ANB Angle
≤ -4°
Lower Incisor Inclination (IMPA)
≤ 83°
Holdaway Angle
≤ 3.5°
M/M Ratio
≤ 0.84
🦷 Interpretation: If your patient’s ANB is more negative than -4° and the lower incisors are retroclined below 83°, it’s likely beyond orthodontic camouflage. Surgical correction—usually mandibular setback or bimaxillary surgery—is indicated.
🧠 The Soft Tissue Factor
An underrated but critical insight from the study:
The soft tissue profile often drives the decision more than skeletal numbers.
Even if occlusion could be camouflaged, an unattractive concave profile or reduced Holdaway angle may push the decision toward surgery for facial balance and esthetics.
📚 Final Thoughts
This 1992 study by Kerr et al. remains a cornerstone for understanding the borderline Class III dilemma. It reinforces that:
Good orthodontics begins with good diagnosis—and great orthodontists know when to call the surgeon.
So, the next time you evaluate a challenging Class III case, remember these cephalometric yardsticks. They just might help you make the right call between brackets and bone cuts.
If you’ve ever wondered whether aligner thickness really matters — spoiler alert: it does! A recent study in the Korean Journal of Orthodontics (2025) by Wang et al. dives deep (literally, histologically deep) into how the thickness of clear aligners affects tooth movement and the surrounding periodontal tissues.
🧪 The Setup
Researchers used New Zealand rabbits fitted with aligners of two different thicknesses — 0.38 mm and 0.68 mm. Using 3D scanning, micro-CT, and histological analysis, they explored how each aligner influenced:
Tooth movement speed
Root resorption
Periodontal ligament (PDL) changes
Inflammatory and bone-remodeling markers
⚙️ The Science in Motion
The thicker aligners (0.68 mm) delivered stronger forces, causing more PDL deformation, larger resorption craters, and higher inflammatory marker expression (IL-6, IL-1β).
The thinner aligners (0.38 mm) produced gentler forces, enabling slightly faster tooth movement with less inflammation and more balanced bone remodeling (more osteoclasts on the compression side, stable ALP and OPN expression).
🧠 Mnemonic — “THIN” aligners are KIND:
T — Tiny force, tissue-friendly
H — Higher biological harmony
I — Inflammation less
N — Natural remodeling prevails
Category
Parameter
0.38 mm Aligner (Thinner)
0.68 mm Aligner (Thicker)
1. Mechanical Characteristics
Initial Force → Steady Force
~0.88 N → 0.45 N
~1.58 N → 0.80 N
Force Profile
Lower, more physiologic
Higher, more stressful
Tooth Movement Speed
Slightly faster (efficient force decay)
Slower (higher sustained force)
2. Periodontal Ligament (PDL) Response
PDL Deformation
Minimal, controlled
Pronounced, compressive
PDL Stress Distribution
Even and well-distributed
Concentrated, deeper compression
3. Root Integrity
Root Resorption Pattern
Small, shallow craters
Larger, deeper craters
4. Cellular Response
Osteoclast Distribution
Surface-based, well-organized
Deeper, scattered, disorganized
Osteoblast/Osteogenic Activity (ALP, OPN)
Higher early osteoblastic activation → rapid bone formation
Delayed osteogenic response
5. Molecular Response: Inflammatory Markers
IL-6
Low
High
IL-1β
Lower expression
High expression
Overall Inflammatory Load
Controlled
Amplified
6. Molecular Response: Bone Remodeling Markers
TRAP (qRT-PCR)
Controlled, efficient osteoclastogenesis
Elevated but disorganized
RANKL Expression
Balanced → supports controlled resorption
Elevated → promotes excessive resorption
VEGF Expression
Balanced angiogenesis, stable remodeling
Increased angiogenesis due to stress
7. Compression- and Tension-Side Biology
Tension Side
↑ OPN, ↑ ALP → early osteoblast differentiation
Low osteogenic activity
Compression Side
Controlled inflammatory markers
High IL-6 → heavy inflammatory burden
8. Overall Biological Pattern
Remodeling Outcome
Harmonious, biologically efficient tooth movement
Stress-driven remodeling with higher risk of adverse effects
Clinical Interpretation
Safe, physiologic forces → predictable movement
Higher forces → slower movement, more inflammation, increased resorption risk
When orthodontists treat unerupted or impacted teeth (especially in the anterior region), several complications can occur:
Tooth devitalization (loss of vitality)
Re-exposure or uncovering after surgery
Ankylosis (tooth fused to bone)
External root resorption
Damage to adjacent teeth
Marginal bone loss
Gingival (gum) recession
➡️ These complications can prolong treatment, cause esthetic problems, and even lead to tooth loss.
Why These Problems Happen
Historically, clinicians focused on surgically exposing the tooth (“uncovering”) to bring it into the arch. However, the soft tissue (gingiva) around the tooth was often not given enough attention.
Most early surgical techniques, such as “simple complete exposure,” focused only on getting to the tooth, without considering:
What kind of mucosa (attached gingiva vs. alveolar mucosa) covered it
How that tissue would behave once orthodontic movement began
Why Soft Tissue Type Matters
There are two main kinds of oral mucosa:
Attached gingiva (masticatory mucosa):
Firm, tightly bound to bone
Designed to resist mechanical stress and prevent muscle pull on the gum margin
Ideal marginal tissue around a tooth
Alveolar mucosa:
Movable, thin, and elastic
Poor at resisting muscle pull or inflammation
Not suitable as a marginal tissue
If a tooth is uncovered and surrounded only by alveolar mucosa, the tissue tends to get inflamed easily, which can lead to bone loss and gingival recession as the tooth is moved orthodontically.
What the Ideal Surgical Approach Should Do
Instead of just exposing the tooth, the surgical goal should be to:
Ensure that a band of attached gingiva surrounds the crown once the tooth is exposed.
Create a healthy, functional marginal tissue environment before starting tooth movement.
This provides several key advantages:
Prevents the need for repeated dressings or barriers to keep the tooth exposed
Allows faster and smoother tooth movement (no soft-tissue obstruction)
Prevents gingival recession and bone loss during orthodontic traction
Why Inflammation Is a Risk Factor
Periodontal experience shows that tooth movement in the presence of inflammation is risky — it can accelerate bone loss. Since alveolar mucosa is prone to inflammation, it’s unsafe to move a tooth unless it’s surrounded by healthy attached gingiva.
Thus, the uncovering procedure must integrate periodontal principles — ensuring that the final gingival condition supports tooth health and stability.
ORTHODONTIC CONSIDERATIONS BEFORE SURGERY
Why create space before uncovering the tooth?
There are two main reasons:
For eruption and alignment:
If adequate space isn’t available in the arch, the unerupted tooth has no place to move into.
So, before any surgical exposure, orthodontic space creation ensures there’s enough room for the tooth to erupt or be moved into proper alignment.
For surgical soft-tissue management:
The edentulous (toothless) space left in the arch is covered by attached gingiva, which can be used as a donor site.
This tissue can then be repositioned apically or laterally as a partial-thickness flap to cover the exposed tooth crown after surgery — ensuring the presence of healthy, attached gingiva around the tooth.
SURGICAL PROCEDURE: STEP-BY-STEP LOGIC
Anesthesia and incision:
Local infiltration anesthesia is administered.
The surgeon makes an incision along the ridge in the edentulous area — where the impacted tooth lies beneath.
Determining incision design:
The height (incisogingival dimension) of the incision depends on how much attached gingiva is present on the adjacent teeth or its opposite tooth (antimere).
If there’s plenty of attached gingiva nearby, a larger flap can be created and repositioned.
Flap elevation and bone removal:
Vertical releasing incisions are made to free the attached gingiva.
Connective tissue over the unerupted tooth is gently removed.
Bone is removed only up to the height of contour of the crown, not beyond the cementoenamel junction (CEJ).
⚠️ Why stop at the CEJ? Because this is the zone where the dentogingival attachment (junctional epithelium + connective tissue attachment) naturally forms. If bone is removed beyond the CEJ, it can disrupt this zone and increase the risk of gingival recession — something confirmed in animal (monkey) studies.
PLACEMENT OF ATTACHED GINGIVA (THE GRAFT STEP)
Where and why to place it:
The graft (attached gingiva) is positioned to cover:
The CEJ, and
About 2–3 mm of the crown.
This positioning serves three biologic and mechanical purposes:
Establishing stable attachment:
It helps form a healthy supra-alveolar connective tissue attachment between the tooth root (cementum) and alveolar bone.
This ensures periodontal stability and prevents bone loss.
This seal prevents bacterial ingress and inflammation — something alveolar mucosa cannot achieve.
Allowing safe tooth movement:
As the tooth is orthodontically pulled into the arch, tension develops in the gingiva.
If the gingiva is attached higher (more coronally), it can accommodate slight apical repositioning during movement without losing its protective role.
In simpler terms — the gum margin “moves with the tooth” instead of receding.
POST-SURGICAL STEPS
Sutures are placed on both sides (mesial and distal) to hold the graft stable over the tooth.
A periodontal dressing is placed for 7–10 days to protect the surgical site and allow:
Reattachment of the tissue to the tooth
Epithelial healing over the area
Once the dressing is removed:
A bonded orthodontic bracket is attached directly to the tooth.
Light orthodontic forces are applied immediately to begin eruption or alignment.
🔑 Light force is critical — it allows physiologic movement without jeopardizing the new soft tissue attachment.
Why This Method Works Better
The described surgical exposure technique (with attached gingiva placement) is particularly advantageous for teeth with delayed or retarded eruption. It provides both biologic and mechanical benefits that improve eruption success and tissue health.
What Actually Delays Eruption: Bone or Soft Tissue?
Traditionally, it was thought that bone acts as the main physical barrier delaying eruption.
However, clinical and biologic observations show that this is not true unless the tooth is ankylosed (fused to bone).
👉 The rate of bone remodeling (turnover) is actually faster than the rate of remodeling in the overlying soft tissue.
➡️ Therefore, the soft tissue — not the bone — is often the main factor that slows eruption or impedes tooth movement.
Managing Long-Distance Tooth Movement
When a tooth has to travel a large distance to reach the arch:
The surrounding gingiva may begin to “bunch up” as the tooth moves.
In such cases, minor excision of excess tissue may be required to achieve:
Ideal gingival contour,
Correct tooth positioning,
Long-term posttreatment stability.
The key to managing delayed eruption lies not in removing more bone but in controlling and reconstructing the soft tissue environment. Creating a zone of attached gingiva around the uncovered tooth transforms the biologic response, allowing stable eruption and long-term periodontal integrity.