How Do We Fix a Deep Overbite? 🤔 #PartA

The correction usually follows one (or a mix) of these three approaches:

1️⃣ Extruding the posterior teeth â€“ Raising the back teeth like tiny dental elevators.
2️⃣ Intruding the anterior teeth â€“ Politely pushing the front teeth back where they belong.
3️⃣ Combining both techniques â€“ Because balance is everything!

But choosing the right approach isn’t random—it depends on Intermaxillary Growth Space, Interocclusal Space, Facial Profile, Esthetics, and Occlusal Plane Steepness.

Intermaxillary Growth Space

Think of a growing child’s jaw as an expanding neighborhood. Teeth must either:
✅ Keep up with the expansion by erupting at the right pace.
❌ Lag behind, leading to overbites, open bites, and all sorts of trouble.

If you mentally freeze (ankylose) the teeth in place while the jaw continues growing, a space forms between the arches—this is the intermaxillary growth space.

Growth Rotation Matters! 🚦

👉 Forward Growth Rotation (Nature’s Built-in Facelift 😎):

  • The posterior teeth need to erupt significantly more than the front teeth just to maintain harmony.
  • Teeth grow in an arch-like fashion, with anterior teeth erupting almost straight up and forward.

👉 Backward Growth Rotation (The Skeletal Open Bite Struggle 😨):

  • The anterior teeth erupt way more than the posterior teeth.
  • If orthodontists erupt posterior teeth too much, it worsens the open bite. 🚨

Gear? Nope—Go Intrusive in Adults! đŸ›‘

For nongrowing patients, forget extrusion—intrusion is the way to go! If there’s no jaw growth to accommodate changes, extruding posterior teeth can cause more harm than good by worsening the bite instead of fixing it.

Interocclusal Space: The Hidden Gamechanger 🕵️

Before deciding on the correction method, orthodontists analyze the interocclusal space (normally about 2 mm).

✅ Large Interocclusal Space (as in Class II, Div 2 cases) – Allows posterior teeth to erupt without tipping the mandible open.
❌ Minimal or No Interocclusal Space â€“ Any eruption of back teeth forces the jaw open, which is a disaster in backward-rotating cases.

Facial Profile: Because Looks Matter! 😳

Orthodontics isn’t just about bite correction—it’s also about not making your patient look worse!

🔹 If a patient has a very convex facial profile, increasing the vertical dimension is a huge mistake đŸšŤ.
🔹 Posterior rotation (hinging open) of the mandible worsens Class II relationships.
🔹 With a steep mandibular plane, just 2 mm of opening at the pogonion can cause a huge setback!

Esthetics: Smile Matters! 😁

Sometimes, deep bite correction isn’t just about function—it’s about making sure the patient looks good while talking and smiling!

✅ Toothy, gummy smile? Forget posterior extrusion—intrusion of anterior teeth is the way to go.
✅ Significant intrusion (>3-4 mm)? Get ready for surgical intervention (LeFort I osteotomy).
✅ High cervical headgear? Looks cool at orthodontic conferences but can steepen the occlusal plane too quickly—use with caution!

So, What’s the Takeaway? 🎓

1️⃣ Deep bite correction isn’t a one-size-fits-all treatment—it depends on growth patterns, occlusion, and facial esthetics.
2️⃣ Extruding posterior teeth works for growing patients, but adults need intrusive mechanics.
3️⃣ A bad treatment plan can make things worse—like turning a mild Class II into a full-blown mandibular retrusion disaster.
4️⃣ Sometimes, no amount of orthodontic magic can replace good old-fashioned surgery.

Correcting a deep bite isn’t just about straightening teeth—it’s about understanding jaw growth and making calculated moves. Think of it as playing chess… with teeth. ♟️🦷

So, next time someone asks why their deep overbite correction isn’t a simple “push-the-teeth-back” job, just show them this article and say:

“Because science, my friend. Because science.” đŸ§ŞđŸ˜†

The effects of Le Fort I osteotomies on velopharyngeal and speech functions in cleft patients

If you’ve ever had a conversation with an orthodontic or maxillofacial surgeon, you’ve probably heard the term “Le Fort I osteotomy” thrown around like it’s a casual brunch topic. But don’t worry—this isn’t some medieval torture technique (though patients might beg to differ post-op). It’s actually a routine and life-changing surgical procedure used to correct conditions like vertical maxillary excess, midface hypoplasia, and anterior open bite. Basically, it’s the orthodontic equivalent of upgrading from a flip phone to a smartphone—function meets aesthetics in the best way possible.

As surgeons started routinely repositioning the maxilla in the late ’70s, they noticed something peculiar—some patients who had undergone cleft palate repairs started experiencing changes in their speech post-surgery. And not just a “my voice sounds weird on a voicemail” kind of change, but significant alterations that could be temporary or, in some cases, permanent. This led to an influx of studies trying to figure out exactly what was happening and why. Because let’s face it, no one signs up for surgery expecting to sound like they just inhaled helium for life.

The Root of the Problem: It’s All About the Muscles (and Scars)

Speech issues in cleft patients boil down to a mix of developmental malformations, scarring, and structural obstacles in the oral and pharyngeal regions. Picture a team of musicians where half the instruments are missing, and the rest are playing in the wrong key—yeah, not great for clear articulation. The muscles involved in lifting the soft palate (like the levator veli palatini) and their antagonists (like the palatoglossus) often develop improperly, leading to speech challenges. Add in post-surgical scar tissue, oronasal fistulas, and crossbites, and you have a recipe for some serious phonetic acrobatics.

VPI: When Airflow Has a Mind of Its Own

One of the biggest speech-related concerns in cleft patients is velopharyngeal insufficiency (VPI)—a fancy way of saying the velum (soft palate) and pharyngeal wall aren’t sealing off the nasopharynx properly during speech. This results in excess air escaping through the nose, making speech sound overly nasal, like someone permanently stuck in the middle of a bad cold. On the flip side, some patients with severe midface deficiency develop hyponasality, where the nasal passage is too blocked, making them sound like they have a clothespin on their nose.

Then there are articulation defects, where certain consonants refuse to cooperate. Think of sibilants (like ‘s’ and ‘sh’), fricatives (like ‘f’ and ‘v’), and plosives (like ‘p’ and ‘b’) suddenly staging a rebellion. These errors can result from anatomical misalignment, making the production of crisp, clear sounds a daily challenge.

So, What Does Surgery Actually Do to Speech?

Studies have tried to pin down exactly how maxillary surgery impacts speech, but results have been all over the place—partly because speech is complicated and partly because patient samples have been small and assessment methods inconsistent. However, some trends are clear:

  • Maxillary advancement can improve speech for some patients by providing better tongue space and articulation.
  • Others may experience temporary speech regression as their muscles adjust to the new positioning.
  • For cleft patients with pre-existing VPI, surgery might actually worsen velopharyngeal function, requiring additional speech therapy or even secondary surgeries.

📊 Study Breakdown: The Who, What, and How

👥 Patients: The Speech Test Subjects

Total Patients Enrolled80
Patients with Complete Data54
Gender Distribution37 Male, 17 Female
Age Range at Surgery8 – 33 years

💡 Fun Fact: Speech evaluations were taken anywhere from 3 months to 6 years post-op—because, let’s face it, speech takes its sweet time adjusting.

🛠️ Surgery Types: The Maxillary Makeover

Surgical ProcedurePatients (n=54)
Le Fort I Advancement Only34
Le Fort I + BSSO (Mandibular Setback)20

💬 Translation: 34 patients got a one-way ticket to maxillary forward town, while 20 had their mandible set back to balance the whole look. 😁

🗣️ Speech Evaluation: The Verbal Verdict

To keep things scientific (but still understandable), speech was assessed using a system developed in 1979 by McWilliams and Phillips at the University of Pittsburgh. And yes, it’s been around longer than most of us.

🔎 What Was Measured?

1️⃣ Hypernasality (aka the unintentional nose filter)

  • Scored from 0 (normal) to 4 (severe hypernasality)

2️⃣ Hyponasality (think: permanently stuffed nose sound)

  • Rated as: 0 = none, 2 = moderate/severe

3️⃣ Articulation Errors đŸŽ™ď¸

  • Measured in sibilants, fricatives, and plosives (aka the sounds that make or break clear speech)

4️⃣ Velopharyngeal Valve Function đŸšŞ

  • Classified as:
    • 0 = Normal
    • 1-2 = Borderline competent
    • 3-6 = Borderline incompetent
    • 7+ = Incompetent (oops…)

📉 Speech Score Breakdown

Speech ScoreVP Valve Status
0Normal 🟢
1-2Borderline competent 🟡
3-6Borderline incompetent 🟠
7+Incompetent 🔴

💡 The Big Question: Did the surgery help or hurt speech? Well…

  • Some patients improved 🎉
  • Some stayed the same 🤷‍♂️
  • And a few had new speech issues 🤦‍♀️

📉 Speech at 3 Months Post-Surgery: The Plot Thickens

The biggest shocker? A general decline in velopharyngeal competence. Before surgery, 42% of patients had normal VP function. Three months later? Just 18%! đŸš¨

🔍 VP Mechanism Changes Post-Surgery

VP StatusPre-Surgery (%)Post-Surgery (%)
Competent đŸŸ˘42% (23)18% (10)
Borderline Incompetent đŸŸĄ9% (5)22% (12)
Complete VPI đŸ”´13% (7)20% (11)

💬 Translation: Speech went from “I got this” to “Houston, we have a problem.” 🚀

Overall speech scores? Worse. đŸ˜Ź

  • Pre-surgery average: 2.46
  • Post-surgery average: 4.24
  • And yes, it was statistically significant (P < .05).

🎤 Articulation: A Silver Lining?

Not all was lost! Articulation defects—like trouble with fricatives, plosives, and sibilants—actually improved slightly.

Articulation DefectsPre-Surgery (%)Post-Surgery (%)
Any Speech Defect84% (46)73% (40) ✅
Errors Related to Anterior Dentition64% (35)47% (26) ✅

💡 Moral of the story? If you’re struggling with anterior sounds before surgery, you might get a speech upgrade. But if your VP function is already on the edge… buckle up.

🔄 Hypernasality vs. Hyponasality: The Great Speech Shuffle

One of the quirks of Le Fort I advancement? Some patients swap speech issues like a game of Uno. đŸŽ­

Speech ConditionPre-Surgery (n)Post-Surgery (n)
Hyponasality (Stuffed Nose Sound)188 ✅
Mild Hypernasality (Nasal Twang)1016 ❌
Moderate Hypernasality28 ❌
Severe Hypernasality21 ✅

🔄 So if you went in sounding blocked, there’s a chance you walked out with a bit too much air coming through instead!

👥 Does the Type of Surgery Matter?

Group 1: Le Fort I Only

  • Pre-surgery articulation defects: 88% 🗣️
  • Post-surgery: 74% ✅

Group 2: Le Fort I + BSSO (Mandibular setback included)

  • Pre-surgery articulation defects: 75%
  • Post-surgery numbers cut off (sorry, suspense lovers!)

👉 Moral of the story? It doesn’t seem to matter if you just advance the maxilla or combine it with a mandibular setback—speech still takes a hit!

🔬 Pharyngeal Flaps: Helping or Hurting?

18 patients had a pharyngeal flap before surgery. Here’s how they fared:

  • 9 got worse 😵
  • 8 stayed the same 🤷
  • 1 got better 🎉

Not exactly an inspiring success rate.

📖 The Great Speech Debate: Who Said What?

Team “Maxillary Advancement Worsens VPI” 🚨

  • Schwartz & Gruner (1980s): 84% of cleft patients had worse velopharyngeal function at 4 months post-op. 😬
  • Mason et al. (1980): Cleft patients are at higher risk of hypernasality due to their unique anatomy.
  • Witzel (1990s): If you were borderline VPI before surgery, you’re at major risk afterward.

🔎 Translation? If your velopharyngeal valve was iffy before surgery, it might throw in the towel afterward.

Team “Speech Stays the Same (or Improves)!” 🎉

  • McCarthy et al. (1980s): No increase in VPI, but yes, articulation changed.
  • Dalston & Vig (1984): No articulation improvement (speech therapists, you can relax).
  • Witzel et al. (University of Pittsburgh, 1990s): Dental occlusion affects articulation, and correcting the bite can help!
  • Ruscello et al. (1990s): 85% of patients with pre-op articulation defects improved within 6 months.
  • Vallino (1987): 88.2% of patients saw speech improvements post-op.

🔎 Translation? If your main issue is articulation errors from a bad bite, then surgery could be your speech therapist in disguise.

Our 54-patient study found:
1️⃣ More patients developed borderline incompetence or full-blown VPI post-op đŸ¤Ś
2️⃣ Reduced intraoral air pressure made sibilants, fricatives, and plosives harder to pronounce
3️⃣ Velar closure during speech became incomplete, leading to nasal air leakage

So, we’re leaning toward maxillary advancement potentially worsening VP function. But does this mean doom for all cleft patients? Not necessarily!

🎭 The Balancing Act: Beauty vs. Speech?

🦷 Pros of Le Fort I Advancement:
✅ Better bite & occlusion 🦷
✅ Improved articulation (for some) 🎤
✅ Aesthetically pleasing results ✨

🚨 Cons of Le Fort I Advancement:
❌ Higher risk of hypernasality 🗣️
❌ VPI might worsen (especially in cleft patients) 😷
❌ Some sounds (like “s” and “p”) might become trickier

🤔 So, Should We Be Worried?

Not necessarily! Here’s what to consider:
🔹 If your velopharyngeal function is already borderline, be cautious.
🔹 If you have articulation issues from malocclusion, surgery might help!
🔹 Speech therapy post-op can help retrain articulation and airflow.

🎤 The Curious Case of Pharyngeal Flaps

If you’re one of the lucky 18 who had a pharyngeal flap before maxillary advancement, congratulations! 🎉

💡 Key Findings for Pharyngeal Flap Patients:
👉 50% of them improved or retained their pre-surgical speech function.
👉 67% were already in the “competent or borderline competent” speech category pre-op.
👉 Hyponasality cases dropped. (Since advancing the maxilla opened things up.)

🎯 Moral of the story? If you’re prone to VPI, a pharyngeal flap might be your best friend before Le Fort I surgery. But don’t rush into it post-op! Give it at least a year before considering further surgery.

🤔 To Advance or Not to Advance?

Maxillary advancement surgery is a balancing act—you win in aesthetics & occlusion but might lose a bit in speech function. 😵‍💫

👑 Winners:
✔️ People with articulation errors from a bad bite (Your “s” sounds are about to get crisp! 🍏)
✔️ Those suffering from hyponasality (Breathing free at last! 😮‍💨)

🚨 Potential Strugglers:
❌ Patients already borderline for VPI (Things might get worse. 🙈)
❌ Those at risk for hypernasality (Your voice might sound like it’s permanently in helium mode. 🎈)

Le Fort I is like buying a new, expensive phone—better features, but you might drop a few calls (aka speech issues). 📱📉

👂 Key Takeaways:
1️⃣ Articulation = Likely to improve.
2️⃣ Hypernasality = May get worse.
3️⃣ VPI = Can be a concern, especially for cleft patients.
4️⃣ Pharyngeal flaps = Might help, but timing is key!

Genetics of Cleft Palate and Velopharyngeal Insufficiency

“Fusion? Pfft. We’d rather make history!” declared the medial nasal processes.

And so, clefting was born—a gap not only in the developing palate but in the hearts of speech therapists everywhere.

Fusion Fumbles and Speech Stumbles
Now, when these tiny rebels refuse to join forces, chaos ensues. The velopharynx—a fancy name for the barrier between the nose and mouth—ends up with a few, shall we say, drafty construction errors. Air escapes, speech gets funky, and suddenly, “baby babble” sounds like a wind tunnel experiment gone wrong.

Enter the surgeons, the unsung heroes of tiny palates everywhere. Their mission? To bring order to the mayhem and ensure that future toddlers don’t accidentally sound like they’re narrating their own ghost stories.

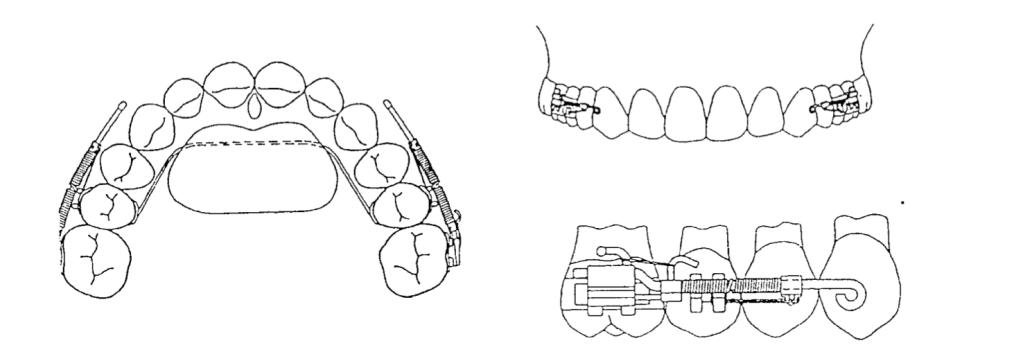
A Historical “Patchwork” Approach
In 1865, Passavant was the first brave soul to attempt fixing the velopharynx by—wait for it—sticking the soft palate to the back of the throat. It’s the medical equivalent of solving a door draft problem with duct tape.

Then came Sloan in 1875 with the pharyngeal flap, followed by Padgett in 1930, who made it official in the U.S. The problem? If you don’t size it right, congratulations! You’ve now upgraded from speech issues to obstructive sleep apnea. Talk about overachieving.

Surgical Glow-Ups and the Quest for the Perfect Fix
Wilfred Hynes in 1950 got creative with myomucosal flaps, because nothing says “innovation” like rearranging muscles with names longer than your prescription list.

The technique kept evolving, because, let’s be real—every surgeon wants to leave their mark. Jackson, Silverton, and Riski all came in with their own spin, probably in a fierce game of “Whose Flap Is It Anyway?”

And then there was posterior pharyngeal wall augmentation—the surgical version of “filling in the blanks.” Early attempts included Vaseline (yes, really) and a parade of materials like porous polyethylene, collagen, and even calcium hydroxyapatite. Because when in doubt, throw some fancy-sounding stuff at it and hope for the best.

Velopharyngeal Anatomy: The Hidden Orchestra of Speech 🎤🎼

🎻 Levator Veli Palatini: The Conductor
Imagine a maestro standing center stage, arms raised, ready to lead the symphony. That’s the levator veli palatini—responsible for lifting the velum like a curtain, sealing off the nasal and oral cavities. Originating from the petrous part of the temporal bone, its fibers cross in the middle, forming a muscular sling. One contraction, and voilà! The velum retracts at a dramatic 45-degree angle to close the velopharyngeal port.

Translation: Without this guy, your words would sound like they were broadcast from inside a wind tunnel.

🎤 Musculus Uvulae: The Backup Singer
Tucked inside the levator’s muscular sling is the musculus uvulae, a tiny but mighty performer. Unlike other muscles, it has no external attachments—it’s a self-sufficient diva that adds bulk to the velum, fine-tuning closure and ensuring speech clarity.

Think of it as the vocal reverb effect for your natural sound system.

🎺 Tensor Veli Palatini: The Stage Crew
What’s a good performance without proper sound balance? Enter the tensor veli palatini, responsible for opening the Eustachian tube during yawning and swallowing. Its tendon takes a dramatic turn around the hamulus of the medial pterygoid plate, ensuring proper ear drainage and pressure equalization.

Fun fact: In cleft palate cases, this muscle’s dysfunction is why kids get chronic ear infections—basically, a feedback loop of middle ear fluid that even the best sound engineers (otolaryngologists) struggle to fix.

🥁 Superior Pharyngeal Constrictor: The Percussionist
Finally, we have the superior pharyngeal constrictor, a multitasking powerhouse made up of four muscle segments (pterygopharyngeal, buccopharyngeal, mylopharyngeal, and glossopharyngeal). It provides the lateral and posterior walls of the pharynx, tightens during speech, and even forms Passavant’s ridge, a temporary bulge that helps close the velopharyngeal port.

In simple terms, it’s the drummer keeping the beat, ensuring speech stays rhythmic and not riddled with air leaks.

🏋️ Palatopharyngeus: The Weightlifter
Muscle Motto: “No food left behind!”

The palatopharyngeus is your posterior tonsillar pillar’s personal trainer. This vertically-oriented muscle starts at the soft palate, extends to the pharyngeal walls and thyroid cartilage, and has one big job—preventing food from making an unscheduled detour into your nasopharynx.

💪 Workout Routine:
✅ Pulls lateral pharyngeal walls inward (creating the Passavant ridge).
✅ Assists the levator veli palatini in velopharyngeal closure.
✅ Helps push food down like a conveyor belt at an airport security check.

Without it, your food might just take a U-turn and end up where it doesn’t belong (hello, awkward nose sneezes).

🏃 Palatoglossus: The Yoga Instructor
Muscle Motto: “Balance is everything.”

The palatoglossus loves flexibility—literally. Found in the anterior tonsillar pillar, it connects the velum to the tongue and works as a direct antagonist to the levator veli palatini.

🧘 Workout Routine:
✅ Lowers the velum (undoing the lift from levator veli palatini).
✅ Helps open the velopharyngeal port for breathing and speech.
✅ Elevates the back of the tongue—because someone has to push food toward the esophagus.

This muscle is basically the chill mediator in the gym, making sure the soft palate and tongue don’t get into a tug-of-war.

🚴 Salpingopharyngeus: The Gym Regular (But No One Knows Why)
Muscle Motto: “I’m just here for the vibes.”

The salpingopharyngeus shows up to the gym but doesn’t seem to have any major responsibilities. It originates near the Eustachian tube and hangs out with the palatopharyngeus, but its function is… well, kind of optional.

🤷 Workout Routine:
✅ Moves the pharynx a little.
✅ Sort of helps with swallowing.
✅ Exists.

Basically, it’s like that guy in the gym who always stretches but never actually lifts anything.

⚡ Nerve Trainers: Keeping the Gym in Check
🧠 Vagus Nerve (Pharyngeal Plexus) – The Boss
✅ Controls levator veli palatini, palatopharyngeus, salpingopharyngeus, and all pharyngeal constrictors.
✅ Makes sure velopharyngeal closure happens (otherwise, you’d sound permanently nasal).

🧠 Mandibular Division of Trigeminal Nerve – The Specialist
✅ Only works on tensor veli palatini (because even the velum needs a specialist for ear pressure equalization).

With these muscles working together, you get clear speech, safe swallowing, and minimal nasal food disasters. But if even one muscle skips leg day (or, in this case, velopharyngeal closure day), things can get messy fast.

So, next time you speak, eat, or yawn, thank your Velopharyngeal Team—they’re always working out, even when you’re not!

The Architectural Flaws and Functional Fixes
Think of the velopharyngeal port as a soundproof door between the nasopharynx and oropharynx. In a normal setup, the levator veli palatini acts like a hinge, lifting the velum to close the door for clear speech. But in cleft palate, that hinge is broken—or rather, misaligned—leading to some major structural and functional issues.

🏗️ What Goes Wrong in Cleft Palate?

Levator Veli Palatini’s Great Misplacement

Normally, this muscle runs horizontally to pull the velum up and back, sealing off the nasopharynx.
In cleft palate, the muscle is discontinuous and positioned longitudinally, inserting onto the hard palate instead.
🚨 Consequence? The velum can’t reach the posterior pharyngeal wall, causing velopharyngeal insufficiency (VPI).
💬 Result? Hypernasal speech and air leakage through the nose while speaking.


The Tensor Veli Palatini’s Failed Pulley System

Normally, the tensor veli palatini works with the levator veli palatini to open the Eustachian tube, preventing middle ear infections.
In cleft palate, the levator’s faulty position disrupts this mechanism, leading to:
✅ Chronic ear infections (otitis media)
✅ Hearing loss (affecting 10–30% of cleft patients)

🎤 How Velopharyngeal Closure Happens (or Doesn’t)
Velopharyngeal closure is like sealing off a room for perfect acoustics—except that people use different methods to achieve it:

🔵 Circular Closure → The Team Effort

The velum and pharyngeal walls both contribute equally.
Ideal for balanced speech production.


⚫ Coronal Closure → Velum-Dominant Approach

The velum does most of the work, moving backward to close the port.
Most common pattern in normal speakers.


🟡 Sagittal Closure → Pharyngeal Walls Take Over

The lateral pharyngeal walls move toward the midline, with less velar involvement.
Less common but seen in some individuals.


👂 Why Does This Matter?

In cleft palate patients, the closure mechanism is often compromised.
Depending on the severity of clefting, surgical correction aims to restore muscle positioning and improve velopharyngeal function.

Velopharyngeal Insufficiency (VPI) vs. Velopharyngeal Incompetence (VPC)


Velopharyngeal dysfunction (VPD) is an umbrella term for abnormal nasal airflow during speech, leading to hypernasality and articulation issues. It can be categorized into:

Velopharyngeal Insufficiency (VPI) – A structural problem where the velopharyngeal port cannot close properly due to an anatomical defect.
Velopharyngeal Incompetence (VPC) – A neuromuscular issue where the structures are intact, but they fail to function properly due to neurological conditions.

📌 Velopharyngeal Insufficiency (VPI): Structural Roadblock

Common Causes:
✅ Cleft Palate (Overt/Submucosal) – The levator veli palatini is abnormally positioned, preventing proper closure.
✅ Short Velum Post-Surgery – Even after palatoplasty, the velum may remain too short for complete closure.
✅ Oronasal Fistula – An opening between the mouth and nose, disrupting normal airflow.
✅ Adenoidectomy – Removal of enlarged adenoids can create an enlarged pharyngeal space, causing temporary or permanent VPI.

📌 Velopharyngeal Incompetence (VPC): A Functional Deficit

Common Causes:
✅ Congenital Hypotonia (e.g., Down syndrome, DiGeorge syndrome) – Weak muscle tone in the velopharynx.
✅ Neurological Disorders (e.g., traumatic brain injury, stroke) – Impaired neuromuscular control.
✅ Cerebrovascular Accidents (Stroke) – Disrupted nerve signaling affecting velopharyngeal movement.

📍 Key Difference?

VPI is a structural defect, while VPC is a neurological issue affecting muscle coordination.

🧬 Genetic Associations of Velopharyngeal
Incompetence

Picture this: a tiny segment of Chromosome 22 decides to disappear during DNA replication. Poof! Gone. As a result, a whole range of issues can pop up, including congenital heart defects, immune deficiencies, and—our star of the show—velopharyngeal incompetence (VPI).

VPI is when the velopharyngeal mechanism (aka the soft palate and surrounding muscles) doesn’t close properly, leading to speech that sounds like someone left the nasal door wide open. It’s like your voice is on a permanent speakerphone setting with no mute button.

Speech & The Great Escape: What’s Happening in VPI?
So, why does VPI happen in 22q11.2 deletions? Well, the list is long and full of bizarre anatomical quirks:

Muscle Hypotonia: The velopharyngeal muscles are basically slacking off, leading to poor closure. Lazy much?

Adenoid Hypoplasia: The adenoids are underdeveloped, so they don’t help with closure either.

Platybasia: A fancy term for a flattened skull base, which increases the velopharyngeal gap—kind of like trying to close a door in a frame that’s too wide.

Upper Airway Asymmetry: The palate lifts unevenly, like a seesaw with one side stuck.

Brain Involvement: Studies suggest even the brain structure is different in these individuals—because why should only the throat have all the fun?

The 22q11.2 Speech Struggle
A whopping 69% of individuals with 22q11.2 deletion have a palatal abnormality, ranging from cleft palates to bifid uvulas (which sounds like a cool sci-fi term but is just a split uvula). And 27% develop VPI, making speech therapy a must.

In a nutshell, VPI in 22q11.2 deletion syndrome isn’t just about anatomy—it’s a whole-body mystery that involves muscles, bones, and even the brain. If genes could talk, they’d probably just say, “Oops, my bad.”

So, next time you hear someone with a nasal voice, just know—it might be their genetics doing a disappearing act. Chromosome 22, you mischievous little trickster!

🧬 Candidate Genes for VPI: TBX1 and Beyond

Meet the Usual Suspect: TBX1

If VPI had a prime suspect, it would be TBX1. This little troublemaker is the most commonly deleted gene in 85% of individuals with 22q11.2 deletion syndrome. The other 15%? They like to keep things interesting with “nested deletions” (which is geneticist-speak for plot twists).

But here’s where it gets wild—some patients who don’t have the typical 22q11.2 deletion are rocking extra copies of the region that’s normally missing. That’s right—genetics sometimes decides to duplicate instead of delete, just to keep researchers on their toes.

TBX1: The Gene with a Plan (Sort of…)
Most of what we know about TBX1 comes from mouse studies. And let me tell you, these mice have been through a lot in the name of science. Researchers have been doing gene targeting experiments, and the results are basically a craniofacial nightmare:

Persistent truncus arteriosus (a heart defect that sounds like a spell from Harry Potter)
Microtia (tiny or missing ears)
Pharyngeal abnormalities (aka, VPI’s favorite excuse)
TBX1 is a transcription factor, meaning it bosses around other genes during development. It’s supposed to help form facial muscles, pharyngeal structures, and the palate, but when it goes missing, everything gets thrown into chaos—kind of like when a group project loses its most responsible member.

TBX1 and Its Entourage

But TBX1 doesn’t work alone—it’s got a whole squad of genes working (or not working) alongside it. Let’s meet the supporting cast:

ISL1 & Tcf21: These guys team up with TBX1 in the pharyngeal mesoderm (a fancy way of saying “throat muscle HQ”).
Six1 & Eya1: These two interact with TBX1 to make sure the fibroblast growth factor 8 (Fgf8) does its job. If Fgf8 isn’t happy, craniofacial development takes a serious hit.
Fgf8: The real MVP of face-building. Without enough Fgf8, the velopharyngeal region doesn’t form properly—resulting in speech and swallowing issues.
Basically, if TBX1 is missing, its whole gene friend group gets thrown into disarray. And when the genes aren’t cooperating, the palate and throat muscles end up looking like a half-finished jigsaw puzzle.

If you ever feel like your velum just isn’t pulling its weight, don’t be too hard on it—it’s probably dealing with a genetic crisis. Between TBX1 and its dysfunctional genetic friend group, the whole system is one big, messy group chat of developmental confusion.

On the bright side, research into these genes is ongoing, and the more we understand their roles, the better we can develop treatments for VPI and related conditions.

Until then, let’s just appreciate the genetic drama happening inside every developing face—because, let’s be honest, biology is just reality TV at a microscopic level.

BMP Signaling & Chordin: The Classic Good Cop, Bad Cop Duo
Bone morphogenetic protein (BMP) is that enthusiastic construction worker making sure your craniofacial structures develop. But if BMP isn’t kept in check, things can go overboard, and suddenly, we’re looking at craniofacial anomalies instead of a well-formed palate.

Enter Chordin, the BMP antagonist (aka The Enforcer). Chordin’s job is to keep BMP under control, but when Chordin takes an unexpected vacation (aka a genetic mutation), BMP gets out of hand. The result? Cleft palates, jaw abnormalities, and a whole lot of orthodontic intervention.

And guess what? TBX1, our favorite gene from the 22q11.2 deletion syndrome, is also involved. It turns out that if you mess up both TBX1 and Chordin, the craniofacial drama doubles. Think of it as trying to bake a cake but forgetting both the eggs and the flour. Not a great outcome.

IRF6: The Gene That Decided Your Lips Needed Extra Pits
Meet Interferon Regulatory Factor 6 (IRF6)—a gene that, when working correctly, helps your palate form properly. But when IRF6 goes rogue, it gives us Van Der Woude Syndrome (VWS), an autosomal dominant disorder responsible for cleft lip and palate… and surprise! Lip pits.

Yes, you heard that right. This gene doesn’t just cause cleft palates; it also throws in congenital pits or sinuses on the lower lip—because apparently, it thought your face needed extra pockets. Fun fact: This syndrome makes up about 2% of all cleft lip and palate cases. So if your lower lip has mysterious little dimples, you might just be rocking a genetic signature!

MSX1: The Overachiever Who Forgot to Finish the Job
Msh homeobox 1 (MSX1) is like that one student in class who almost gets full marks but forgets to answer the last question. MSX1 is critical for palatal formation and tooth development, but if it’s mutated, it causes cleft palate and oligodontia (fancy word for missing teeth).

Scientists studied MSX1-deficient mice (because mice always get roped into these things), and their palatal shelves formed, elevated… and then just didn’t fuse. It’s like the gene started the job and then took an extended coffee break. The exact reason? Still a mystery, but it seems related to down-regulated BMP signaling (back to BMP being the root of all trouble).

PVRL1: The Margarita Island Mystery Mutation
Ah, PVRL1, the gene with a backstory straight out of a medical mystery novel. Found on chromosome 11q23.3, this gene is responsible for keeping epithelial and endothelial cells nice and tight—kind of like the glue in your tissues. But when a mutation occurs? Say hello to ectodermal dysplasia Margarita Island type.

This autosomal recessive disorder is named after Margarita Island (off the coast of Venezuela), where there’s a surprisingly high number of people carrying this gene mutation. Affected individuals have cleft lip/palate, ectodermal dysplasia, and partial syndactyly (a.k.a. webbed fingers and toes).

Why is this mutation so common there? Scientists think it might have provided resistance to herpes simplex virus 1 & 2. So, while these folks may have had some serious craniofacial anomalies, at least they were better protected from cold sores. Genetics is wild.

If craniofacial development were a group project, TBX1, IRF6, MSX1, PVRL1, BMP, and Chordin would all be on the team. But, as we all know, in every group project:

One person (BMP) does way too much and messes everything up.
Another (Chordin) tries to control the chaos but can’t keep up.
One (MSX1) almost finishes but forgets the final step.
Another (PVRL1) makes a random decision no one saw coming.
And TBX1? Well, TBX1 just disappears half the time.
So, if your palate is perfectly formed—congrats! Your genetic group project actually turned out well. But if not… just blame your ancestors.

Molar incisor hypomineralization (MIH): The “Why, What and How” of decision making for orthodontists

Picture this: You’re an orthodontist, standing in your clinic, ready to battle malocclusions like a dental superhero. Your trusty sidekicks? Brackets, bands, and auxiliaries. But then, lurking in the shadows of enamel comes a formidable foe—Molar-Incisor Hypomineralization (MIH). Cue dramatic music.

Now, you might be thinking, “Really? Another dental complication? Didn’t we already have enough to deal with—like convincing teenagers to wear their rubber bands?” But fear not! We can break down this orthodontic enigma using Simon Sinek’s Golden Circle method. Yes, the same framework that inspires businesses and leaders can also help us decode MIH. Let’s dive in.

The “Why” – Our Core Purpose: Why Should We Care About MIH?

If you’re an orthodontist, MIH isn’t just another acronym to add to your vocabulary—it’s a genuine clinical headache. This condition, which disrupts enamel development, makes teeth more porous, fragile, and annoyingly prone to decay. Imagine trying to bond brackets to enamel that crumbles like a poorly baked cookie. Not fun.

Beyond the technical struggles, there’s the human factor. Kids with MIH often experience dental anxiety, sensitivity, and a higher risk of caries, making their orthodontic journey more challenging. As professionals dedicated to crafting beautiful, functional smiles, we need to take MIH seriously. Because at the end of the day, what’s the point of straightening teeth if they don’t last?

The “What” – Understanding the Beast: What Is MIH Exactly?

MIH affects the first permanent molars and incisors, leading to weak enamel that flakes, fractures, and generally behaves like it skipped calcium class. Researchers blame a mix of genetic and environmental factors, including childhood illnesses, antibiotics, and—because why not?—potentially some mysterious, yet-to-be-determined causes.

Orthodontists face a tough battle here. Hypomineralized enamel doesn’t bond well, meaning brackets are more likely to pop off mid-treatment, like an overenthusiastic popcorn kernel. Sealants and fillings? They don’t always stay put. In severe cases, extractions may even be necessary, often under general anesthesia. Add in the stress of anxious kids, frustrated parents, and mounting healthcare costs, and MIH turns into more than just an enamel issue—it’s a full-blown orthodontic challenge.

The “How” – Fighting Back: How Can We Manage MIH in Orthodontics?

Here’s where we get creative. Since MIH-affected teeth can be hypersensitive and structurally compromised, orthodontists need to tweak their usual strategies. Some battle-tested tips include:

  • Stronger Bonding Protocols: Think of it like using super glue instead of tape. Resin-modified glass ionomers or self-etching primers may offer better adhesion.
  • Adjunctive Support: Don’t just slap on a bracket and hope for the best. Consider bands, indirect bonding, or even temporary anchorage devices to minimize stress on hypomineralized teeth.
  • Strategic Treatment Planning: Sometimes, it’s better to extract a compromised first permanent molar early to allow for favorable space closure—sort of like cutting your losses before they spiral out of control.
  • Desensitization Strategies: MIH teeth can be dramatically hypersensitive, making simple treatments feel like medieval torture. Pre-treatment fluoride varnishes, casein phosphopeptide-amorphous calcium phosphate (CPP-ACP), or desensitizing agents may be game changers.
  • Multidisciplinary Collaboration: Since MIH is a complex condition, working closely with pediatric dentists and restorative specialists ensures comprehensive care. Translation: Teamwork makes the dream work.

How Do We Measure MIH Severity?

Great question! Over the years, researchers have tried to classify MIH using complex scoring systems. Some use criteria like:

  1. Demarcated opacities – The ‘Instagram filters’ of enamel defects.
  2. Posteruptive enamel breakdown (PEB) – The ‘oops, it’s crumbling’ stage.
  3. Atypical restorations – The ‘let’s fix this mess’ approach.
  4. Tooth extractions due to MIH – The ‘eviction notice’ for first permanent molars.
  5. Failure of eruption – Because sometimes, teeth just don’t feel like showing up.

One commonly used scoring system is the MIH Treatment Need Index, which, let’s be real, sounds like something straight out of a bureaucratic nightmare. But it’s actually useful—it helps us determine how bad the MIH situation is and what to do next.

Does MIH Affect Quality of Life? Oh, Absolutely.

If you think MIH is just about funny-looking enamel, think again. Studies show that MIH can significantly impact a child’s oral health-related quality of life (OHRQoL). Here’s how:

  • Oral Symptoms & Functionality: MIH-affected molars are often hypersensitive, making eating ice cream a horror movie experience.
  • Social & Emotional Impact: MIH-affected incisors can make kids feel self-conscious about their smiles, leading to social anxiety. And let’s not forget about potential teasing—because kids can be brutally honest.
  • Increased Dental Fear & Anxiety (DFA): Some studies say MIH-affected kids are more likely to dread dental visits. Others say, “Nah, they’re fine.” Either way, behavior management is key.

So, What’s the Game Plan?

MIH doesn’t come with a ‘one-size-fits-all’ treatment. Instead, it requires a mix of strategies:

  • Minimally invasive techniques (like microabrasion or infiltration) to improve aesthetics.
  • Restorations to protect those weak spots—composite resins, glass ionomer cements, and the occasional crown for stubborn cases.
  • Fluoride varnishes and desensitizing agents to ease the ouch factor.
  • Extraction of molars (if necessary) with careful ortho planning—because no one wants unexpected space issues later.
  • Patient and caregiver education (because sometimes, a little reassurance goes a long way!).

Step 1: To Extract or Not to Extract?

Before anything else, orthodontists must decide whether the MIH-affected teeth should stay or go. If the teeth are beyond repair—hypersensitive, structurally weak, or just outright stubborn—it may be best to bid them farewell. If they are salvageable, then buckle up because they require extra TLC during treatment.

Bonding and Banding: Special Considerations for MIH-affected Teeth

MIH-affected enamel is like a fragile antique—handle with care. Unlike their healthier neighbors, these teeth don’t always cooperate with traditional bonding and banding techniques. But don’t worry, science has our backs! Here’s how we can secure brackets and bands without a meltdown (from either the patient or the orthodontist).

Orthodontic Bonding Tips:

🦷 Prophylaxis First: Clean the tooth surface with a rubber cup and fluoride paste (up to 13,500 PPM fluoride). Think of it as a spa day for the tooth before the real work begins.

🦷 Pretreatment Magic: A little 5% sodium hypochlorite works wonders before using a self-etching primer bonding system. It’s like priming a wall before painting—essential for a strong hold.

Cementing and Bonding Options:

🔹 GIC (Glass Ionomer Cement): A reliable option with fluoride release—because extra protection is always a plus.

🔹 RMGIC (Resin-Modified GIC): Think of this as GIC with superpowers—it has better adhesion and longevity.

🔹 Compomer (Polyacid-modified GIC): A hybrid option that offers flexibility and durability.

🔹 Resin Composite: The go-to for a strong, lasting bond, but only if the enamel allows it. MIH teeth can be temperamental!

Banding Done Right:

📌 Metal Printed Bands: Custom-fitted for a snug, secure grip. Think of it as a tailored suit—because one size never fits all.

Utilization of extraction spaces for orthodontic corrections

Ah, the noble First Permanent Molar (FPM)—a tooth that stands its ground, anchors the jaw, and chews through life’s challenges. But what happens when it’s compromised beyond repair? Orthodontists face a real conundrum: extract it and risk space management issues, or keep it and endure the long-term consequences? Let’s break it down (pun intended) with a deep dive into extraction spaces for orthodontic corrections, all while keeping our humor intact—because nothing soothes dental woes like a good laugh!

Orthodontists typically avoid extracting FPMs because of their strong anchorage potential. Think of them as the wise elders of the dental arch, holding everything together. But when they fall victim to hypomineralization, decay, or pain, tough choices must be made.

Timing is everything! Extract too early, and adjacent teeth tip into the space like an overly enthusiastic Jenga tower. Extract too late, and you risk poor occlusal contact, overeruption of opposing teeth, and the orthodontist giving you “that look.”

The Referral Chain Reaction

Most patients first visit their general dentist, who then passes the case to a pediatric dentist. If the situation is dire, the orthodontist enters the scene, often finding themselves in a borderline decision-making scenario. At around 8-9 years old, kids undergo assessment, as this is the sweet spot where Second Permanent Molars (SPMs) are still in development. Severe pain? Extraction is likely, no matter the malocclusion type.

Timing Matters: Extracting the Lower FPM

Extracting a compromised lower FPM while the SPM is still developing (between ages 8-10) minimizes occlusion disruption. But miss this window, and you may be dealing with tipping, rotation, and spacing nightmares. Think of it like catching a bus—you don’t want to be too early or too late unless you enjoy waiting at the stop forever.

However, once extracted, the domino effect begins. Patients may face mesial tipping of upper and lower SPMs, distal migration of premolars, and bite deepening. Orthodontists must then break the news: “Congrats! You might need future extractions and prosthetic work.” Sounds fun, right?

The Third Molar Wild Card

If there’s a third molar in the same quadrant, hooray! Space closure improves. If not, no biggie—patients can still function with a shorter dental arch. It just makes mesial movement of the lower SPM a tad more complicated.

The Art of Extraction Strategy: Class I, II, and III Cases

  • Class I Malocclusion (Moderate to Severe Crowding): Extracting FPMs can create much-needed space, but it’s often best to wait until the SPMs erupt. If extractions aren’t needed, stainless steel crowns may be the unsung heroes of long-term FPM protection.
  • Class II Division 1: Delayed extractions of upper FPMs help avoid mesial drift, which could mess up overjet correction. In cases of a retrusive mandible, keeping lower FPMs intact is preferred—because excessive retraction can lead to airway complications. Nobody wants that.
  • Class II Division 2 (Deep Overbite Patients): Lower FPM extractions? Bad idea—especially for brachyfacial cases. Instead, retention strategies and immediate appliance placement post-SPM eruption can help maintain vertical dimension.
  • Class III Malocclusions: Super unpredictable growth patterns mean extractions should be postponed until growth ceases. Removing lower FPMs can worsen the situation, making upper third molars redundant and worsening reverse overjet. In short, let the teeth settle before making any rash decisions!

The Dilemma of Restoring vs. Extracting FPMs

Endodontic treatment sounds like a noble plan, but reality hits hard. The success rate of restoring hypomineralized teeth is dicey at best. Bond failures, post-eruptive breakdown, and the need for perfect sealing make restorations a gamble. Plus, getting an 8-year-old to sit still for a lengthy procedure? Good luck! If the initial restoration fails, a second round of general anesthesia might be needed for extraction—something everyone would rather avoid.

Space Closure & The Battle Against Overeruption

If the lower FPM is extracted before functional therapy, maintaining occlusal coverage is crucial. Overeruption can be a real nuisance, and a holding appliance might be necessary until the space is restored prosthetically or closed via orthodontic treatment. But compensating extractions? Only in extreme cases where the FPMs are beyond salvation!

Managing space closure is no walk in the park, especially in deep curve of Spee cases or patients with reduced lower anterior facial height. Add strong occlusal forces into the mix, and even stainless steel crowns struggle to stay put.

Class III cases demand the most caution, as premature extractions can throw everything out of whack. The best approach? Delay major decisions until growth stabilizes and all options (including orthodontic camouflage vs. surgery) are on the table.

Orthodontists are basically playing 4D chess when deciding whether to extract an FPM. It’s all about precision, timing, and making sure one move doesn’t throw the whole game into chaos.

So next time your orthodontist suggests extracting an FPM, know that they’ve calculated the risks, assessed the potential consequences, and likely lost sleep over it. Because in the world of orthodontics, every extraction is a strategic decision—one that could determine the future of a patient’s perfect smile!

(And if all else fails, there’s always the stainless steel crown—a knight in shining armor for struggling FPMs everywhere!)

Anterior Maxillary Distraction by Tooth-Borne Palatal Distractor

Let’s talk about anterior maxillary osteotomy—a fancy way of saying “pushing your upper jaw back into place because your teeth decided to go rogue.” Now, before we dive into the nitty-gritty, let’s acknowledge the real heroes here: the orthodontists and surgeons who spend their days nudging bones like a very sophisticated game of Jenga.

Maxillary osteotomies have been around longer than your grandma’s secret recipe for laddoos. But unlike her kitchen skills, these techniques come with scalpels, screws, and a significant chance of making your nose twitch for weeks.

We have three classic moves in the Maxillary Osteotomy Dance:

1. Wassmund osteotomy – Named after a guy who probably spent too much time thinking about cutting bones.


2. Wunderer osteotomy – Wunderer…because wondering if your face will move correctly afterward is part of the thrill.


3. Anterior maxillary downfracture osteotomy – For those who like their surgery with a side of gravity.

While all three techniques get the job done, they differ in their “access route”, like Google Maps giving you three ways to get to the same dental conference—one scenic, one straightforward, and one with a questionable dirt road.

The Problem With Pushing Forward

Now, if you thought moving the anterior maxilla forward was easy, think again. The palatal mucosa is like an overprotective mother—it does not stretch easily. If you try too hard, you might end up with an oronasal or oroantral fistula. (For those unfamiliar, that’s a fancy way of saying, “Congratulations, you now have an accidental bonus airway!”)

In fact, the only reported case of maxillary advancement via osteotomy happened in 1968—shoutout to William Bell, the original maxillary daredevil. He moved the maxilla forward, bone-grafted the leftover gap, and then—because 1968 was a wild time—popped in a removable denture like a dental Band-Aid.

Enter Distraction Osteogenesis – The Slow and Steady Approach

The dental world eventually realized that gradual movement is the way to go (kind of like convincing your cat to take a bath). So, we borrowed a trick from orthopedics: distraction osteogenesis. Originally developed for cleft lip and palate cases, this technique slowly moves bones using:

External distractors – Big, bulky, and very “Mad Max.”

Orthodontic face masks – Like Invisalign’s overachieving cousin.

Internal distractors – The discreet VIP section of distraction devices.


But here’s the twist: these are mostly used to move the whole maxilla forward (Le Fort I style), rather than just the anterior segment. That’s like moving an entire apartment building when all you really needed was to shift the balcony.

The Unexpected Hero: The Palatal Distractor

Palatal distractors have traditionally been used for expansion, helping kids (and the occasional brave adult) widen their maxilla to correct collapsed buccal occlusion. But someone (probably while holding a coffee and staring at a dog study) thought, “Hey, what if we used this thing to move the maxilla forward?”

The results?

Tooth-borne distractors were tested on dogs (lucky them), and they did successfully move the anterior maxilla forward—along with a lot of dental movement.

Bone-borne distractors came in to save the day, ensuring that actual bone (not just teeth) was being moved.

And guess what? There’s exactly ONE reported case of a palatal distractor being used to advance a retruded maxilla in a non-cleft patient. Just one. That’s rarer than an orthodontist who doesn’t own at least three pairs of loupes.

Who Needs This? (Besides People Who Want to Look Like Their Own X-Ray)

This technique is perfect for patients with maxillary hypoplasia in both the anteroposterior and transverse planes—especially if they have cleft lip and palate. Think of it like a strategic battlefield move:

Crossbite limited to anterior and premolars? Check.

Molars behaving themselves in normal buccal occlusion? Check.

Dental crowding making your orthodontist sigh dramatically? Check.


The beauty of this approach? As your maxilla gradually advances, new bone forms in its wake—meaning your displaced teeth can be politely guided into their new positions with post-surgical orthodontics.

The Surgical Game Plan: Step-by-Step (or Slice-by-Slice)

Step 1: Build Your Secret Weapon – The Hyrax Appliance

Before the surgery even starts, we need our mechanical hero: the Hyrax orthodontic appliance (which sounds like a prehistoric creature but is actually a German-made expansion screw). Unlike its usual role in expanding palates sideways, we tweak it to push forward instead of out.

4 arms of the appliance:

2 anterior arms → Soldered to canines or first premolars

2 posterior arms → Soldered to first or second molars

This is the equivalent of securing a medieval battering ram before storming the castle walls.

Step 2: Knock Knock, It’s Surgery Time!

Under general anesthesia (because no one wants to be awake for this), we begin:

1. Vestibular incision – From first molar to first molar (basically, a wide front door for the maxilla).

2. Mucoperiosteal flap reflection – Peeling back the gums like opening a well-wrapped gift… but with scalpels.

3. Buccal linear osteotomy – A clean cut above the maxillary teeth from pyriform rim to distraction site.

4. Lateral nasal wall cut – Because your nose needs to be in on the action too.

5. Septal osteotomy – The nasal septum gets a trim at its base (like a very aggressive haircut).

At this point, your maxilla is thinking, “What did I do to deserve this?”

Step 3: The Grand Downfracture (Because Upfracturing Isn’t a Thing)

Vertical interdental osteotomy → First, a light cut through the buccal cortex, then deepened carefully (like slicing a layered cake).

Palatal osteotomy → Extending the cut medially to separate the segment without puncturing the palatal mucosa (because who needs a hole in their mouth?).

Downfracturing the anterior maxilla → A gentle wiggle and push to mobilize it forward (think of convincing a cat to move off your laptop).

Important Rule: Do not mess with the palatal mucosal pedicle—it’s keeping everything alive!

Step 4: Installing the Hyrax & Hitting the Snooze Button

1. Cement the appliance onto the selected teeth. (Your maxilla is now officially in a mechanical relationship.)

2. Close the surgical wound. (Because we don’t want to leave things open-ended.)

3. Let the bone chill for five days. (Surgery is tiring. Even for your face.)

Step 5: The Big Move – Slow & Steady Wins the Maxilla Race

On post-op day five, we start activating the Hyrax:

1mm per day (Because bones like to take their time).

2 to 4 activation rhythms per day (Like an orthodontic drumbeat).

The anterior maxilla keeps moving forward until a normal overjet is achieved.

Once it’s in place? Lock it in for 6 weeks—because good things take time (and so does new bone formation).

The Good, The Bad & The Orthodontist Who Has to Deal With It

✅ The Benefits:

⭐ No need for bone grafts – Your body does all the hard work.
⭐ Improved soft tissue support – Upper lip & paranasal area get a free upgrade.
⭐ Better space for orthodontic alignment – Less need for tooth extractions.
⭐ Stability – Unlike nonvascularized bone grafts, this bone won’t shrink over time.

⚠️ The Potential Drama:

🚨 Anchorage issues – If the patient lacks premolars/molars, the posterior teeth might move instead of the maxilla.
🚨 Tooth proclination – If the palatal osteotomy isn’t done properly, the front teeth might tip forward instead.
🚨 Appliance limitations – Tooth-borne distractors provide great control, but bone-borne devices might be more stable.

Long-term Follow-up After Maxillary Distraction Osteogenesis in Growing Children With Cleft Lip and Palate

If bones could talk, they’d probably say, “Hey, stop pulling me!” But in the world of distraction osteogenesis (DO), that’s exactly what we do—intentionally stretch bone tissue to create new growth. Think of it as the orthodontic equivalent of a yoga instructor telling your jaw to lengthen and breathe.

While orthognathic surgery has been the gold standard for skeletal corrections, DO has stepped in as the cool new kid, especially for cases that were once deemed untreatable. But is it really the superior method, or just a fancier way to move bones? Let’s break it down.

Since its first craniofacial application by McCarthy et al. in 1992, DO has come a long way from being an experimental idea to a widely used technique for maxillary and mandibular expansion. But, like any orthodontic superhero, it comes with its strengths, weaknesses, and a history of trial-and-error that reads like a medical thriller.

The Origins: From Soviet Leg Braces to Jawline Makeovers

DO owes its roots (pun intended) to Ilizarov’s principles—a Russian orthopedic surgeon who figured out that bone can be stretched and tricked into regenerating. What started as a method for limb lengthening soon found its way into orthodontics when McCarthy et al. used it to lengthen hypoplastic mandibles in children.

Once researchers saw potential in midface and maxillary distraction, it became a game-changer for patients with clefts and severe maxillary hypoplasia—especially when traditional orthognathic surgery wasn’t an ideal option.

With miniature distraction devicesrigid external distraction (RED) systems, and intraoral appliances, the orthodontic world saw an explosion (well, controlled expansion) of techniques:

🔹 Cohen et al. (1997) â€“ Introduced maxillary distraction in young children.
🔹 Polley & Figueroa (1997) â€“ Used the RED device to treat severe maxillary hypoplasia.
🔹 Molina et al. (1998) â€“ Tried a mix of facial masks and intraoral appliances for mixed dentition cases.

So, Does It Work? The Numbers Speak!

Swennen et al. (2001) reviewed 16 studies spanning 33 years (1966-1999) and found that maxillary advancements ranged from 1 mm to 17 mm. Not bad for a non-surgical approach, right?

Well, not so fast—relapse was reported in 50.4% of cases. That’s like getting a six-pack after months of workouts only for it to disappear when you eat one slice of pizza.

Rachmiel et al. (2005) reported stable results in 12 cleft patients after two years, showing that maxillary length (Condylion to A point) held its ground. But Krimmel et al. (2005) later threw a wrench into that optimism, noting a decrease in SNA and ANB angles just one year after distraction.

Cheung & Chua (2006) conducted a meta-analysis of 26 studies (1966-2003) on 276 cleft patients, revealing:

📌 Most maxillary advancements were between 5-9 mm.
📌 External distractors (68.8%) were more common than internal distractors (2.17%) and facial masks (25.72%).
📌 Maxillary relapse? 5.56% within two years—but only one study provided actual numbers.

One thing is clear: distraction osteogenesis works, but long-term stability is still a mixed bag.

The Study: Six Patients, One Mission—Expand That Maxilla!

Meet our VIPs: six Chinese patients (3 boys, 3 girls, average age 10.5 years), all of whom had:
✔ Cleft lip and palate (two unilateral, four bilateral)
✔ Primary lip and palate repair in infancy
✔ Anteroposterior maxillary hypoplasia (aka, their upper jaw was slacking)
✔ Class III malocclusion with a negative overjet (translation: their lower teeth were winning a battle they shouldn’t even be fighting)

These kids weren’t just getting braces—they were about to experience controlled bone expansion, courtesy of the Rigid External Distraction (RED) device.

1️⃣ Pre-Orthodontic Preparation – Because even bone stretching needs a good warm-up.
2️⃣ Complete High Le Fort I Osteotomy – A fancy way of saying, “Let’s surgically cut the upper jaw so we can move it.” where the maxilla was delicately detached with septal and pterygomaxillary disjunction. (Translation: we made it mobile but still attached—think of it as unlocking a door, not knocking it down.)
3️⃣ RED Device Installation – Think of this as the orthodontic version of a headgear, but instead of just pushing teeth, it’s stretching the entire upper jaw.
4️⃣ Latency Period (5 Days) – Let the jaw marinate before we start stretching it.
5️⃣ Active Distraction (1 mm/day) – The screws on the RED device were adjusted daily to pull the maxilla forward. (It’s like a gym for your bones—except you don’t have to do the work; your jaw does.)
6️⃣ Overcorrection Achieved! 🎉 – Because we know relapse is real, we stretched the maxilla a little extra to compensate for future setbacks.
7️⃣ Consolidation (6-8 Weeks) – The RED device stayed put to let the new bone solidify.
8️⃣ Device Removal & Orthodontics – After the expansion was done, the real party started: braces to fine-tune everything.

The study wasn’t just about making kids look less Class III—it was about proving that DO actually works (and hopefully, stays that way). Here’s how they did it:

📸 Lateral Cephalographs  were taken at four key points:
🔹 T0 (Before Distraction) – “This is your jaw on cleft-induced hypoplasia.”
🔹 T1 (Immediately After Distraction) – “Congratulations, your maxilla has entered the chat.”
🔹 T2 (6 Months Later) – “Let’s see if your jaw likes its new position.”
🔹 T3 (1+ Year Later) – “Did it stay put, or did it sneak back?”

Instead of using simple before-and-after pictures (this isn’t a weight loss commercial), the researchers mapped out skeletal and dental landmark positions using a cranial base reference system.

How, you ask?

🔹 First, skeletal landmarks were pinpointed on the T0 cephalogram.
🔹 Then, these landmarks were transferred onto T1, T2, and T3 cephalograms using a best-fit method—aligning surrounding bone structures and trabecular patterns (Huang & Ross, 1982).
🔹 To keep things precise, an x-y coordinate system was created:

Y-axis: A perpendicular line intersecting the X-axis at sella
🔹 This coordinate system was then transferred onto each cephalogram for standardized measurements.

X-axis: Drawn 7° below the sella-nasion plane

Key Takeaways

✅ Overjet increased (yay, no more Class III woes!).
✅ Overbite decreased—except for our rebellious Case 5.
✅ Maxilla went forward (woo-hoo!) but then took a casual retreat backward over a year (boo!).
✅ Some vertical movement—first up, then down (the maxilla, not our enthusiasm).
✅ Teeth tagged along for the ride, moving anteriorly and inferiorly.
✅ Relapse? Oh yeah—about 9.6% at 6 months, increasing to 24.5% by a year.

Effects of lip bumper therapy on the mandibular arch dimensions of children and adolescents

Move over, braces—there’s a new sheriff in town, and it’s called the Lip Bumper (LB)! Okay, not exactly new, but definitely underrated. If you thought orthodontic appliances were just about pulling teeth in different directions, LB is here to expand your perspective—literally!

Let’s break down the magic of LB, one millimeter at a time.

Orthodontic treatment often involves making critical decisions about space management in the mandibular dental arch. One conservative approach that has gained attention is lip bumper (LB) therapy, which may serve as an effective alternative to future space deficiency resolution, reducing the necessity for tooth extractions.

LB Therapy: The Good, The Bad, and The Bulky

The Good: More Space, Less Crowding

Studies suggest that LB therapy can help gain mandibular arch circumference by:
✔️ Distally angulating the first molars (M1)
✔️ Proclining the incisors (hello, newfound space!)
✔️ Buccally tipping the deciduous molars/premolars
✔️ Preventing mesial migration of molars (keeping that precious E space intact!)

This results in increased arch width, length, and perimeter, making it a solid alternative for managing mild to moderate crowding.

The Bad: Unpredictability & Side Effects

Before you rush to prescribe LBs to every borderline crowding case, let’s talk about the flip side: ❌ High uncertainty about the exact amount of movement per tooth
❌ Risk of M2 impaction or ectopic eruption (ouch!)
❌ Potential excessive buccal tipping of incisors, leading to periodontal concerns
❌ Social struggles—lips looking permanently puffed out (not ideal for the self-conscious teen)

The Bulky: Activation Matters

Not all LBs are created equal—activation protocols vary across studies. The amount of activation differs depending on the region:

Tooth RegionActivation Range (mm)
Molars (M1)2 – 5 mm
Premolars/Primary Molars3 – 8 mm
Canines3 – 5 mm
Incisors1 – 3 mm

More activation ≠ better results. Too much force can lead to M2 eruption disturbances, especially if the LB is worn for over two years.

LBs: A Space Maker or a Space Stealer?

While LB therapy is great for anterior crowding relief, posterior space management often gets overlooked. If not planned carefully, gaining space in the front can mean losing it in the back—resulting in impacted second molars (M2).

🚨 Negative Predictors for M2 Impaction:

  • Pre-treatment M2 inclination >30°
  • LB treatment duration >2 years

So before jumping on the LB train, check that M2 position! Otherwise, you’ll be trading one problem (crowding) for another (impacted molars and potential future surgeries).

Final Thoughts: The Patient Factor

If LB therapy had a motto, it would be: “Cooperation is key.” A patient who refuses to wear their LB (or removes it every chance they get) is on the fast track to treatment failure. In some cases, orthodontists have resorted to tying the LB in place—because desperate times call for desperate measures.

🔹 Max LB duration in studies: 28 months 🔹 Ideal duration: As short as possible while achieving stable results

Bottom Line:

✔️ LB therapy can increase arch length and reduce crowding.
❌ But it comes with unpredictability, risk of M2 impaction, and social discomfort.
💡 Plan wisely, evaluate molar positions, and keep treatment durations reasonable!

Choosing the Right Needle

Endodontic success is contingent upon meticulous debridement, shaping, and disinfection of the root canal system. Among the numerous factors influencing treatment outcomes, irrigation needle selection is an often-overlooked yet critical determinant of efficacy. The choice of needle gauge directly impacts the delivery of irrigants, ensuring optimal penetration, minimal apical extrusion, and maximal bacterial eradication. This article explores the scientific rationale behind needle gauge selection and its implications for clinical practice.

The Role of Needle Gauge in Endodontic Irrigation

Root canal irrigation serves multiple objectives: mechanical flushing of debris, dissolution of organic matter, microbial disinfection, and smear layer removal. The gauge of the irrigation needle determines the flow dynamics, pressure distribution, and depth of penetration within the canal. The ideal needle must navigate the complex anatomy of the root canal while facilitating efficient irrigant exchange without causing undue apical pressure.

Comparative Analysis of Commonly Used Needle Gauges

Gauge (G)External Diameter (mm)Clinical Considerations
21G0.81Rarely used due to excessive size and risk of irrigant extrusion
23G0.64Suitable for wide canals but limits depth of penetration
25G0.51Balances flow rate with controlled delivery
27G0.39Optimal for most cases; allows deeper penetration while minimizing extrusion
28G0.36Enhances precision for minimally invasive approaches
30G0.30Preferred for deep, narrow canals requiring delicate irrigation

Fluid Dynamics and Needle Design

The efficiency of irrigation is not solely dictated by gauge but also by the design of the needle tip. Side-vented needles, for example, reduce the risk of apical extrusion by directing flow laterally rather than apically. Additionally, advances in computational fluid dynamics have demonstrated that smaller gauge needles create more turbulent flow patterns, enhancing irrigant activation and biofilm disruption.

Advanced Irrigation Modalities: Beyond Traditional Needle Irrigation

While conventional needle irrigation remains the gold standard, emerging technologies aim to augment disinfection through enhanced fluid dynamics and activation mechanisms:

  • Ultrasonic and Sonic Activation: Agitates the irrigant to improve penetration into lateral canals and dentinal tubules.
  • Photoactivated Disinfection: Employs photosensitizers and light energy to generate reactive oxygen species for microbial eradication.
  • Electrochemically Activated Solutions (e.g., Sterilox): Generates hypochlorous acid and free chlorine radicals, enhancing antimicrobial efficacy while maintaining biocompatibility.
  • IntraLight UV Disinfection: Uses a 254 nm UV intracanal illuminator to eliminate residual microbial biofilms.

Clinical Implications and Future Directions

The evolution of endodontic irrigation strategies underscores the growing emphasis on precision-driven, minimally invasive techniques. While the 27-gauge needle remains the most widely adopted due to its balance of penetration and safety, ongoing research into fluid dynamics, antimicrobial solutions, and activation methods promises to redefine the standard of care.

As endodontic irrigation techniques continue to advance, the selection of an appropriate needle gauge must be guided by both anatomical considerations and the latest evidence-based protocols. A nuanced understanding of irrigation dynamics will not only improve disinfection efficacy but also contribute to superior long-term treatment outcomes.

Conclusion

Endodontics is no longer just about mechanical instrumentation; it is an interdisciplinary science integrating fluid mechanics, microbiology, and material science. The seemingly simple decision of needle gauge selection is, in reality, a critical component of treatment success. By refining our approach to irrigation, we can elevate endodontic outcomes, ensuring that root canal therapy is not only effective but also biologically sound.

Evaluation of the Jones jig appliance for distal molar movement

What is the Jones Jig Appliance?

Orthodontic treatment often requires space creation to align teeth properly. One effective way to achieve this is through molar distalization—moving the upper first molars backward to make room for crowding or to correct bite discrepancies. Traditionally, orthodontists have relied on headgear, Class II elastics, and removable appliances, all of which require patient compliance (and we all know how reliable that is! 🙄).

But what if there was a more predictable, fixed alternative?

Enter the Jones Jig Appliance—a fixed, non-compliance-based distalizing appliance designed to move molars efficiently without relying on patient effort.

How Does the Jones Jig Work?

✔ Palatal Button â€“ A 0.5-inch diameter acrylic button, anchored to the maxillary second premolars using a 0.036-inch stainless steel wire for stability.
✔ Jones Jig Arms â€“ One arm fits into the 0.045-inch headgear tube, while the other fits into the slot of the first molar band.
✔ Nickel-Titanium Spring â€“ A 0.040-inch coil spring delivers a controlled force of 70-75 g to push the molars backward.

Once the Jones Jig is cemented, it is activated by tying the activation loop with a 0.010-inch ligature off the bracket of the anchoring tooth. This ensures continuous force application.

The coils are then reactivated every 4 to 5 weeks until the desired molar movement is achieved.

Once activated, the appliance applies a gentle but continuous distal force on the upper first molars, moving them backward over time. The best part? Since it’s fixed, patients don’t have to remember to wear it, making treatment more reliable.

Advantages of the Jones Jig

✅ No Patient Compliance Needed â€“ Unlike headgear, patients don’t have to wear or adjust it.
✅ Continuous Force Application â€“ The coil spring ensures a steady force for predictable movement.
✅ Faster Treatment Time â€“ Studies show that molars can be distalized in 4-6 months.

While the Jones Jig is highly effective, it does come with some considerations:
🔹 Molar Tipping â€“ Instead of bodily movement, molars may tip distally, requiring additional mechanics for uprighting.
🔹 Anchorage Loss â€“ The anterior teeth may shift forward slightly, which may need to be controlled with TADs (temporary anchorage devices) or a transpalatal arch (TPA).

Does the Eruption of Second Molars Affect Treatment?

When using the Jones Jig Appliance for molar distalization, orthodontists must consider various factors that can influence treatment outcomes. One key question is: Does the eruption of second molars impact molar movement and anchorage loss?

A study evaluating 72 patients explored this question by comparing cases with erupted vs. unerupted maxillary second molars to determine how they affected the type and amount of molar movement and anchorage loss.

Study Findings: Second Molar Eruption and Its Effects

Researchers divided the patients into two groups:

GroupCondition of Second MolarsKey Observations
Group 1 (28 patients)Unerupted second molars (below the cementoenamel junction of the first molar)Less anchorage loss in premolars and incisors, potentially more controlled molar movement.
Group 2 (44 patients)Erupted second molars (not banded or bonded)More anchorage loss observed, possibly due to resistance from the second molars.

The presence or absence of second molars plays a significant role in the effectiveness of molar distalization. Patients with unerupted second molars may experience better molar movement with less anchorage loss, while those with erupted second molars may require additional anchorage support. In cases with erupted second molars, additional anchorage reinforcement (e.g., TADs or a transpalatal arch) may be necessary to prevent undesired movement.

Study Findings: How Far Did Those Molars Go?

retrospective study of 72 patients using the Jones Jig showed:

Tooth MovementMean ChangeTipping AngleComparison to Other Appliances
Maxillary First Molar2.51 mm distal movement7.53° distal tipping
(meaning they didn’t just move—they leaned back like someone dodging responsibility. 😅)
Similar to Herbst, Wilson Mechanics, and Pendulum Appliance 📏
Maxillary Second Molar1.79 mm distal movement
(Not as much as the first molar, but still making progress! 🔄)
8.03° distal tipping
(tipped even more than first molars)
0.71 mm extrusion observed 📉
(suggests that second molars are like that one friend who always stands out in group photos. 📸)
OverjetIncreased 0.45 mm

If necessary, J-hook headgear or Class II elastics can help maintain anchorage.
2.21° incisor proclination

(much less than the 6° seen in other studies. So, while there’s some flaring, it’s not enough to make your patient look like Bugs Bunny. 🐰)
Less flaring than with Pendulum & Repelling Magnets 😎

Less than the 1.30 mm increase seen with the Pendulum appliance and the 1.60 mm increase with repelling magnets.
OverbiteDecreased 1.28 mm—Improved vertical control compared to other appliances 📊

Anchorage Control: Because We Don’t Want Molar Tipping Running the Show

Distalizing molars is great, but uncontrolled tipping? Not so much. Here’s where anchorage control steps in like a responsible chaperone at a high school dance.

✅ Use a Nance holding arch, utility archwire, or stopped archwire to keep those molars in check.
✅ Short Class II elastics can help move the premolars and incisors back once the molars are in position.
✅ J-hook headgear can reinforce anchorage (for the brave souls who still prescribe it).

Molar Extrusion: Is It a Big Deal?

One concern with distalization is molar extrusion—but does the Jones Jig make teeth “float away”? Not really.

🔹 Jones Jig Patients:

  • Males: 3.17 Âą 1.79 mm of extrusion
  • Females: 1.33 Âą 1.38 mm of extrusion

🔹 Untreated Class I Patients (for comparison):

  • Males: 4.1 Âą 3.1 mm
  • Females: 1.9 Âą 2.2 mm

📌 Takeaway?
The extrusion in Jones Jig patients is within normal growth changes. So, unless your patient is trying to float their molars into the stratosphere, this isn’t a major concern. đŸš€

Jones Jig vs. Headgear: Any Real Difference?

The study found no statistically significant differences between the Jones Jig group and a matched Headgear groupwhen evaluating:

✅ Maxillary first molar position
✅ Maxillary central incisor angulation
✅ Linear position of incisors
✅ Overjet & Overbite changes

So, if you’re an orthodontist who loves avoiding unnecessary patient lectures about compliance, the Jones Jig might be your new best friend. 🎉

Treatment Comparison: Who Wins?

Treatment ModalityPatient Compliance Needed?Molar Distalization (mm)Overjet Change (mm)Overbite Change (mm)
Jones Jig Appliance❌ No compliance needed2.51 mm+0.45 mm-1.28 mm
Cervical Headgear✅ Requires compliance 😬2.50 mm+0.40 mm-1.30 mm
Class II Elastics✅ Requires compliance 🙄Varies (depends on use)Greater risk of overjet increaseLess predictable molar control

📌 Takeaway?
The Jones Jig does everything headgear does—without the compliance drama. It’s like getting straight A’s without ever studying (if only life worked that way 😆).

Final Verdict: Is the Jones Jig Worth It?

✔ YES! If you want a fixed, predictable, non-compliance-dependent way to correct Class II malocclusions, the Jones Jig is a great choice.

✔ Same results as headgear—without the teenage rebellion.

✔ Minimal anchorage loss compared to other distalization appliances (no crazy overjet increase).

✔ Less annoying for patients = less annoying for you. đŸ˜†

Unilateral face-bows: A theoretical and laboratory analysis

Orthodontics has long relied on mechanical devices to refine tooth movement and optimize jaw alignment. Among these, the face-bow remains an essential tool for controlled force application. Recent experimental and theoretical studies have focused on enhancing face-bow designs to achieve unilateral distal forces more efficiently. This post synthesizes key findings regarding the efficacy of various face-bow configurations, addressing their theoretical underpinnings and practical implications for advanced orthodontic care.

Comparative Analysis of Face-Bow Designs

Face-Bow TypeKey FeaturesForce DistributionResulting Forces
Swivel-Offset Face-Bow– Outer bow attached eccentrically via a swivel joint.- Allows lateral movement of the outer-bow tips.– Unequal force distribution.- Delivers unilateral distal forces.- Generates lateral forces.– Delivers unilateral force with predictable lateral forces.- Effective for asymmetric treatment.
Symmetrical Face-Bow– Outer bow symmetrically aligned.- Balanced force application.– Even force distribution on both sides.- No lateral force generated.- Ineffective for unilateral force delivery.– No unilateral or lateral forces delivered.
Soldered-Offset Face-Bow– Rigid attachment of outer bow on one side.- Appears asymmetrical but does not deliver unilateral forces.– Symmetrical force distribution.- No lateral force generated.– No unilateral force delivered.
Spring-Attachment Face-Bow– Spring on one terminal of the inner bow.- Symmetrical outer-bow tips.– Equal force on both sides.- No lateral force generated.– No unilateral force delivered.

Which Face-Bow Designs Effectively Deliver Unilateral Distal Forces?

Not all face-bow designs are capable of delivering sufficient unilateral distal forces, an essential factor for treating conditions such as unilateral posterior crossbites or asymmetrical dental arch development. The following analysis highlights the effectiveness of different face-bow configurations:

  • Ineffective Designs:
    • Bilaterally Symmetrical Face-Bows: These designs maintain equal force distribution on both sides, making them unsuitable for unilateral force application.
    • Spring-Attachment Face-Bows: Despite their versatility, these face-bows fail to concentrate force on a single side, limiting their application in unilateral treatments.
    • Soldered-Offset Face-Bows: While superficially asymmetrical, the rigid attachment of the outer bow does not result in the necessary unilateral force distribution.
    These designs consistently failed to generate a mean unilateral distal force exceeding 60%, thereby limiting their clinical utility for unilateral orthodontic applications.
  • Effective Designs:
    • Power-Arm Face-Bows: These designs effectively direct unilateral forces, achieving greater than 60% of the force distribution to one side, which aligns with clinical requirements for unilateral force application.
    • Swivel-Offset Face-Bows: By incorporating a swivel mechanism, these face-bows create asymmetry, allowing for targeted distal force delivery to one side.

Both of these designs surpass the 60% threshold for unilateral force distribution, thus meeting the criteria for effective treatment.

Theoretical Framework for Unilateral Force Delivery

The key to effective unilateral force application lies in the asymmetry of the face-bow’s design. When the outer-bow tips are positioned asymmetrically relative to the midsagittal plane of the inner bow, it allows for the focused application of force on one side:

  • Asymmetrical Designs: These designs facilitate targeted force delivery by creating a mechanical advantage that directs the force to one side. This results in the efficient application of unilateral distal forces, which is essential for treating asymmetric dental and skeletal issues.
  • Symmetrical Designs: These configurations fail to produce unilateral forces because the force is evenly distributed, thus making them ineffective for unilateral applications.

The swivel-offset face-bow achieves this asymmetry through a lateral swing of the outer-bow terminals, while power-arm face-bows, when constructed with comparable geometric patterns, similarly exhibit the necessary force distribution for unilateral applications.

Characterization of Lateral Forces in Unilateral Face-Bows

Unilateral face-bows not only generate distal forces but also produce lateral forces that contribute to the overall mechanical effect. These lateral forces are characterized by the following:

  • Directionality: The lateral force is directed from the side receiving the greater distal force toward the opposite side, ensuring balanced correction of dental and skeletal asymmetries.
  • Magnitude: The magnitude of the lateral force increases with the unilateral effectiveness of the face-bow, making it a predictable variable in effective designs.
  • Predictability: Experimental studies demonstrate that lateral forces are highly predictable in effective designs, such as the power-arm and swivel-offset face-bows, whereas they are erratic and difficult to control in symmetrical, ineffective designs.

Practical Considerations for Clinicians: Which Face-Bow Design is Optimal?

While both the power-arm and swivel-offset face-bows are effective in delivering unilateral distal forces, the power-arm design stands out in terms of practicality and clinical efficiency:

  • Ease of Fabrication: The power-arm face-bow can be easily modified chairside from a conventional face-bow, offering flexibility and reduced chair time for both clinicians and patients.
  • Predictable Performance: Experimental data show that the power-arm design provides a force distribution that closely matches that of the swivel-offset face-bow, with less than a 5% difference in performance.
  • Patient Comfort: The power-arm design ensures more consistent force application, contributing to better patient comfort and compliance during treatment.