What is the Jones Jig Appliance?
Orthodontic treatment often requires space creation to align teeth properly. One effective way to achieve this is through molar distalization—moving the upper first molars backward to make room for crowding or to correct bite discrepancies. Traditionally, orthodontists have relied on headgear, Class II elastics, and removable appliances, all of which require patient compliance (and we all know how reliable that is! 🙄).
But what if there was a more predictable, fixed alternative?
Enter the Jones Jig Appliance—a fixed, non-compliance-based distalizing appliance designed to move molars efficiently without relying on patient effort.
How Does the Jones Jig Work?
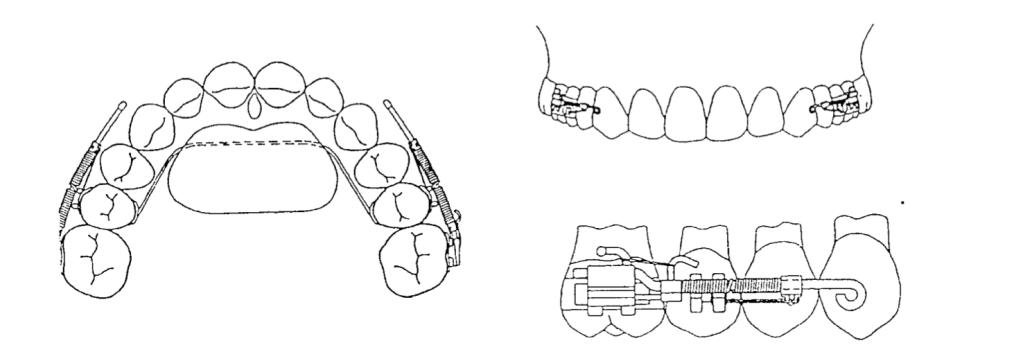
✔ Palatal Button – A 0.5-inch diameter acrylic button, anchored to the maxillary second premolars using a 0.036-inch stainless steel wire for stability.
✔ Jones Jig Arms – One arm fits into the 0.045-inch headgear tube, while the other fits into the slot of the first molar band.
✔ Nickel-Titanium Spring – A 0.040-inch coil spring delivers a controlled force of 70-75 g to push the molars backward.
Once the Jones Jig is cemented, it is activated by tying the activation loop with a 0.010-inch ligature off the bracket of the anchoring tooth. This ensures continuous force application.
The coils are then reactivated every 4 to 5 weeks until the desired molar movement is achieved.
Once activated, the appliance applies a gentle but continuous distal force on the upper first molars, moving them backward over time. The best part? Since it’s fixed, patients don’t have to remember to wear it, making treatment more reliable.
Advantages of the Jones Jig
✅ No Patient Compliance Needed – Unlike headgear, patients don’t have to wear or adjust it.
✅ Continuous Force Application – The coil spring ensures a steady force for predictable movement.
✅ Faster Treatment Time – Studies show that molars can be distalized in 4-6 months.
While the Jones Jig is highly effective, it does come with some considerations:
🔹 Molar Tipping – Instead of bodily movement, molars may tip distally, requiring additional mechanics for uprighting.
🔹 Anchorage Loss – The anterior teeth may shift forward slightly, which may need to be controlled with TADs (temporary anchorage devices) or a transpalatal arch (TPA).
Does the Eruption of Second Molars Affect Treatment?
When using the Jones Jig Appliance for molar distalization, orthodontists must consider various factors that can influence treatment outcomes. One key question is: Does the eruption of second molars impact molar movement and anchorage loss?
A study evaluating 72 patients explored this question by comparing cases with erupted vs. unerupted maxillary second molars to determine how they affected the type and amount of molar movement and anchorage loss.
Study Findings: Second Molar Eruption and Its Effects
Researchers divided the patients into two groups:
| Group | Condition of Second Molars | Key Observations |
|---|---|---|
| Group 1 (28 patients) | Unerupted second molars (below the cementoenamel junction of the first molar) | Less anchorage loss in premolars and incisors, potentially more controlled molar movement. |
| Group 2 (44 patients) | Erupted second molars (not banded or bonded) | More anchorage loss observed, possibly due to resistance from the second molars. |
The presence or absence of second molars plays a significant role in the effectiveness of molar distalization. Patients with unerupted second molars may experience better molar movement with less anchorage loss, while those with erupted second molars may require additional anchorage support. In cases with erupted second molars, additional anchorage reinforcement (e.g., TADs or a transpalatal arch) may be necessary to prevent undesired movement.
Study Findings: How Far Did Those Molars Go?
A retrospective study of 72 patients using the Jones Jig showed:
| Tooth Movement | Mean Change | Tipping Angle | Comparison to Other Appliances |
|---|---|---|---|
| Maxillary First Molar | 2.51 mm distal movement | 7.53° distal tipping (meaning they didn’t just move—they leaned back like someone dodging responsibility. 😅) | Similar to Herbst, Wilson Mechanics, and Pendulum Appliance 📏 |
| Maxillary Second Molar | 1.79 mm distal movement (Not as much as the first molar, but still making progress! 🔄) | 8.03° distal tipping (tipped even more than first molars) | 0.71 mm extrusion observed 📉 (suggests that second molars are like that one friend who always stands out in group photos. 📸) |
| Overjet | Increased 0.45 mm If necessary, J-hook headgear or Class II elastics can help maintain anchorage. | 2.21° incisor proclination (much less than the 6° seen in other studies. So, while there’s some flaring, it’s not enough to make your patient look like Bugs Bunny. 🐰) | Less flaring than with Pendulum & Repelling Magnets 😎 Less than the 1.30 mm increase seen with the Pendulum appliance and the 1.60 mm increase with repelling magnets. |
| Overbite | Decreased 1.28 mm | — | Improved vertical control compared to other appliances 📊 |
Anchorage Control: Because We Don’t Want Molar Tipping Running the Show
Distalizing molars is great, but uncontrolled tipping? Not so much. Here’s where anchorage control steps in like a responsible chaperone at a high school dance.
✅ Use a Nance holding arch, utility archwire, or stopped archwire to keep those molars in check.
✅ Short Class II elastics can help move the premolars and incisors back once the molars are in position.
✅ J-hook headgear can reinforce anchorage (for the brave souls who still prescribe it).
Molar Extrusion: Is It a Big Deal?
One concern with distalization is molar extrusion—but does the Jones Jig make teeth “float away”? Not really.
🔹 Jones Jig Patients:
- Males: 3.17 ± 1.79 mm of extrusion
- Females: 1.33 ± 1.38 mm of extrusion
🔹 Untreated Class I Patients (for comparison):
- Males: 4.1 ± 3.1 mm
- Females: 1.9 ± 2.2 mm
📌 Takeaway?
The extrusion in Jones Jig patients is within normal growth changes. So, unless your patient is trying to float their molars into the stratosphere, this isn’t a major concern. 🚀
Jones Jig vs. Headgear: Any Real Difference?
The study found no statistically significant differences between the Jones Jig group and a matched Headgear groupwhen evaluating:
✅ Maxillary first molar position
✅ Maxillary central incisor angulation
✅ Linear position of incisors
✅ Overjet & Overbite changes
So, if you’re an orthodontist who loves avoiding unnecessary patient lectures about compliance, the Jones Jig might be your new best friend. 🎉
Treatment Comparison: Who Wins?
| Treatment Modality | Patient Compliance Needed? | Molar Distalization (mm) | Overjet Change (mm) | Overbite Change (mm) |
|---|---|---|---|---|
| Jones Jig Appliance | ❌ No compliance needed | 2.51 mm | +0.45 mm | -1.28 mm |
| Cervical Headgear | ✅ Requires compliance 😬 | 2.50 mm | +0.40 mm | -1.30 mm |
| Class II Elastics | ✅ Requires compliance 🙄 | Varies (depends on use) | Greater risk of overjet increase | Less predictable molar control |
📌 Takeaway?
The Jones Jig does everything headgear does—without the compliance drama. It’s like getting straight A’s without ever studying (if only life worked that way 😆).
Final Verdict: Is the Jones Jig Worth It?
✔ YES! If you want a fixed, predictable, non-compliance-dependent way to correct Class II malocclusions, the Jones Jig is a great choice.
✔ Same results as headgear—without the teenage rebellion.
✔ Minimal anchorage loss compared to other distalization appliances (no crazy overjet increase).
✔ Less annoying for patients = less annoying for you. 😆
