
Source Borley Textbook
Source Borley Textbook

Source Borley Textbook
Mouth rehabilitation is defined as restoration of form and function of the masticatory apparatus to as nearly normal as possible.
# Adjunctive care :Lesions like ulcer, abscess should be cure and be given time for healing. During their healing period adjunctive therapies like tissue massage, use of mouth washes etc. are used. For normal patients, 48 hour rest with tissue massage is sufficient.
#Removal of retained dentition : An OPG gives a clear idea whether to remove the retained dentition or not.
Removal of unerupted teeth::
The unerupted teeth lying close to ridge should be removed but the one which deeply submerged and non symptomatic can be left untouched.
Removal of retained roots::
All the retained roots should be removed but if it’s removal can cause large bony defect and is asymptomatic , then it can be left untouched.
# Correction of Hypermobile Ridge tissue :
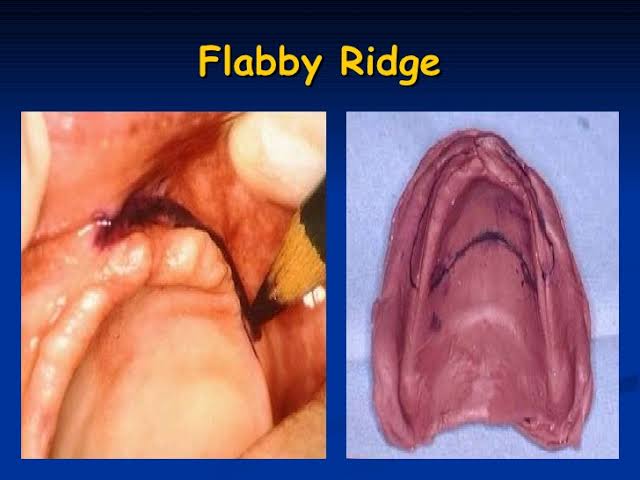
Hypermobile tissues are caused by excessive residual ridge resorption. Small Hypermobile tissues which do not affect functioning of denture can be left untouched but the large pendulous Hypermobile tissues should be removed.
#Removal of soft tissue interfaces : Firm soft tissue interference, which do not affect the stability of the denture,can be left intact. In case of maxillary tuberosity with excessive fibrous tissue, there is need for surgical removal.
#Removal of Hypertrophic maxillary labial frenum:

In case of high frenum attachment ,where the frenum is not so close to crest of the ridge , surgery is not mandatory, only labial notch in the denture is sufficient. But when this notch breaks the peripheral seal , in that case surgical procedure is done.
( ref : Textbook of prosthodontics: Deepak nallaswamy , images : Google images)
#Removal of a Hypertrophic Lingual frenum:
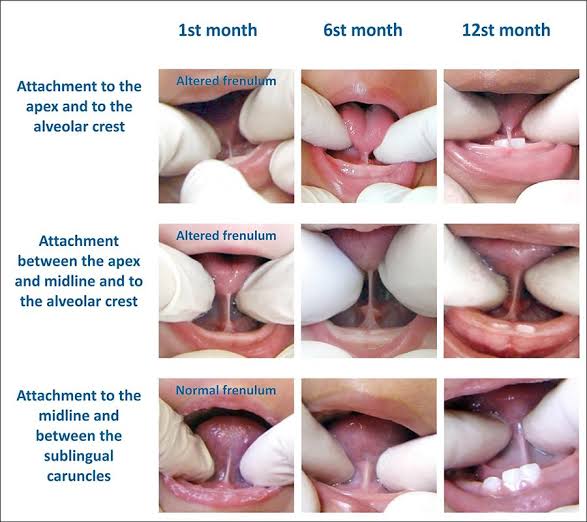
Frenectomy is indicated in this case. Tongue tie test is performed.Patient is asked to touch his upper lip with tongue, if the denture is displaced by doing so then frenectomy is to be done.
#Correction of prominent buccal frenum: Removal is generally not necessary as they are not present as so large. Buccal frenum is soft and it can be easily displaced by denture without any injury.
#Removal of Papillary hyperplasia:

These hyperplastic lesions occur due to irritation. It can be large or small . Small lesions are treated by curettage and large by split thickness supraperiosteal excision.
#Treatment of Epulis fissuratum:

It is an soft tissue reaction in sulcular regions due to overextension of denture flanges. No specific treatment except shortening and smoothening of denture borders.Give it time to heal.
# Removal of ridge undercuts: Small and moderate unilateral undercuts can be left untouched , while severe undercuts or bilateral moderate requires surgical correction ( alveoloplasty).
( ref: textbook of prosthodontics , Deepak nallaswamy , images: Google images.)
#Management of prominent Mylohyoid and internal oblique ridges: They are seen in lingual surfaces of mandible. Sometimes they become prominent due to ridge resorption. If there is repeated ulceration, loss of peripheral seal , they should be surgically reduced.
#Reduction of Maxillary tuberosity: Reduction of wide tuberosity is easier compared to vertically large tuberosity. Before it’s reduction, radiological evaluation is mandatory,as maxillary sinus tends to expand in tuberosity.
#Treatment of sharp spiny ridges: These type of ridges usually occur in lower anterior region due to resorption of labial and lingual cortical plates. For this ,ridge augmentation can be done.
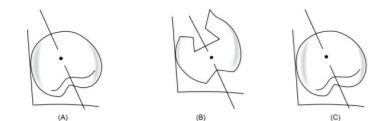
Meyer’s classification for knife edge ridges:
⛔Saw-tooth
⛔Razor-like
⛔Ridge with discrete spiny projections
#Excision of Tori :

Tori are small bony projections of unknown etiology. Indications for maxillary Tori removal:
Interference of speech
Loss of posterior palatal seal
Poor denture stability
All the mandibular Tori should be excised .
#Vestibuloplasty:

It is the surgical procedure to increase the vestibular depth. Techniques for vestibuloplasty are::
Mucosal Advancement
Secondary Epithelialisation
Epithelial Graft Vestibuloplasty
( ref : textbook of prosthodontics,Deepak nallaswamy, image: Google images)

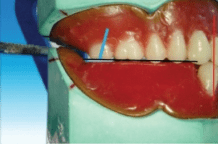
Method II: Placement of rubber dam and clamp together

Split dam technique is indicated:
• To isolate anterior teeth
• When there is insufficient crown structure
• When isolation of teeth with porcelain crown is required. In such cases placement of rubber dam clamp over the crown margins can damage the cervical porcelain.
• Dam is placed without using clamp.
• Here two overlapping holes are punched and dam is stretched over the tooth to be treated and adjacent tooth on each side.
REFERENCE- NISHA GARG TEXTBOOK OF ENDODONTICS
Written by : Dr. Urusa I Inamdar
It is also called as split bone block technique / shell technique.


Placement of the maxillary first premolar in all three planes


The buccal cusp tip of the maxillary first premolar is in contact with occlusal plane (black line), and palatal cusp 1 mm short of the occlusal plane


buccal cusp corresponds with the canine tip, and
the palatal cusp corresponds to previous drawn reference line of the mandibular residual ridge line
When viewed from:
Front: Long axis parallel towards the vertical axis.
Side: Long axis parallel towards the vertical axis.
Occlusal plane: Buccal cusp is in contact with occlusal plane
and palatal cusp 1 mm short of occlusal plane

Placement of the maxillary second premolar in all three planes


The buccal surface of the maxillary second premolar is barely visible when the patient smiles when viewed from the front
The buccal cusp of the maxillary second premolar corresponds with the buccal cusp of maxillary first premolar (blue line), and the palatal cusps of both the premolars correspond to the previous drawn line

When viewed from:
Front: Long axis parallel towards the vertical axis.
Side: Long axis parallel towards the vertical axis.
Occlusal plane: Both buccal cusp and palatal cusp is in contact
with occlusal plane
Placement of the maxillary first premolar in all three planes


the mesio- and distobuccal cusps correspond with
the buccal cusp of second premolar (blue line) and the mesio- and distopalatal cusps correspond to the previous drawn line (yellow line).

When viewed from:
Front: Long axis slopes buccally.
Side: Long axis slopes distally.
Occlusal plane: Only mesiopalatal cusp is in contact with
occlusal plane

The long axis of the maxillary second molar (blue line) is distally
inclined in relation to the vertical axis (red line) when viewed from the front .
All the cusps are short of the occlusal plane (black line).
The maxillary second molar is slightly buccally inclined when viewed from the front. The buccal surface of the maxillary second molar is barely visible when viewed from the front


When viewed from:
Front: Long axis slopes buccally more steeply than first molar.
Side: Long axis slopes distally more steeply than first molar.
Occlusal plane: Only mesiopalatal cusp is nearest to occlusal
plane
Source – S. Lakshmi preclinical manual of prosthodontics
Prosthesis may be defined as an artificial replacement of a missing part of the human body
i. Dental prosthesis
ii. Maxillofacial prosthesis
iii. Ancillary prosthesis
An artificial replacement of one or more teeth and associated dental/alveolar structures.
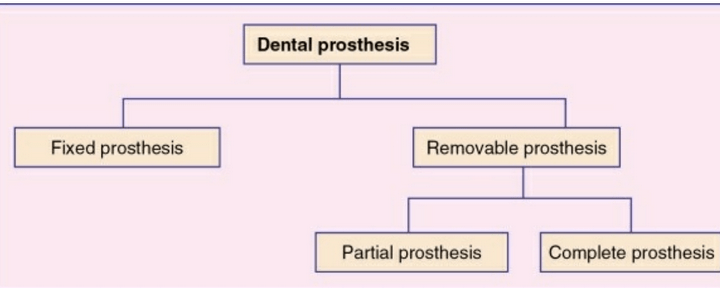
Any dental prosthesis that is cemented, screwed or attached to the retained natural teeth or roots.
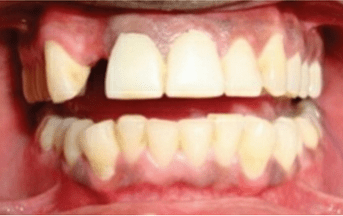

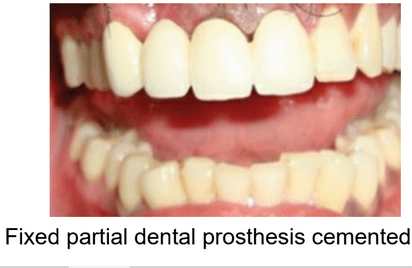
Any dental prosthesis that replaces some of the missing teeth in a partially edentulous arch

The prosthesis that replaces some of the teeth in a partially edentulous arch and that can be removed from the mouth by the patient.
It can be a simple removable partial denture fabricated in acrylic resin called temporary partial
denture.
A removable partial denture fabricated in cast metal alloy and acrylic resin is called cast partial denture

The prosthesis that replaces the entire dentition and associated structures of maxilla and mandible

The prosthesis that is used to replace a part or all of any stomatognathic or craniofacial structures.
Examples of the maxillofacial prosthesis are auricular
prosthesis, orbital prosthesis, nasal prosthesis and facial prosthesis.

The prosthesis that is used to replace the missing teeth , retained by implant supported prosthesis.

The type of dental prosthesis used in prosthodontics for a very short term of usage
example- splints ,stents and guides
source – preclinical textbook of prosthodontics by S Lakshmi and image source- google and S Lakshmi
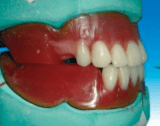
After the registration of the maxillo-mandibular , the artificial teeth must be set in centric occlusal position.
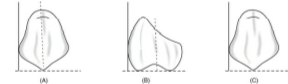
The facial form of the patient should be classified into-
–square
–ovoid
– tapering
-The form of the teeth should be in harmony with the form of the face, square teeth are used for those with a square face and so on.
-In addition, the patient’s age, gender and personality should be taken into consideration when trying to improve to improve the appearance.


-The color is also important, dark and opaque teeth should be selected for elderly patient, light and translucent teeth for the young patients.
-The size of the teeth must also be in harmony according to the size of the face and the gender of the patient.
to provide a comfortable and atraumatic occlusion
to assist in preparing food for deglutition
to impart a pleasing and natural appearance
to assist in speech
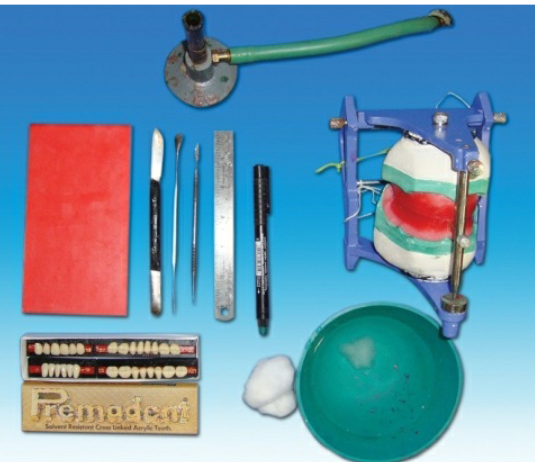
Armamentarium
•Maxillary occlusal rim with cast
• Mandibular occlusal rim with cast
• Mean value articulator
• Teeth shade
• Measurement scale
• Wax knife
• Roach carver
• Wax spatula
• Wax sheet
• Gas torch
• Cotton
• Rubber bowl with cold water
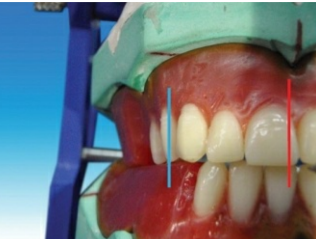
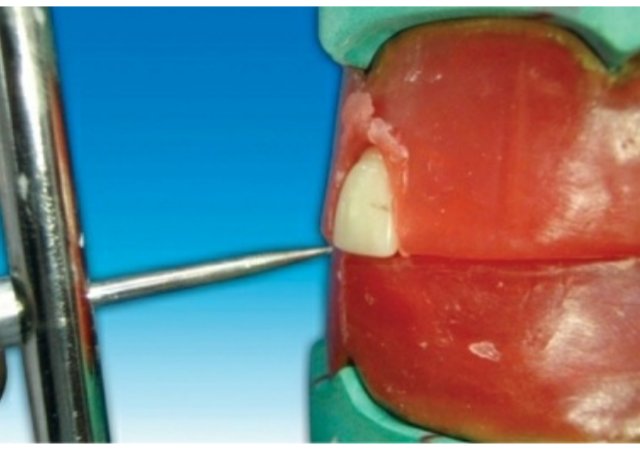
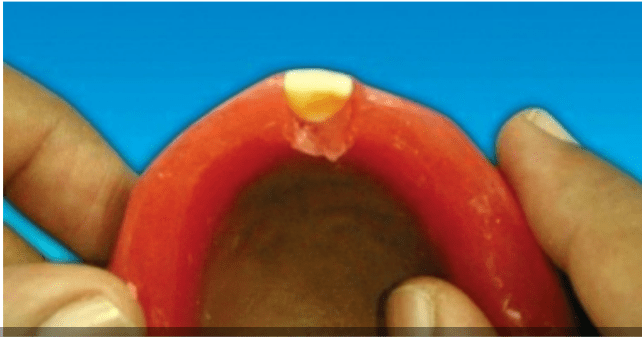
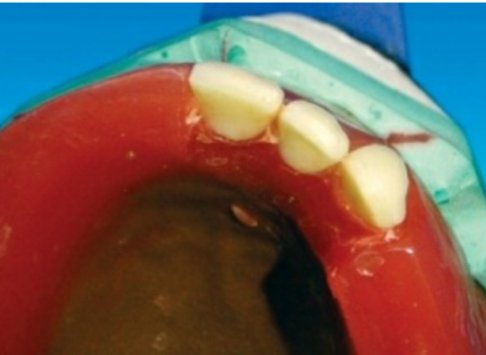
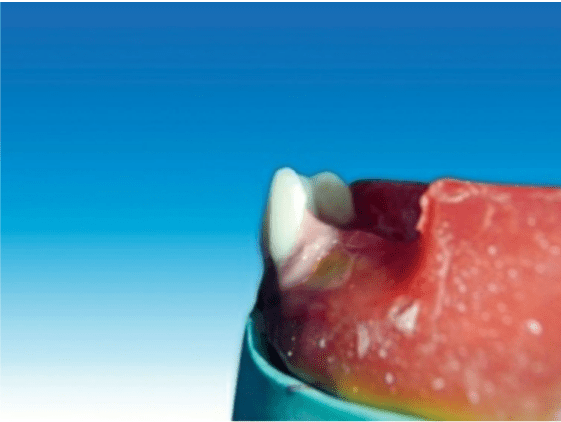
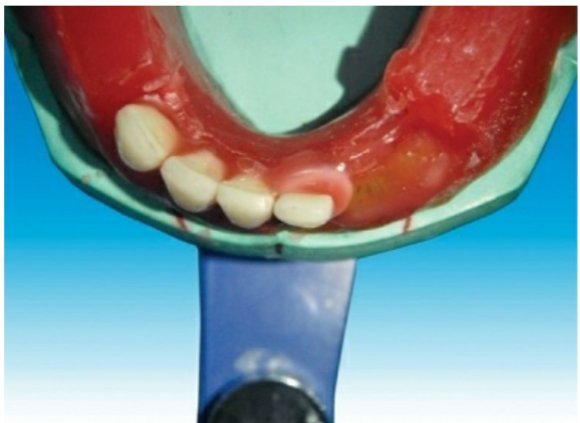
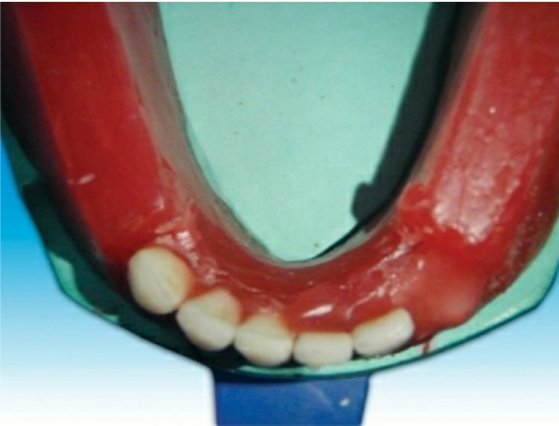
Guidelines for anterior teeth setting are marked on the cast and the land area of the cast.
I. The centre of the incisive papilla (marked in red)
II. A line is drawn along the midline of the cast through the centre of the incisive papilla (marked in black).
III. A perpendicular line is drawn to the above line through the centre ofincisive papilla till the land area (marked in blue; CPC line).
IV. During setting of maxillary canine, the cuspid tip of the canine should be placed in line with this point
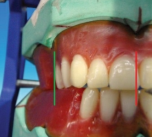
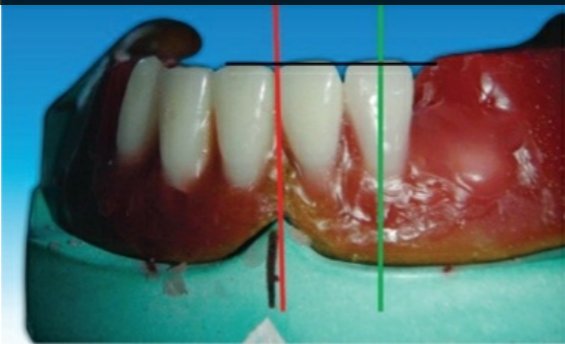
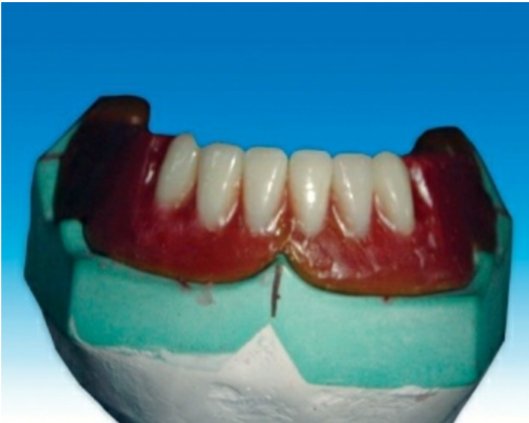
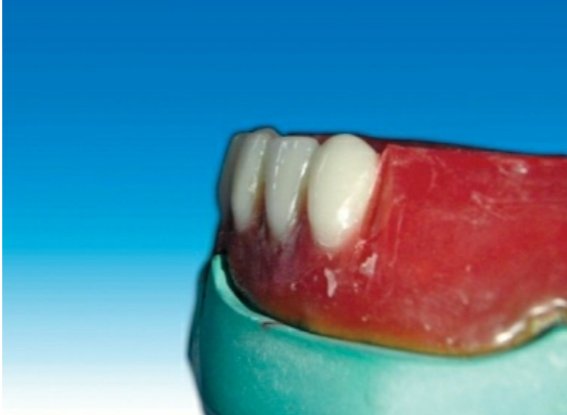
The crest of the lower residual alveolar ridge is marked in red colour along the posterior aspect of the lower cast. A corresponding line is marked on the upper cast in blue

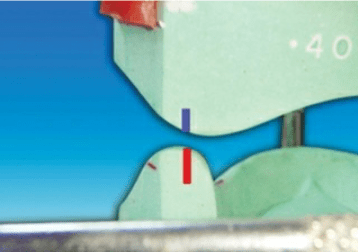
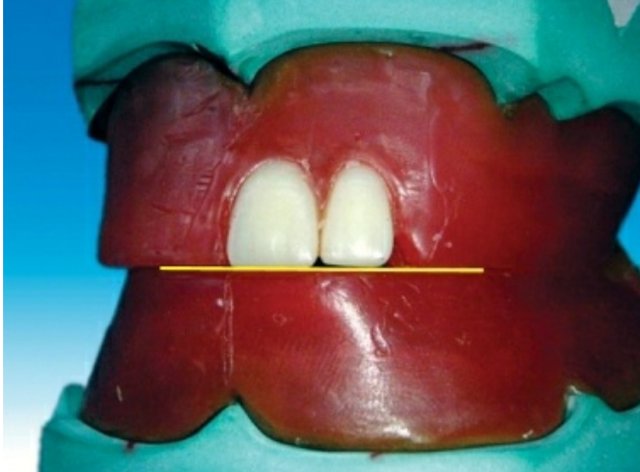
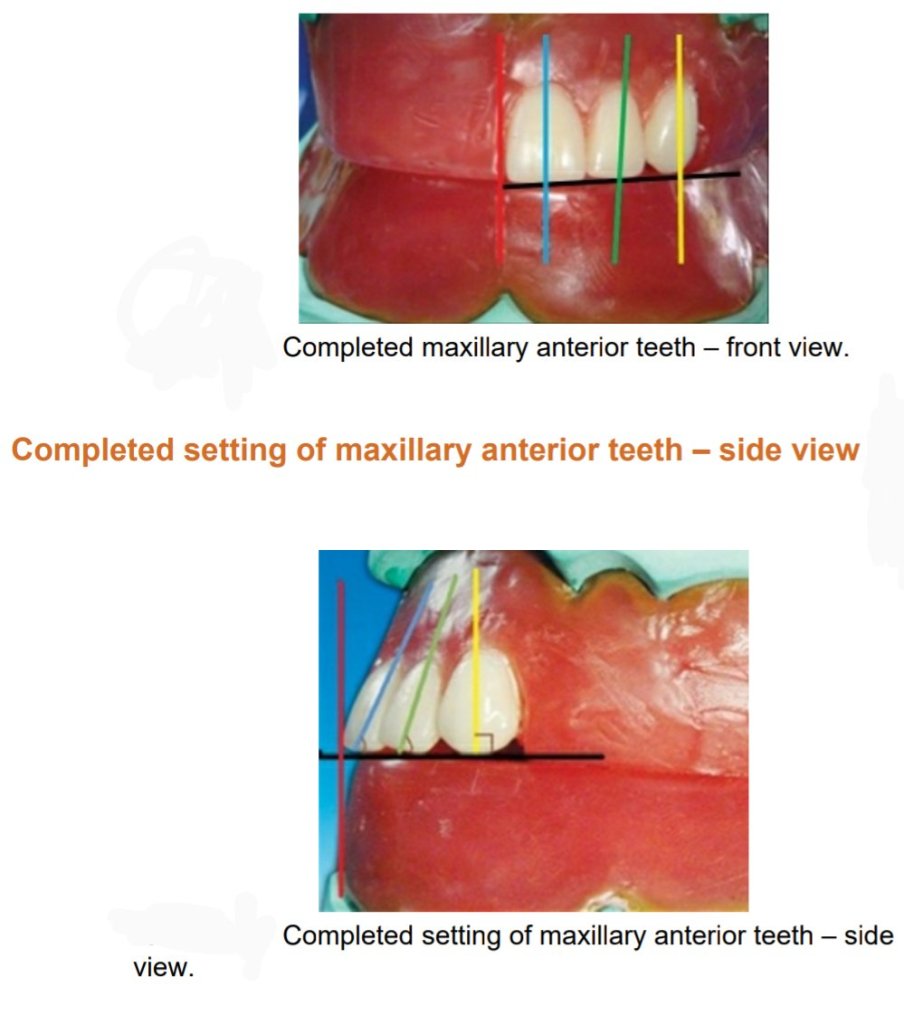
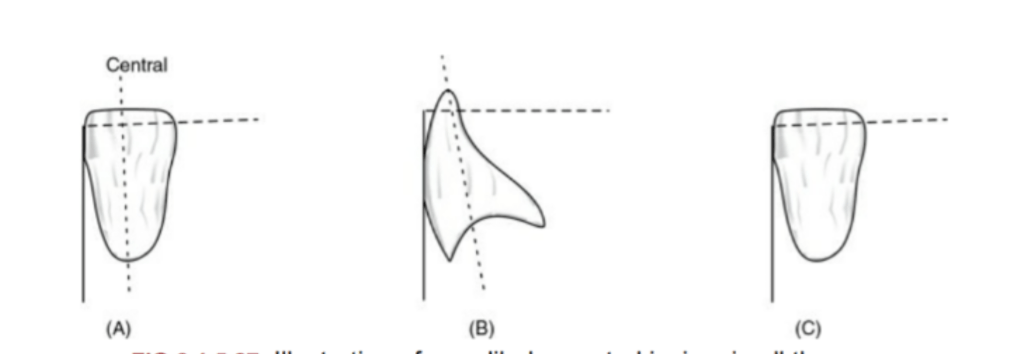
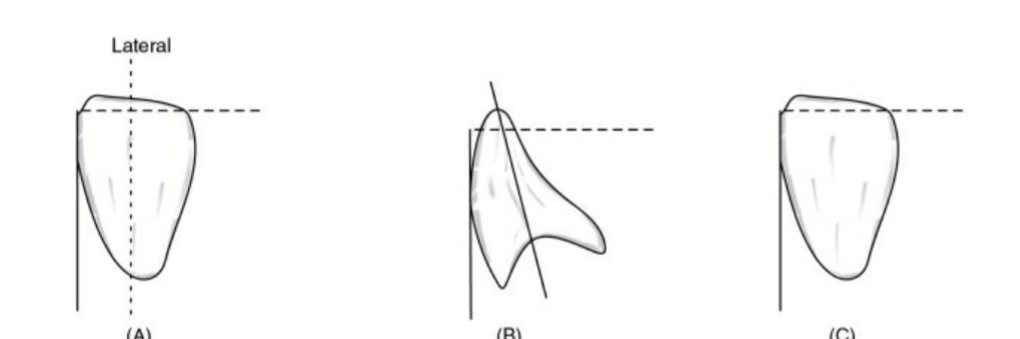
Placement of the maxillary central incisor in relation to all three planes.
🔻The long axis of the central incisor (the blue line) is positioned parallel to the
vertical axis (the red line) when viewed from the front
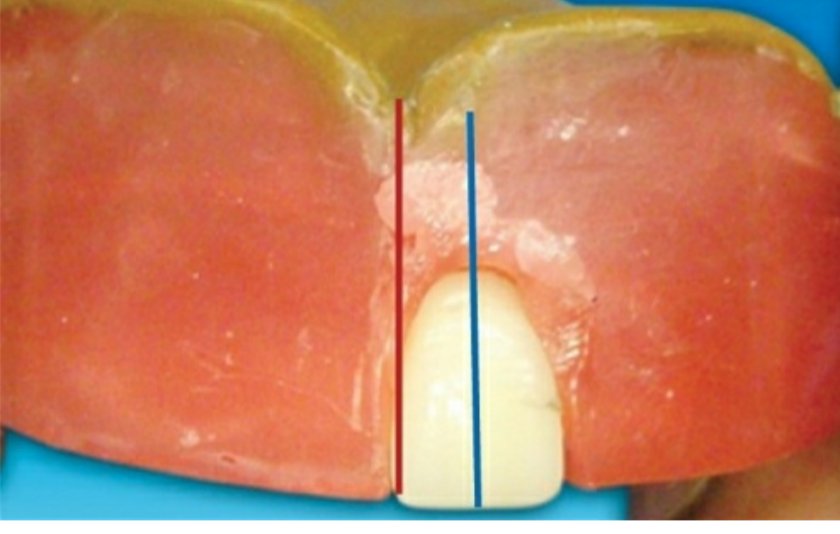
🔻The incisal edge of the maxillary central incisor is positioned in line with the
anterior occlusal plane . The central pin of the articulator will point the mesioincisal line edge of the central incisor.
🔻The central pin of the articulator will
point the mesioincisal line edge of the central incisor.
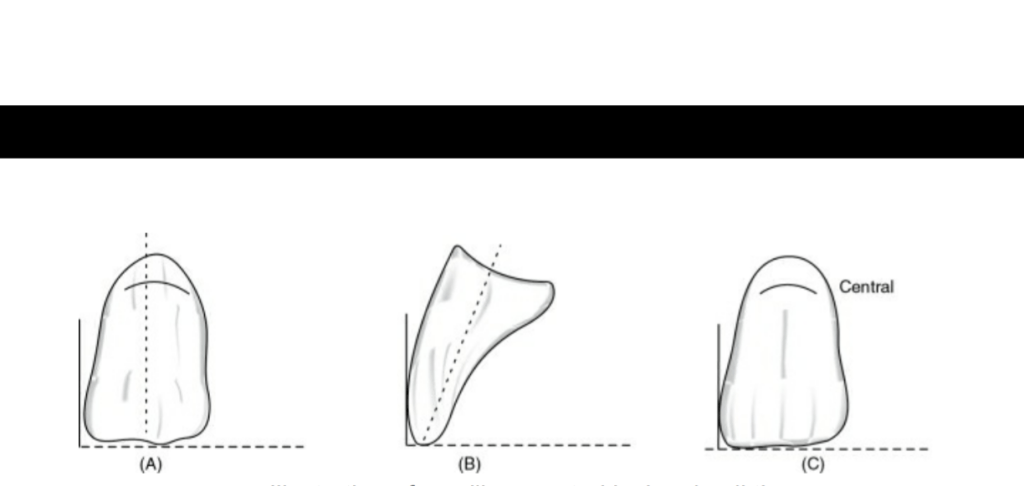
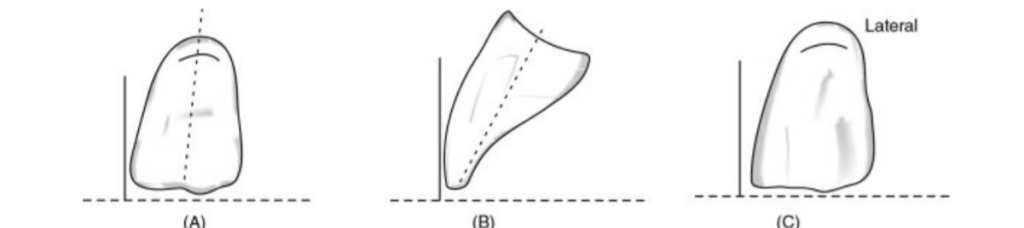
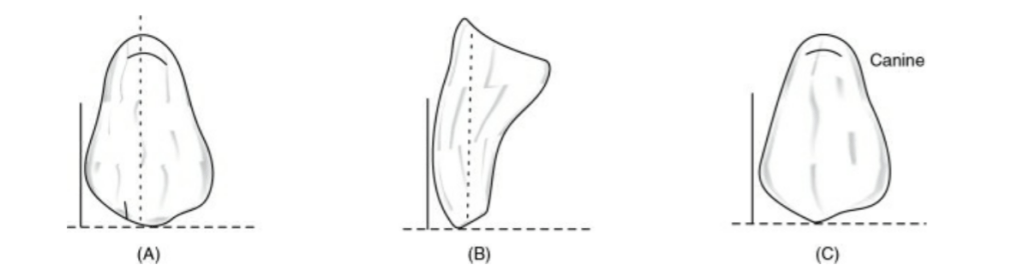
When viewed from:
Front: Long axis parallel towards the vertical axis.
Side: Slopes labially about 15 degrees.
Occlusal plane: Incisal edge is in contact with occlusal plane

🔻The long axis of the lateral incisor (green line) is placed slightly inclined to
the vertical axis (red line).
🔻The incisal edge of the maxillary lateral incisor is placed slightly short of the
occlusal plane (marked as yellow line).
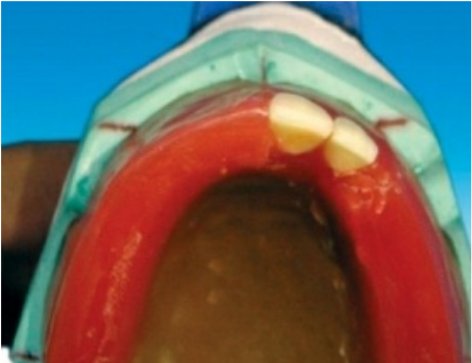
🔻The incisal edge of the maxillary lateral incisor should follow the outline of
the occlusal rim when viewed occlusally
When viewed from:
Front: Long axis slopes towards midline at incisal edge.
Side: Slopes labially about 20 degrees.
Occlusal plane: Incisal edge is 1 mm short of occlusal plane
🔻The long axis of the maxillary canine (yellow line) should be parallel to the
vertical axis (red line) when viewed from the front.
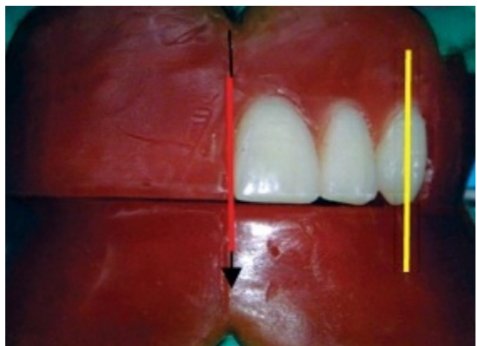
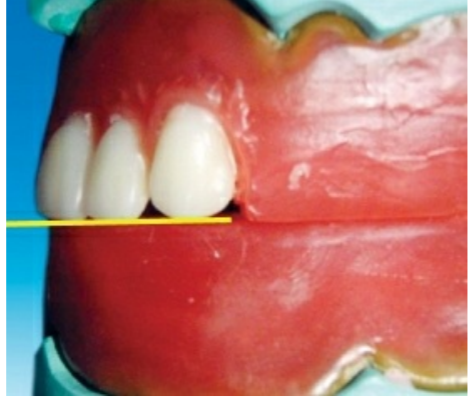
🔻The long axis of the maxillary canine (yellow line) should be parallel to the
vertical axis (red line) when viewed from the side .
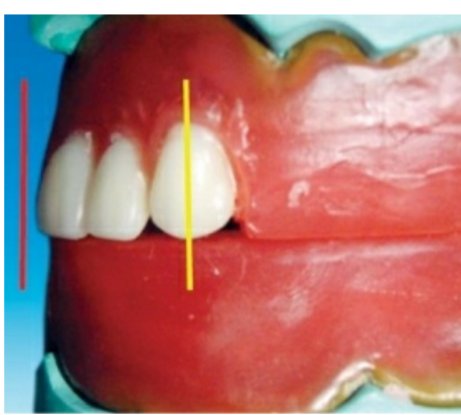
Maxillary canine follows the outline of occlusal rim, and the tip of the canine
corresponds to the canine papillary line
When viewed from:
Front: Long axis parallel towards the vertical axis.
Side: Long axis parallel towards the vertical axis.
Occlusal plane: Cuspid tip is in contact with occlusal plane

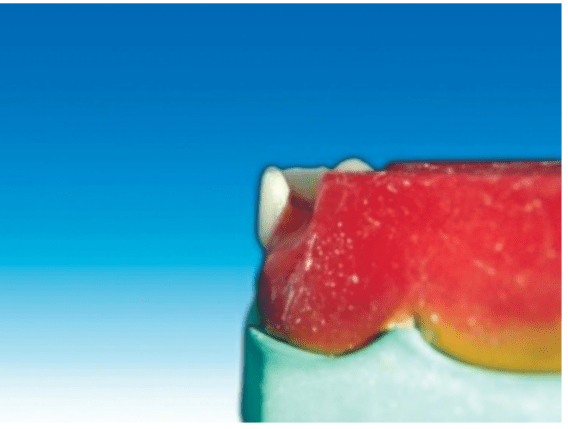
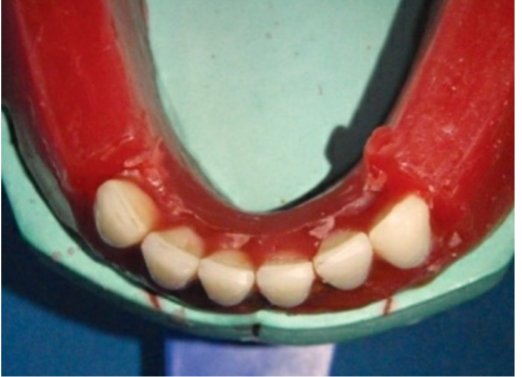
🔻The incisal edge of the mandibular central incisor should follow the outline
of the occlusal rim, and the incisal edge of the mandibular central incisor tooth
should not cross over the land area when viewed occlusally
When viewed from:
Front: Long axis inclines slightly towards the vertical axis.
Side: Slopes labially.
Occlusal plane: Incisal edge is 0.5–1 mm above the occlusal
plane
When viewed from:
Front: Long axis inclines towards the vertical axis.
Side: Slopes labially less than central incisor.
Occlusal plane: Incisal edge is 0.5–1 mm above the occlusal
plane
When viewed from:
Front: Long axis inclined towards midline.
Side: Slopes lingually.
Occlusal plane: Cuspid tip is 0.5–1 mm above the occlusal
plane

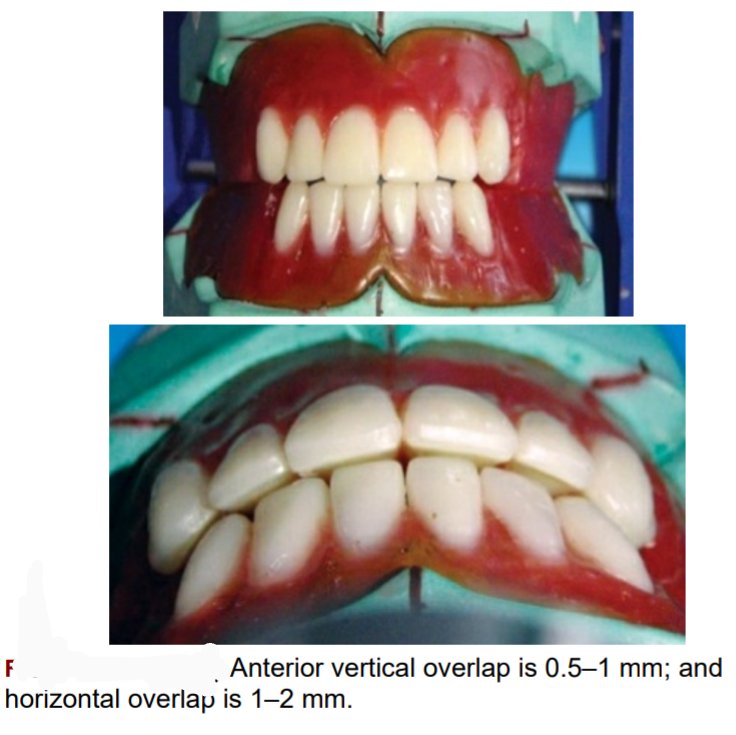
The mesial slope of the maxillary canine should overlap the distal slope of
the mandibular canine
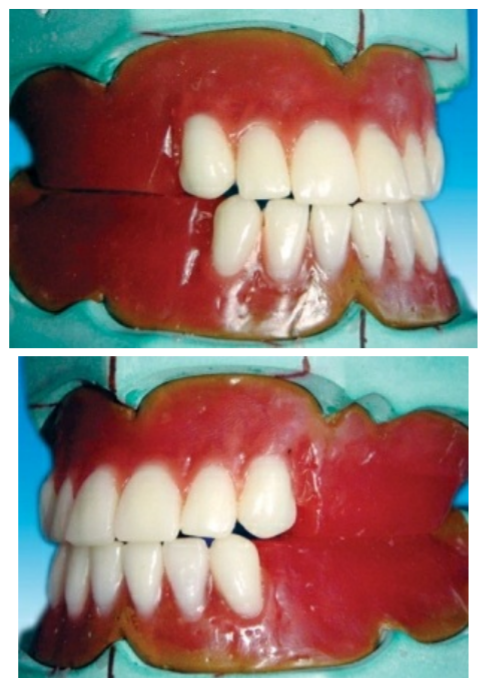
🛑The vertical overlap (over bite) between the maxillary and mandibular
incisal edge should be 0.5–1 mm, and the horizontal overlap (over jet) between
the maxillary and mandibular incisal edges should be 1–2 mm.
🛑The horizontal overlap should be uniform from left maxillary to right maxillary canine
Source – preclinical manual of prosthodontics S . Lakshmi
