Finishing and Polishing: Goals & Benefits

🎯 GOALS…

  1. To obtain : ✔ Desired anatomy ✔ Proper occlusion ✔ Reduction of roughness, depth of gouges & scratches
  2. Polished surface should be smooth enough to be well tolerated by oral soft tissues and to resist bacterial adhesion & excessive plaque accumulation.
  3. When plaque deposits exist on restorative material surfaces, they should be easily removable by brushing & flossing.

⭐ BENEFITS ⭐

  1. BETTER GINGIVAL HEALTH:- A well contoured & polished restoration resists the accumulation of food debris and pathogenic bacteria. ✔ Food glides more freely over occlusal & embrasure surfaces during mastication.
  2. CHEWING EFFICIENCY:- Strength is improved especially in surfaces where more occlusal forces are applied.
  3. PATIENT COMFORT:- Patient can detect a surface roughness change of less than 1um ✔ Smooth restoration surfaces minimize wear rates on opposing & adjacent teeth.
  4. ESTHETICS:- Finishing and polishing aid in esthetics.
  5. TARNISH & CORROSION:- It can be reduced in metallic restoration.
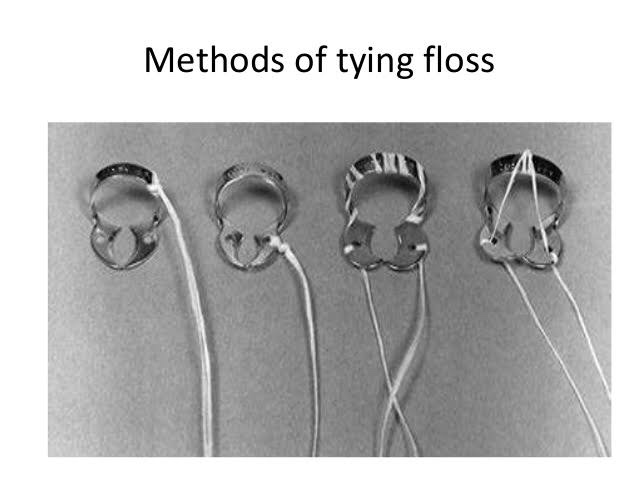
  6. HYGIENE:- Smoother surfaces have less retention areas & are easier to maintain in a hygienic state when preventive oral care is practiced ( dental floss & toothbrush bristles )

REFERENCE:- STURDEVANTS – CONS. DENTISTRY

How to study efficiently and score more marks in exams.

Muhad Noorman P, Final year Student – Team Dentowesome

Scoring good and better marks are always priority of any student irrespective of their level and class .  Hard work and smart work helps to score good marks.

Some tips to study smart and score more marks

1) Always organise yourself, Never procrastinate. Don’t think about wasted days ,look forward days ahead and make efficient planning.

2) Give importance to every subject equally, start with easy and end in hard nuts.


3) Identify your best time, and place to study. Ignore and never seek how you’re peer group works. Always your peer lies about studies, focus on yourself 🙂

4) Cut your social distraction, even though it sounds like a rocket science, regular practice helps to cut your Distraction. Utilise focus mode in android phones, Install Forest app. It Helps to prioritise your study hours.


5) Teach yourself as if you’re a teacher, trust me you’ll crack a million topics.


6) Teach you’re peer group , it’ll help to recollect and brush up your brain.


7) Regularly shift your studyplace , between a period of 1 hour or 2 hour later,  brain and mind always rejects learning from a same environment.


8) Get familiarise with the exam layout, use previous year question, understand nature of questions , prepare accordingly.


9) Always finish with previous questions first and if time allows study other topic left, mentioned in  University syllabus.


10) Reading a book not studying :  Revise topic after 1 or 2 hour, Prepare notes, put away books . Attempt topic as an exam question. Self realization is best methodology to improve yourself.


11) Never cut too many corners: Often we get devastated listening rumors , predictable questions . And the  truth is anything can come.


12) Practice mock exams during free times. Practice always make a man perfect.


13) Organize your answer while writing in exam papers. Never forget, Presentation matters. Include as much as figures, flowcharts, pie diagrams..etc.. Proove examiner you have an edge over topics. Underline important points with seperate ink.


14) Last but not least get an adequate sleep.(Ideally 6 to 7 hours)  Give some time for your brain and hippocampus to process your memory.

References: Image : Google

CLASSIFICATION OF TOOTH DISCOLORATION

Classification of discoloration

  • Intrinsic discoloration
  • Extrinsic discoloration
  • Combination of both

1.Based on the Etiology of tooth discoloration

Intrinsic stains

  • • Pre-eruptive causes– Disease
    i. Alkaptonuria
  • iiHematological disorders
    iii. Disease of enamel and dentin
  • iv. Liver diseases.– Medications
    i. Tetracycline stains and other antibiotic use
  • ii. Fluorosis stain.
  • • Posteruptive causes of discoloration– Pulpal changes
    – Trauma
    – Dentin hypercalcification
    – Dental caries
    – Restorative materials and operative procedures – Aging
    – Functional and parafunctional changes.

Extrinsic stains
• Daily acquired stains

– Plaque
– Food and beverages – Tobacco use
– Poor oral hygiene
– Swimmer’s calculus
– Gingival hemorrhage.  

  • Chemicals
    – Chlorhexidine
  • – Metallic stains.

2.Classification of extrinsic stains (Nathoo in 1997)

  • •  N1 type dental stain (direct dental stain): Here colored materials bind to the tooth surface to cause discoloration. Tooth has same color, as that of chromogen.
  • •  N 2 type dental stain (direct dental stain): Here chromogen changes color after binding to the tooth.
  • •   N3 type dental stain (indirect dental stain): In this type prechromogen (colorless) binds to the tooth and undergoes a chemical reaction to cause a stain.

3.Different Types of Stains according to Color:

BLACK COLOR-

It usually results due to contact with certain metallic elements such as silver, iron and lead.It may appear as thin line running approximately 1 mm or so above the gingival margin, it may occur on both the facial and lingual surfaces of teeth.Stain is firmly attached to the surface but remains extrinsic, thus it may be removed by brush and abrasives. But, it recurs later on.

Green stain

It usually occurs as thick deposit involving the cervical one-third of facial surface of maxillary incisors of young children. It affects boys more frequently than girls.

It is associated with poor oral hygiene and decalcification is sometimes present in enamel, underlying the deposit. It occurs due to chromogenic bacteria or fungi or it may be caused by bacterial action on remnants of enamel cuticle. It is extrinsic and may be removed by simple brushing and abrasive.

Orange stain

It occurs infrequently and usually involve both facial and lingual surfaces of the incisors. It is easily removed than green stain and its cause is unknown but it is believed to be the result of chromogenic bacteria. It is associated with poor oral hygiene and removed with the help of brush and abrasives.

Brown stain

It can be seen in non-smokers and is usually lighter brown than that of tobacco and form a tenacious, but delicate film on surface of the teeth. It is usually seen more commonly on lingual surface of lower incisors and buccal surface of maxillary molar teeth. It is formed due to altered salivary mucins which have undergone change through the action of bacterial enzymes.

REFERENCE- NISHA GARG TEXTBOOK OF ENDODONTICS AND ANIL GHOM TEXTBOOK OF ORAL MEDICINE

Histopathology of dentinal caries

Zone I: Zone of fatty degeneration of odontoblast process
Zone 2: Zone of dentinal sclerosis characterized by deposition of cal- cium salts in dentinal tubules
Zone 3: Zone of decalcification of dentin, a narrow zone, preceding bacterial invasion
Zone 4: Zone of bacterial invasion of decalcified but intact dentin Zone 5: Zone of decomposed dentin

Earldentinal caries

Fatty degeneration oodontob/ast process

>Disposition of fat globules – precedes early sclerotic changes  >Special stains – Sudan red
>Significance-
1.Fat contributes to impermeability 

2.Predisposing factor for dental sclerosis

Sclerotic dentin

>Reaction of vital pulp – calcification of dentinal tubules (DT)

>Seals off DT from further penetration of microorganisms

>Minimal in rapidly advancing caries

>Prominent in slow caries

>Sclerotic dentin – appear white in transmitted light

Decalcification odentinatubules

>Above dentinal sclerosis – zone of decalcification

>Occurs in advance of bacterial invasion of DT 

>Pioneer bacteria
>The initial decalcification – only the walls of DT 

>Study of tubules- pure form of microorganisms

Zone omicrobial invasion

>Proteolytic organisms – predominantly in deeper layers Acidogenic microorganisms – more in early caries
>Supporting the hypothesis that initiation and progression are two distinct processes and must be differentiated

Advanced dentinacaries

>Decalcification of the walls of DT – confluence

>Thickening of sheath of Neumann – along its course • Increase in the diameter of DT – microorganisms

>Focal coalescence of adjacent tubules and ovoid area of destruction- liquefaction foci
>Acidogenic organisms – initial decalcification

>Proteolytic organisms – matrix destruction

>Multiple areas of destruction>Necrotic mass of dentin (leathery consistency)

>Formation of transverse cleftsExtend at right angles to DT and parallel contour line

>Peeling away of carious dentin

REFERENCE- Shafers textbook of oral pathology 8th edition

Histopathology of enamel caries

Four zones are clearly distinguishable, starting from the inner advancing front of the lesion. These are the (1) translucent zone, (2) dark zone, (3) body of the lesion and (4) surface layer.

Zones of enamecarieTranslucenzone {TZ)

First recognizable zone of alteration

Advancing front of the lesion

Half the lesions demonstrate TZ, not always present

Seen in longitudinal ground sections in clearing (quinoline – RI – 1.62)

TZ appears structureless

Pore volume – I% (compared to 0.1 % of sound enamel)

Dark zone

Lies adjacent and superficial to the translucent zone Positive zone

Shows positive birefringence (in contrast to sound enamel.

Pore volume of 2-4% (polarized light)
Presence of small pores; large molecules of quinoline are unable to penetrate
Micropore system – gets filled with air and becomes dark
Medium like water may penetrate

Body othlesion

Between unaffected, surface and dark zone
Area of greatest demineralization
Pore volume – 5% in periphery and 25in centre
Quinoline imbibition – body appears transparent
Water imbibition – positive birefringence compared to sound enamel Striae of Retzius – prominent

Surfaczone

Quantitative studies – partial demineralization of 1-10% • Pore volume – less than 5% of the spaces

Negative birefringence – water imbibition

Positive birefringence – porous subsurface
All the four zones of enamel caries cannot be seen with same immersion medium.

REFERENCE – Shafers textbook of oral pathology 8th edition

RUBBER DAM

Rubber dam was introduced byBarnum, a New York dentist in 1863

Advantages of using a rubber dam

• It is raincoat for the teeth
• It helps in improving accessibility and visibility of the working area
• It gives a clean and dry aseptic field while working
• It protects the lips, cheeks and tongue by keeping them out of the way
• It helps to avoid unnecessary contamination through infection control
• It protects the patient from inhalation or ingestion of instruments and medicaments
• It helps in keeping teeth saliva free while performing a root canal so that tooth does not get decontaminated by bacteria present in saliva
• It improves the efficiency of the treatment
• It limits bacterial laden splash and splatter of saliva and blood

• It potentially improves the properties of dental material.
• It provides protection of patient and dentist.

Disadvantages of using a rubber dam

• Takes time to apply 
• Communication with patient can be difficult 
• Incorrect use may damage porcelain crowns/crown margins/ traumatize gingival tissues 
• Insecure clamps can be swallowed or aspirated.Contraindications of use of rubber dam

• Asthmatic patients
• Allergy to latex
• Mouth breathers
• Extremely malpositioned tooth • Third molar (in some cases).

Rubber dam equipment

• Rubber dam sheet• Rubber dam clamp • Rubber dam forceps• Rubber dam frameRubber dam accessories•Lubricant/petroleum jelly• Dental floss• Rubber dam napkin.

Rubber Dam Sheet

  • The rubber dam sheet is normally available in size 5 × 5 or 6 × 6 squares in green or black color
  • It is available in three thicknesses, i.e. light, medium and heavy
  • The middle grade is usually preferred as thin is more prone to tearing and heavier one is more difficult to apply
  • Latex-free dam is necessary as number of patients are increasing with latex allergy
  • Flexi dam is latex-free dam of standard thickness with no rubber smell.

Rubber Dam Clamps

  • Rubber dam clamps, to hold the rubber dam onto the tooth are available in different shapes and sizes.
  • Clamps mainly serve two functions:
    1. They anchor the rubber dam to the tooth.
    2. Help in retracting the gingiva.

Rubber Dam Forceps

  • Rubber dam forceps are used to carry the clamp to the tooth.
  • They are designed to spread the two working ends of the forceps apart when the handles are squeezed together.
  • The working ends have small projections that fit into two corresponding holes on the rubber dam clamps.
  • The area between the working end and the handle has a sliding lock device which locks the handles in positions while the clinician moves the clamp around the tooth.
  • It should be taken care that forceps do not have deep grooves at their tips or they become very difficult to remove once the clamp is in place.

Rubber Dam Frame

Rubber dam frame supports the edges of rubber dam .Frames have been improved dramatically since their old style with the huge ‘butterflies’.Modern frames have sharp pins which easily grip the dam. These are mainly designed with the pins that slope backwards.

• Rubber dam frames are available in either metal or plastic. 

• Plastic frames have advantage of being radiolucent.
• When taut, rubber dam sheet exerts too much pull on the rubber dam clamps, causing them to come loose,especially clamps attached to molars.
• To overcome this problem, a new easy-to-use rubber dam frame (Safe-T-Frame) has been developed that offers a secure fit without stretching the rubber dam sheet. Instead, its “snap-shut” design takes advantage of the clamping effect on the sheet, which is caused when its two mated frame members are firmly pressed together. In this way, the sheet is securely attached, but without being stretched. Held in this manner, the dam sheet is under less tension, and hence, exerts less tugging on clamps—especially on those attached to molars.

SAFE T FRAME

Rubber Dam Punch

  • Rubber dam punch is used to make the holes in the rubber sheet through which the teeth can be isolated.
  • The working end is designed with a plunger on one side and a wheel on the other side.
  • This wheel has different sized holes on the flat surface facing the plunger.
  • The punch must produce a clean cut hole every time.
  • Two types of holes are made, single and multihole.
  • Single holes are used in endodontics mainly.
  • If rubber dam punch is not cutting cleanly and leavingbehind a tag of rubber, the dam will often split as it is stretched out.
  1. Rubber Dam Template
    • It is an inked rubber stamp which helps in marking the dots on the sheet according to position of the tooth.
    • Holes should be punched according to arch and missing teeth.
  1. Rubber Dam Accessories
  2. Lubricant or Petroleum Jelly
  3. It is usually applied on the undersurface of the dam.
  4. It is helpful when the rubber sheet is being applied to theteeth.
  5. dental floss
  6. It is used as flossing agent for rubber dam in tight contact areas.
  7. It is usually required for testing interdental contacts.

Rubber Dam Napkin

• This is a sheet of absorbent materials usually placed between the rubber sheet and soft tissues.
• It is generally not recommended for isolation of single tooth.

REFERENCE – NISHA GARG TEXTBOOK OF ENDODONTICS AND GROSSMAN’S TEXTBOOK OF ENDODONTICS

RUBBER DAM PLACEMENT

  1. Placement of Rubber Dam
  2. Before placement of rubber dam, following procedures should be done:
    • Thorough prophylaxis of the oral cavity.
    • Check contacts with dental floss.
    • Check for any rough contact areas.
    • Anesthetize the gingiva if required.
    • Rinse and dry the operated field.
  • Methods of Rubber Dam Placement.
  • Method I: Clamp placed before rubber dam
  • Select an appropriate clamp according to the tooth size.
  • Tie a floss to clamp bow and place clamp onto the tooth
  • Larger holes are required in this technique as rubber dam has to be stretched over the clamp. Usually two or three overlapping holes are made.
  • Stretching of the rubber dam over the clamps can be done in the following sequence:
  • – Stretch the rubber dam sheet over the clamp
  • – Then stretch the sheet over the buccal jaw and allow tosettle into place beneath that jaw
  • – Finally, the sheet is carried to palatal/lingual side andreleased.
    This method is mainly used in posterior teeth in both adults and children except third molar.

Method II: Placement of rubber dam and clamp together

  • Select an appropriate clamp according to tooth anatomy.
  • Tie a floss around the clamp and check the stability.
  • Punch the hole in rubber dam sheet.
  • Clamp is held with clamp forceps and its wings are insertedinto punched hole.
  • Both clamp and rubber dam are carried to the oral cavityand clamp is tensed to stretch the hole.
  • Both clamp and rubber dam is advanced over the crown.First, jaw of clamp is tilted to the lingual side to lie on thegingival margin of lingual side.
  • After this, jaw of the clamp is positioned on buccal side.
  • After seating the clamp, again check stability of clamp.
  • Remove the forceps from the clamp.
  • Now, release the rubber sheet from wings to lie around thecervical margin of the tooth.
  • Method III: Split dam technique: This method is split dam technique in which rubber dam is placed to isolate the tooth without the use of rubber dam clamp. In this technique, two overlapping holes are punched in the dam. The dam is stretched over the tooth to be treated and over the adjacent tooth on each side. Edge of rubber dam is carefully teased through the contacts of distal side of adjacent teeth.

Split dam technique is indicated:

• To isolate anterior teeth
• When there is insufficient crown structure
• When isolation of teeth with porcelain crown is required. In such cases placement of rubber dam clamp over the crown margins can damage the cervical porcelain.
• Dam is placed without using clamp.
• Here two overlapping holes are punched and dam is stretched over the tooth to be treated and adjacent tooth on each side.

REFERENCE- NISHA GARG TEXTBOOK OF ENDODONTICS

ABFRACTION

  1. It is also called as ‘stress lesion’. It is the loss of tooth structure that results from flexure which is caused by occlusal stresses. The magnitude of tooth tissue loss depends on the size, duration, direction, frequency and location of the forces.
  1. Causes and mechanism

• Occlusal restoration—some suggested that occlusal restoration may lead to weakening of tooth ability to resist the stresses of occlusion leading to abfraction.

• Predisposing factors—factors, such as erosion and abrasion may play a significant role in tooth tissue loss.

Clinical features

  • Location—itusuallyaffectsbuccal/labialcervicalareas of teeth. Commonly affects single teeth with excursive interferences or eccentric occlusal loads.
  • Appearance—itappearsasdeep,narrowV-shapednotch. The lesion is typically wedge shaped with sharp line angles, but occlusal abfraction may present as circular invaginations.

REFERENCE- ANIL GHOM TEXTBOOK OF ORAL MEDICINE [2nd ed]

EROSION

It is the loss of tooth substance by chemical process that does not involve known bacterial action. Dissolution of mineralized tooth structure occurs due to contact with acids. Erosion is a chemical process in which the tooth surface is removed in the absence of plaque.

Types (depending upon etiology)

  • Intrinsic—erosionthatoccurduetointrinsiccausese.g. gastroesophageal reflux, vomiting.
  • Extrinsic—erosionoccurringfromextrinsicsourcese.g. acidic beverages, citrus fruits.Etiology
  • • Local acidosis—it is seen in periodontal tissue from damage due to traumatogenic occlusion.
  • • Chronic vomiting—complete loss of enamel on lingual surfaces of teeth through dissolution by gastric hydrochloric acid. Vomiting can also occur in alcoholics, peptic ulcer, gastritis, pregnancy and drug side effect.
  • • Acidic foods and beverages—Large quantities of highly acidic carbonated beverages or lemon juice can produce erosion. Most of the fruits and fruits juices have a low pH and can cause erosion. Frequent consumption of carbonated drinks, which are acidic in nature, may result in the erosion of teeth.
  • • Anorexia nervosa—it induces chronic vomiting often after bouts of uncontrolled eating that is interspersed between periods of starvation, because of inner rejection of food.
  • • Occupational—workersinvolvinginmanufacturingof lead batteries, sanitary cleaners or soft drinks can develop erosion.
  • • Poorly monitored pH swimming pool—in cases of poorly monitored pH swimming can also cause erosion of the teeth.
  • • Medication—medication like chewable vitamin C and aspirin tablet may lead to erosion of teeth.
  • Clinical features

• Sites—It occurs most frequently on labial and buccal surfaces of teeth; some times, may occur on proximal surfaces of teeth. Usually confined to gingival thirds of labial surface of anterior teeth. Erosion may involve several teeth of dentition. From extrinsic source, it causes erosion on labial and buccal surface and from intrinsic source, it causes erosion on lingual or palatal source.

  • Appearance—it is usually a smooth lesion which exhibits no chalkiness.
  • Symptoms—loss of enamel often causes hypersensitivity in teeth and may also trigger secondary dentin formation.
  • Signs—lossoftoothsubstanceismanifestedbyshallow, broad, smooth, highly polished and scooped out depression on enamel surface adjacent to cementoenamel junction. When erosion affects the palatal surfaces of upper maxillary teeth, there is often a central area of exposed dentine surrounded by a border of unaffected enamel. In most cases, it results in little more than a loss of normal enamel contour, but in severe cases, dentin or pulp may be damaged.
  • Pink spot—there may be pink spot on tooth which is attributable to the reduced thickness of enamel and dentin making the pink hue of pulp visible.
  • Cupping—erosive lesions cause ‘cupping’ in dentin.
  • Radiographic features
  • • It appears as radiolucent defect in the crown margins may be well defined or diffuse.
  • Management
  • Dietcontrol—inapatientwherelossoftoothsurfaceis essentially caused by erosive fluids, advise regarding diet and use of sugar free chewing gum.
  • Fluoride mouthwash—prescription of a fluoride mouthwash is certainly indicated here.
  • Brushinghabits—brushinghabitsshouldbemodified.
  • Restoration—restoration of the defect, usually by glassinomer cement.
  • Systemic management—for systemic management ofvomiting, patient should be referred to the physician.

REFERENCE- ANIL GHOM TEXTBOOK OF ORAL MEDICINE [2nd ed]