As an ortho student, you keep hearing “check adenoids, check tonsils, check breathing.” By the end of this blog, you should be able to predict the likely malocclusion pattern just from knowing where the child’s airway is obstructed – and explain the logic behind it to parents and ENTs, not just quote it.
The core question Nunes asked
Nunes & Di Francesco (2010) studied 114 mouth-breathing, snoring children (3–12 years) with tonsillar and/or adenoid enlargement, all seen in an ENT clinic.
They asked a very simple but powerful question:
“Is the site of lymphoid obstruction (adenoids, tonsils, or both) associated with specific patterns of malocclusion (sagittal / transverse / vertical)?”
Posterior crossbite prevalence ↑ in all airway obstruction types
Early maxillary expansion = functional + airway benefit
VERTICAL RELATIONSHIP
☐ Open bite / Deep bite
⚠️ Not directly site-dependent
Influenced by:
Facial type
Oral habits (thumb sucking, tongue thrust)
Is this malocclusion causing airway issues, or is the airway issue causing this malocclusion? Airway obstruction causes the malocclusion. Nunes 2010 shows enlarged adenoids/tonsils (64.9% combined obstructive) drive specific patterns: combined → Class II (43.2%) via backward mandibular rotation for airflow; tonsils only → Class III (37.5%) via forward tongue thrust. Mouth breathing narrows palate → 36.8% posterior crossbite (vs 6.9-16.4% controls/population). Reverse (malocclusion → airway) not supported—it’s functional matrix disruption (Moss theory).
If I correct the teeth without correcting the airway, will this case relapse? Yes, high relapse risk. Obstruction persists → ongoing tongue displacement, mandibular posture changes, dolichofacial growth continue post-ortho. Adenotonsillectomy normalizes GH → mandibular growth boost, but without it, ortho stability fails as functional drivers (mouth breathing) remain. Early ENT + ortho (pre-spurt) prevents irreversibility.
Am I seeing a dental problem or a functional growth problem? Functional growth problem. 36.8% crossbite, site-specific sagittal shifts (P=.02) signal airway-altered craniofacial development, not isolated dental misalignment. Class I appears “normal” but hides constricted arches → future crowding; true dental issues lack this obstruction-malocclusion signature.
Will correcting the airway allow self-correction of growth? Partial self-correction possible pre-spurt: surgery normalizes GH, boosts condylar/mandibular base apposition → some malocclusion improvement. Not full—ortho often needed for transverse (crossbite), residual sagittal discrepancies.
In Class II: Is the mandible retruded due to posture or true deficiency? Posture-driven retrusion from airway obstruction. Nunes shows combined adenoid+tonsil enlargement (64.9% sample) correlates with Class II (43.2% vs population 12.6%), caused by backward mandibular rotation—child opens posture for airflow through narrow palate, displacing mandible posteriorly. Not primary skeletal deficiency; functional adaptation becomes skeletal if untreated pre-spurt.
In Class II: Is the head posture influencing jaw position? Yes, head posture reinforces retrusion. Mouth breathing → forward head tilt + downward chin to compensate airway restriction, locking mandible in distal position and promoting dolichofacial growth (vertical dominance). Nunes links this cycle: obstruction → tongue flop → posture change → Class II signature (P=.02 sagittal association).
In Class III: Is tongue pressure from tonsillar obstruction contributing? Yes, directly. Isolated tonsillar enlargement (7%) drives Class III (37.5% vs population 1.9%)—tonsils narrow oropharynx, forcing tongue forward/downward against lower anteriors, proclining incisors and shifting mandible mesially. Adenoids alone (12% Class III) lack this lower-level pressure effect.
In Class III: Is this a true skeletal Class III or a pseudo-Class III? Pseudo-Class III (functional). Forward tongue thrust from tonsils creates mesial molar relation + lower incisor procline, mimicking skeletal but reversing post-tonsillectomy via normalized tongue posture and mandibular growth (GH normalization). True skeletal lacks airway trigger; differentiate via tonsil grade + tongue eval
Ladies and gentlemen, orthodontic residents of the jury— Today we talk about Class III malocclusion, aka “the maxilla that refused to show up to growth spurts.”
You know the type. Mandible loud. Maxilla shy. Parents hopeful. You? Exhausted.
Enter stage left: Alt-RAMEC—the protocol that doesn’t shove the maxilla forward… …it gaslights the sutures into giving up.
Traditional RME says:
“Open the suture. Hope for the best.”
Alt-RAMEC says:
“Open it. Close it. Open it again. Close it again. Do this for 9 weeks until the circummaxillary sutures question all their life choices.”
Designed for prepubertal Class III patients (around 9–10 years old) with maxillary retrognathia, Alt-RAMEC isn’t about instant gratification. It’s about preparation—like stretching before a marathon, except the marathon is facemask protraction and the stretching is controlled skeletal chaos.
Understanding the Core Problem
The traditional approach combines RME with facemask therapy, operating on the assumption that expansion forces disarticulate the circumaxillary sutures, making the maxilla more responsive to protraction.
But here’s the limitation: conventional RME applies continuous expansion, which may not optimally mobilize all the sutures surrounding the maxilla. The zygomaticomaxillary, zygomaticotemporal, and other circummaxillary sutures might need a different mechanical stimulus to truly “loosen up” the entire nasomaxillary complex.
The 9-Week Protocol: Step-by-Step
The implementation is straightforward but requires precise patient compliance:
Week 1: Expand 1mm per day (two turns morning, two turns evening)
Week 2: Constrict 1mm per day (same activation schedule)
Repeat this alternating pattern for 9 consecutive weeks
The double-hinged design positions the center of rotation near the maxillary tuberosity, theoretically enhancing forward movement
Pause for thought: Before reading the results, ask yourself:
How much forward movement of point A would you consider clinically significant in a 9-week orthopedic protocol?
Which structures beyond the maxilla might be affected by these alternating forces?
Could this protocol have unintended effects on the airway or facial soft tissues?
What the Evidence Shows
A landmark 3D study by Yilmaz and Kucukkeles followed 20 prepubertal patients (mean age 9 years 8 months) through the complete 9-week Alt-RAMEC protocol using CBCT and 3D facial photography. Their findings challenge some assumptions while validating others
Skeletal Effects (Alt‑RAMEC Alone)
Measurement
Mean Change
Point A (AP)
+0.9 mm forward
Point A (Vertical)
+0.9 mm downward
Point A transverse width
+5.5 mm
Nasal width (INC r–l)
+3.0 mm
Zygomaticomaxillary width
+1.6 mm
Zygomaticotemporal sutures
~0.5–0.8 mm
Pearl: Transverse effects >> sagittal effects
These findings confirm that Alt-RAMEC forces extend beyond the midpalatal suture, affecting the entire circummaxillary complex and producing a triangular expansion pattern, with differential vertical and transverse displacement of adjacent bones.
Note: 3mm point A advancement in Alt RAMEC versus 1.6mm for conventional RME
Soft Tissue Changes
Area
Change
Alar width
+1.7 mm
Subalare width
+1.1 mm
Lips / profile
No significant change
Airway Changes
Compartment
Change
Anterior nasal airway
↑ ~376 mm³
Nasal cavity
↑ ~4630 mm³
Total airway
↑ ~5320 mm³
Pharyngeal airway
No significant change
These airway improvements occur without facemask therapy, suggesting Alt-RAMEC alone may benefit patients with constricted nasomaxillary complexes and breathing concerns.
In what clinical scenario might the 9-week timeline conflict with your practice’s typical treatment sequencing?
Two-phase treatments sequence expansion/protraction into Phase I (6-12 months total), followed by comprehensive fixed appliances after 3-6 months observation. Alt-RAMEC extends Phase I initiation, delaying Phase II bonding when second molars erupt, potentially compressing timelines
Patient Growth Phase Transitions
Mixed dentition timing (ages 7-9) is ideal for early intervention, but a 9-week commitment delays facemask protraction, which typically follows 3-4 weeks of conventional RME. If a patient nears late mixed dentition or cervical stage 2, postponing protraction risks reduced skeletal response as maxillary sutures stiffen.
Seasonal and Compliance Conflicts
Summer vacations or school holidays often prompt parents to request faster starts, but Alt-RAMEC’s extended activation spans breaks, disrupting compliance monitoring. Practices with bimonthly recalls find the weekly parental turns challenging without interim checks, unlike shorter RME phases.
How does the double-hinged screw’s center of rotation near the maxillary tuberosity compare biomechanically to standard Hyrax expanders in finite element models?
Early correction of Class III malocclusion is one of the most debated areas in orthodontics. Should you intervene early or wait until growth is complete? Peter Ngan’s landmark review gives us clear, clinically grounded answers—based on evidence, long-term outcomes, and growth prediction.
1. Why Treat Class III Early?
In 1981, Turpin suggested early treatment only when positive conditions exist—such as:
Convergent facial type
Anterior functional shift
Symmetrical condyle growth
Mild skeletal discrepancy
Some growth potential remaining
Good cooperation
No strong family history of mandibular prognathism
If these factors are negative, waiting until growth completes may be wiser.
What 20 more years of evidence taught us
Class III patients with maxillary deficiency respond very well to maxillary expansion + facemask therapy.
2. What Happens Biomechanically During Expansion + Facemask Protraction?
A prospective clinical trial on 20 skeletal Class III patients showed consistent and predictable changes after 6–9 months:
Combining these increases predictability dramatically.
6. Clinical Indicators: Who Is an Ideal Candidate for Facemask Therapy?
Best Candidates
✔ Skeletal Class III with retrusive maxilla ✔ Hypodivergent growth pattern ✔ Functional anterior shift ✔ Moderate overbite ✔ Good cooperation ✔ No strong family history of mandibular prognathism
Why Overbite Helps
It helps stabilize the corrected overjet and prevents relapse.
7. Special Considerations: Hyperdivergent Patients
These patients can worsen vertically.
Recommendation:
Use a bonded palatal expander → controls vertical eruption
Retention phase →
Mandibular retractor or
Class III activator with posterior bite block
Vertical control is the priority here.
What Should Students Take Away From This?
✔ Maxillary expansion + facemask is powerful
Especially before the pubertal growth spurt.
✔ Overcorrect and hold
Aim for Class I/II molar and positive/edge-to-edge overjet.
✔ Growth prediction determines long-term success
Use:
Björk analysis
Symphyseal morphology
Schulhof system
GTRV analysis
Cephalometric predictors
✔ Mandibular growth is the biggest spoiler
Failures typically occur due to horizontal mandibular surge, not poor treatment execution.
✔ Not every Class III child is a facemask candidate
Case selection → Success.
Conclusion
Understanding the biomechanics, growth prediction, and treatment indicators allows you to approach Class III treatment scientifically—not guesswork.
Class III malocclusion has always been orthodontics’ plot twist — unpredictable, stubborn, and full of surprises. For decades, clinicians believed the villain was a big, bad mandible. Turns out? Many children actually have a retruded maxilla, not a hypergrown mandible.
Cue the protraction facemask — an appliance designed to pull the maxilla forward during childhood, before growth makes the situation harder to fix.
But here’s the real question every orthodontic student should be asking:
👉 Does the facemask actually work? And if yes, by how much, in whom, and under what conditions?
A group of researchers (Kim et al., 1999) got tired of the confusion and did something smart: They conducted a meta-analysis — essentially combining data from 14 acceptable studies out of 440 initially screened — to find real, clinically meaningful answers.
🔍 Why a Meta-Analysis Was Needed
Research on facemask therapy was messy:
Different appliances
Different ages
Different force levels
Different study designs
Many case reports, few controlled trials
And because each study had small sample sizes, the orthodontic world couldn’t agree on:
the best age to start treatment
whether palatal expansion helps
how much skeletal vs dental effect is actually achieved
A meta-analysis solves this by pooling data to reveal the big picture.
1. Overall Effects of Facemask Therapy
Parameter
Direction of Change
Clinical Meaning
SNA
↑ increases
Maxilla moves forward
SNB
↓ decreases
Mandible rotates down-back
ANB
↑ increases (~2.8° mean)
Skeletal relationship improves
Wits
↑ improves (4–5 mm)
Sagittal correction achieved
Mandibular plane angle
↑ increases
Down-back rotation of mandible
Palatal plane angle
Slight ↓
Mild clockwise tipping
Upper incisor inclination
↑ labial proclination
Dental compensation
Lower incisor inclination
↓ uprighting
Chin-cup and soft tissue effects
Point A
Moves forward
Skeletal protraction confirmed
2. Expansion vs. Non-Expansion Groups (RPE vs No RPE)
Finding
RPE Group
Non-Expansion Group
Interpretation
Maxillary forward movement
Similar
Similar
Both effective
Mandibular rotation
Similar
Similar
Similar skeletal effect
ANB improvement
Similar
Similar
No major difference
Upper incisor proclination
LESS
MORE (+2.8°)
RPE reduces dental side-effects
Treatment duration
Shorter
Longer
RPE may speed skeletal effect
Overall skeletal response
Slightly more favorable
Slightly less favorable
RPE enhances orthopedic effect
3. Younger vs. Older Age Groups
Age Group
Treatment Response
Magnitude of Advantage
Clinical Interpretation
Younger patients (4–10 yrs)
Larger skeletal change
+0.6° SNA, +1.0° ANB, +1.3 mm Wits
Earlier = better
Older patients (10–15 yrs)
Still responds well
Slightly reduced effect
Still worth treating
Overjet correction
More skeletal
More dental
Younger = orthopedic, Older = dentoalveolar
Variation
Higher in younger
Lower in older
Younger growth less predictable
4. Expected Treatment Effects (Averaged Across 14 Studies)
Variable
Combined Mean Change
Interpretation
SNA
+1.7°
Maxillary advancement
SNB
–1.2°
Mandibular backward rotation
ANB
+2.79°
Significant skeletal correction
Wits
+4–5 mm
Sagittal improvement
Upper incisor torque
+7°
Labial flaring
Lower incisor torque
–3°
Uprighting
Point A horizontal
Forward movement
Confirms orthopedic action
Total treatment duration
~6–12 months
Typical clinical protocol
🎒 What Ortho Students Should Understand by the End
Here is the logical framework you must take away:
1. Class III ≠ always mandibular excess
Maxillary retrusion is common → treat the right jaw.
2. Facemask therapy produces both skeletal and dental changes
But the skeletal component is real, reproducible, and meaningful.
3. Early treatment works best, but late mixed dentition still responds
Don’t write off 10–12-year-olds.
4. Expansion improves efficiency, but doesn’t determine success
It’s an enhancer, not a prerequisite.
5. Meta-analysis helps us see beyond isolated case reports
This study cuts through the clinical noise to reveal clear trends.
If you think orthodontics is only about teeth and jaws, think again. The temporomandibular joint (TMJ)—especially the glenoid fossa—quietly influences some of the most important facial patterns you diagnose every day:
Class II retrusion vs. Class III prognathism
High-angle vs. low-angle growth patterns
Deep bites, open bites, vertical maxillary excess
Mandibular rotation direction
And yet, most students rarely analyze the fossa position.
Baccetti et al. (1997) decided to change that.
The Big Question
Does the position of the glenoid fossa differ between Class I, II, III and between high-, normal-, and low-angle facial types? If yes—can this help us diagnose better?
Spoiler: YES. And the vertical dimension tells a story even more strongly than the sagittal one.
THE STUDY AT A GLANCE
Sample
180 children (7–12 years) — equal males/females
Pretreatment cephalograms
Clear glenoid fossa outline required
Divided into 9 subgroups:
Class I, Class II, Class III
Low-, normal-, high-angle
Combined internally for controlled comparison
Why this is important?
Because it removes age/sex bias → differences truly reflect facial type, not growth/sex variation.
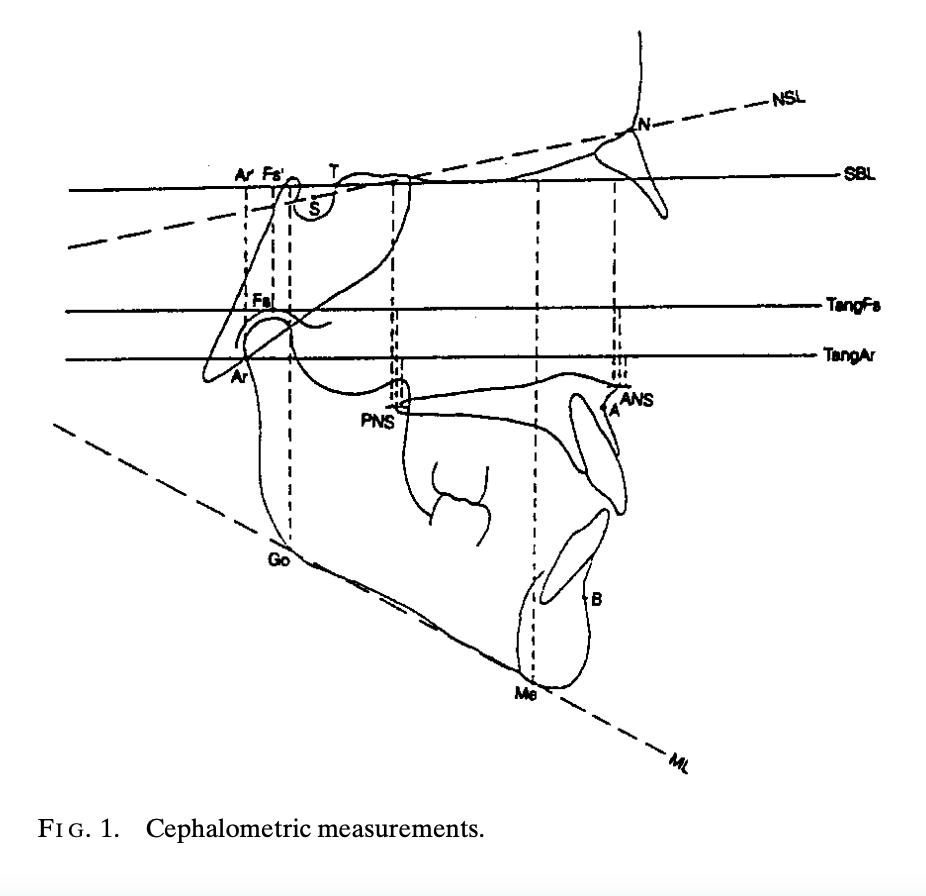
What Exactly Did They Measure?
Two planes of interest:
1. Sagittal (Anterior–Posterior) TMJ Position
Key indicators:
T–Fs’: Distance from sella wall (point T) to fossa summit projection
T–Ar’: Distance from point T to articulare projection
Shorter distances = fossa positioned more posteriorly.
2. Vertical (Cranial–Caudal) TMJ Position
Key indicators:
Fs–Fs’
Ar–Ar’
TangFs–PNS and TangAr–PNS
SBL–Me, SBL–Go, SBL–ANS
These measure how high or low the fossa sits relative to the cranial base and nasal spines.
Takeaway: Vertical indicators tell you far more than sagittal ones.
THE LOGIC OF THE FINDINGS
Let’s break them down so they make intuitive sense.
1. Sagittal Findings (Class I vs II vs III)
Class II → Glenoid Fossa is More Posterior
A posterior fossa places the condyle backward → enhances mandibular retrusion → increases ANB.
This fits what you see clinically:
Class II often have posteriorly positioned condyles
Functional appliances can remodel the fossa anteriorly (as noted in prior studies)
Class III → Glenoid Fossa is More Anterior
An anteriorly placed fossa gives the mandible a “forward hinge.” This contributes to:
Lower ANB
Apparent mandibular prognathism
Logical link: The fossa location magnifies or mitigates jaw relationships.
2. Vertical Findings (Normal vs Low vs High Angle)
This is where the study becomes extremely clinically valuable.
High-Angle Patients → Glenoid Fossa is More Cranial (Higher Up)
A high-positioned fossa elevates the condyle → encourages vertical growth pattern → clockwise rotation → long-face appearance.
Clinical correlation:
Hyperdivergent faces
Increased mandibular plane angle
Open bite tendencies
Posterior rotation of mandible
Low-Angle Patients → Glenoid Fossa is More Caudal (Lower Down)
Although the study used 2D cephalograms, the concept is timeless:
TMJ position is not the result of teeth; it helps shape the face. Understanding fossa position allows you to predict growth and plan treatment wisely.
Today, CBCT gives even clearer visualization—but the same principles apply.
Final Takeaway for Ortho Students
If you understand this one idea, you have mastered the essence of the paper:
The glenoid fossa is not a passive socket—it actively influences sagittal and vertical facial patterns. Its position helps determine whether a patient grows long, short, forward, or backward.
Once you learn to read it, the TMJ becomes one of your most powerful diagnostic tools.
↓ LPM activity → increased, not reduced, condylar growth Researchers: Auf Der Maur, Pancherz, Ingervall, Bitsanis ➡️ Opposite of original hypothesis.
3. CURRENT UNDERSTANDING (Modern Paradigm)
What actually promotes condylar growth?
Sustained forward mandibular positioning
Viscoelastic stretch of posterior periarticular tissues
Altered joint-space loading
Improved retro-condylar vascular perfusion
Functional adaptation of soft tissues ➡️ Growth results from stable repositioning, not muscle hyperactivity.
4. PRACTICAL CLINICAL TAKEAWAYS
✔ Functional appliances work—but not because of LPM hyperactivity ✔ Continuous wear > part-time wear (stability > force) ✔ Condylar remodeling depends on tissue stretch & vascular changes ✔ LPM helps maintain position but does not stimulate growth ✔ Growth is a multifactorial adaptive response, not a muscle-traction effect
When we think of Class III malocclusion, our minds instantly jump to “mandibular prognathism,” “maxillary deficiency,” or that unmistakable concave profile. But what if we told you that the story begins much deeper—in a region most clinicians rarely visualize: the cranial base.
A fascinating study by Chang et al. (2005) reveals how subtle changes in the cranial base shape can quietly set the stage for a Class III facial pattern long before the first molar even erupts.
🔍 Why the Cranial Base Matters
The cranial base serves as the architectural foundation for:
The position of the mandible
The forward placement of the maxilla
TMJ inclination
Facial profile development
Think of it as the “orthodontic motherboard.” If it develops differently, everything built upon it shifts.
1. The Big Finding: A Shorter Posterior Cranial Base
The study compared 100 Class III children with 100 normal controls. The most striking difference?
👉 The posterior cranial base was significantly shorter in Class III subjects.
This included reduced:
S–Ar
Pc–Ar
Pc–Ba
Pc–Bo
Ar–PM
Bo–PM
This matters because the posterior cranial base guides the position of the condyle. A short base = the TMJ sits more forward → the mandible follows → Class III appearance emerges.
Clinically: Ever seen a child with mild mandibular projection but no clear functional shift? Think posterior cranial base deficiency.
2. The Saddle Angle Story: More Acute Angulation
The study found:
N–S–Ar and N–Pc–Ar angles were more acute in Class III children.
This means the cranial base is more bent—a phenomenon sometimes called “cranial base kyphosis.”
Why it matters:
A more acute saddle angle shifts the glenoid fossa forward → the mandible comes along for the ride.
This is a skeletal pattern—not a habit, not a posture.
4. The Cranial Base Pattern Is Set Early—Very Early
Several classic studies say show that:
Cranial base shape develops prenatally
The saddle angle remains remarkably stable through childhood
Variations appear early and persist
This explains why:
Class III patterns often run in families
Interceptive treatment is most effective before growth accelerates
Prediction of Class III progression often depends on baseline cranial-base morphology
Final Thought
Class III malocclusion is not simply a “big mandible vs small maxilla” problem.
It’s a developmental story—one rooted in the very foundation of the skull.
Understanding cranial-base morphology gives orthodontists a sharper lens to diagnose, counsel, and treat Class III patients—particularly in their formative years.
Growth & Treatment Planning Hints
Shortened, flexed posterior cranial base → Expect stronger skeletal Class III tendency. → Earlier interceptive approaches (facemask + RME, chincup, functional orthopedics) may be more justified.
Cranial base near normal, but Class III present → Consider dominant roles of maxillary retrusion, mandibular overgrowth, or local factors.
Rapid visual check on lateral ceph
Look at posterior base: S‑Ar, Pc‑Ar, Pc‑Ba, Ar‑PM, Ba‑PM, Bo‑PM.
Rapid Maxillary Expansion (RME) is one of the most powerful orthopedic tools available during growth. While most of us associate RME with “widening the palate” and correcting crossbites, its influence extends far beyond the transverse plane.
A landmark study by Farronato et al. evaluated 183 growing patients—Class I, II, and III—and revealed that RME also drives important sagittal and vertical changes. These effects vary significantly depending on the skeletal class, which is critical when planning early treatment.
This blog breaks down these findings into practical clinical insights you can apply from your very next patient.
🔍 Why RME Matters Beyond Transverse Correction
When the Hyrax appliance opens the midpalatal suture, it triggers a chain reaction:
Circummaxillary sutures loosen
Maxilla may reposition
Mandible adapts to new occlusal contacts
Vertical dimensions can shift
These effects can help or hinder skeletal correction—if you understand how they behave in each malocclusion.
🔹 CLASS I
Sagittal
ANB ↓ slightly (–0.34°) → Mild improvement toward Class I
Maxilla & Mandible
No significant sagittal movement
Slight downward–backward rotation of palatal plane
Vertical
No significant N–Me change
Mandibular plane: unchanged
👉 Clinical Impact
Improves transverse deficiency without disturbing sagittal or vertical balance.
Class I kids are like the straight-A students who also volunteer and play violin. You expand them and—poof!—they get wider. That’s it.
Downward–backward rotation of mandible & palatal plane
👉 Clinical Impact
RME improves early skeletal Class III by: ✓ Forward translation of maxilla ✓ Clockwise rotation of mandible
Now, Class III… These kids don’t just enter the clinic. They storm in with a plotline.
RME hits them and BAM— the maxilla moves forward (+0.81°), the mandible rotates down and back like it’s trying to avoid an awkward conversation, and ANB shoots up like a Broadway finale (+2.16°).
Meanwhile, vertical height increases too. Because of course it does. Why do one thing when you can do five?
Class III kids after RME look like they’ve had a character arc. Like they went to Paris and “found themselves.”
Summary of Cephalometric Changes After RME
Parameter
Class I
Class II
Class III
Maxillary Position (SNA)
No significant change
No significant change
↑ SNA (maxilla moves forward)
Mandibular Position (SNB)
No significant change
↑ SNB (mandible moves forward)
↓ SNB (mandible rotates down–back)
ANB Angle
↓ slightly (minor Class I improvement)
↓↓ significantly (Class II improves)
↑↑ significantly (Class III improves)
Palatal Plane (SN–SNP.SNA)
↑ (down–back rotation)
↑ (down–back rotation)
↑ more (significant rotation)
Anterior Facial Height (N–Me)
No significant change
No significant change
↑ increased vertical height
Mandibular Plane (SN–GoGn)
No significant change
No significant change
Mild ↑ (not always significant)
Posterior Facial Height (S–Go)
No significant change
No significant change
No significant change
Clinical Interpretation of RME Effects
Clinical Aspect
Class I
Class II
Class III
Sagittal Effect
Minimal
Mandible moves forward → improves Class II
Maxilla advances + mandible rotates back → improves Class III
Vertical Effect
Stable
Stable
Vertical dimension increases (N–Me ↑)
Overall Skeletal Correction
Mild
Moderate
Strong
Most Active Phase
Active + Retention
Mainly retention
Active phase
Risk Areas
Few
Few
Vertical increase in hyperdivergent cases
Mechanism Behind RME Changes
Effect
How It Happens
Mandibular forward shift (Class II)
Removal of transverse “lock” → lower arch can posture forward (McNamara effect)
When you begin the leveling and aligning stage in fixed orthodontic treatment, one challenge always lurks around the corner—upper anterior teeth love to tip forward. This is especially true with preadjusted edgewise appliances because of the built-in tip in the brackets.
To solve this, McLaughlin and Bennett introduced something brilliantly simple: the laceback ligature. The idea was elegant—use a figure-eight stainless-steel ligature from the molar to the canine to prevent incisor flaring and apply light distalizing forces on the canine.
But the clinical question is: 👉 Are laceback ligatures actually effective? 👉 And how do they compare to something stronger, like NiTi closed coil springs?
A controlled clinical study by Melih Sueri and Tamer Turk (Angle Orthodontist, 2006) provides the answers—and some surprises.
1. PURPOSE OF LACEBACK LIGATURES
Prevent forward tipping of upper anterior teeth during leveling.
Apply a light, interrupted distalizing force on canines.
Provide controlled movement with minimal anchorage loss.
2. FORCE APPLICATION
Laceback Ligature
Material: 0.010″ stainless steel ligature wire
From first molar → canine
Re-tighten at every visit
Force type: interrupted / light
NiTi Closed Coil Spring
Material: Superelastic NiTi
Force: 150 g
From first molar → canine
Reactivate monthly
Force type: continuous
3. CLINICAL EFFECTS
Canine Movement
Parameter
Laceback
NiTi Coil Spring
Distal movement
~1.67 mm
~4.07 mm
Distal tipping
4.5°
11.6°
Rotation
2.7° distobuccal
7.8° distopalatal
Movement rate
0.66 mm/month
1.61 mm/month
🔎 Interpretation:
Lacebacks = Slower but more controlled movement
NiTi coil springs = Faster, less controlled, more tipping & rotation
4. MOLAR MOVEMENT (Anchorage Loss)
Parameter
Laceback
NiTi Coil Spring
Mesial movement
0.70 mm
1.93 mm
Mesial tipping
3.9°
3.1°
🔎 Interpretation:
Lacebacks cause significantly less anchorage loss.
5. INCISOR EFFECTS
Upper incisors show retroclination and posterior movement with both methods due to overall anterior segment retraction forces.
WHEN TO USE WHAT?
✔ Use Laceback Ligatures When:
You want maximum anchorage control
You’re in the leveling & aligning stage
Controlling canine tipping/rotation is critical
Light, intermittent forces are preferred
✔ Use NiTi Closed Coil Springs When:
You need faster canine retraction
Anchorage can be reinforced or is less critical
Canine tipping is acceptable or planned
Final Thoughts
This study beautifully highlights a truth every orthodontist must embrace: Success isn’t just about moving teeth—it’s about controlling how they move.
Lacebacks may look old-school, but they offer unmatched finesse during the initial phase of treatment. NiTi coils, on the other hand, are powerful tools when used at the right time.
Mastering when to use each one is a hallmark of an excellent clinician.