Why safe zones matter 🧭
- Interradicular anatomy limits where miniscrews can be placed without root proximity or sinus encroachment, making mesiodistal space the key parameter over buccolingual thickness.
- Safe placement reduces root contact, improves primary stability, and avoids sinus and tuberosity pitfalls in the maxilla
📌 General Guidelines
- Preferred screw diameter: 1.2–1.5 mm (safe clearance: ≥1 mm bone around screw).
- Thread length: 6–8 mm, conical shape recommended.
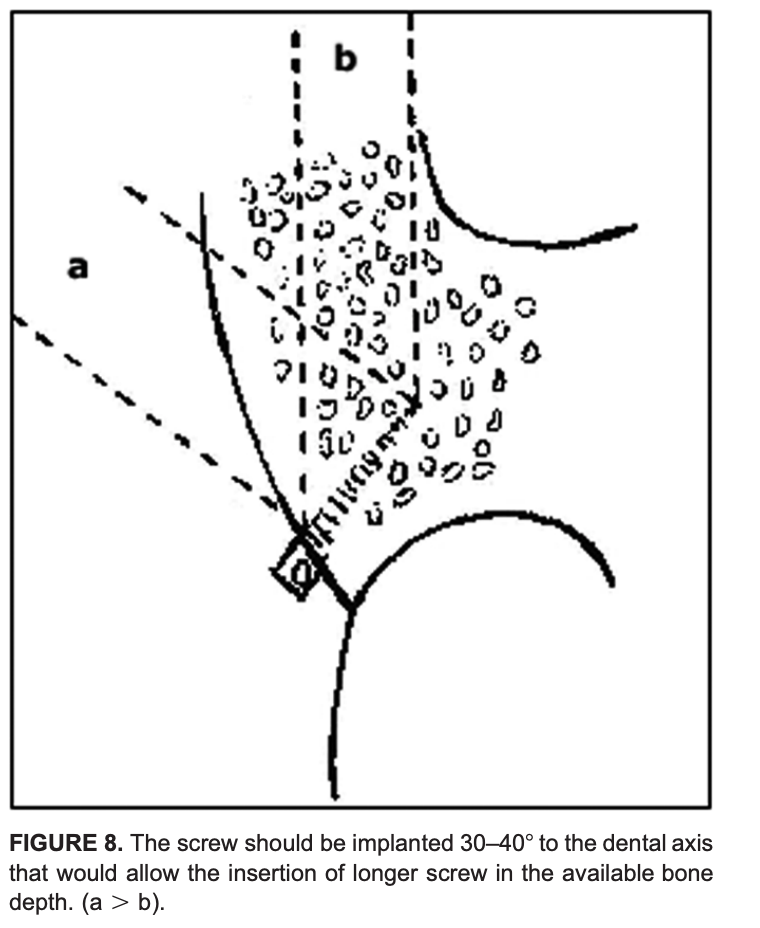
- Insertion angle: 30–40° to long axis of tooth → more bone engagement, less root risk.
- Avoid: Tuberosity, >8 mm above alveolar crest in maxilla (sinus risk), very close root proximity sites.
MAXILLA
| Interradicular Site | Depth from Crest | Safety | Notes |
|---|---|---|---|
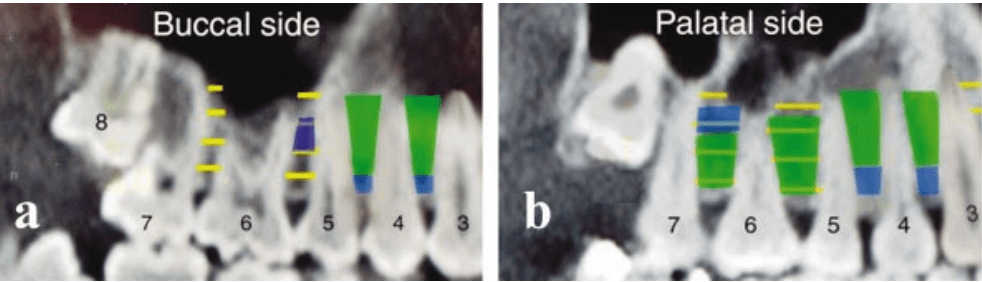
| 6–5 (1st Molar–2nd PM, Palatal) | 2–8 mm | 🟢 SAFE | Best site |
| 7–6 (2nd–1st Molar, Palatal) | 2–5 mm | 🟢 SAFE | Avoid >8 mm (sinus) |
| 5–4 (2nd–1st PM) | 5–11 mm | 🟢 SAFE | Both buccal & palatal |
| 4–3 (1st PM–Canine) | 5–11 mm | 🟢 SAFE | Both buccal & palatal |
| 6–5 (Buccal) | 5–8 mm | 🟡 Limited | Narrow mesiodistal space |
| Tuberosity | Any | 🔴 UNSAFE | Thin bone, sinus, 8s |

Key maxillary insights 🦴
- Palatal side offers more safe space than buccal, especially between 6–5 and 7–6 within 2–8 mm from the crest.
- Avoid 8–11 mm apical to crest in posterior maxilla due to frequent sinus proximity; tuberosity is generally inadequate unless third molars are absent and bone is verified.
MANDIBLE
| Interradicular Site | Depth from Crest | Safety | Notes |
|---|---|---|---|
| 7–6 (2nd–1st Molar) | 8–11 mm | 🟢 SAFE | Best site |
| 5–4 (2nd–1st PM) | All depths | 🟢 SAFE | Consistently wide |
| 6–5 (1st Molar–2nd PM) | 11 mm | 🟡 Limited | Shallow = risk |
| 4–3 (1st PM–Canine) | 11 mm | 🟡 Limited | Safe only apically |
| 4–3 (2–5 mm) | 🔴 UNSAFE | Very close roots |

Key mandibular insights 🦴
- Safest sites: 7–6 and 5–4 across depths; 6–5 improves at deeper levels; 4–3 is tight and safer from 8–11 mm.
- Buccolingual thickness is generous posteriorly, but mesiodistal spacing still dictates feasibility.
Depth logic mnemonic
“Two–to–Eight for Maxilla, Eight–to–Eleven for Mandible.”
- Maxilla safer band: 2–8 mm near crest.
- Mandible safer band: 8–11 mm deeper.
Diameter clearance mnemonic
“Diameter plus Double.”
- Required mesiodistal space ≈ screw diameter + 2 mm total clearance.
Clinical decision pathway 🧠
- Step 1: Select region by biomechanics; favor palatal 6–5 or 7–6 in maxilla and 7–6 or 5–4 in mandible.
- Step 2: Choose depth band where mesiodistal space meets diameter + 2 mm clearance rule; avoid maxillary posterior >8 mm.
- Step 3: Plan 30–40° insertion path with conical screw to maximize safe thread length and minimize root risk.
- Step 4: Confirm with radiographic assessment in every case; population averages do not replace patient‑specific imaging.
Scenario 1: Maxillary site and depth
A 19-year-old with bilateral Class I crowding needs anterior retraction with absolute anchorage. Planned site: interradicular, maxillary right 6–5. Which depth window minimizes sinus risk while maximizing mesiodistal clearance?
A. 0–2 mm from crest
B. 2–8 mm from crest
C. 8–11 mm from crest
D. >11 mm from crest
Answer: B
Rationale: Palatal 6–5 offers the greatest mesiodistal space at 2–8 mm; posterior maxilla beyond ~8 mm risks sinus proximity and narrowing interradicular space.
Takeaway: Choose 2–8 mm for maxillary posterior interradicular placement; avoid deep apical insertion due to sinus.
Scenario 2: Mandibular posterior preference
A 22-year-old requires lower incisor intrusion and posterior anchorage. Best interradicular site in the mandible for consistent mesiodistal space?
A. 4–3 at 2–5 mm
B. 6–5 at 2–5 mm
C. 5–4 across 2–11 mm
D. 7–6 at 2–5 mm
Answer: C
Rationale: 5–4 is reliably favorable across depths; 7–6 is safest deeper (8–11 mm), while 4–3 is tight near crest.
Takeaway: Prefer 5–4 broadly; use 7–6 when inserting deeper (8–11 mm).
Scenario 3: Diameter and clearance rule
Planning a 1.5 mm conical miniscrew interradicularly. Minimum mesiodistal width to satisfy “diameter plus double” clearance?
A. 2.0 mm
B. 2.5 mm
C. 3.0 mm
D. 3.5 mm
Answer: D
Rationale: Approximate rule: screw diameter + 2.0 mm total clearance; 1.5 + 2.0 = 3.5 mm.
Takeaway: For 1.5 mm screws, target ≥3.5 mm mesiodistal space.
Scenario 4: Angulation choice
A resident plans perpendicular insertion between maxillary 6–5 to maximize cortical engagement. What is the best correction?
A. Maintain perpendicular, use longer screw
B. Angle 30–40° to the long axis to lengthen the safe path
C. Shift to tuberosity to avoid roots
D. Use 2.0 mm diameter to improve stability
Answer: B
Rationale: 30–40° increases safe trans-cortical path and reduces early root proximity compared with perpendicular insertion.
Takeaway: Favor 30–40° to the tooth axis in interradicular sites.
Scenario 5: Palatal posterior caution
During palatal placement near 7–6, the plan is to embed 10–12 mm for maximum stability. Best revision?
A. Maintain depth; palatal roots diverge widely
B. Reduce to ~6–8 mm embedding to avoid buccal root convergence
C. Switch to perpendicular insertion to stay central
D. Increase diameter to 2.0 mm to improve purchase
Answer: B
Rationale: Palatal roots allow space initially, but buccal roots converge; keep embedding around 6–8 mm with angulation.
Takeaway: In palatal posterior, limit depth and use oblique path.
Scenario 6: Buccal 7–6 in the maxilla
A plan is made for buccal 7–6, 5 mm from crest, 1.5 mm screw. What is the primary risk?
A. Buccal plate perforation
B. Infringement of the maxillary sinus at 5 mm
C. Narrow mesiodistal interradicular clearance compared to palatal
D. Insufficient buccopalatal cortical thickness
Answer: C
Rationale: Buccal 7–6 has narrower mesiodistal space than palatal; clearance is the limiting factor.
Takeaway: Mesiodistal width dictates feasibility more than buccolingual thickness.
Scenario 7: Immediate placement torque
In dense mandibular bone, a self-drilling miniscrew shows high insertion torque approaching fracture. Best intraoperative adjustment?
A. Increase hand torque to seat fully
B. Switch to pre-drilling (pilot) to lower torsional stress
C. Upsize to 2.0 mm diameter
D. Angle perpendicular to reduce resistance
Answer: B
Rationale: Pre-drilling reduces insertion torque and fracture risk in dense bone while preserving stability.
Takeaway: Manage torque with pilot drilling in high-density bone.
Scenario 8: Root contact cue
During insertion, the driver suddenly stalls and higher force is needed; patient reports sharp sensitivity despite topical anesthesia. Next step?
A. Continue inserting to pass the tight spot
B. Reverse 1–2 turns and redirect trajectory
C. Switch to a longer screw
D. Load immediately to test stability
Answer: B
Rationale: Stall/sensitivity suggests PDL/root proximity; back out and redirect to avoid injury.
Takeaway: Recognize tactile and patient cues of root contact; reposition immediately.
Scenario 9: Palatal anterior boundary
A miniscrew is planned at the second palatal rugae for retraction anchorage. What is the safer adjustment?
A. Move anteriorly for thicker cortical bone
B. Place posteriorly at or behind the third palatal rugae
C. Shift to infrazygomatic crest routinely
D. Increase diameter to 2.0 mm for stability
Answer: B
Rationale: Anterior palatal placements at/near second rugae risk root injury; safer zone is at/behind third rugae.
Takeaway: Respect anterior palatal boundaries to avoid incisor root injury.
Scenario 10: Postoperative soft-tissue issues
A patient returns with mucosal overgrowth and peri-implant inflammation around a stable miniscrew. Best management?
A. Immediate removal of the miniscrew
B. Debride, add a low-profile healing collar or spacer, reinforce hygiene, and consider chlorhexidine
C. Load more heavily to reduce movement
D. Ignore unless painful
Answer: B
Rationale: Overgrowth and inflammation respond to local hygiene measures, soft-tissue management, and contour optimization; removal is not first-line if stable.
Takeaway: Manage soft tissues proactively to maintain stability.
Scenario 11: Choosing between sites
Needing maxillary anchorage but palatal vault is shallow; CBCT shows limited palatal bone near 6–5. Best alternative?
A. Buccal 7–6 at 11 mm depth
B. Buccal 6–5 at 5–8 mm depth with oblique angulation
C. Tuberosity interradicular site
D. Anterior palatal at second rugae
Answer: B
Rationale: Buccal 6–5 mid-depth can be acceptable with careful angulation and clearance assessment; 11 mm posterior risks sinus.
Takeaway: When palatal is limited, use buccal 6–5 at mid-depths with precise planning.
Scenario 12: Stability factor prioritization
Which factor most consistently correlates with miniscrew stability in interradicular sites?
A. Screw length alone
B. Screw diameter and cortical thickness, plus soft-tissue health
C. Patient age and sex
D. Immediate loading is contraindicated
Answer: B
Rationale: Diameter, cortical engagement, and inflammation control are key; length alone is less predictive, and immediate loading can be acceptable with good primary stability.
Takeaway: Optimize diameter/site quality and soft-tissue health for stability.

