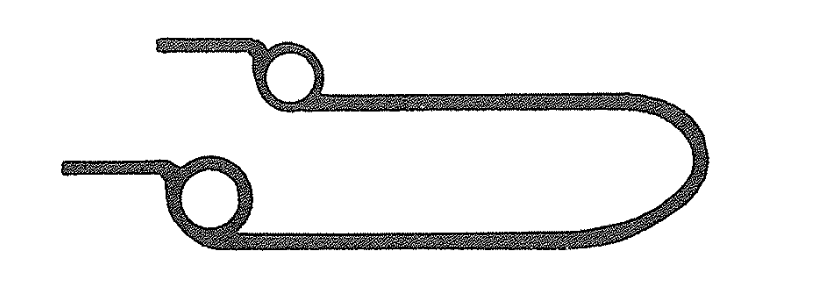
Deep bites are tricky—not just vertically, but also in the sagittal and transverse planes. But what if you could correct both anterior and posterior segments simultaneously with calibrated force? Enter the 0.016-inch distal extension, an appliance designed to erupt and rotate both halves of the arch in harmony.
🔩 Indications: When Should You Use This Appliance?
- ✅ Growth potential remains — you need an eruptive force.
- ✅ Second-order discrepancy: Incisors are higher than canines.
- ✅ Mild arch length deficiency: 2–3 mm per side.
- ✅ Deep curve of Spee requiring leveling.
- ✅ Extractions performed (usually 1st premolars).

🧰 Appliance Design: What’s It Made Of?
| Component | Description |
|---|---|
| Base arch | 0.018 × 0.025 SS with helices (or 0.017 × 0.025 TMA for flexibility) |
| Distal extension | 0.016-inch wire with: 1) Vertical loop mesial to canine, 2) Helix distal to canine |
| Lingual arch | 0.036-inch wire to stabilize molars and maintain transverse control |


Where does the distal extension go?
- It may lie over the tie-wings of the second premolar bracket
- OR hook over the buccal segment wire for stability
🔬 Biomechanics: Alpha + Beta Moment Logic
The beauty of this system lies in its dual-moment design:
- Alpha moment = From the distal extension → anterior eruption and rotation (roots distal)
- Beta moment = From the base arch → posterior eruption and rotation (roots mesial)
💡 Equal alpha and beta moments (A = B) → Balanced leveling of anterior and posterior segments.
💡 More alpha > beta → More anterior eruption.
💡 More beta > alpha → More posterior eruption.
💡 Clinical Scenario: Classic Use Case
👩⚕️ Patient:
- 13-year-old female
- Deep curve of Spee
- Class I extraction case (1st premolars removed)
- Incisors slightly higher than canines
Treatment Strategy:
- Use 0.016-inch distal extension with base arch + lingual arch
- Activate helix distal to canine (preactivation bends)
- Open the vertical loop mesial to canine by 2 mm for controlled canine eruption
- Tie back the base arch anteriorly and posteriorly through helices

Expected Response:
- Canines and lateral incisors erupt and rotate (roots distal)
- Central incisors may not erupt, due to depressive force at midline (from base arch)
- Buccal segments rotate with mesial root movement (flattening curve of Spee)
- Canines nudge distally, helping resolve minor crowding from extraction space
📈 Smart Force Calibration:
- Use a Dontrix gauge
- Activate base arch to deliver 100g per side (midline 200g)
- Adjust vertical loop and helices for fine control of eruption depth and direction
📍 Clinical Scenario 1: Balanced Leveling (Alpha = Beta)
Goal: Simultaneous leveling of deep anterior and posterior segments in an extraction case.
👩⚕️ Case:
- 14-year-old male
- Class I malocclusion with deep curve of Spee
- 1st premolars extracted
- Canines slightly high; incisors and second molars need to level simultaneously
- Good growth potential
🎯 Action:
- Distal extension helix pre-activated (alpha moment)
- Base arch helices activated equally (beta moment)
- Tie-back done at midline and molar regions
- Lingual arch in place
🧠 Biomechanical Result:
- Anterior and posterior segments erupt together
- Curve of Spee flattens from both directions
- Incisor roots move slightly distally, and molar roots move slightly mesially
- No change in arch length
💡 Takeaway: Use equal moments when both curves—anterior and posterior—need correction simultaneously.
📍 Clinical Scenario 2: Dominant Anterior Eruption (Alpha > Beta)
Goal: Level anterior segment more than posterior — ideal for flared incisors or high canines.
👩⚕️ Case:
- 12-year-old female
- Deep bite with flared incisors and canines higher than centrals
- Premolars extracted
- Posterior segment relatively flat
🎯 Action:
- Stronger activation in distal extension helix (increase alpha moment)
- Base arch lightly activated (smaller beta moment)
- Anterior tie-back still present for vertical control
- Lingual arch helps stabilize molars
🧠 Biomechanical Result:
- Lateral incisors and canines erupt more
- Central incisors stay relatively stable (due to midline tie-back)
- Posterior segment moves minimally
💡 Takeaway: Increase alpha moment to focus eruption where it’s needed—ideal when you want to level high caninesor intrude flared incisors.
📍 Clinical Scenario 3: Dominant Posterior Eruption (Beta > Alpha)
Goal: Flatten steep posterior occlusal plane while maintaining incisor position.
👨⚕️ Case:
- 15-year-old male
- Deep overbite due to extruded second molars and upright first molars
- Incisors already well-aligned, no need for anterior extrusion
🎯 Action:
- Strong preactivation of base arch helices (high beta moment)
- Minimal or no activation in distal extension (low alpha moment)
- Anterior tie-back ensures incisor control
- Lingual arch reinforces anchorage
🧠 Biomechanical Result:
- Posterior teeth (especially molars) erupt and rotate
- Incisors stay stable or even intrude slightly
- Curve of Spee flattens mostly from the posterior end
💡 Takeaway: Boost beta moment when you want to rotate posterior segments without disturbing the incisors.
🔁 Quick Recap:
| Situation | Dominant Moment | Effect |
|---|---|---|
| Want both anterior + posterior leveling | Alpha = Beta | Balanced eruption |
| Canines/laterals are high | Alpha > Beta | More anterior eruption |
| Molars need eruption | Beta > Alpha | More posterior eruption |
🧠 Final Student Takeaway: Logic-Based Questions Before Using the Distal Extension
- Is there a vertical difference between incisors and canines?
- Do you want both anterior and posterior segments to level together?
- Are extractions done and minimal arch space required?
- Is the lingual arch in place to counter uncontrolled molar movement?
- Have you pre-activated helices/loops to deliver precise alpha and beta moments?
🧪 Bonus Concept: Incisor Behavior
🔍 Incisors won’t erupt unless alpha moment overcomes the midline depressive force from the base arch. That’s why laterals and canines erupt more than centrals!
